Purchase and Payables Basic User Training Guide for Dynamics 365 Business Central
Accounts Payable
When purchase invoices and credit memos are posted into the vendor account (Accounts Payable), the vendor ledger entries will be available for payment entries.
There are 2 main methods of posting payments to the vendor ledger:
-
Using a Payment Journal
-
Payment Reconciliation Journal
Note: The use of Payment Reconciliation Journal assumes that there is no separate vendor payment run — the process reconciles bank statement entries (e.g. direct bank debits) to vendor ledger entries.
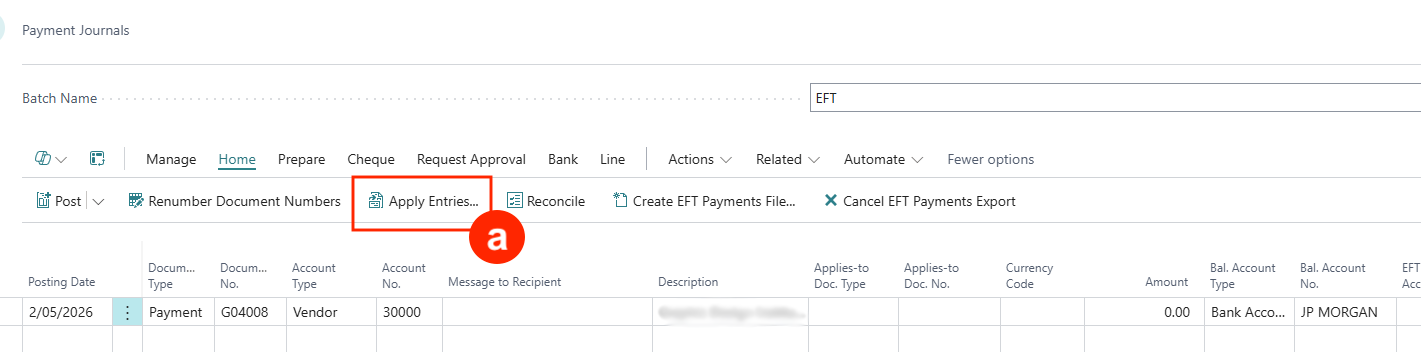
Payment Journal
The Payment Journal is used to record payments for vendor invoices. Optionally, refunds to customers can also be recorded in a payment journal line.
-
Navigate to Payment Journals to open the payment journals entry page.

A payment journal can be used to record different payment methods e.g. EFT, Cheque, Bank Credit Transfers. Additionally, some methods can be configured to create bank files or print cheques.
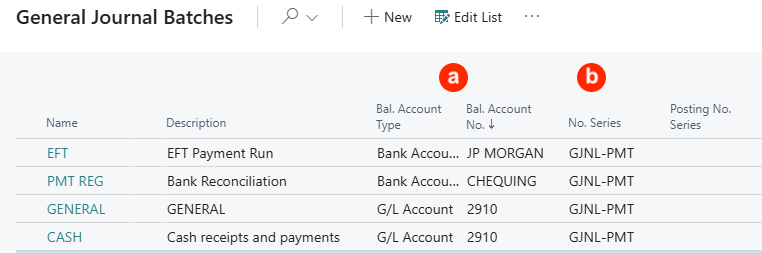
Tip: It is advisable to create a Batch code for each payment method made by each bank so that the bank account can be defaulted.
A Payment Journal Batch can be used to default the following:
a) Bal. Account Type and Bal. Account No. — To default the paying bank.
b) No. Series — To specify a specific numbering series for the payment record.
Recording a Single Payment
One journal line represents one payment amount that can be applied to one or more (unsettled) invoices based on the invoice Remaining Amount.
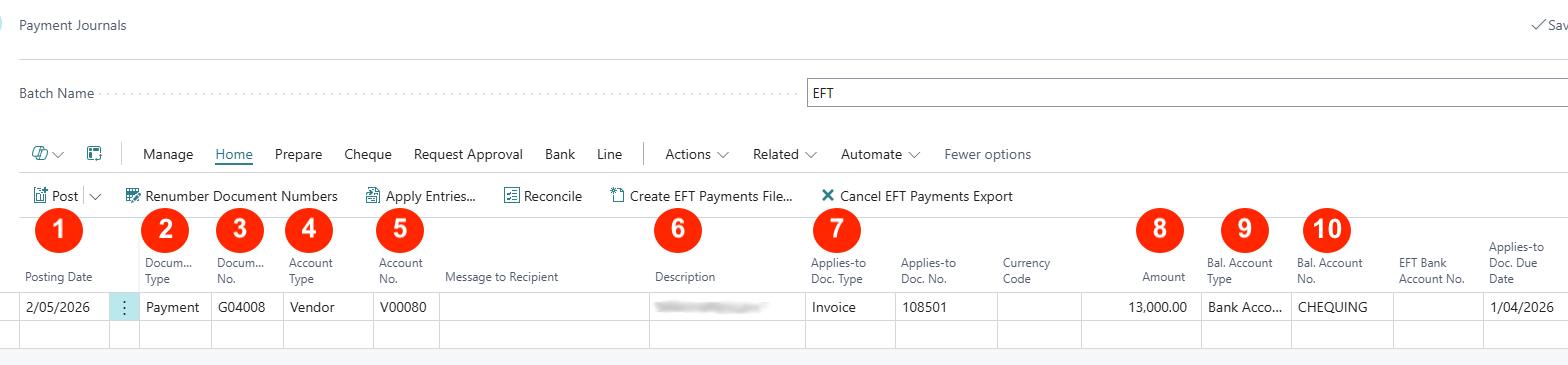
Select the Batch Name (if specific batches are created for different payment methods or bank accounts) and enter the following key fields:
-
Posting Date — Enter the date to post this receipt (line).
-
Document Type — Select Payment since this is a payment transaction.
-
Document No. — Enter a document number reference or use the default numbering sequence.
-
Account Type — Select Vendor.
-
Account No. — Select the vendor code.
-
Description — This defaults to the vendor’s name (enter any text if needed).
-
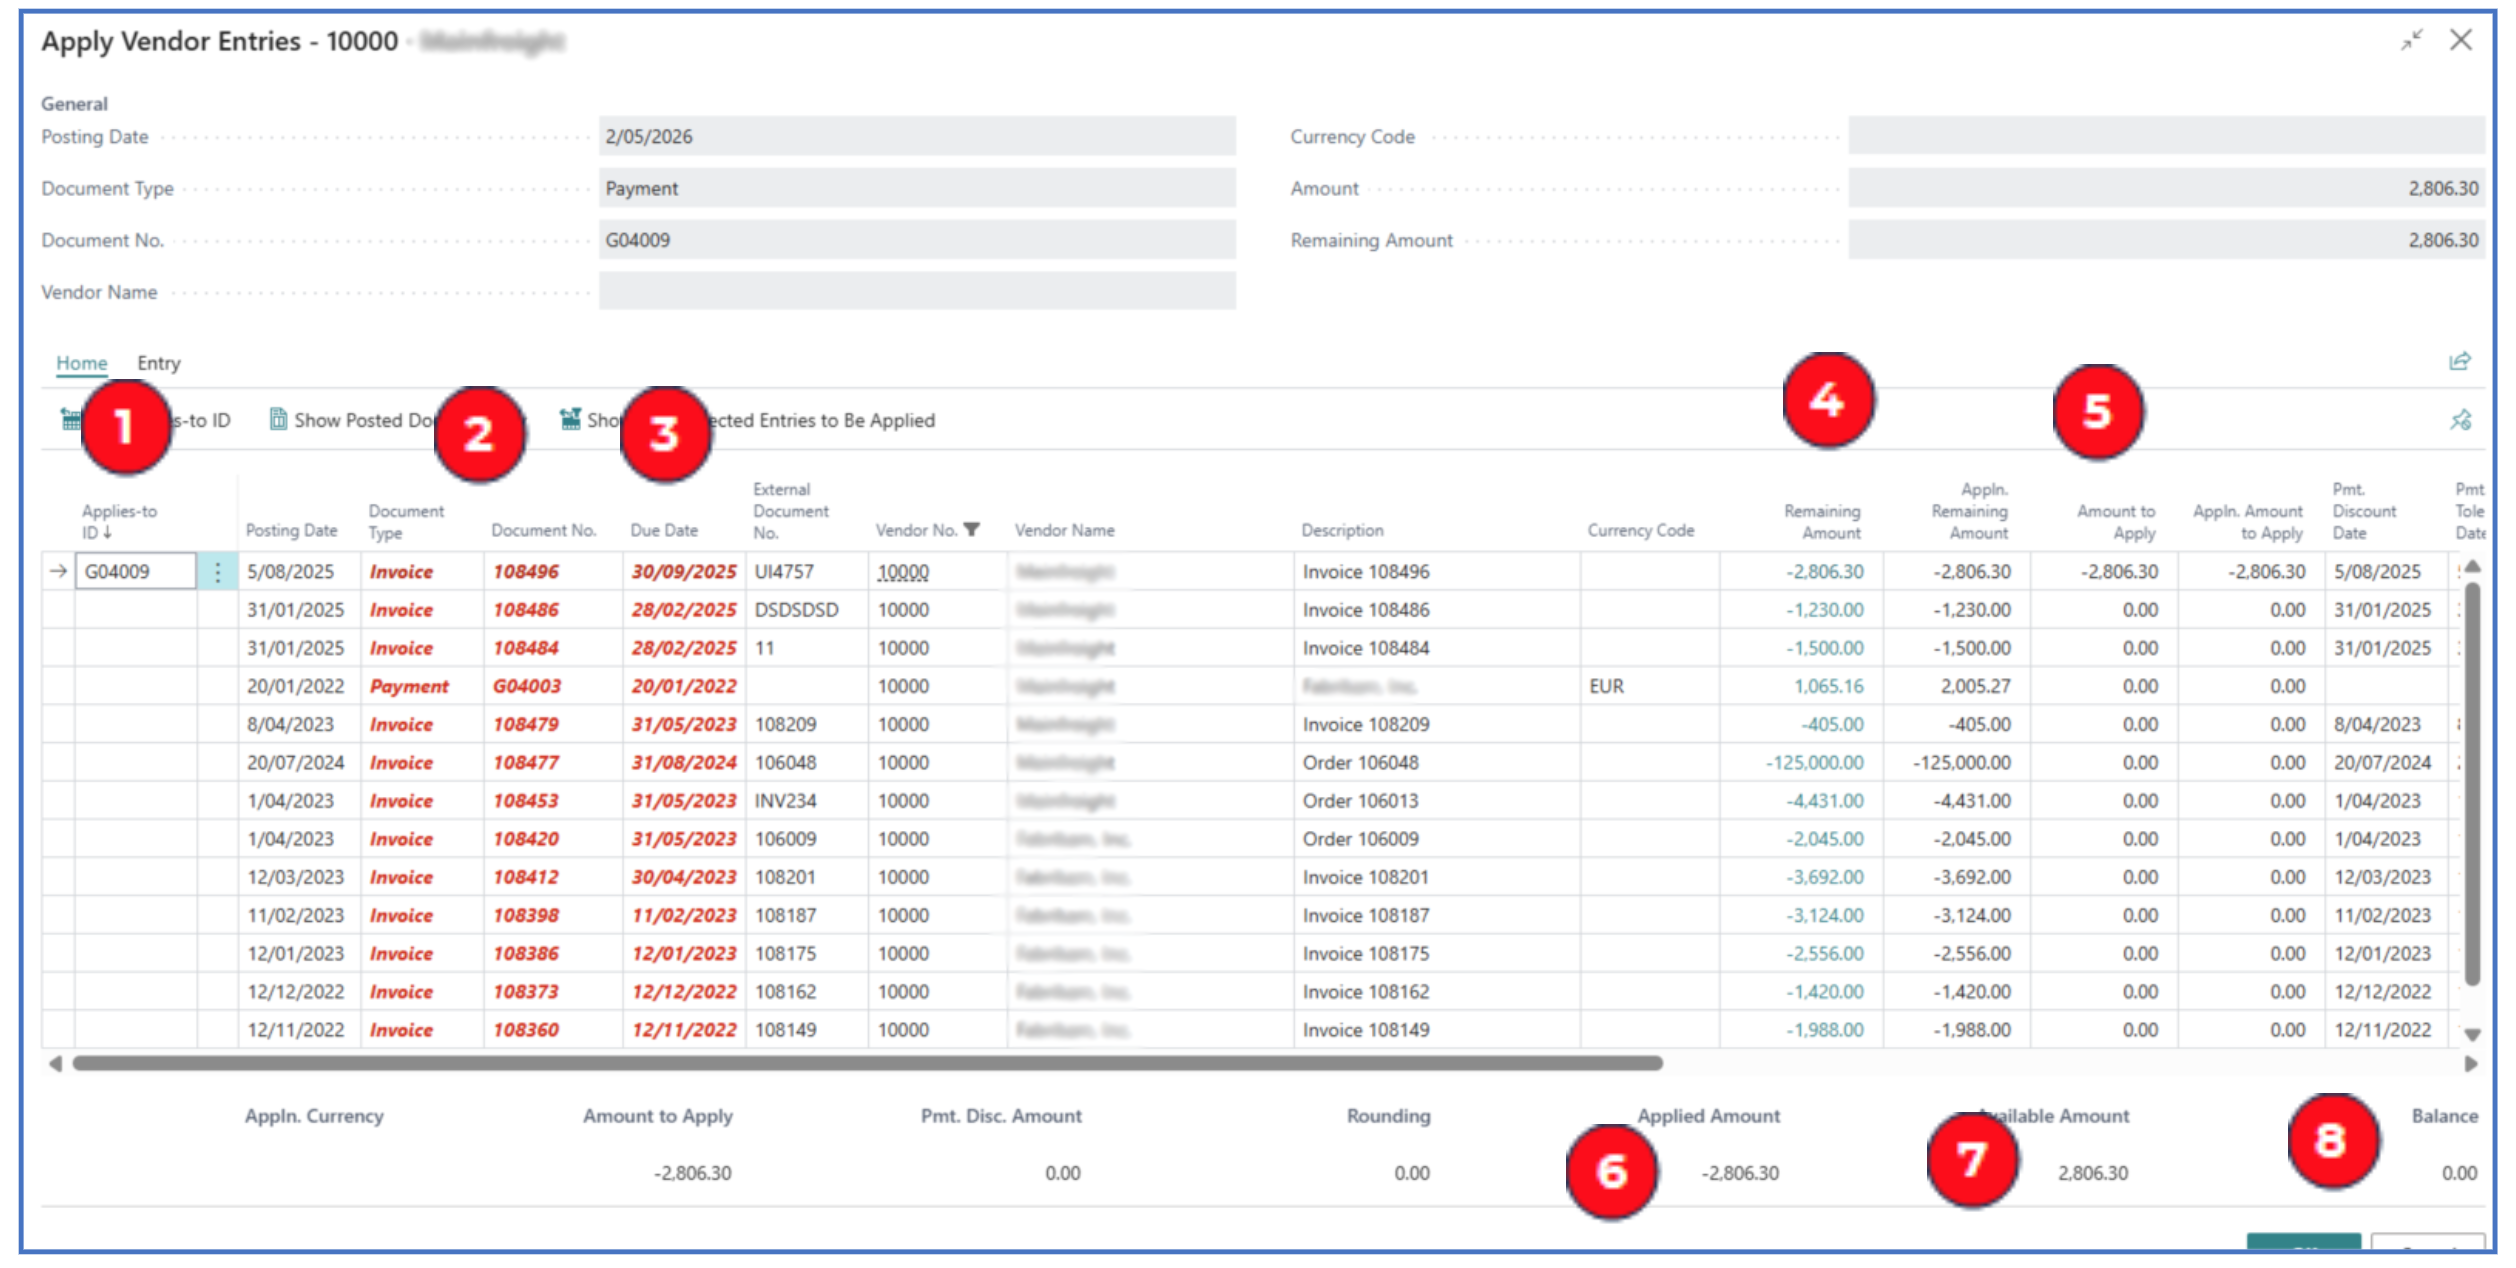
Applies-to Doc. No. — Click on the field to open the Apply Vendor Entries list page (see below) to select the invoice to apply this payment.
-
Amount — This value defaults from the invoices selected in step 7 (Applied-to Doc. No.).
-
Bal. Account Type — Select Bank as the payment is to be posted to a G/L bank account.
-
Bal. Account No. — Select the Bank code defined.
Apply Vendor Entries:
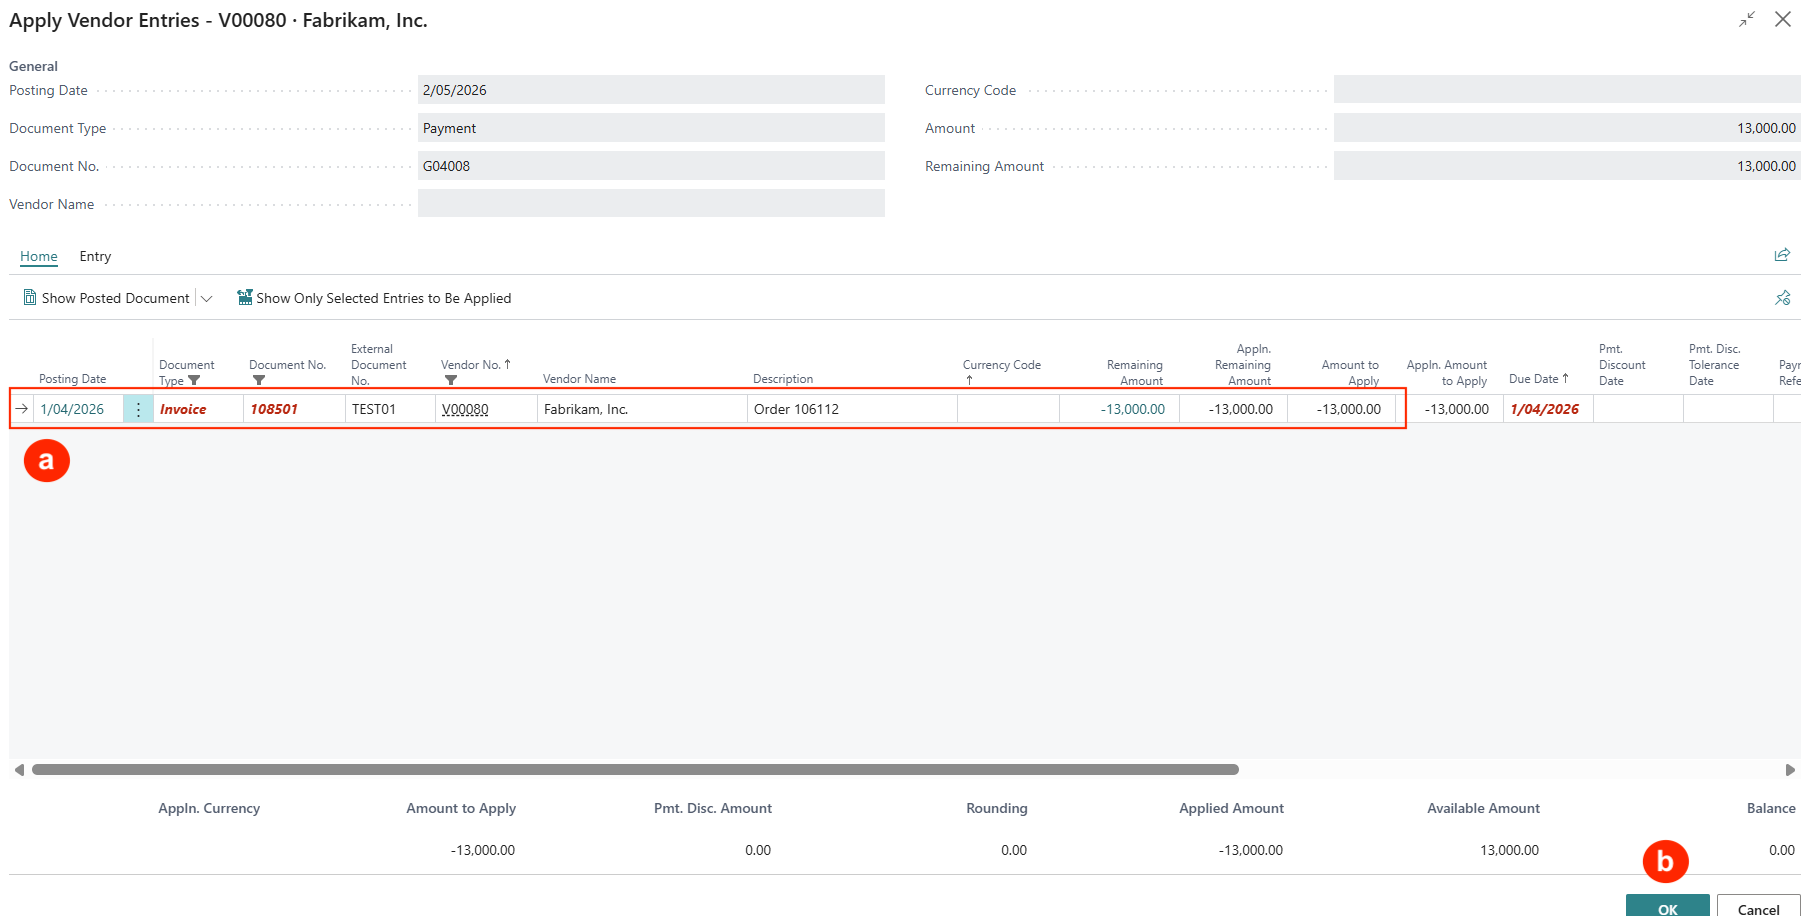
NB: The red highlighted invoices indicate that these are past payment due date.
Applying a Single Invoice to the Payment Received
a) Select the invoice record to apply this payment (above example).
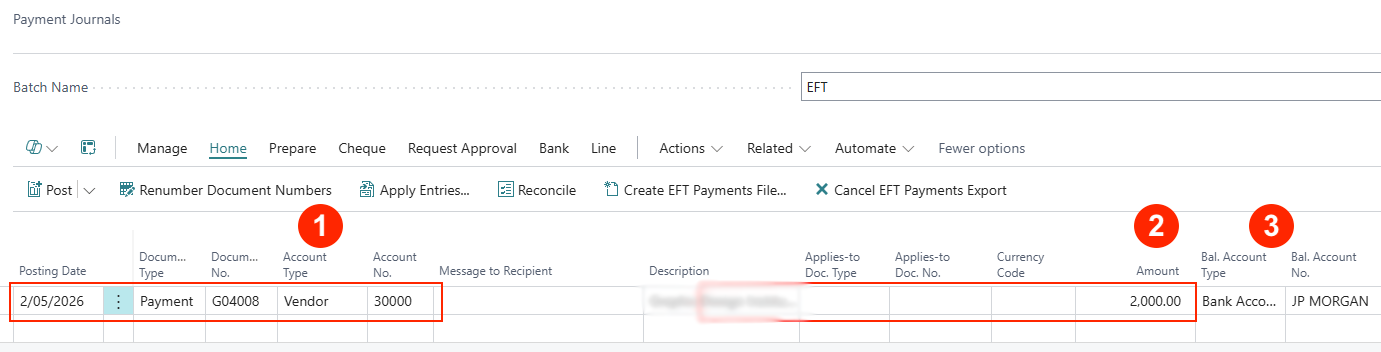
b) Click OK and the value of the invoice will appear in the Payment Journal line (with an opposite sign -ve).
c) This indicates that the payment amount will be applied to the single selected invoice on posting the Payment Journal.
d) Repeat above steps for every (single) invoice payment from different Customer code selected — this will create a journal line for each payment applied against each vendor invoice.
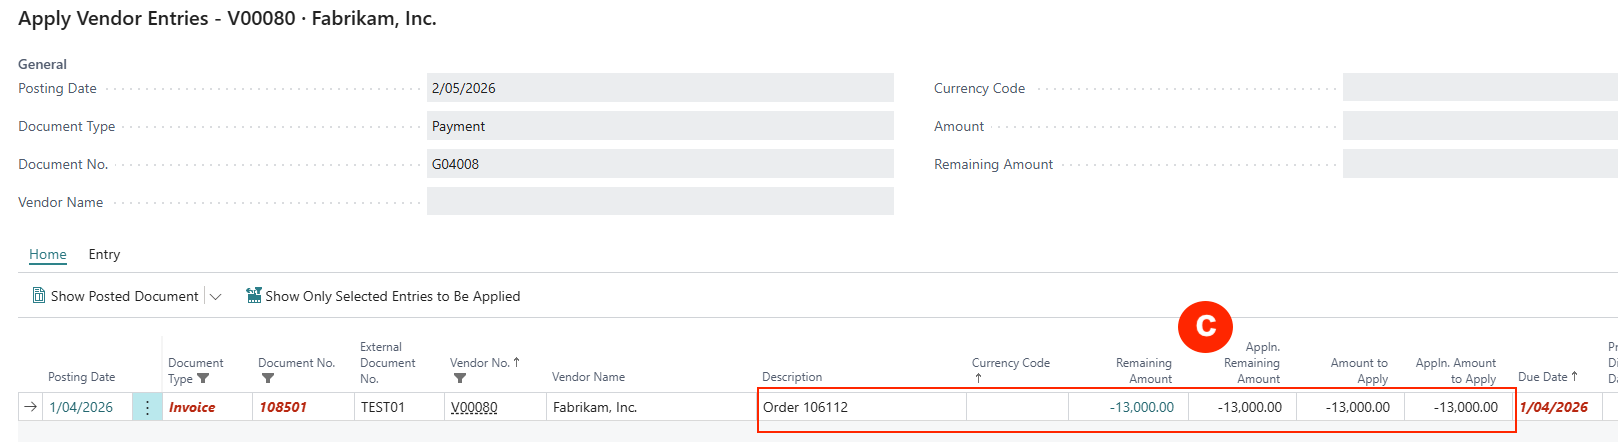
Applying Multiple Invoices to the Payment (as a lumpsum)
a) If the payment is a lumpsum for several vendor invoices, click on Apply Entries in the Payment Journal to open the Apply Vendor Entries list page.
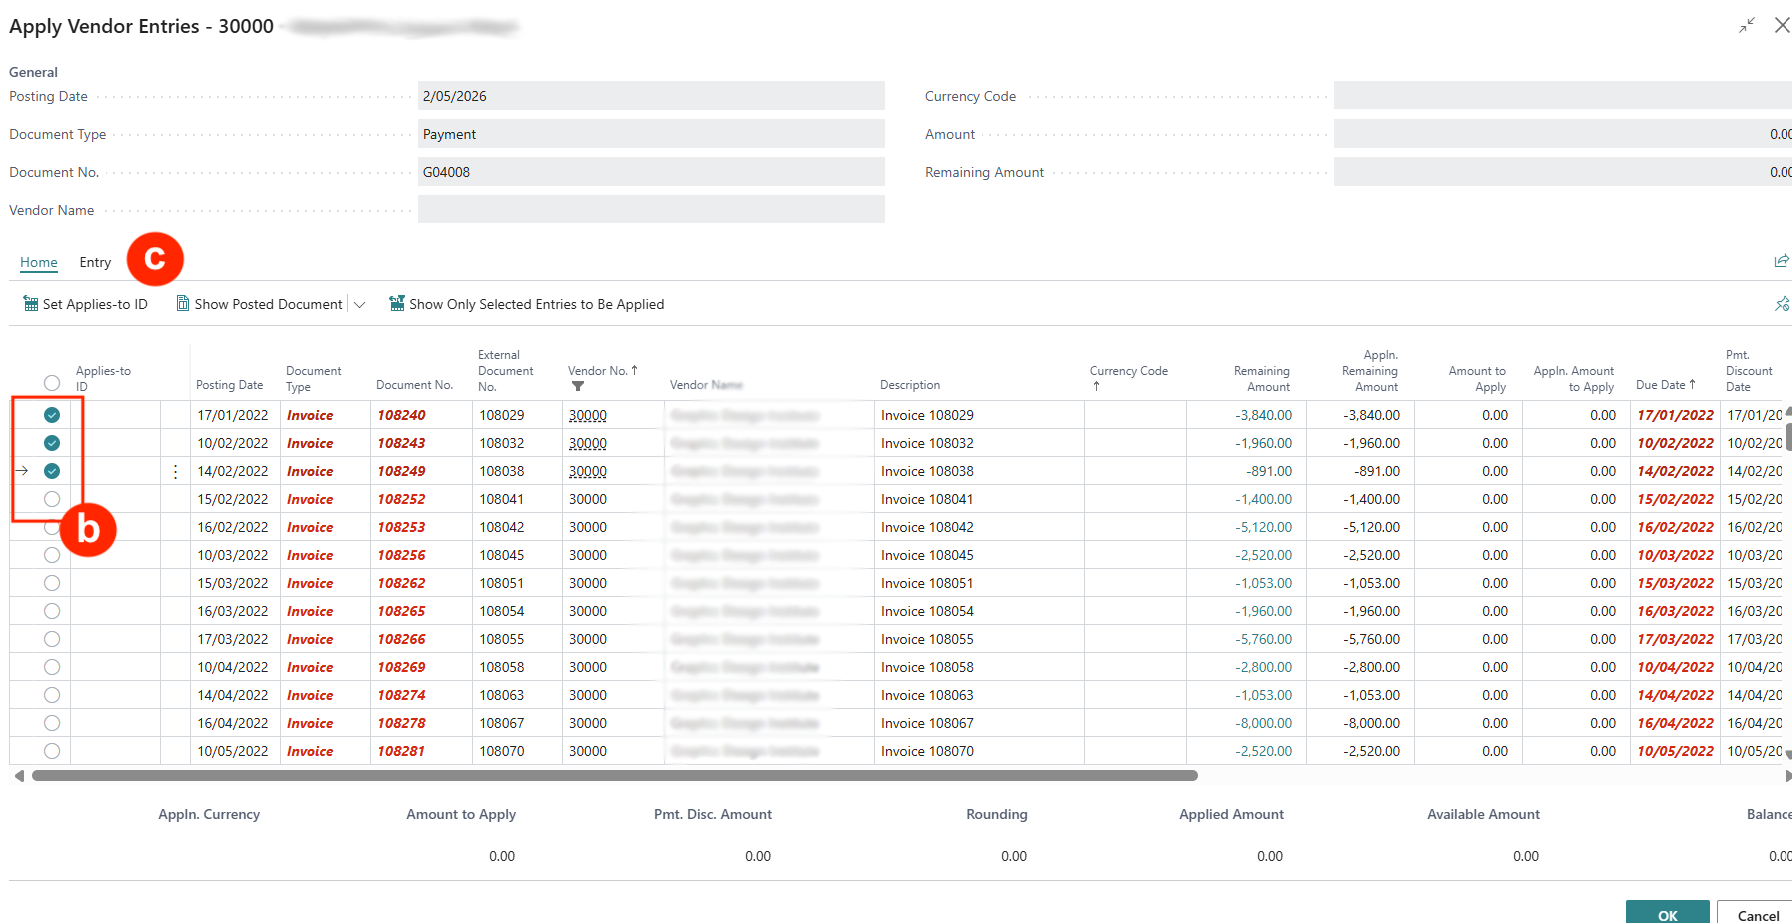
b) select multiple invoice (and offset credit memos if available) lines to apply such that the net total is the value of the payment.
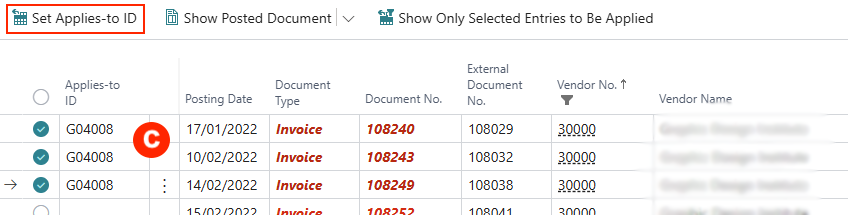
c) Click on Set Applied-to ID to assign the selected documents a common applies-to reference that combines the totals. Click OK to confirm the payment total. The total net amount will appear in the Payment Journal line.

Apply On-Account Payment
If you do not select any invoice to apply, the payment amount will be posted in the vendor account as On-Account. Similarly for credit memos that are not applied to any invoices.
-
Enter the payment journal line with Account Type of Vendor and vendor account code.
-
Amount — Enter the payment amount (the +ve amount indicates a debit to the vendor account).
-
Bal. Account Type — Select Bank Account type if the payment was taken out from the bank account.
Applying On-account Credit in the Vendor Ledger
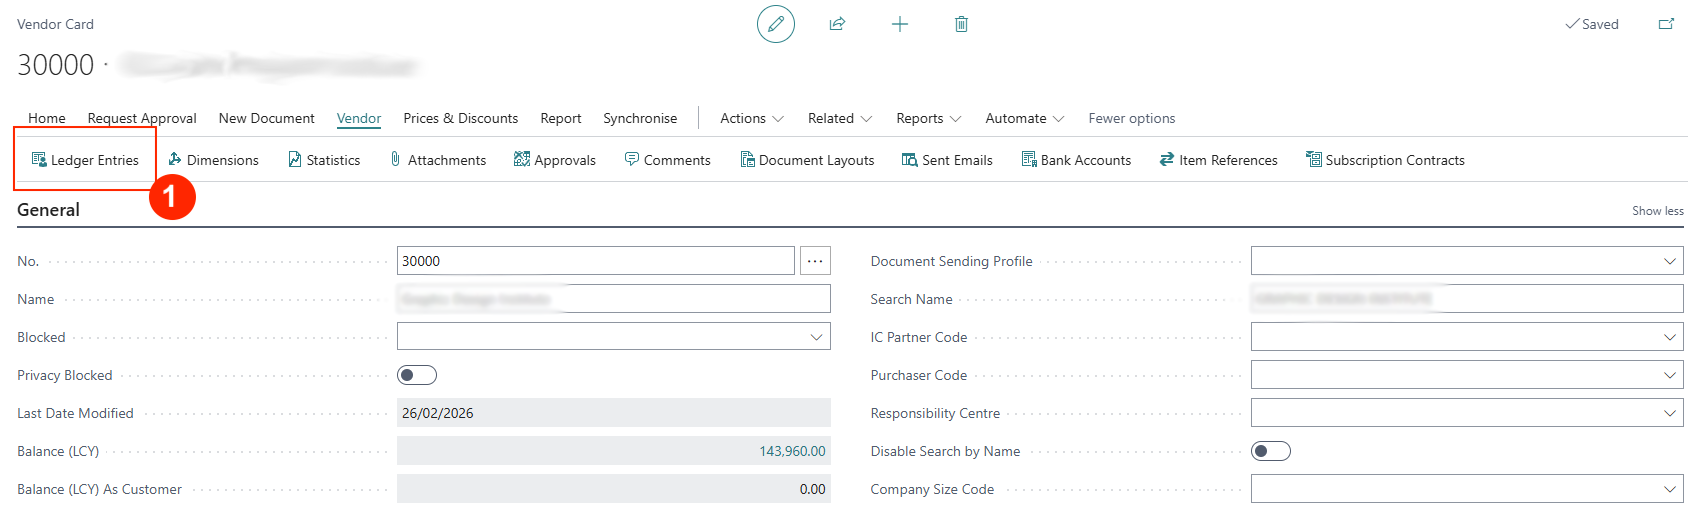
The Vendor Ledger entries can be viewed from within a vendor card page. Navigate to the vendor list page and select a vendor.
-
Select menu option Vendor > Ledger Entries to open the Vendor Ledger Entries list page.
NB: Documents in red highlight indicate that these are past due date.
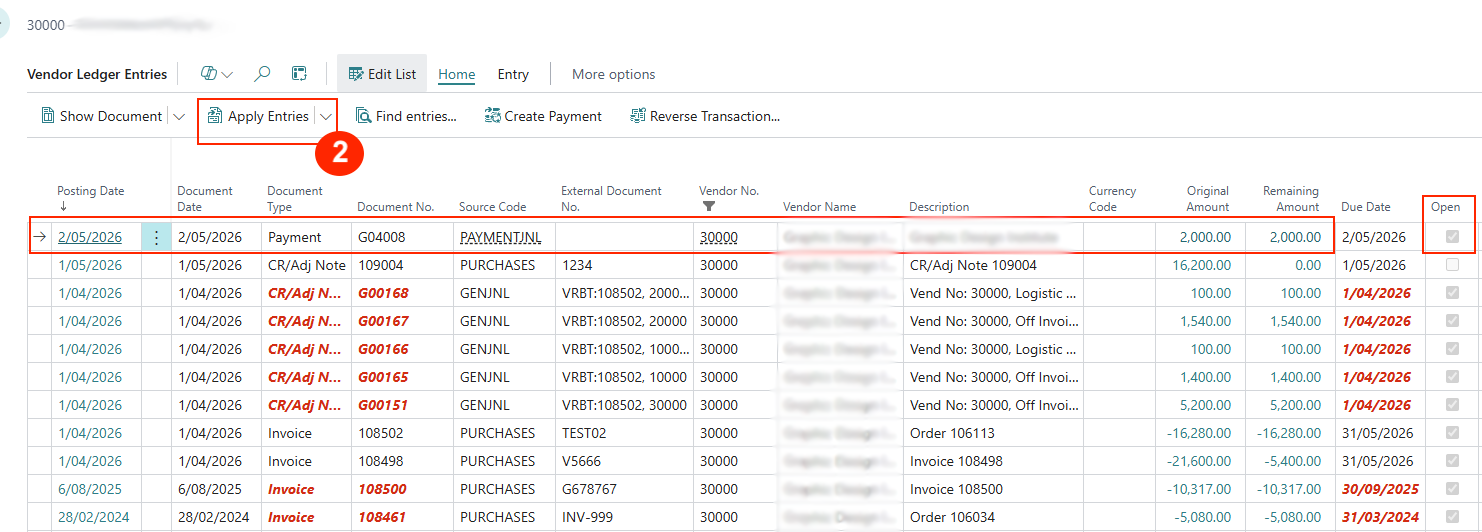
-
The posted on-account cash payment is reflected as a +ve amount with Document Type of Payment and Open flag is ticked. Select the on-account payment and click on menu option Apply Entries to open the Apply Customer Entries list page.
-
The Apply Vendor Entries page displays the on-account payment and the list of available Open documents that can be selected to offset this payment against.
NB: The bottom summary provides the balance to offset (e.g. $2,000)
-
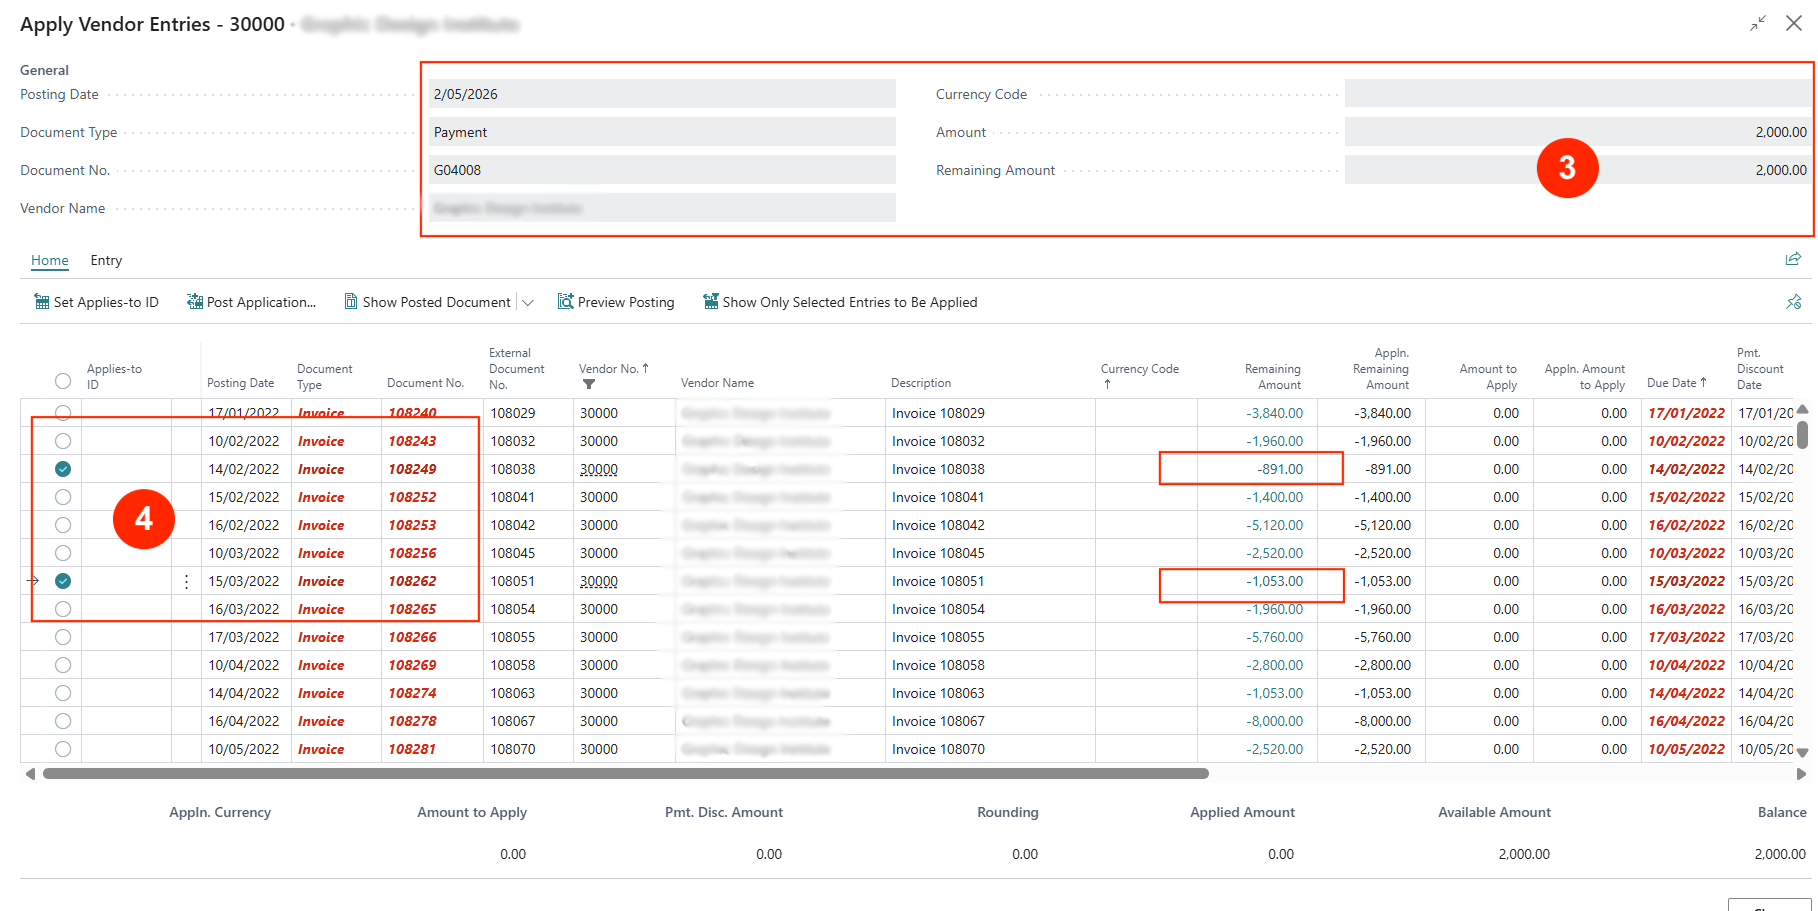
Multi-select the documents to apply the on-account payment and click on Set Applies-to ID to confirm the selection for offset.
This will default the user id to the Applies-to ID field as an audit record of which user performed this payment offset.
The bottom summary also provides the value for Applied Amount and Balance. Continue to apply the Balance amount to other documents so that the balance is close to $0.
If there is a -ve balance, it means that the on-account payment is over-applied to invoices and some invoices need to be removed.
If there is a +ve balance, it means that the on-account payment has a balance to apply to other invoices.
-
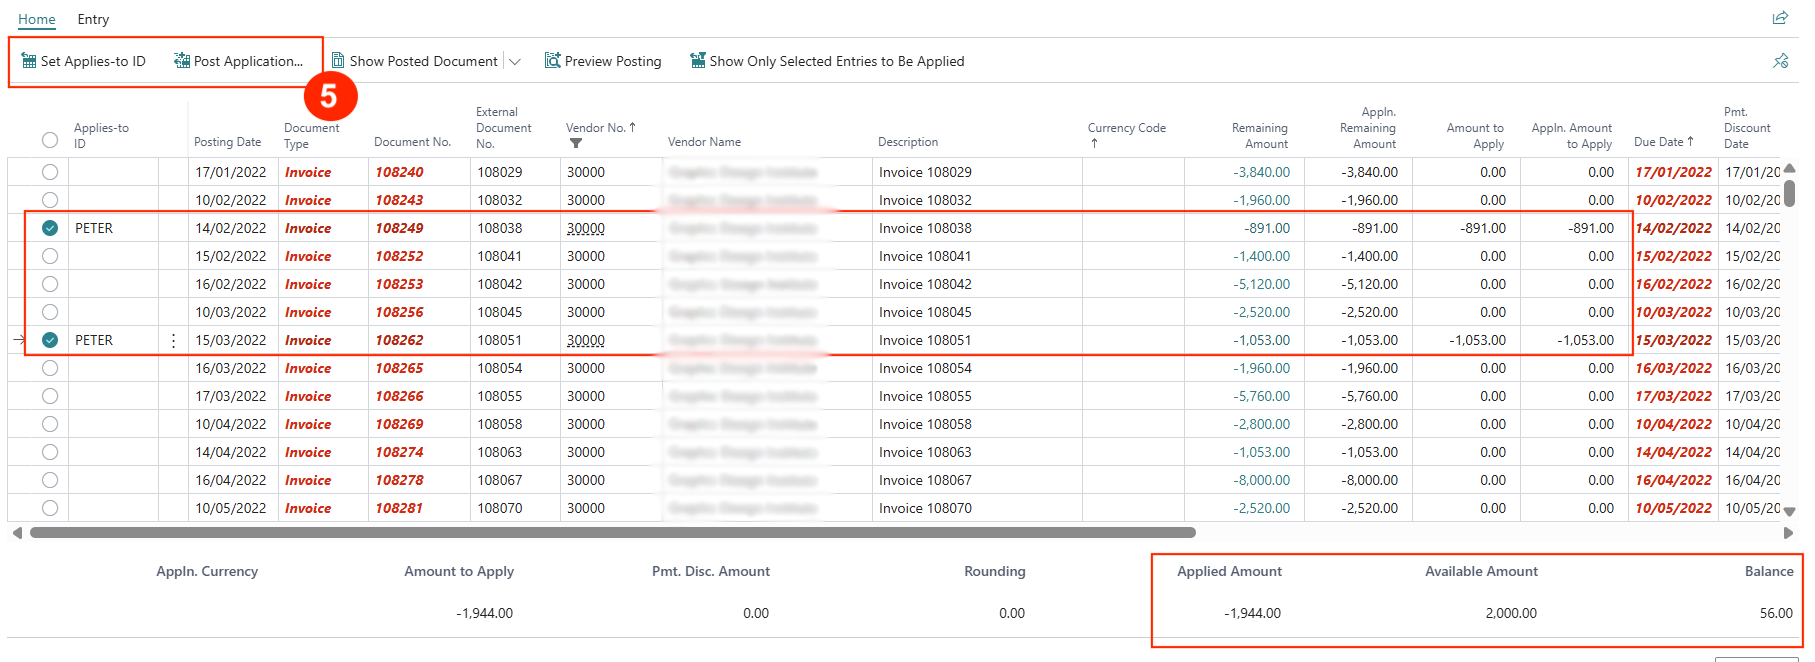
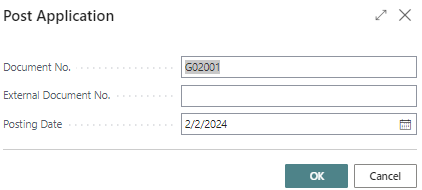
Finish the process by posting — click on Post Application to post the offset transactions and confirm the posting date.
Use preview posting to check the value adjusted in the vendor account upon posting.
-
The above process can be repeated and if the on-account payment was not fully applied the first time, the +ve balance will be available for future application (shown as Remaining Amount).


Un-applying Offset Amounts Customer Ledger
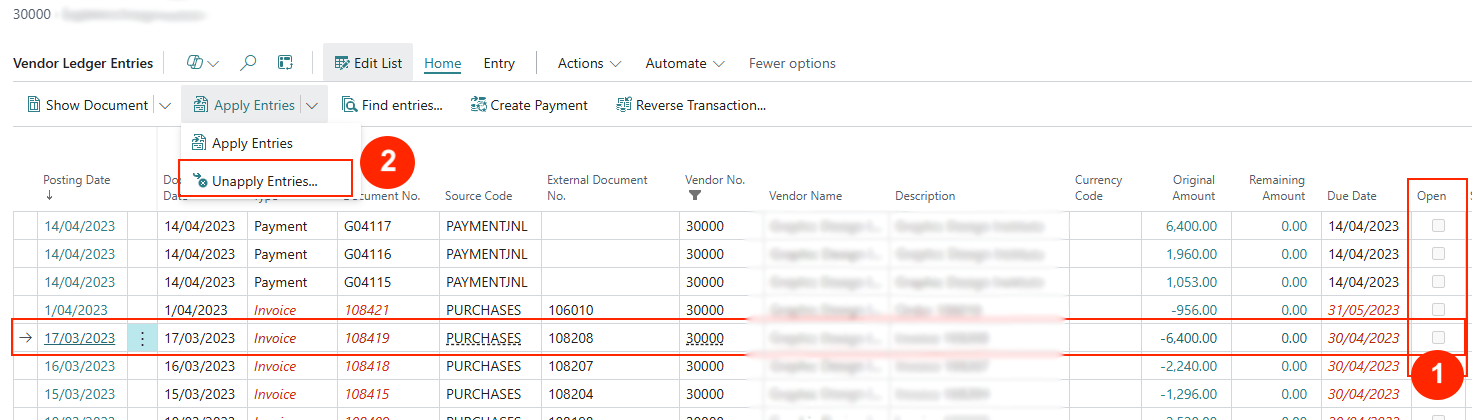
There are times when the offset application of a payment or credit memo against an invoice was incorrect and must be corrected/reversed. This is the napply Entries process.
Navigate to the Vendor Ledger Entries list page for the vendor:
-
Select the record (invoice or payment) with the incorrect offset application.
NB: The status should not be Open (unticked).
-
Click on menu option Apply Entries > Unapply Entries to open the Unapply Vendor Entries list page.
-
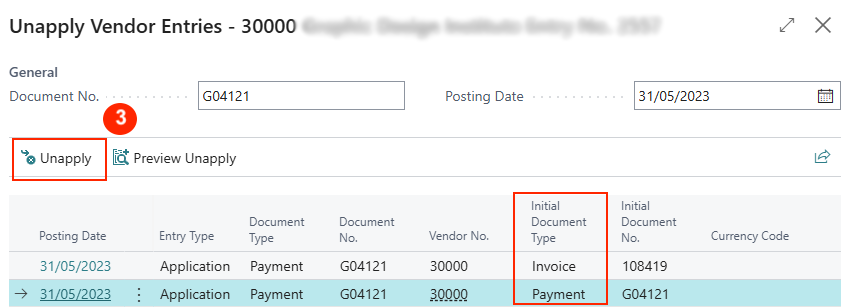
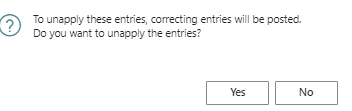
Highlight the invoice or payment to unapply (reversing the offset to make the invoice balance unpaid) and click on Unapply. Accept the confirmation.
-
By unapplying the transaction, invoices will be re-opened (as unpaid) and on-account payments will be reinstated (with full Remaining Amount to be used).
Vendor Payments
Payments to vendors are processed through Payment Journals — these include Cheques, Bank EFT, or just recording manual payments.
Cheques, EFT, and Bank Credit Transfer payments are usually batch payment runs — this requires generating a payment batch for effecting the Bank Payment Type.
Navigate to Payment Journal using the Action option Payment Journal.

This opens the Payment Journal page.
Example:
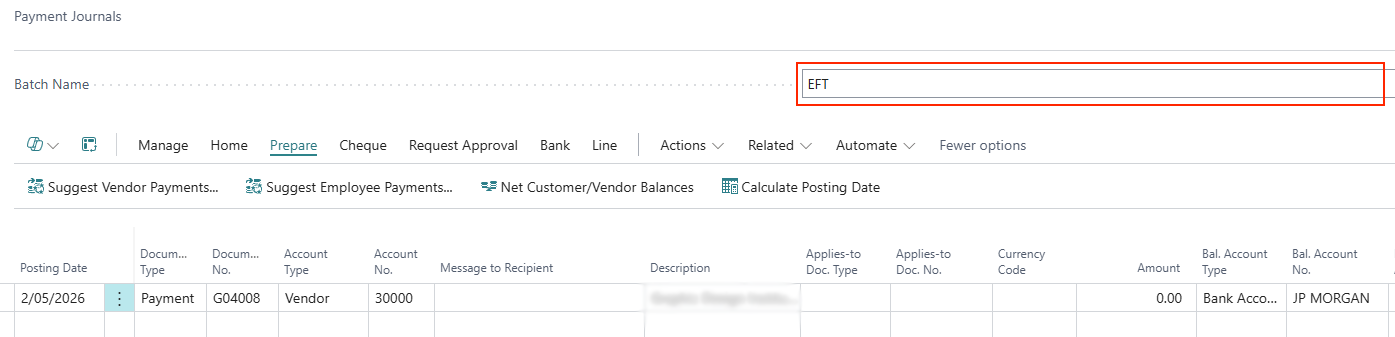
-
Batch Name — Select a batch.
-
Navigate to Prepare > Suggest Vendor Payments
-
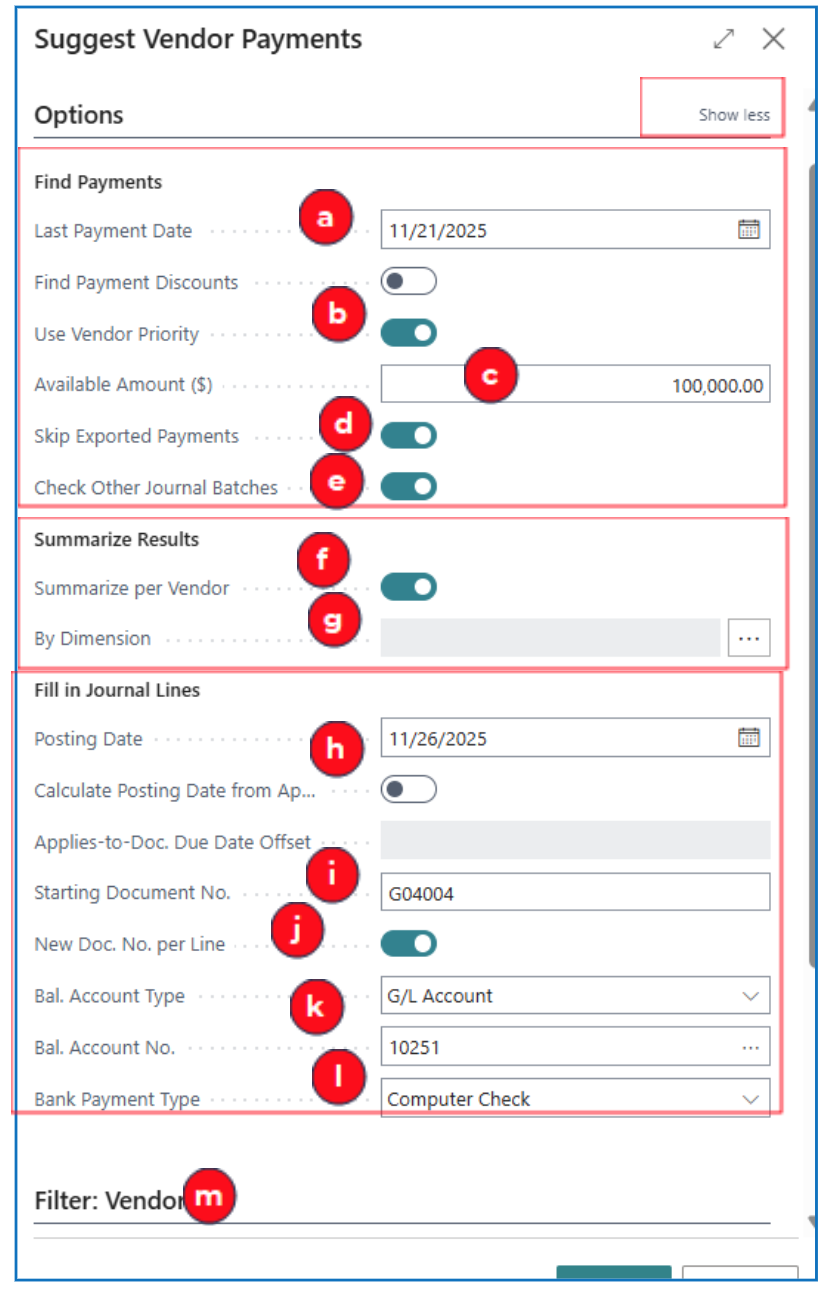
Selecting this menu option opens a prompt to filter posted vendor invoices for payment processing. (click Show More to expand the options)
-
Find Payments options help to find and filter open vendor invoices:
a) Last Payment Date — Select the date on which payment due dates are selected i.e. this is the inclusive date for selecting all invoice due dates.
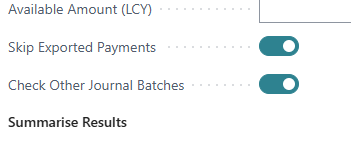
b) Use Vendor Priority — This is enabled by default if the Available Amount is used to limit the total value for a payment run.
c) Available Amount — Enter the available funds for the payment run (the system will retrieve all invoices until this amount is reached).
d) Skip Exported Payments — Enable this if there is another payment run batch that has exported the bank file for processing (this avoids duplication of payments).
e) Check Other Journal Batches — Enable this so that the process will check other journal batches and not duplicate the payment journal entry.
-
Summarize Results options define any payment grouping, e.g.
f) Summarize per vendor — Enable this to summarise a lumpsum payment for each vendor (all invoices).
g) By Dimension — Select a dimension if your vendor is grouped by dimension.
-
Fill In Journal Lines options will default values to the Payment Journal output:
h) Posting Date or Calculate Posting Date — Select the date for posting the payment run or enable the Calculate Posting Date… to let the system default a posting date relative to the invoice due date.
i) Starting Document No. — Enter a start number for the journal
NB: For a cheques payment run, this number will be replaced by the cheque number.
j) New Doc. No. per line — Enable this to have a new document number for each payment journal line.
k) Bal. Account Type and Bal. Account No. — Select the offset account to be used for the payment journal posting i.e. usually, this is a credit entry to a bank account
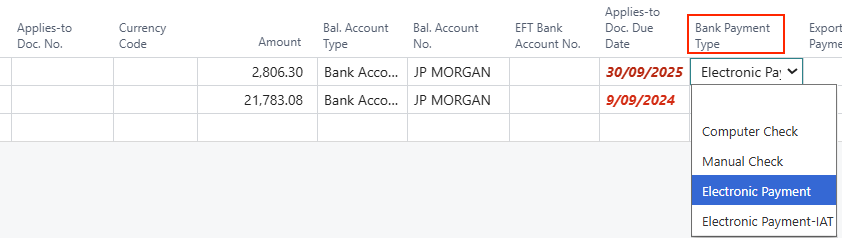
l) Bank Payment Type — Select the payment type used for the payment run (e.g. Computerised Cheques or Bank EFT). This will default to all the payment journal lines for processing.
-
Filter: Vendor — Use filters to further select vendors or invoices e.g.
m) Payment Method Code — Use this field to select invoices belonging to vendors with a specific payment method code.
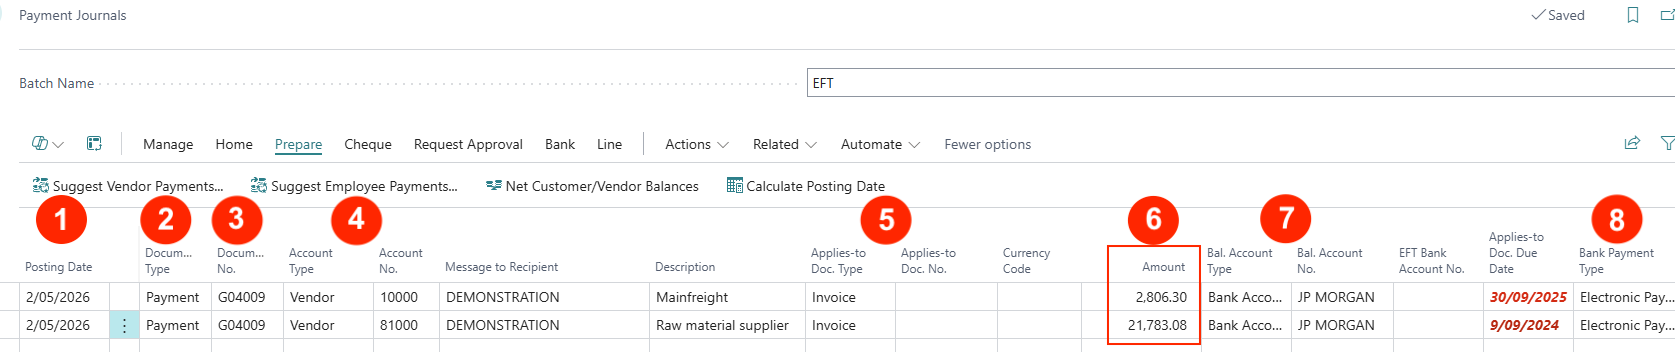
- When Suggest Vendor Payments completes, a set of Payment Journal entries will be displayed — each row representing a vendor.
-
Posting Date — This posting date is based on the selection in the Suggest Vendor Payment options.
-
Document Type — This will default to Payment for the batch.
-
Document No. — In a Check payment run, this number will be the check number. For non-check payments, this number will increase from the number provided.
-
Account Type and Account No. — The vendor codes selected in the payment run will be displayed.
-
Applies-to-Doc. Type — This defaults to Invoice.
-
Amount — The payment run cumulates all open invoice (per vendor) to compute the Amount per journal line.
-
Bal. Account Type and Bal. Account No. — The offset account type and account no. fields are inserted.
-
Bank Payment Type — These values are inserted according to the runtime prompt.
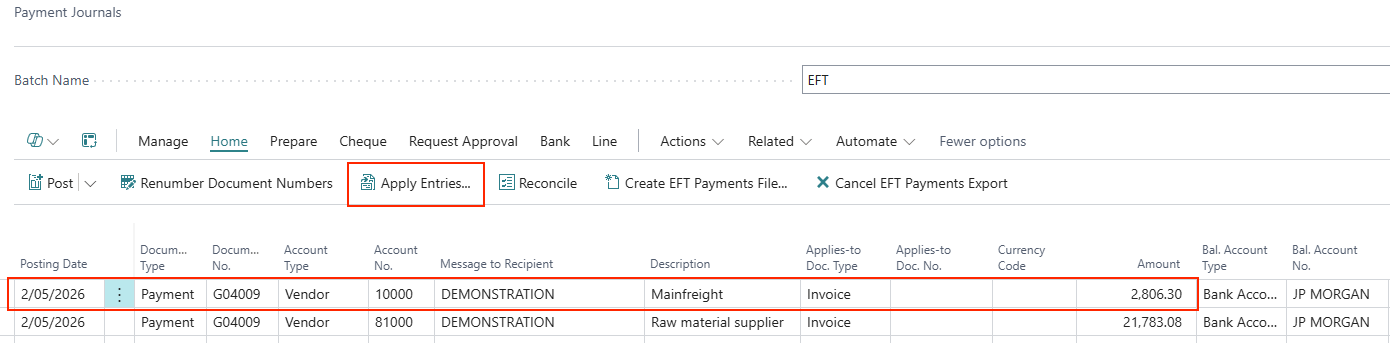
- To view the vendor invoices that were included in any of these payments, highlight the payment journal line and navigate to Home > Apply Entries.
-
This opens the Apply Vendor Entries page displaying posted purchase invoices, for example:
-
Applies-to ID — The payment document number will be inserted to indicate that the invoice is included in the payment amount.
-
Document Type and Document No. — These display the selected invoice numbers (note: the invoices are in red lettering because they are overdue).
-
Due Date — The invoice due dates. Based on the date selected for Last Payment Date in the payment prompt, the due dates are included if they fall before the Last Payment Date (e.g. Last Payment Date was 11/30/25 and all invoices before this date are included).
-
Remaining Amount — This displays the remaining unpaid amount of the invoice.
-
Amount to Apply — This is the amount of payment for the invoice.
-
Applied Amount — Displays the total amount used in applying to unpaid invoices.
-
Available Amount — This defaults to the payment amount (being available unless a limit is reached).
-
Balance — This will be $0 when the invoices are settled in full by the payment. Otherwise, there will be a balance.
NB: if there are unselected invoices, these are likely included in other unposted payment journal. The system prevents duplicate payments with these 2 flags in the generate payment prompt:
-
-
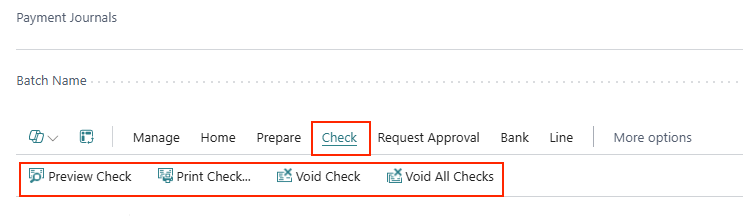
If the Payment batch requires approval, use Request Approval to submit it for approval.

-
After the payment batch is selected and approved, the payment can be affected through manual or printed Cheques/Checks and Electronic Funds Transfer (EFT).
The method depends on the selection of Bank Payment Type field updated manually or through the payment generation.
Payment by Printed Cheque/Check
-
If the Payment Journal -> Bank Payment Type is Computer Check, use the menu option Print Check to print the cheques/checks for the batch.
-
One cheque will be printed for each vendor’s total amount unless the option to print One Cheque per Vendor per Document is enabled.
NB: Pre-printed cheque/check layout needs to be customised and tested.
Payment by EFT
-
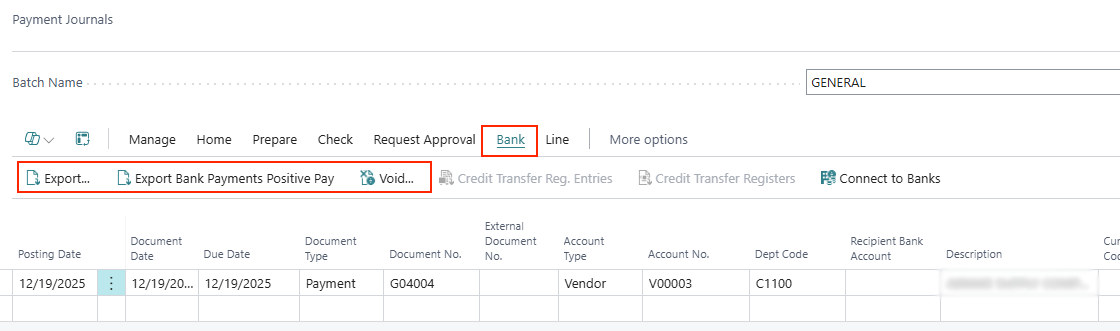
If the Bank Payment Type is Electronic Payment (i.e. payment file uploaded to the bank for payment to vendors’ accounts), use the menu option Bank.
-
This function will generate an export file (.csv or .xml) that needs to be configured to match the format required by your bank.
NB: Bank export file formats are configured and tested during implementation.
Remittance Advice for Payments
-
Remittance Advice can be emailed to vendors either before posting the payment journal or after. If EFT payment is used, the Remittance Advice is usually sent after the EFT Bank file is exported for processing.
-
For emailing of Remittance Advice, the system uses the email address defined under the Vendor’s Remit Address. In the vendor card, navigate to Related > Vendor > Remit Addresses to define the remit-to email address.
Printing Before Posting Payment Journal
-
To print/email Remittance Advice when the payment journal is created (i.e. payment is processed), select menu option Related > Payments > Print Remittance Advice or Send Remittance Advice.

-
This option will print the Remittance Advice for every payment journal line in the batch.
Printing After Posting Payment Journal
-
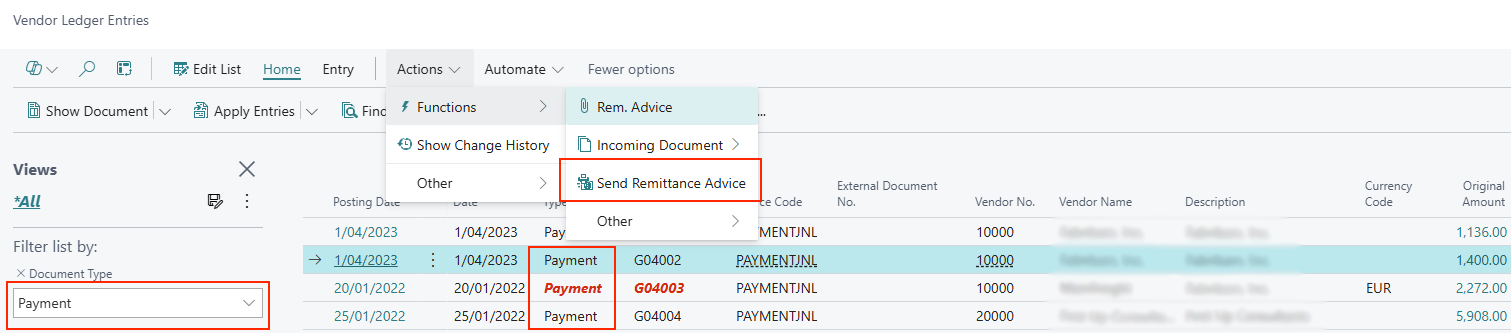
To print Remittance Advice after the payment journal is posted (e.g. sending after bank confirmation), navigate to the Vendor Ledger Entries page and filter the Document Type of Payment.
-
Select the payment to print the Remittance Advice, and select menu option Actions > Functions > Send Remittance Advice.
Reports
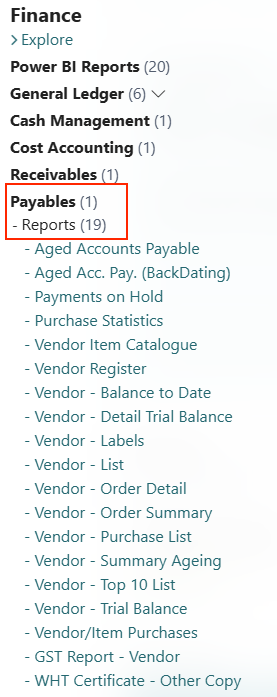
Standard vendor reports available in Business Central can be found from the menu option All Reports.

Select the report from Finance > Payables > Reports.
Aged Accounts Payable
This is a common report to use. Navigate to the report through All Reports menu option for this report.
When this report is run, the prompt allows for options to define the aging “as of” date, the aging brackets (date and duration) and other parameters.

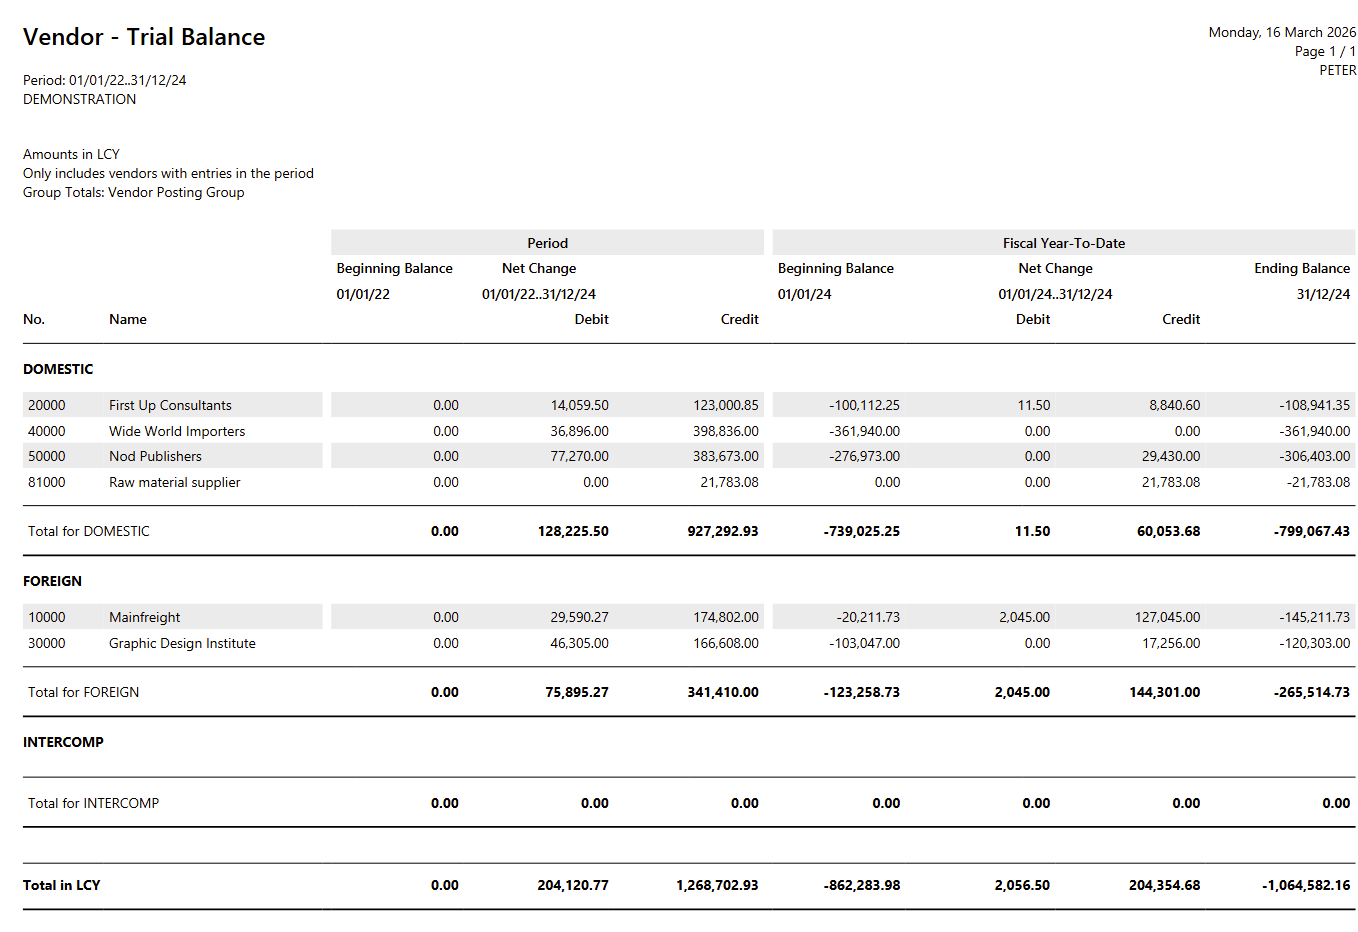
Vendor — Trial Balance
This is a report showing the trial balance of transactions posted to vendor accounts over a date range (specified in the runtime prompt).
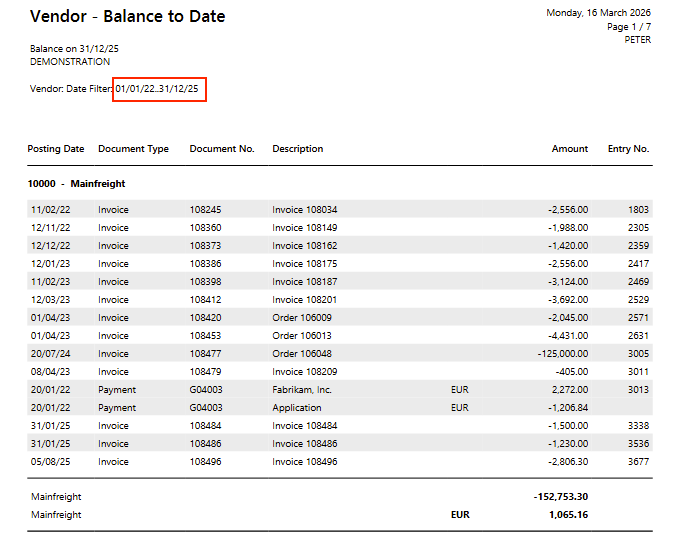
Vendor — Balance to Date
The report lists all unapplied transactions (i.e. Remaining Amount <> $0) for each vendor, based on a posting date range.
Example:
Written By:
Peter Loo
Team Leader, Business Central
Connect on LinkedIn