Risk Management User Guide for Dynamics 365
Introduction
This user guide will help you harness the full capability of Microsoft Dynamics 365 for Risk Management, particularly through the Power Apps Risk Hub. With instructions and practical advice, this guide ensures your risk management practices comply with ISO 31000’s internationally recognised standards. It covers basic navigation to advanced workflows for risk identification, assessment, evaluation, and treatment.
To get the risk management solution, visit Risk Management for Microsoft Dynamics 365 .
Purpose and Scope
This guide is intended for risk officers, compliance professionals, and any users involved in managing organisational risk using Dynamics 365. It will walk you through all major system functions: from logging in and personalising dashboards to exporting risk reports and managing incidents, contacts, and activities. The guidance adheres to ISO 31000, ensuring you follow global best practices for systematic risk management.
Overview of ISO 31000
ISO 31000 sets out principles and a framework for risk management, applicable to any organisation. It emphasises the importance of integrating risk management into all organisational processes, promoting a structured approach to identifying, assessing, and treating risk.
Key Aspects
-
Integration of risk management into all organisational activities
-
Structured and comprehensive approaches to identify, assess, and treat risk
-
Continual evaluation and improvement of the risk management process
Dynamics 365 for Risk Management supports these principles with robust tools for documentation, analysis, communication, and follow-up.
Getting Started
Accessing Power Apps Risk Hub
-
Open your web browser (e.g. Chrome, Edge, etc.) and go to your organisation’s Power Apps portal (typically via a bookmarked link or company intranet).
-
Log in using your company-issued credentials. Multi-factor authentication may be required for security.
-
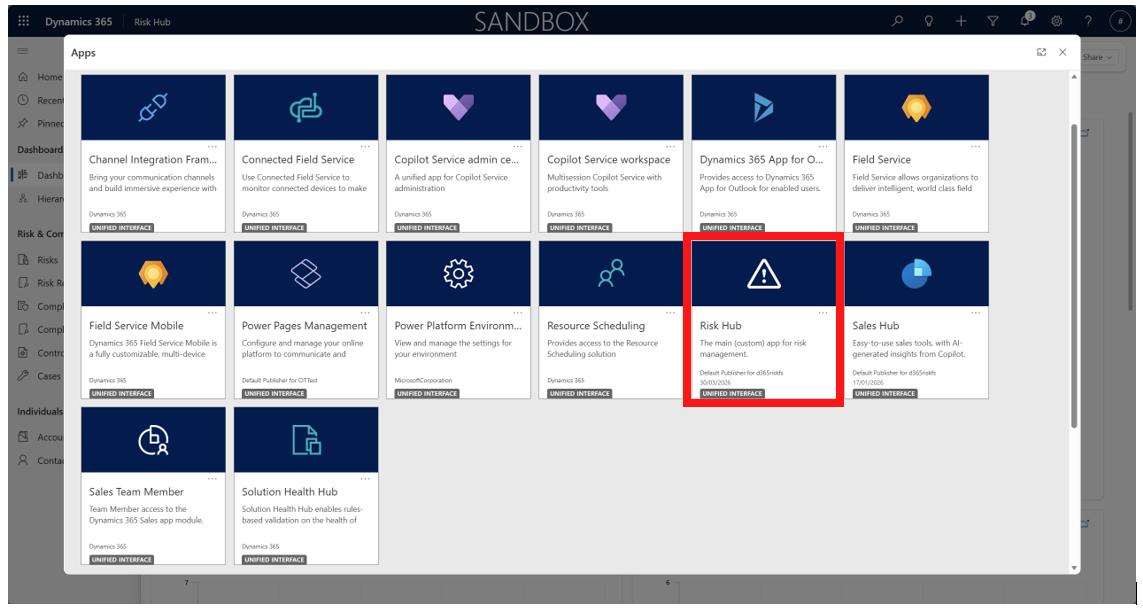
Once inside Power Apps, locate and select Risk Hub from your available applications. This will open the main workspace for risk management activities.
User Roles and Permissions
-
Risk Manager: Has comprehensive access to create, edit, assign, and close risks, incidents, and activities, as well as manage dashboards and configure system settings.
-
System User: Can interact with risk records, report incidents, and access dashboards, but may have limited administrative access based on role configuration.
-
Viewer: Granted read-only access, suitable for auditors or senior management who need oversight.
Permissions can be tailored by your Dynamics 365 administrator to reflect your organisation’s security policies.
Basic Navigation
Menu Overview
The Power Apps Risk Hub’s menu is typically positioned on the left-hand side and includes:
-
Dashboards: Overview of risk landscape, key metrics, and KPIs
-
Risks: Access to the risk register, risk forms, and related actions
-
Incidents: Incident logging, investigation, and status tracking
-
Activities: Task management, meeting tracking, and reminders
-
Contacts: Database of internal and external stakeholders
-
Settings: Customisation, user preferences, and administration
Interface Walkthrough
When you sign in or log in, the home screen displays a summary of your pending tasks, recent risk reviews, and critical incidents. Navigation between modules is smooth---simply click on the relevant section in the sidebar to bring up its workspace. The top bar provides universal search, quick access to notifications (for reviews, overdue actions, etc.), and your user profile for settings and preferences.
Dashboard View and Creation
Dashboards in risk management, particularly within a system like Microsoft Dynamics 365, are essential tools for monitoring, visualizing, and communicating the organization’s risk profile in real-time. They translate complex data from the Risk Register into easy-to-digest visual summaries, enabling faster and more informed decision-making.
Risk management dashboards serve three primary functions:
- Monitoring
- Analysis
- Communication
They are often highly visual and interactive, typically built using integrated tools like Power BI.
Viewing Dashboards
-
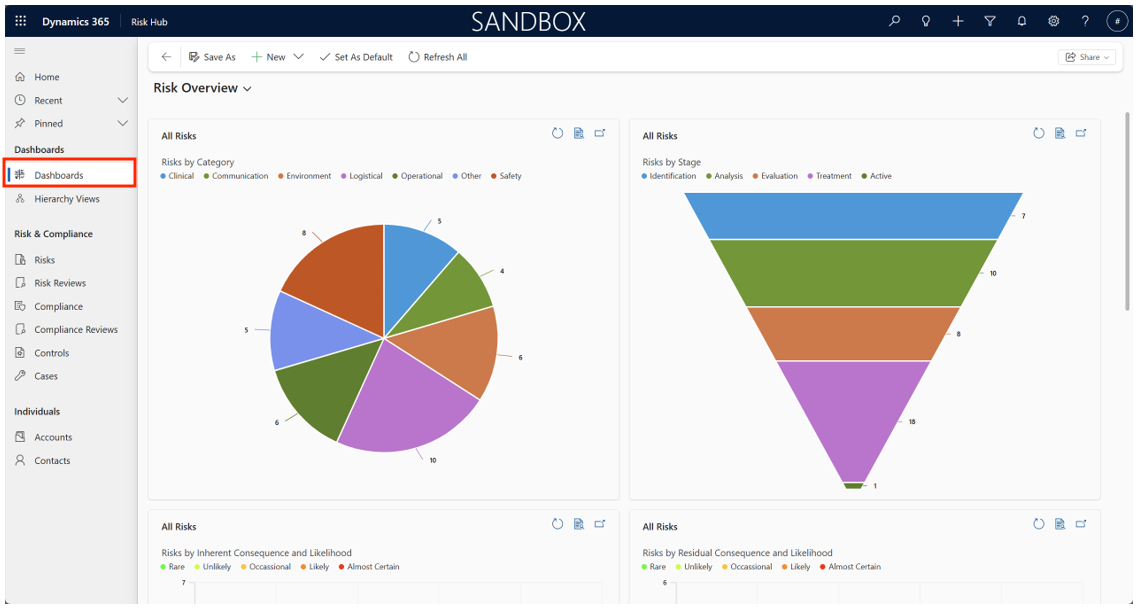
From the main menu located on the left-hand side, click Dashboards. You’ll see a list of existing dashboards, which may be organised by department, division, or user.
-
Click on the name of the dashboard to open it. Standard dashboards display risk heat maps, trend analysis charts, open action lists, and summary statistics (e.g., risks by type, number of overdue reviews, etc.).
Creating a New Dashboard
-
Click the New Dashboard button.
-
Assign a descriptive name and select the layout (e.g., single panel, two columns, grid).
-
To add a widget, choose from charts (bar, line, pie), tables, KPIs, or custom metrics by clicking Add Widget.
-
For each widget, select your data source (e.g., live risk data, historical incidents, review status) and configure display settings (filters, aggregation, visualisation type).
-
Preview and rearrange widgets by dragging them into your preferred arrangement.
-
Click Save. You may also set permissions for dashboard visibility (personal, team, organisation-wide).
Customisation Tips
Here are tips for customising dashboards effectively.
-
Use filters to show only data relevant to a particular department, risk category, or time period.
-
Widgets can be resized or rearranged to emphasise critical metrics.
-
Share dashboards via link or by setting access permissions.
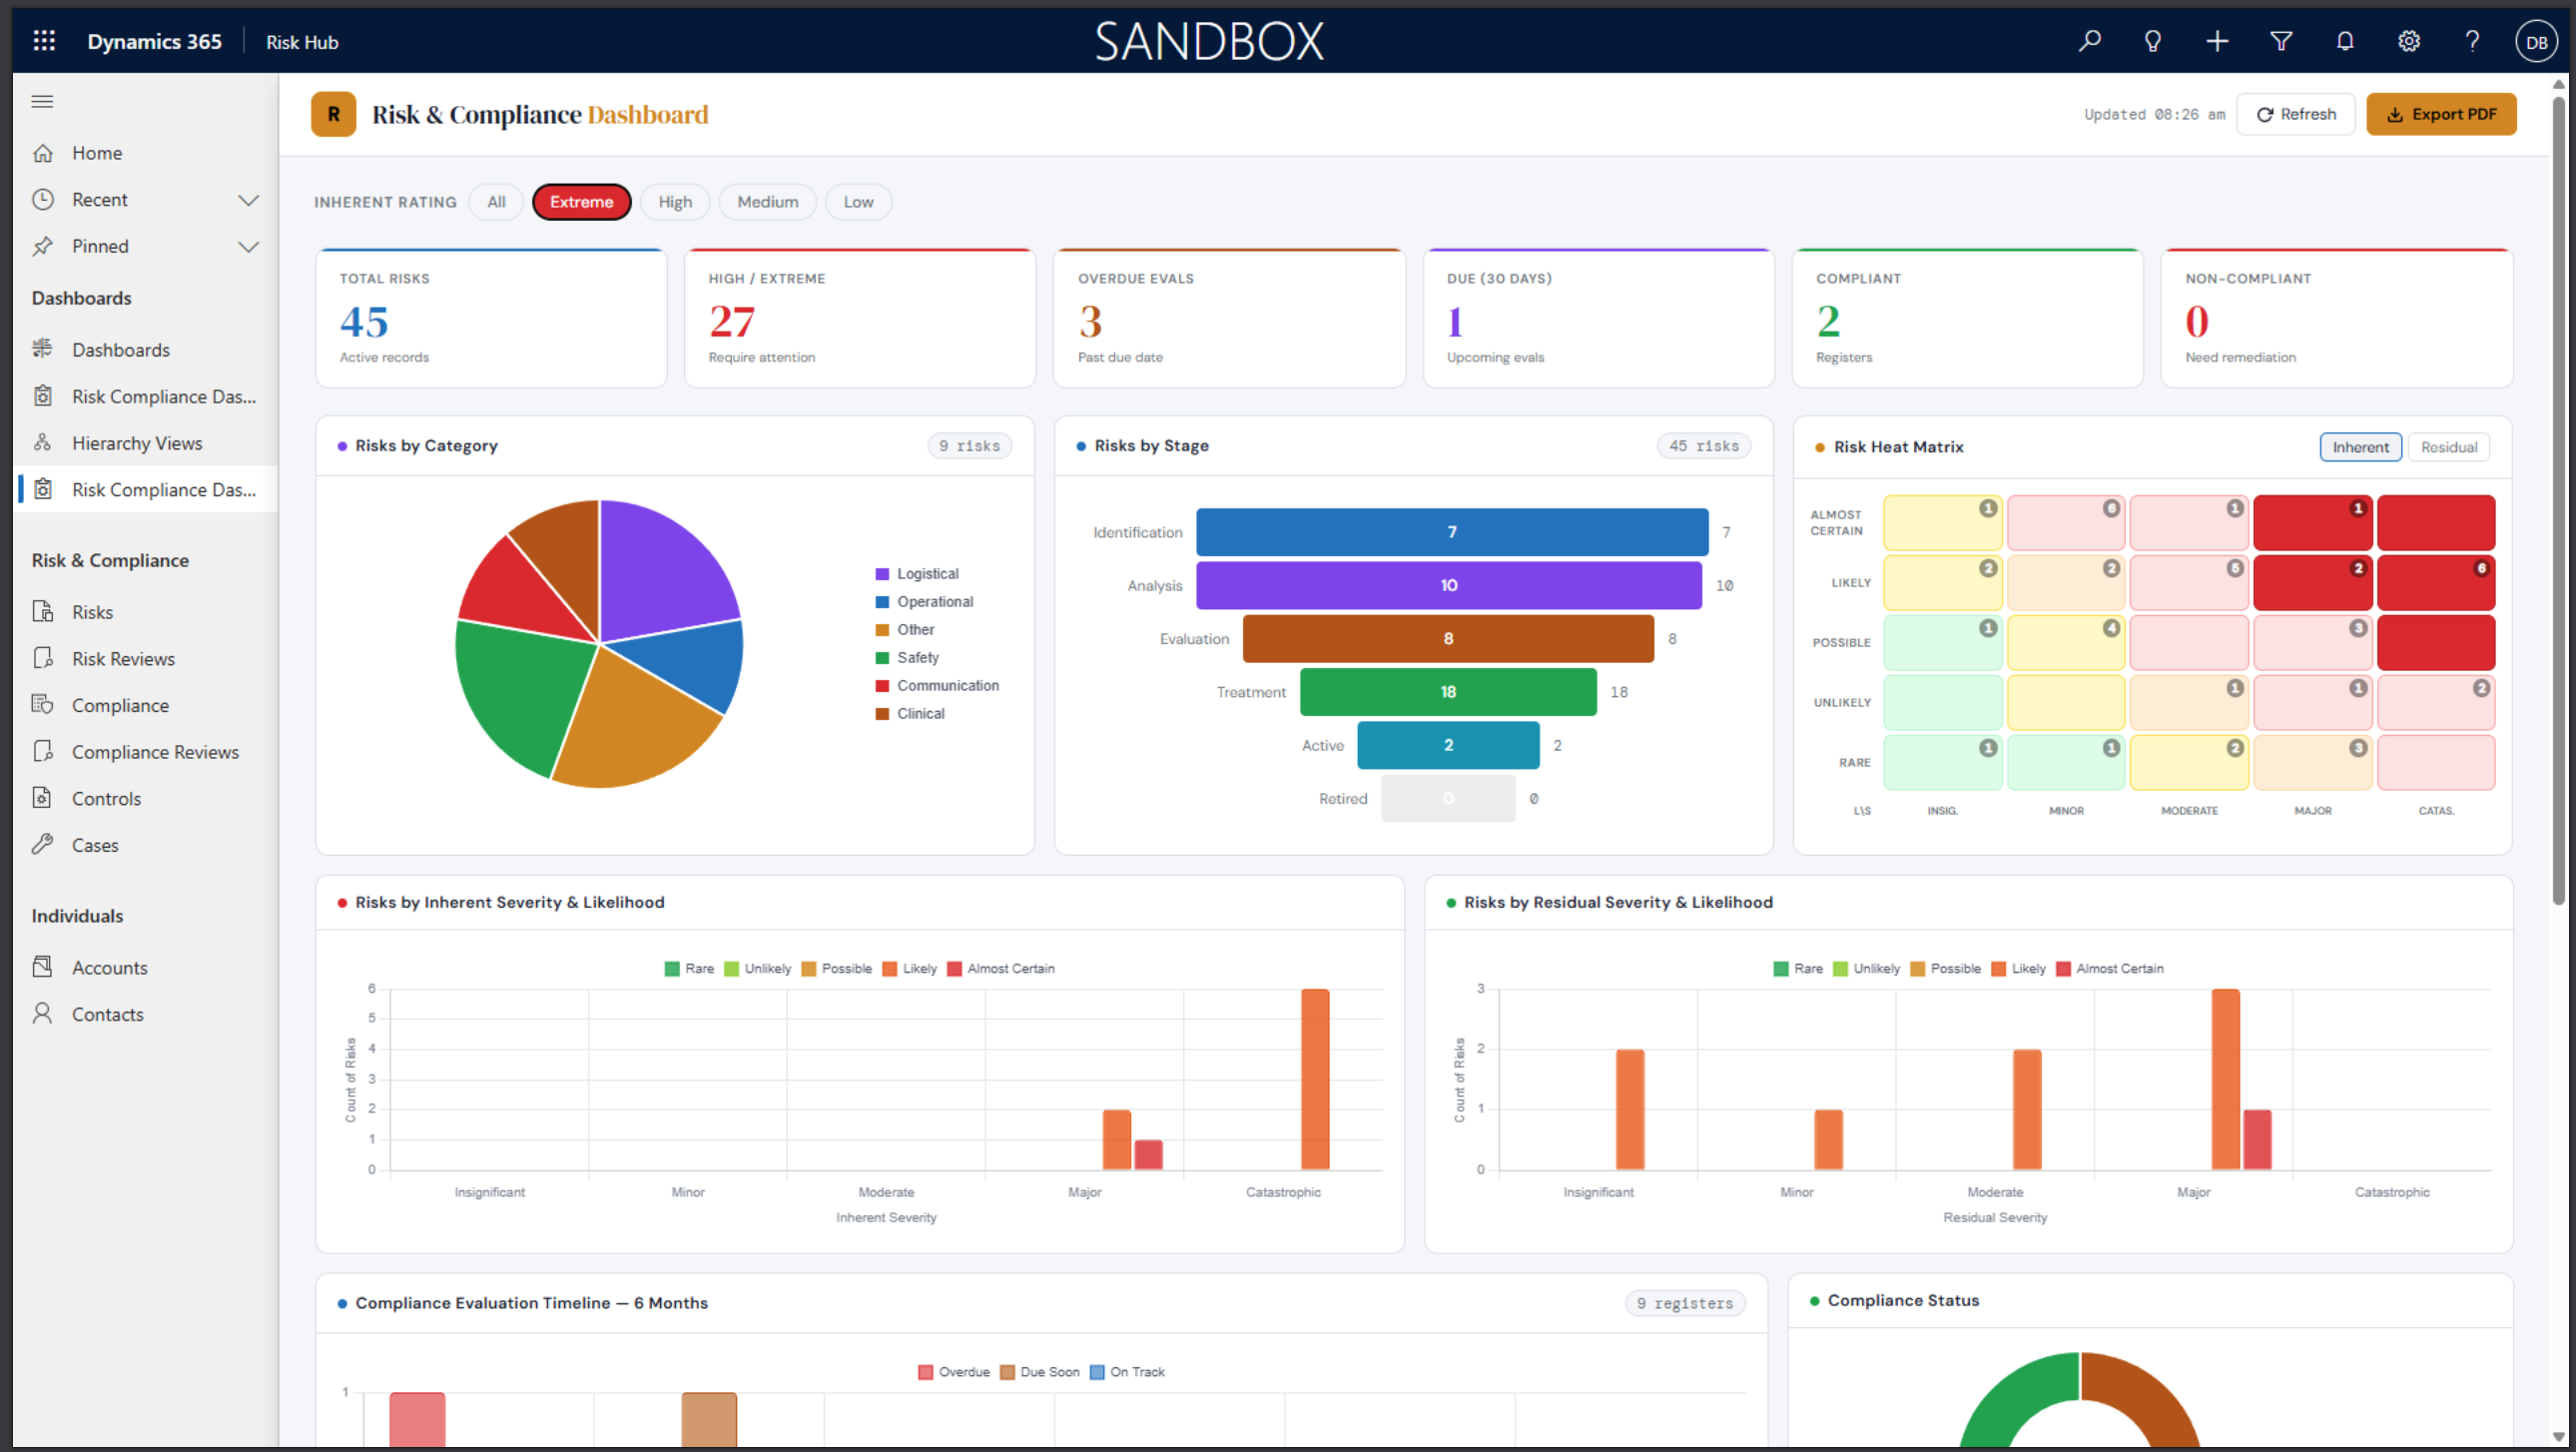
Description of New Risk Charts and Dashboards
This section will discuss the new risk charts and dashboards.
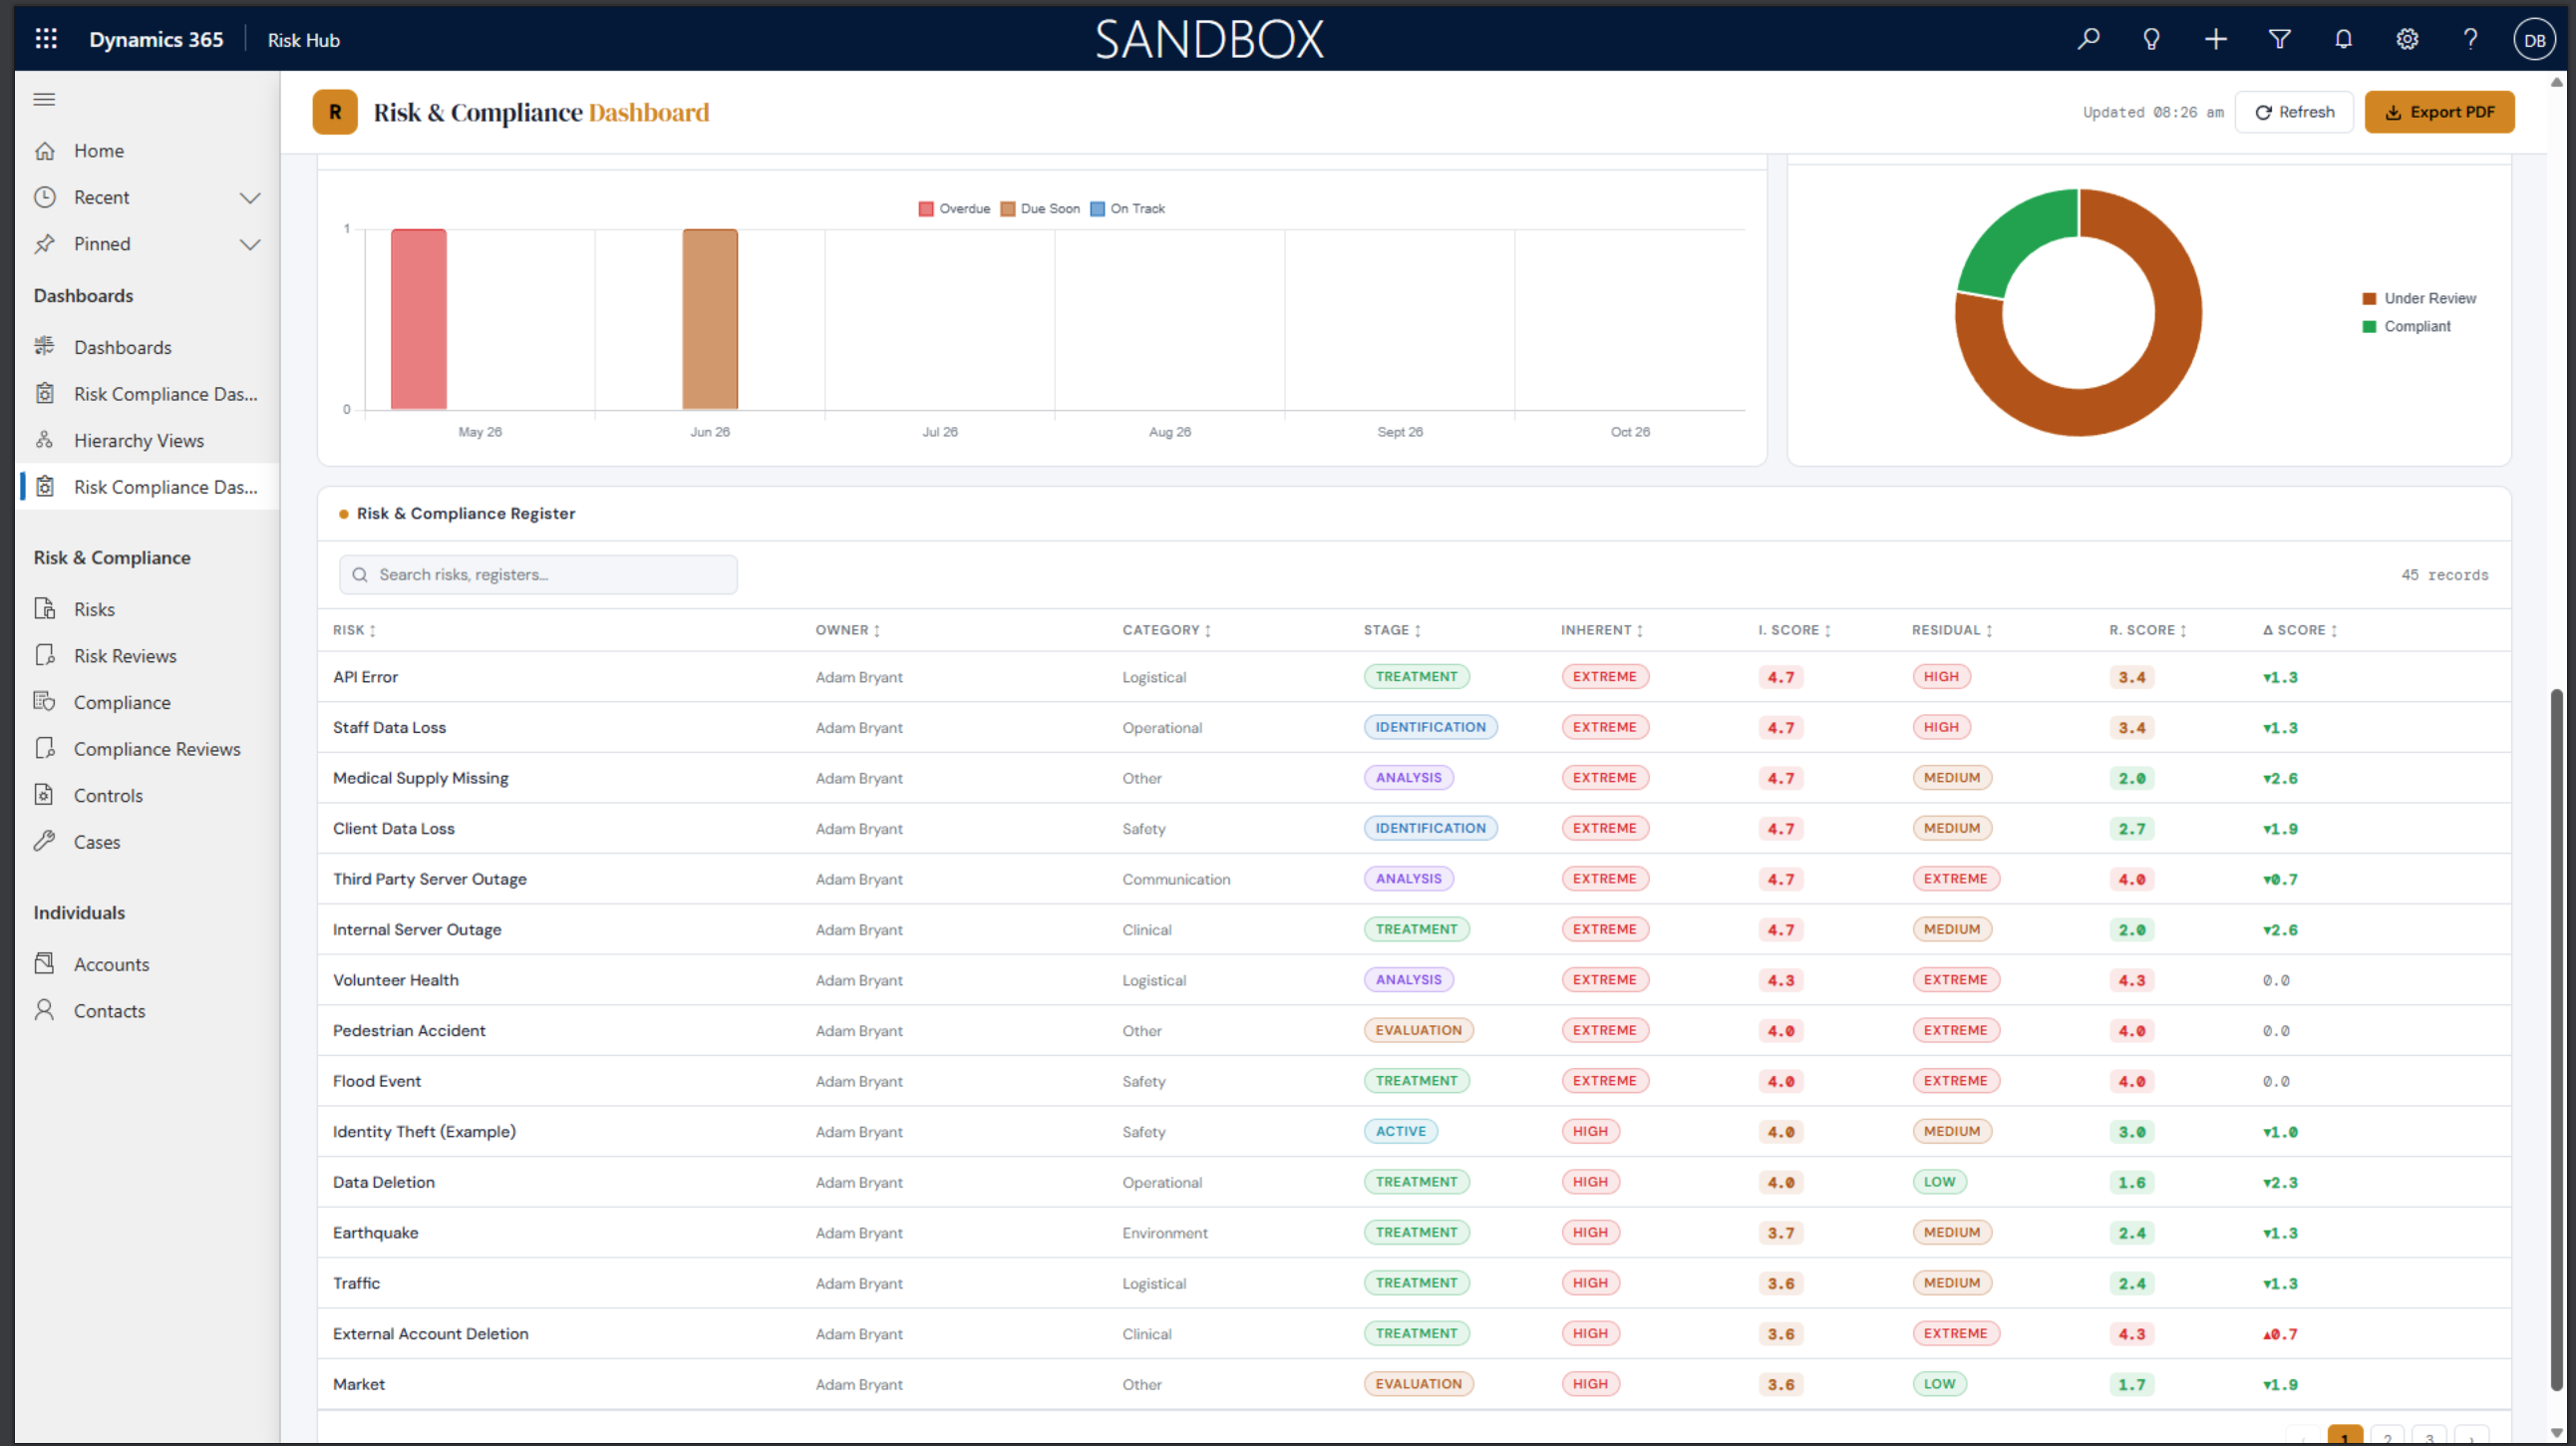
From the main menu, select Dashboards to view the available dashboards. You will see Risk Compliance Dashboard which opens the Risk & Compliance Dashboard.
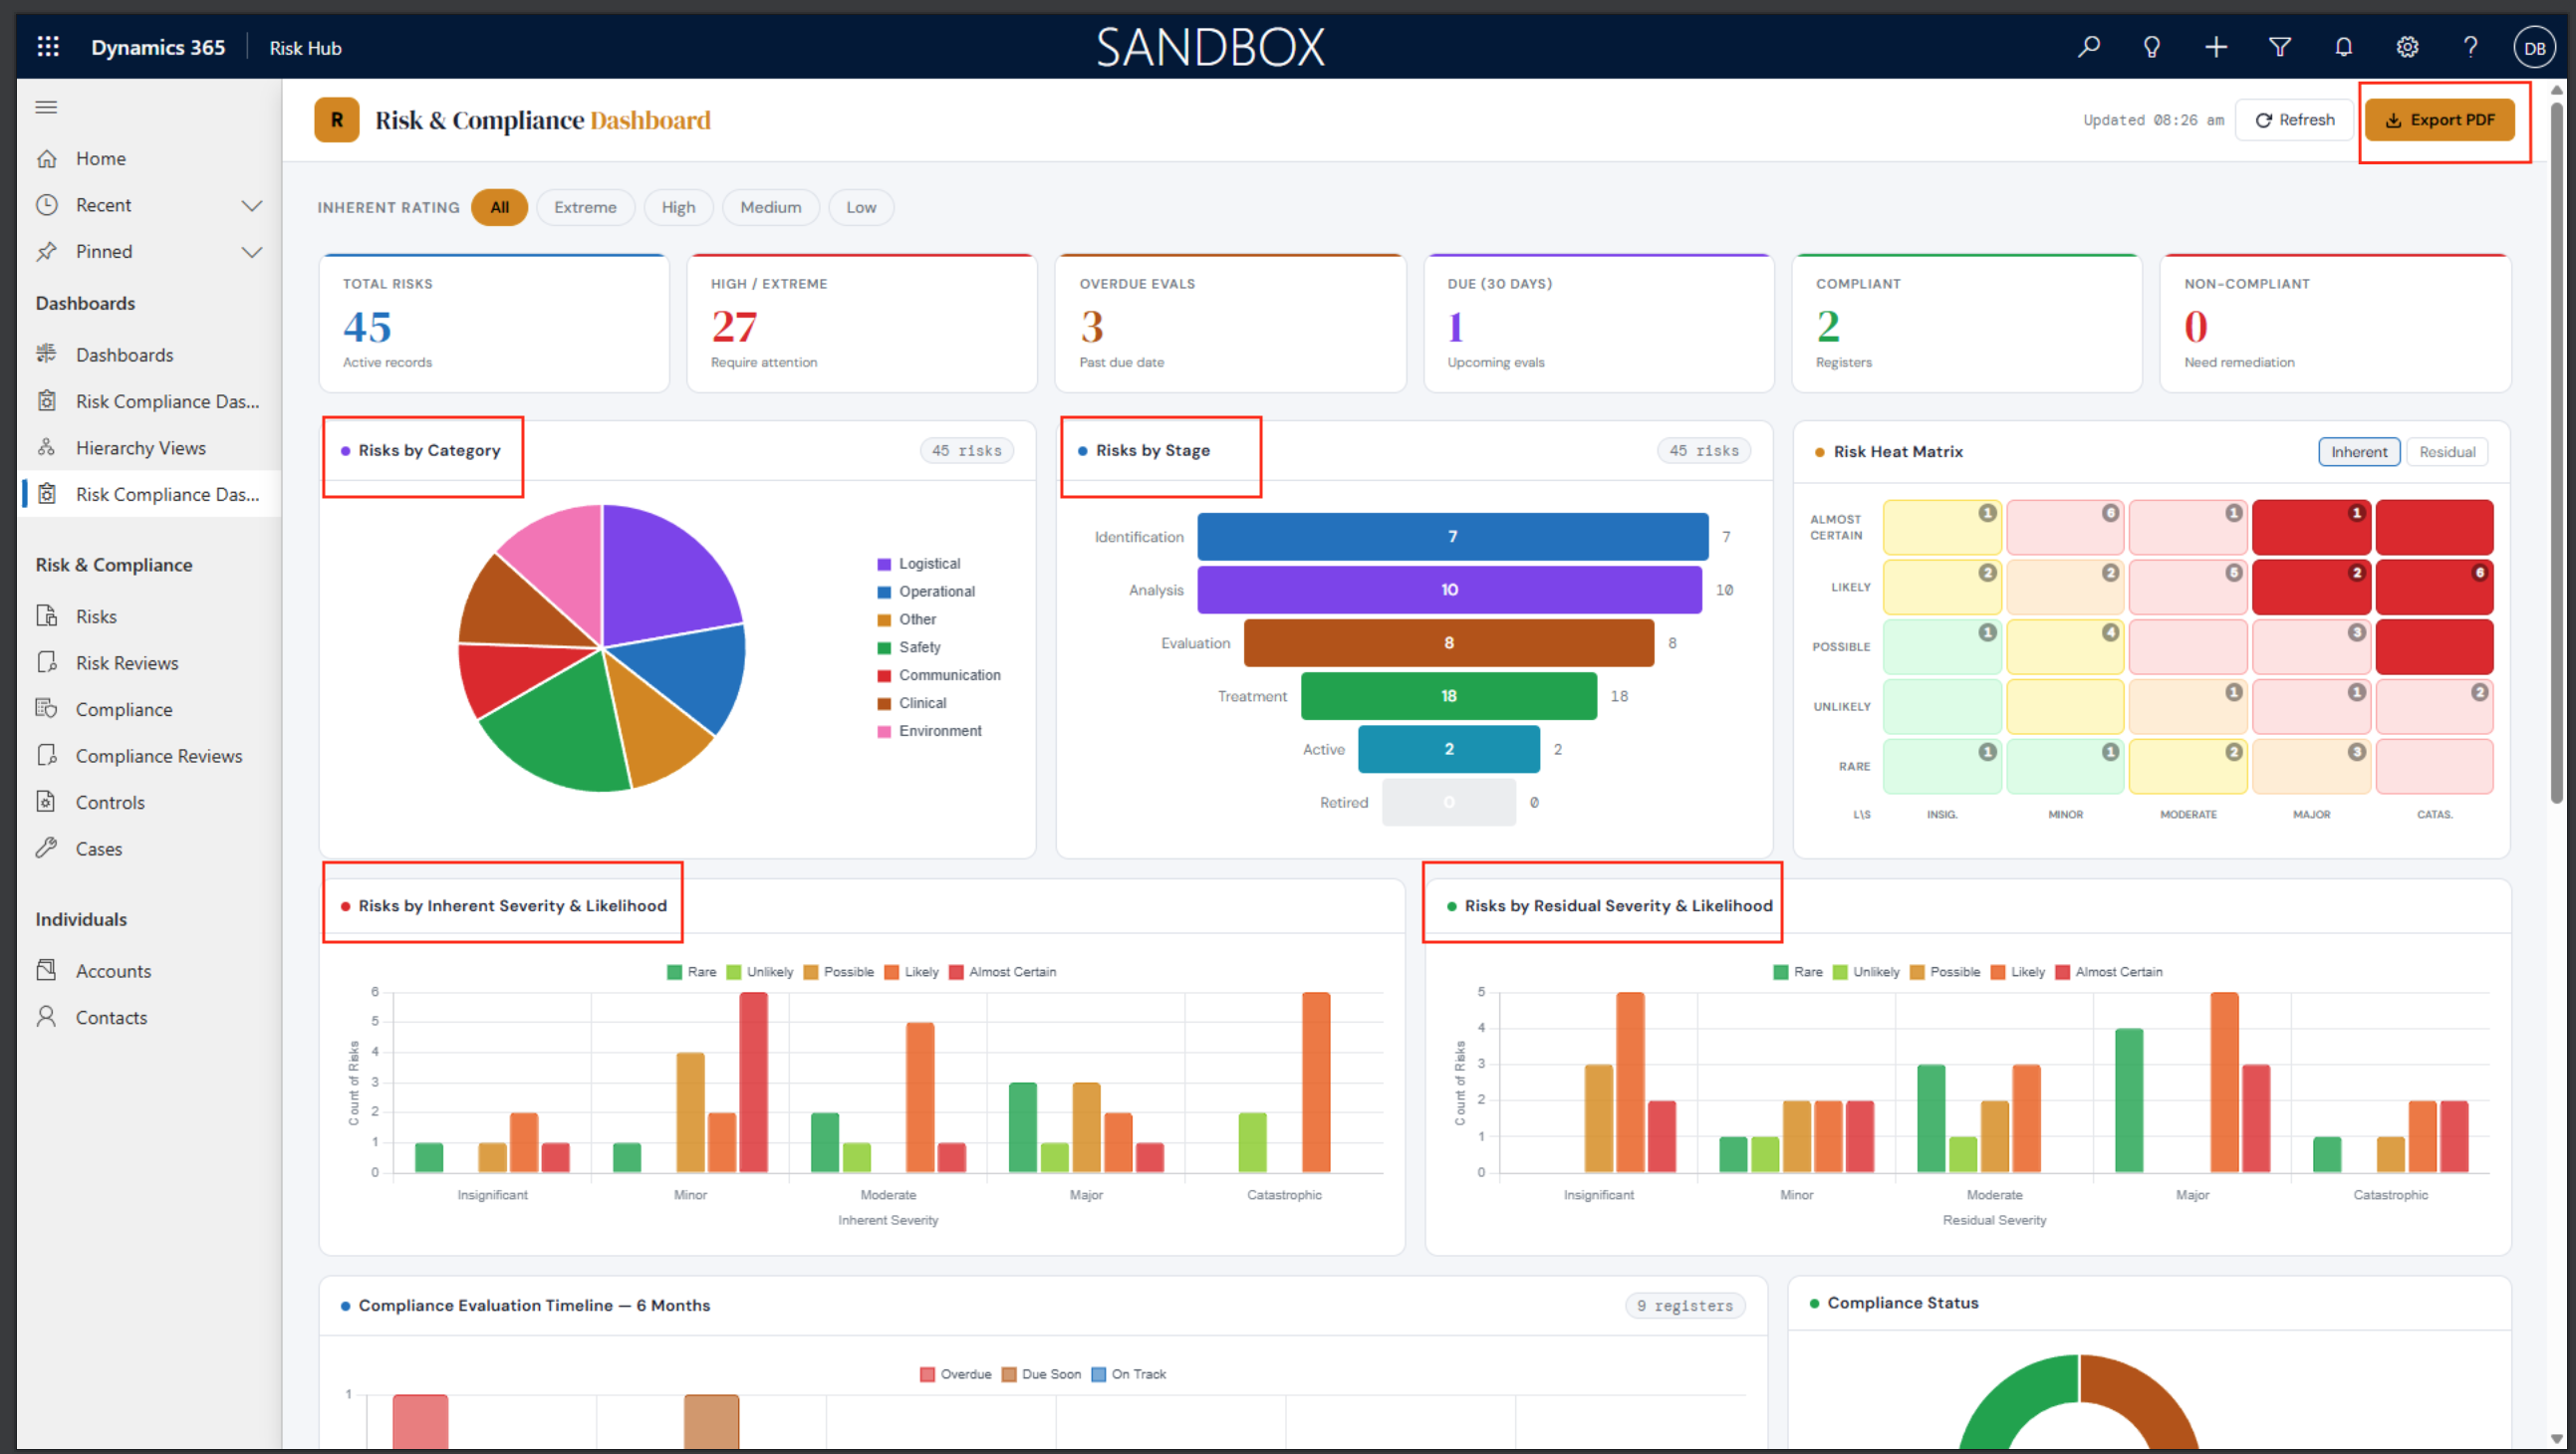
- Risks by Category — Pie chart, same concept but styled dark and interactive.
- Risks by Stage — Funnel/pyramid shape (Identification → Analysis → Evaluation → Treatment → Active), widest at top like the OOB.
- Risks by Inherent Consequence & Likelihood — Grouped bar chart, x-axis = consequence level, bars grouped by likelihood (Rare → Almost Certain) with the same colour coding as OOB (green → red).
- Risks by Residual Consequence & Likelihood — Same chart mirrored for residual.
New Additions
- PDF Export — Click the gold Export PDF button in the header, pick which sections to include (KPIs, Risk Register, Controls Register, Compliance Summary, Overdue Items), and it generates a clean A4 executive report. Uses html2pdf.js which loads via CDN when inside D365.
- Category Filter Buttons — Dynamically built from your actual risk categories, so clicking “Operational” filters every chart and the table simultaneously.
- Compliance Doughnut — Replaces one of the smaller panels with a Compliant/Non-Compliant/Under Review breakdown.
PDF sections available:
- Executive Summary KPIs
- Full Risk Register table
- Controls Register with overdue highlights
- Compliance Summary
- “Immediate Attention” list — Critical/High risks + all overdue controls
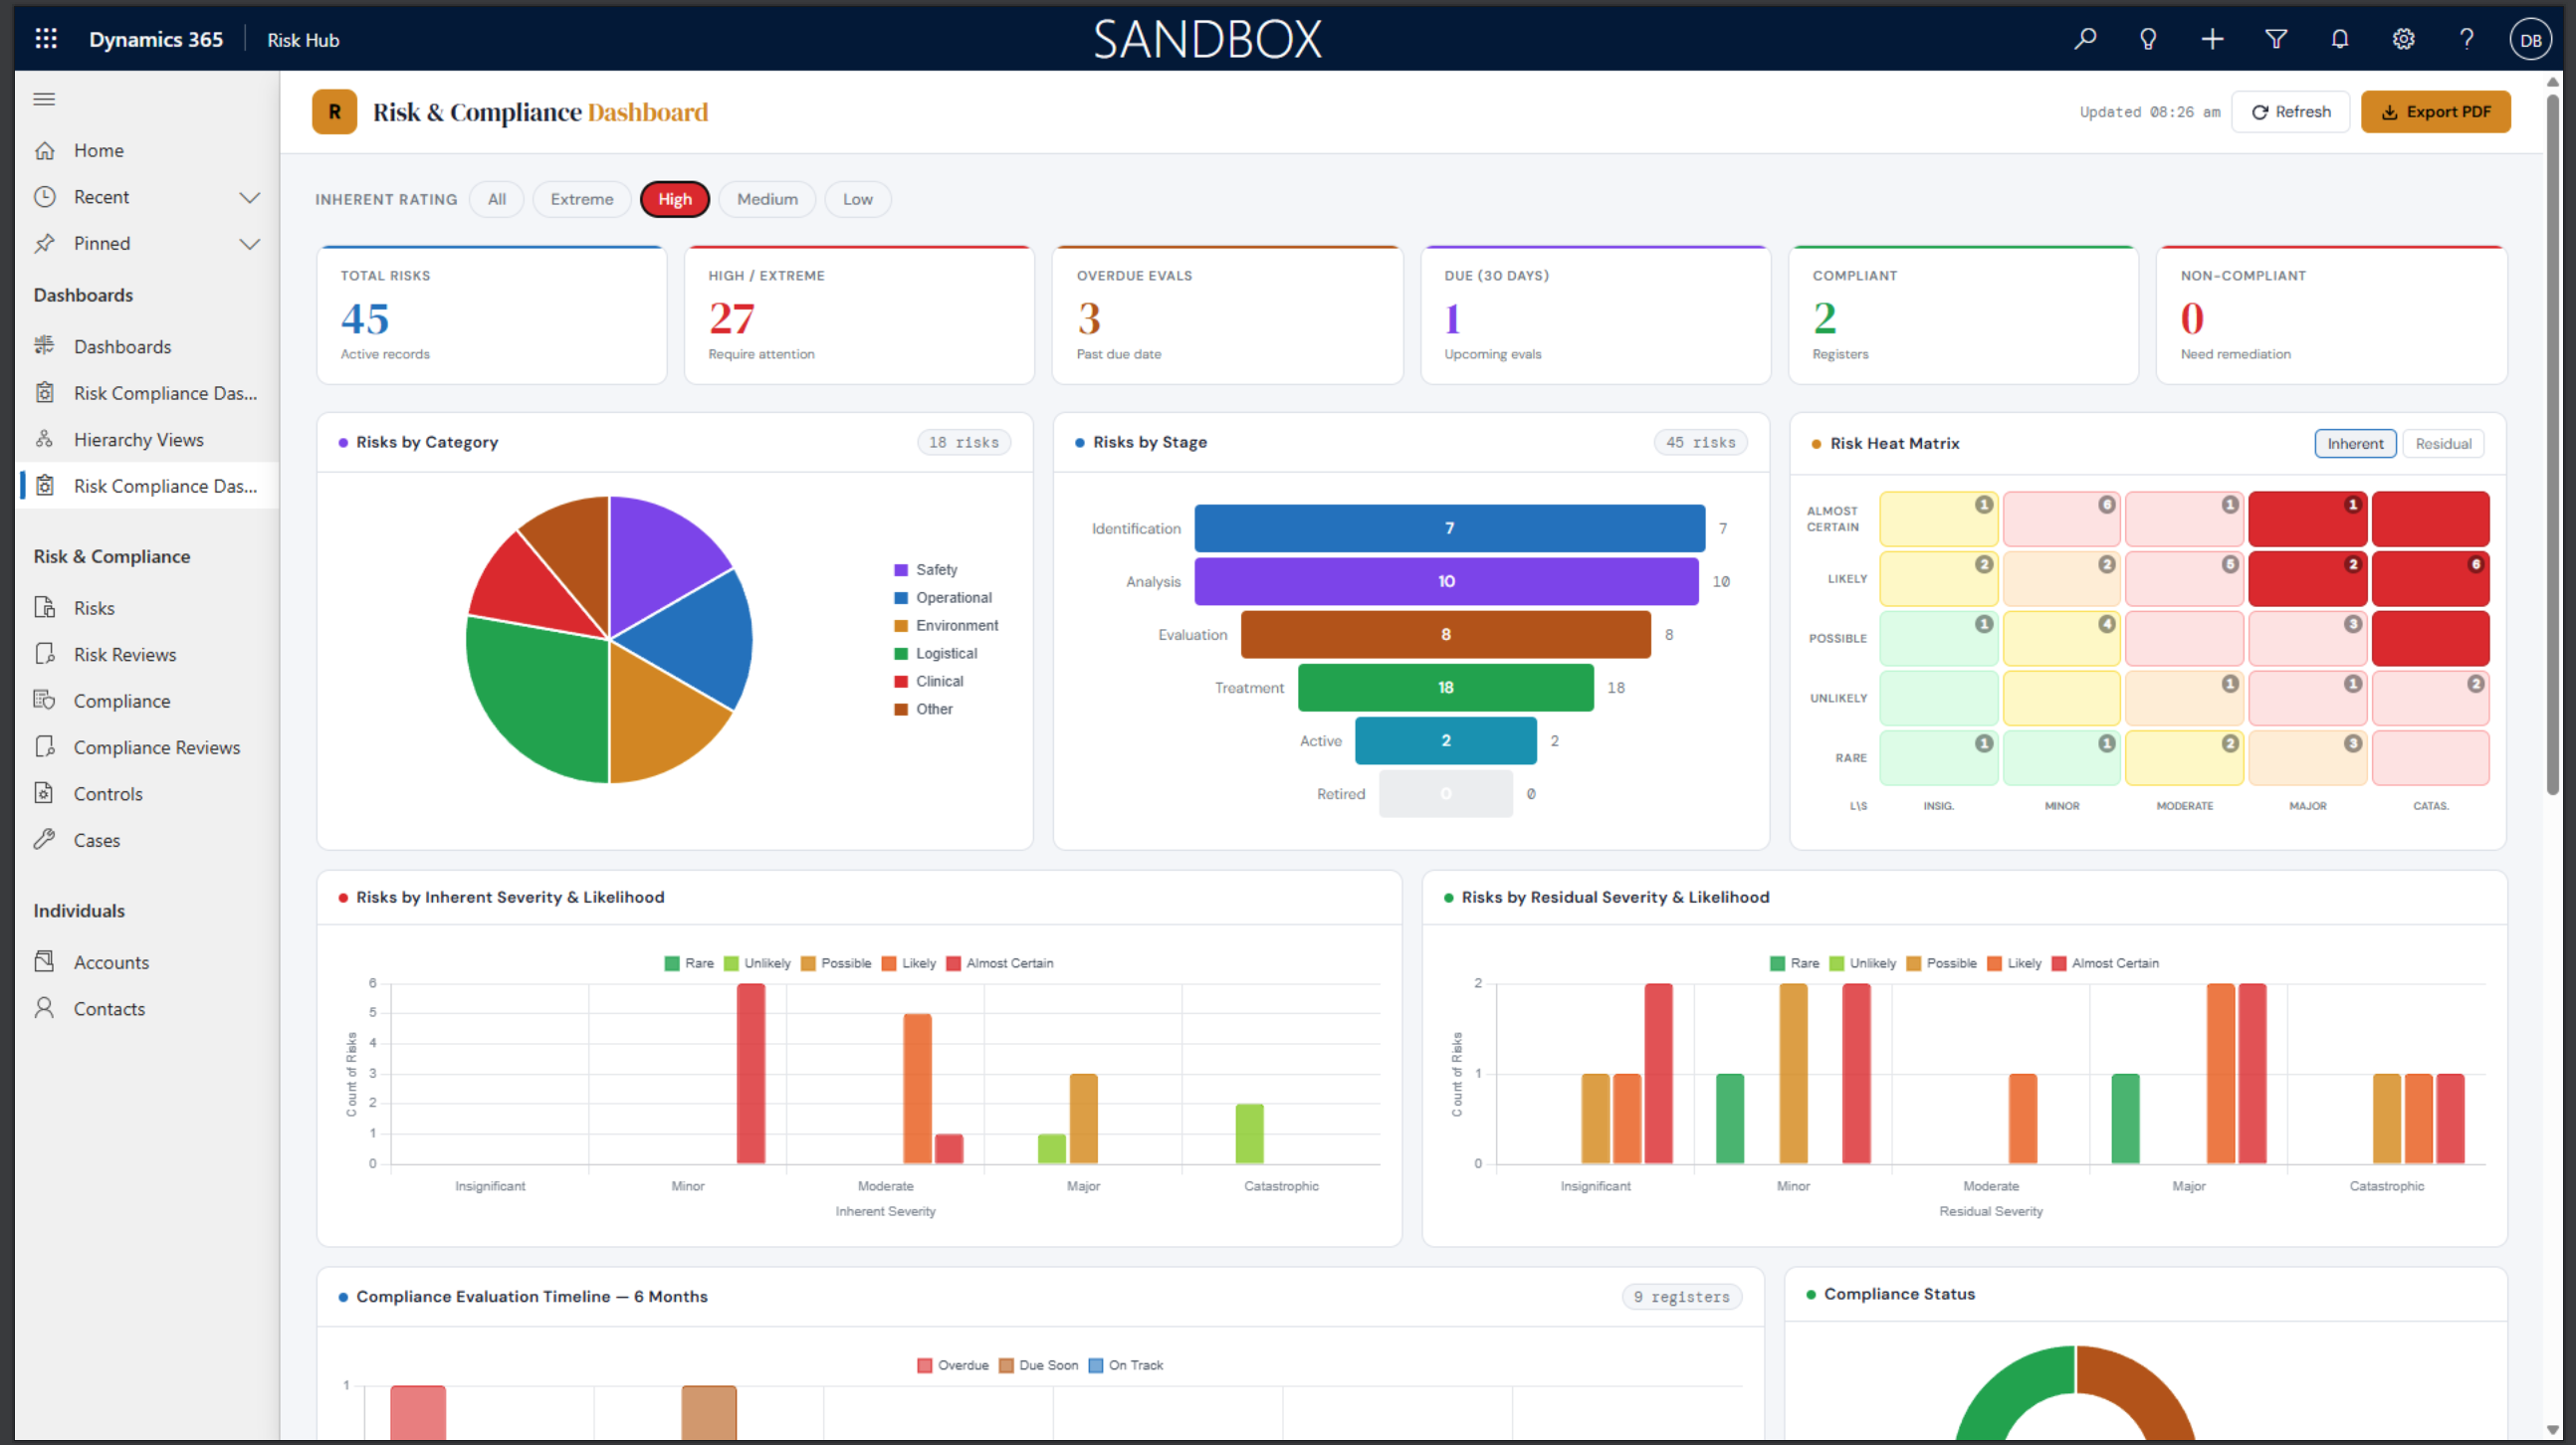
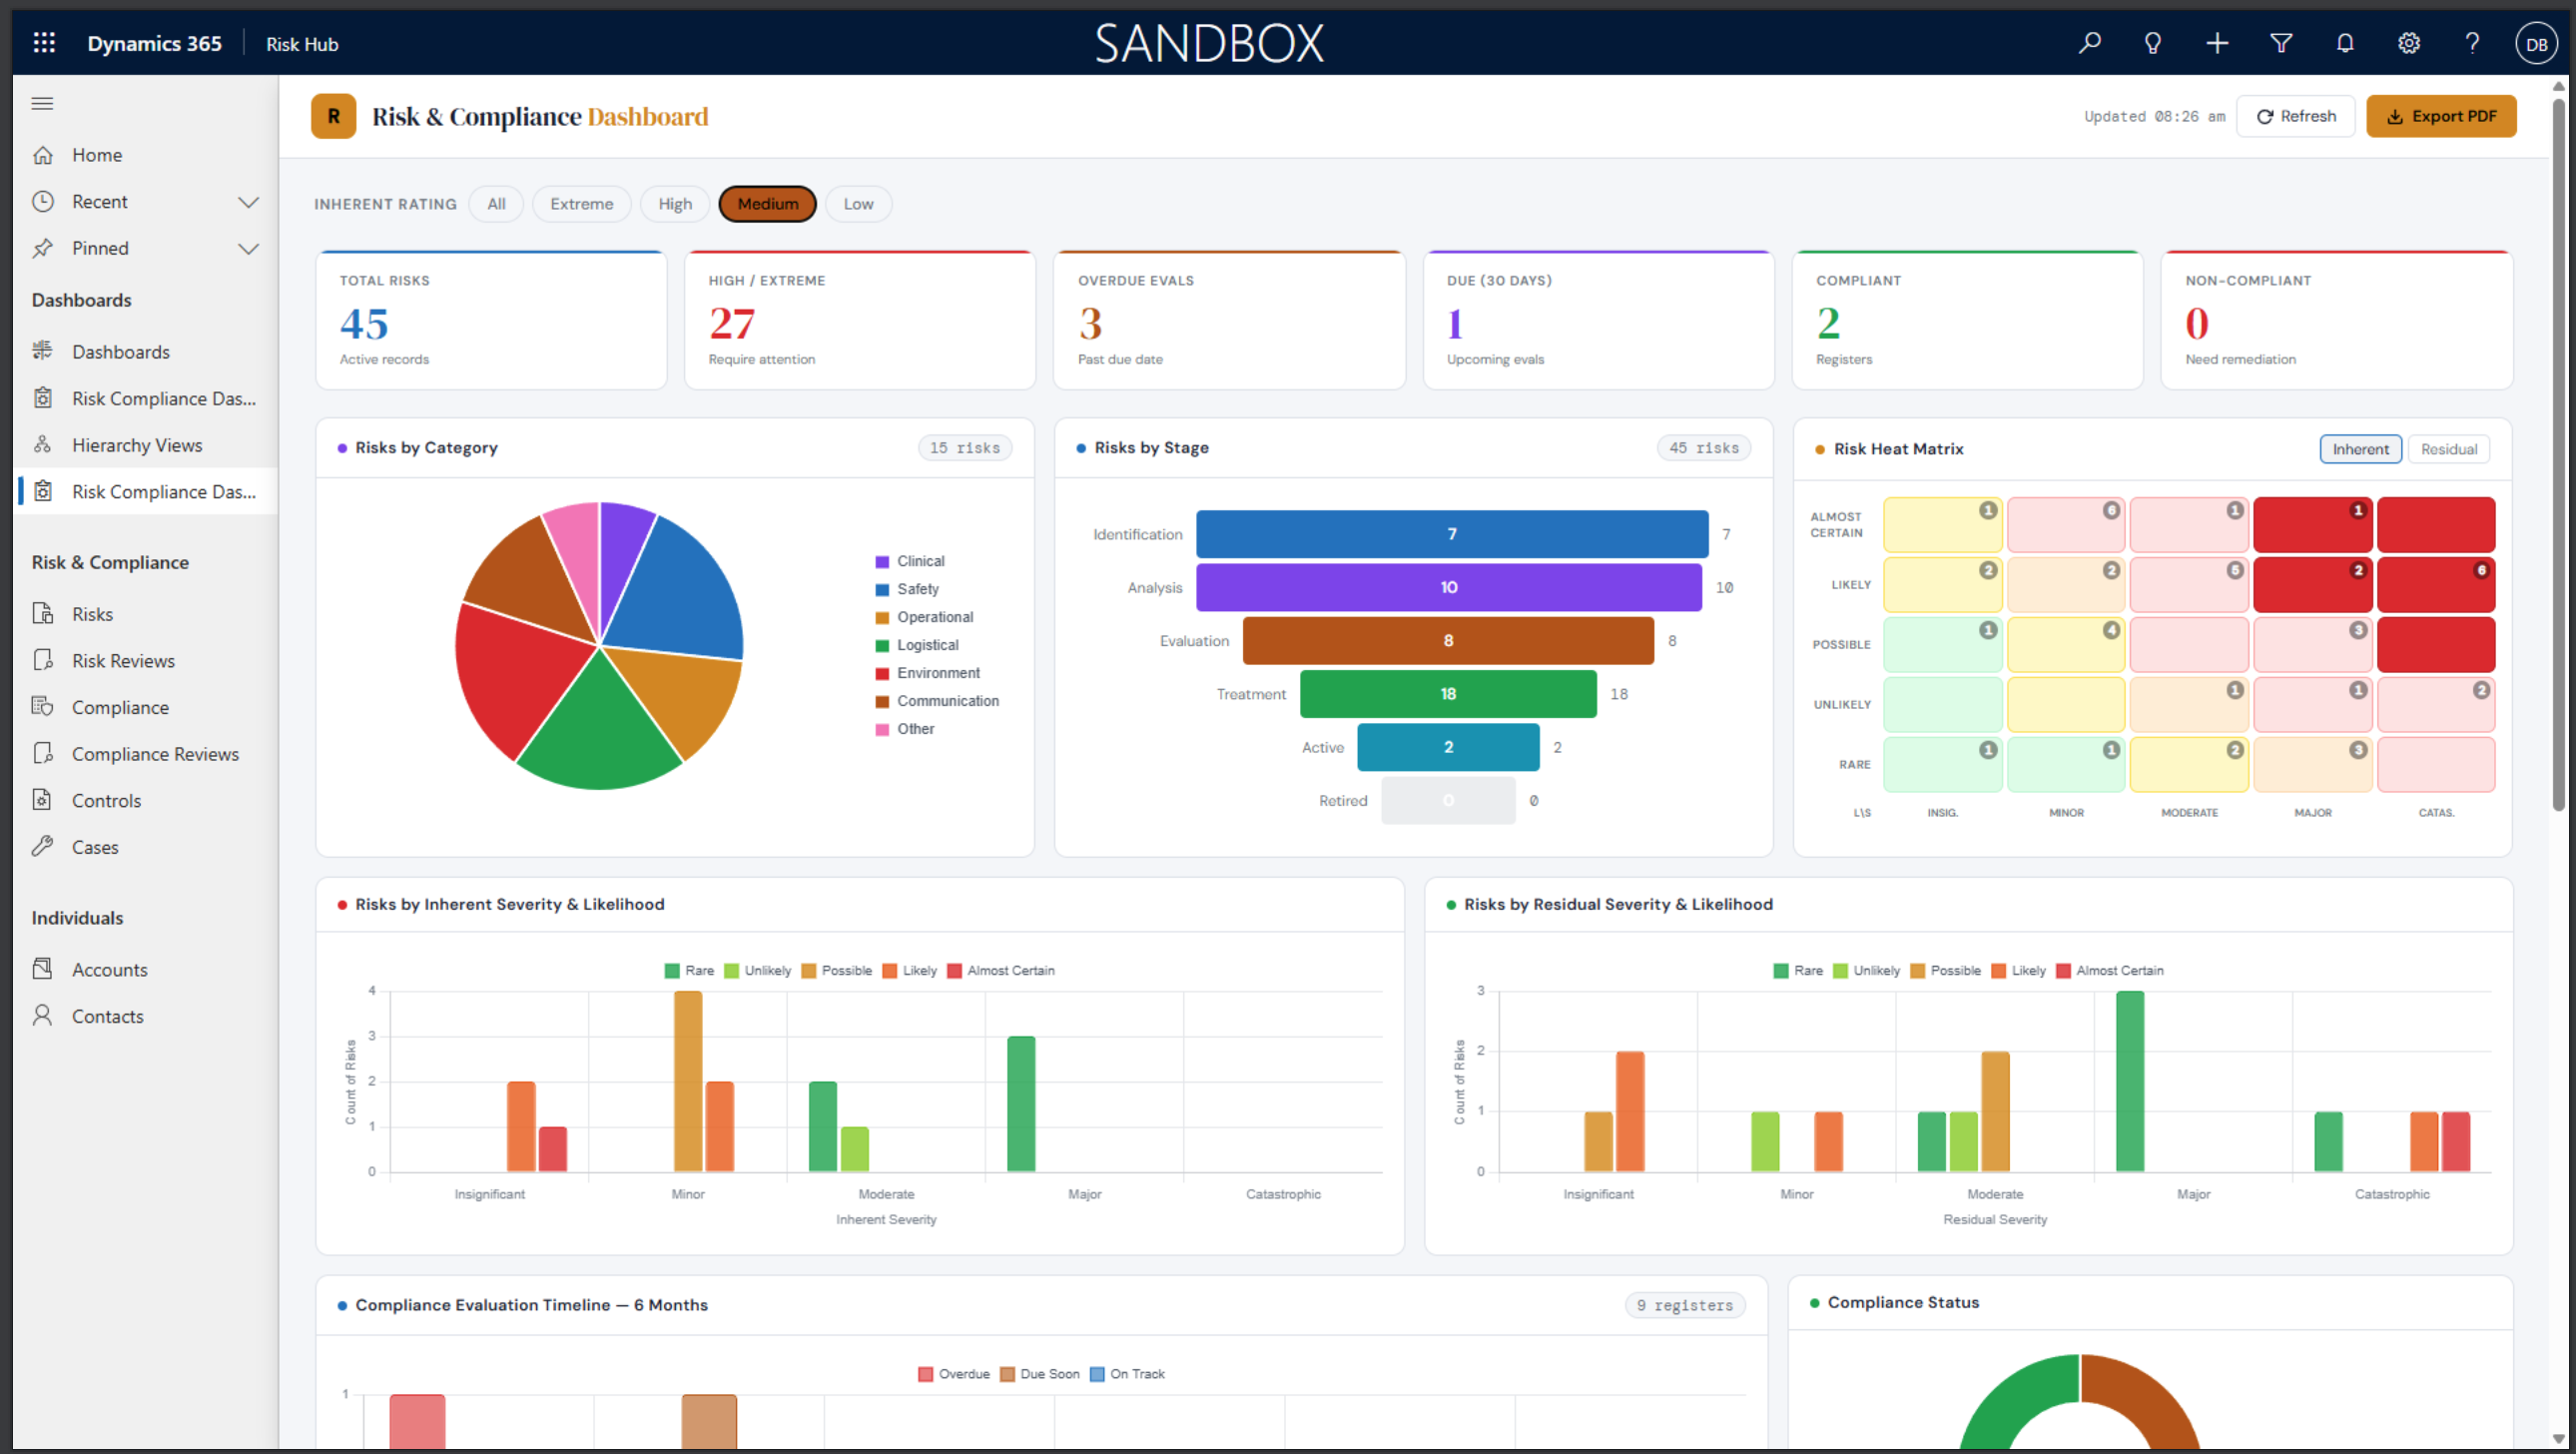
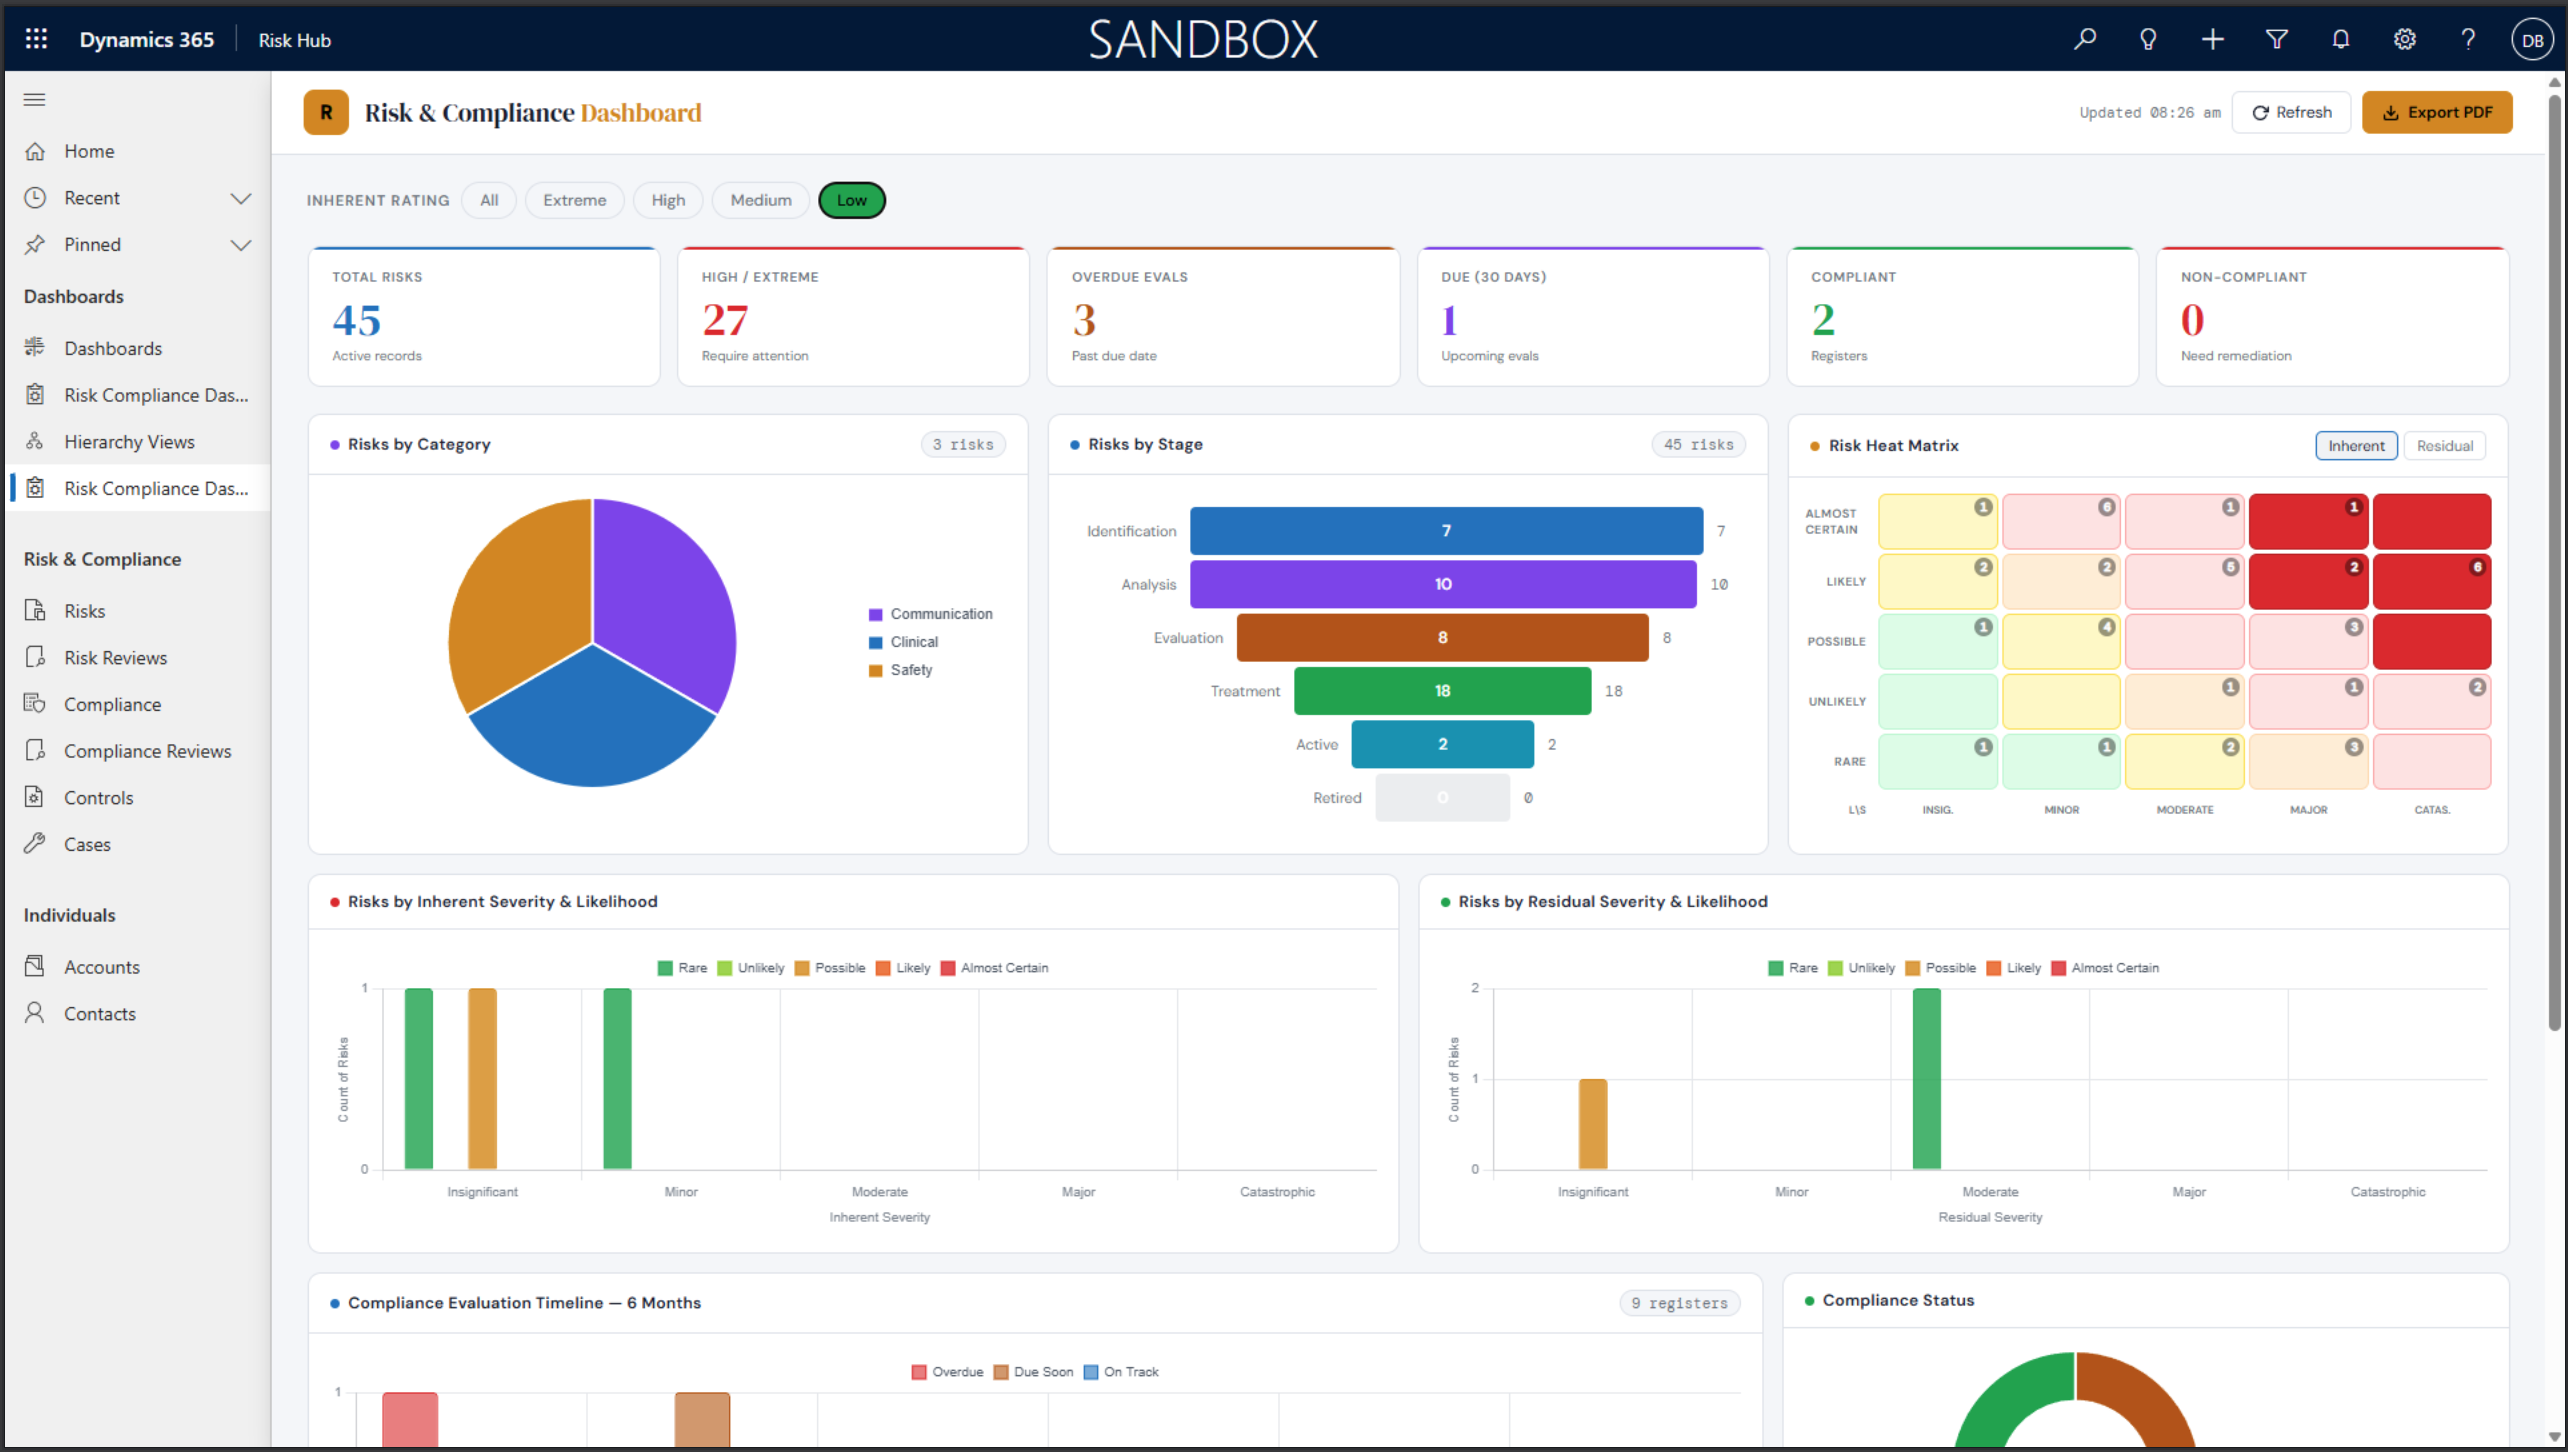
Inherent Ratings Dashboard Examples
The following are examples of the inherent ratings dashboard, which is a new addition to the Risk & Compliance Dashboard. It shows the distribution of risks based on their inherent consequence and likelihood, providing a visual representation of the risk landscape.
- Inherent Rating: Extreme
- Inherent Rating: High
- Inherent Rating: Medium
- Inherent Rating: Low
Risk List View Management
Editing Columns and Filters
-
Navigate to the Risks section under Risk Management from the main menu. By default, you’ll see a tabular risk register with current open and closed risks.
-
Click Edit Columns to add, remove, or rearrange the columns shown---common fields include risk ID, owner, category, rating, and status.
-
Set filters by clicking Filter (usually atop each column) to narrow results by business unit, risk level, owner, or custom fields.
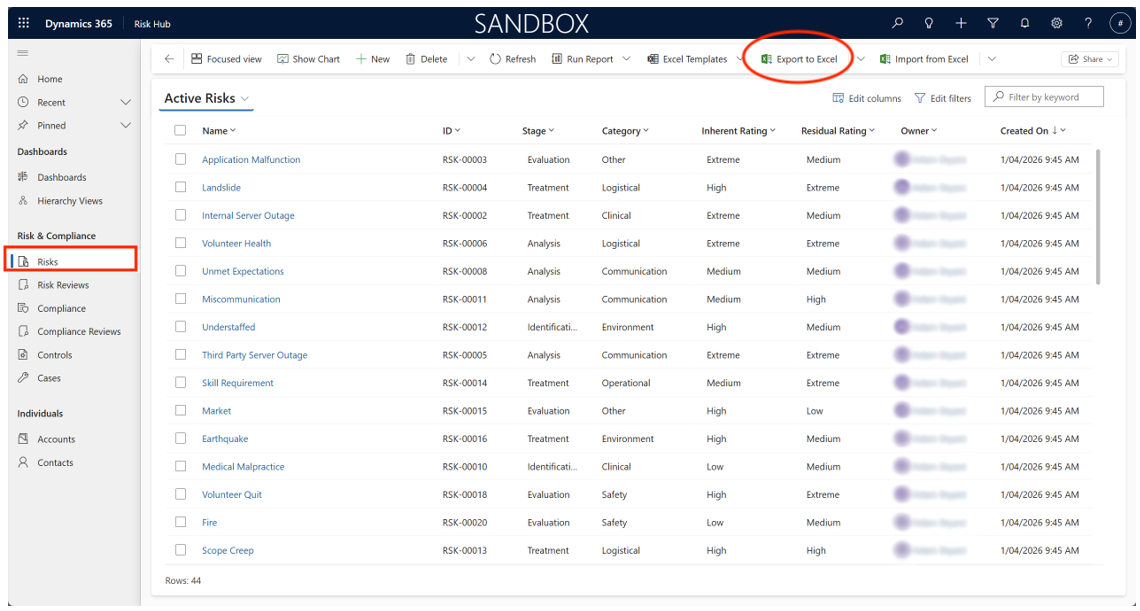
The following shows a view of risks, including the inherent details chart.

The image displays the Active Risks dashboard.
The left side features a bar chart titled Risks by Inherent Consequence & Likelihood. This chart visualizes the distribution of risks based on a matrix of Inherent Consequence (x-axis) and Likelihood (color-coded legend).
-
Inherent Consequence categories (from lowest to highest): Insignificant, Minor, Moderate, Major, and Severe.
-
Likelihood categories (legend): Rare (Blue), Unlikely (Green), Occasional (Purple), Likely (Pink), and Almost Certain (Brown, though not clearly visible/dominant).
Exporting to Excel
-
Click the Export button, typically found above the table or under a menu labeled More Actions.
-
Choose Export to Excel. You may be prompted to specify whether you want only the current view or the full dataset.
-
The system generates an Excel file that can be opened immediately or saved for later analysis and reporting.
-
Exported data retains your column selection and filter settings for consistency.
Risk Identification
Adding New Risks
-
Click New Risk in the Risks section of the Risk Register, in the Identify tab.
-
Enter a clear, descriptive risk title. Example: Data Deletion.
-
Provide a detailed risk description, outlining causes, affected processes, and potential consequences. Save your information by clicking the Save button.
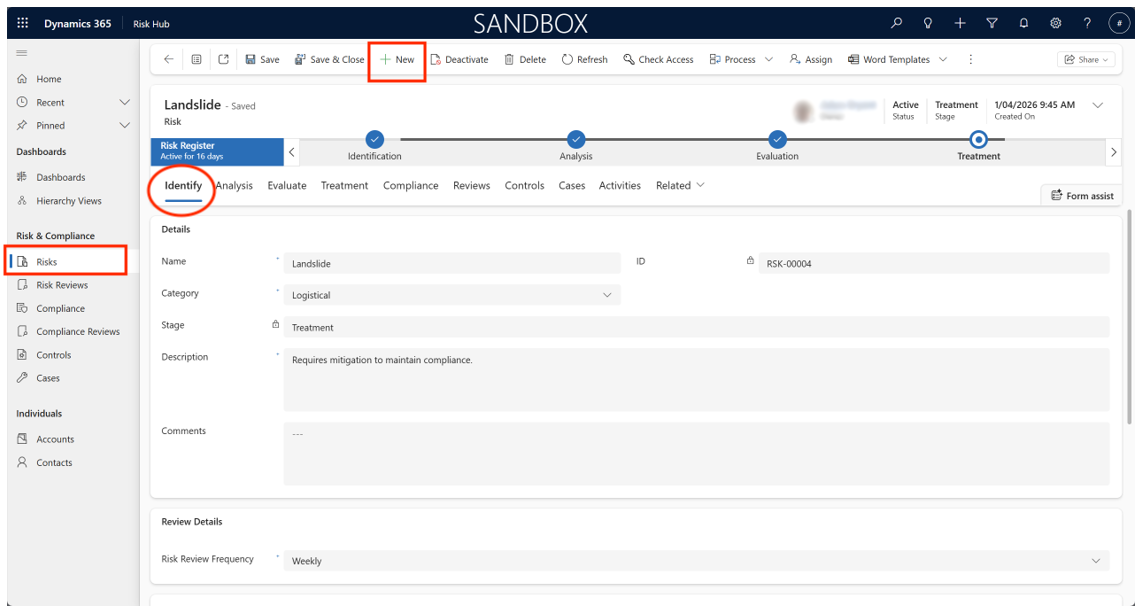
The Identify tab is a detailed form for managing and tracking the Data Deletion risk, categorizing it as an Operational risk caused by accidental user action, and setting its review frequency to Weekly.
Risk Categorisation
-
Select the primary risk category (e.g., Strategic, Operational, Financial, Compliance, Reputational).
-
Add sub-categories or tags for more granular classification (e.g., IT Security within Operational).
Frequency
-
Specify the expected occurrence frequency: options often include “One-off”, “Monthly”, “Quarterly”, “Annually”, or a custom interval.
-
This setting supports trend analysis and review planning.
Risk Analysis
Using the Risk Matrix
The risk matrix visualises risks based on their likelihood and consequence, supporting consistent assessment across all records. The matrix is usually colour-coded (e.g., green for low risk, amber for moderate, red for high).
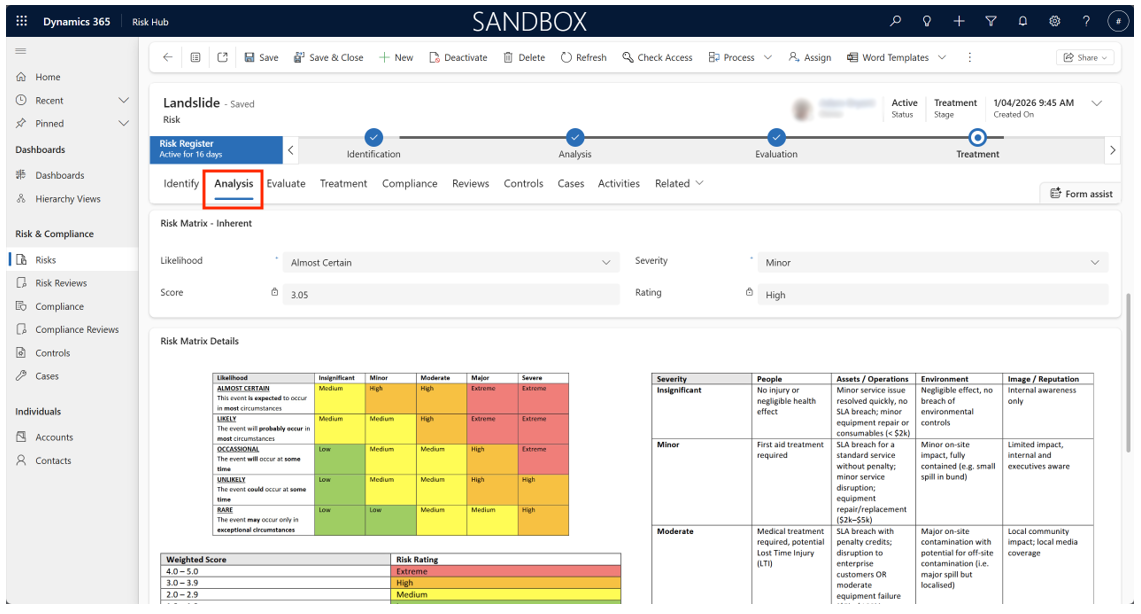
The Analysis tab shows the Analysis stage of the Data Deletion risk (ID: RSK-00001) within the Microsoft Power Apps/Dynamics 365 Risk Management solution. This stage focuses on assessing the inherent risk level and reviewing existing controls.
The view is focused on the Analysis tab, which contains two main components: Existing Controls and the Inherent Risk Matrix assessment.
-
Existing Controls: This control is an administrative measure designed to limit the potential for accidental deletion by restricting user permissions to only the necessary data/functions. It is a security-based access role to provide access to only what is needed for a given user.
-
Inherent Risk Matrix: The assessment calculates the risk level before factoring in the effectiveness of existing controls. From our example image risk is:
-
Inherent Likelihood: Almost Certain
-
Inherent Severity (Consequence): Minor
-
Inherent Score: 3.05
-
Inherent Rating: High
-
Entering Risk Details
-
Consequence Level: Select the appropriate level (choices are often “Insignificant”, “Minor”, “Moderate”, “Major”, “Catastrophic” based on impact definitions tailored to your organisation).
-
Likelihood: Rate the probability of occurrence (“Rare”, “Unlikely”, “Possible”, “Likely”, “Almost Certain”).
-
Severity: System-calculated or user-input, combining consequence and likelihood according to the matrix.
-
Rating and Score: The system assigns a rating (sometimes a colour and/or numeric value) which determines the risk level. Always review to ensure it matches your assessment.
You may attach supporting documents (e.g., historical data, assessment reports) to the risk record for audit purposes.
Risk Evaluation
Interpreting the Risk Matrix
Compare the risk rating to your organisation’s risk appetite and tolerance thresholds. The matrix helps determine which risks require immediate action, and which can be accepted or monitored. Explicit thresholds should be set in your risk management policy and referenced in the system.
Evaluation Steps
Follow these steps for evaluating the risk.
-
Review the numeric or qualitative risk score produced by the matrix.
-
Consult your organisation’s defined risk appetite and tolerance, often found in the policy repository or as a dashboard widget.
-
Decide, with justification, whether the risk requires mitigation, transfer, or acceptance. Record your decision and rationale in the system for future reference.
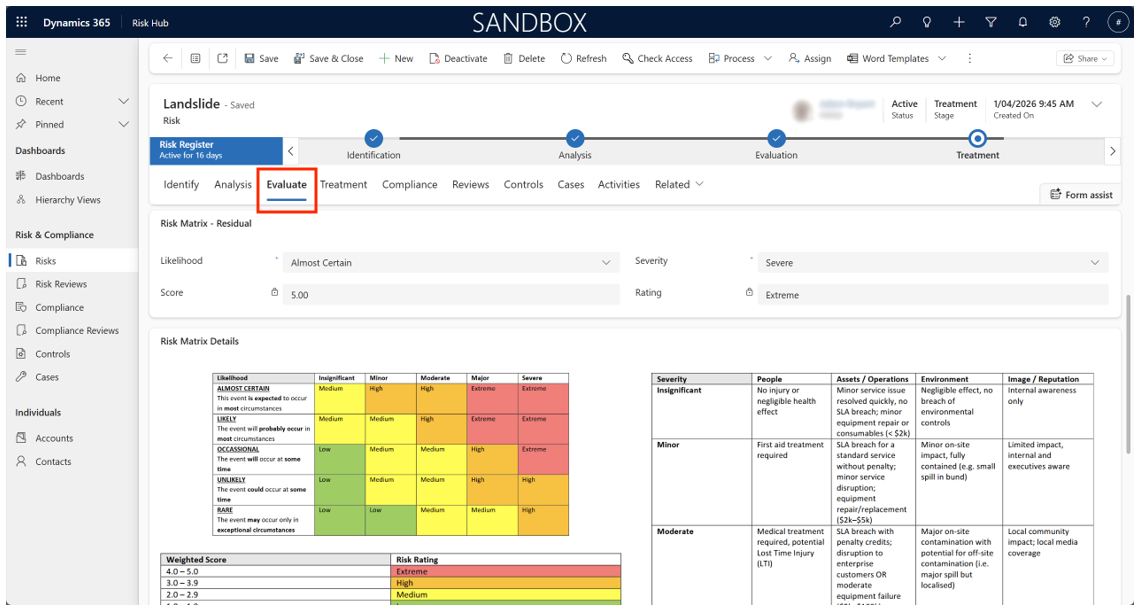
The Evaluate tab shows the results of the risk analysis and makes a final determination on how the risk should be handled. This is shown in the Conclusion field.
Risk Treatment
This section describes the specific actions planned to control the risk.
Selecting Treatment Type
-
Avoid: Change or discontinue the activity causing the risk.
-
Mitigate: Implement controls or processes to reduce the probability or impact.
-
Transfer: Shift risk via insurance, contracts, or partnership agreements.
-
Accept: Formally acknowledge the risk by monitoring and contingency planning.
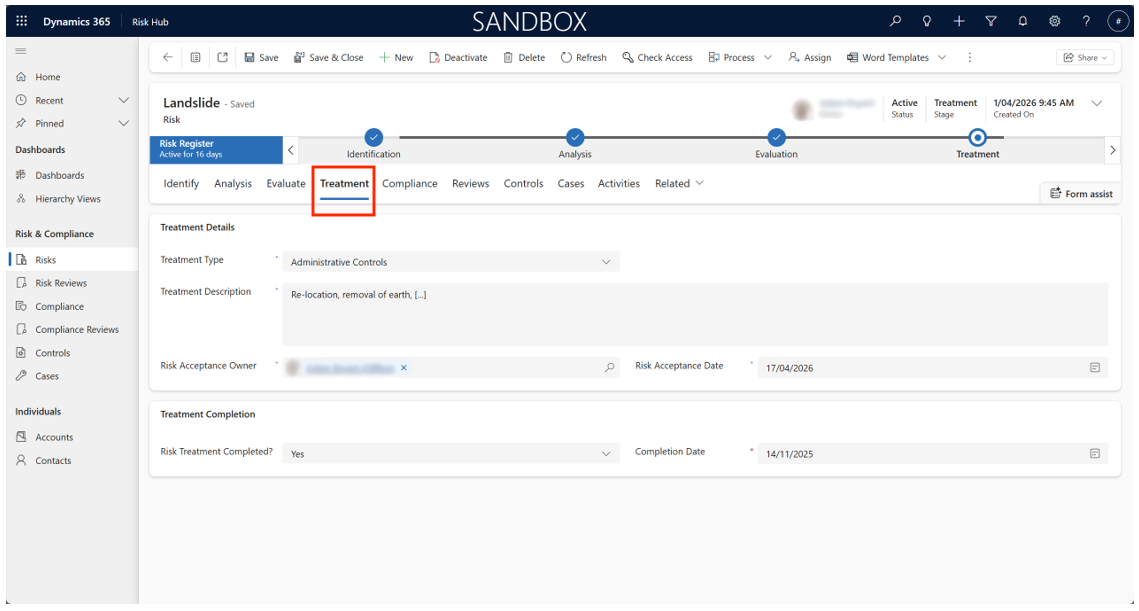
The Treatment tab outlines the proposed mitigation of actions and subsequent residual risk assessment.
Documenting Actions
-
For each treatment, document the responsible owner, detailed planned actions (e.g., procurement of backup systems, staff training), and anticipated completion dates.
-
Attach relevant files, such as contracts, policy documents, or technical assessments.
-
Set up automated reminders for follow-up on outstanding actions.
The risk management process is now nearing completion, with the next steps potentially involving implementing the treatment plan and monitoring the risk through the Reviews and Incidents tabs.
Risk Reviews
Setting Review Frequency and Start Date
-
Open the risk record, then select the review frequency (“Monthly”, “Quarterly”, etc.) from the dropdown menu.
-
Set the initial review date, which will trigger reminder notifications for responsible staff.
-
Assign review tasks to individuals or teams, outlining specific focus areas for each review cycle (e.g., control effectiveness, incident trends, compliance checks).

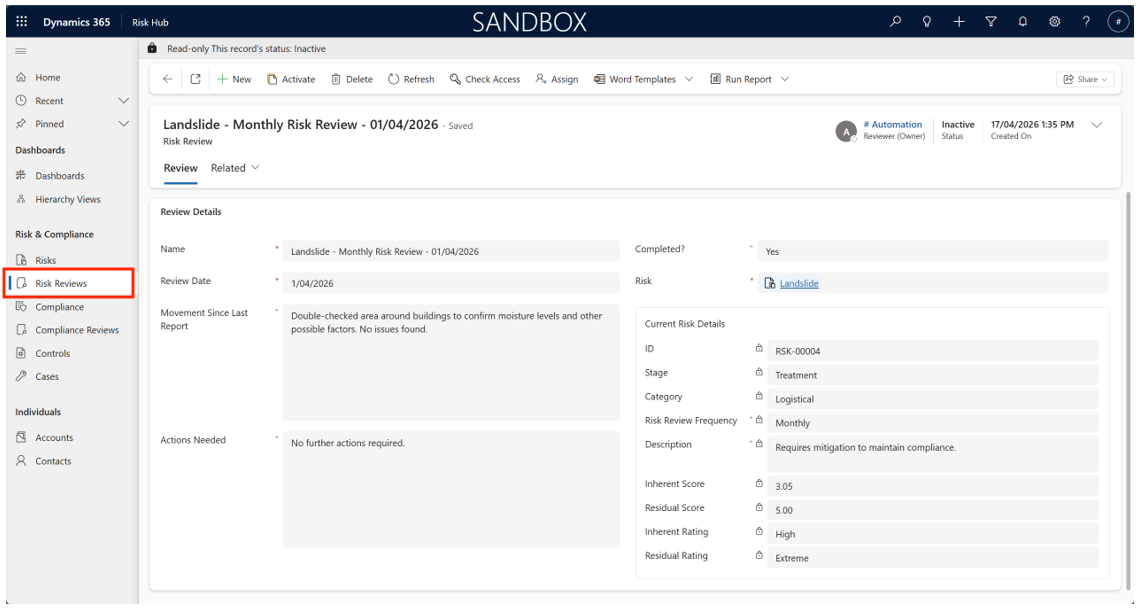
The Reviews tab is part of the Monitor and Review phase, which is a continuous activity that follows the initial treatment plan. Its primary function is to ensure the risk, the controls, and the treatment strategies remain effective and relevant over time.
This ensures that risk management is a continuous process, not a one-time event. It is the mechanism that enforces the continuous monitoring required by risk management standards (like ISO 31000) to ensure the organization’s risk exposure remains within acceptable limits.
Tracking Actions
-
Use the Actions tab on each risk to monitor the status of review-related tasks.
-
System notifications and email reminders are sent for overdue or upcoming reviews.
-
Historical reviews are logged for audit trails and continuous improvement.
Compliance
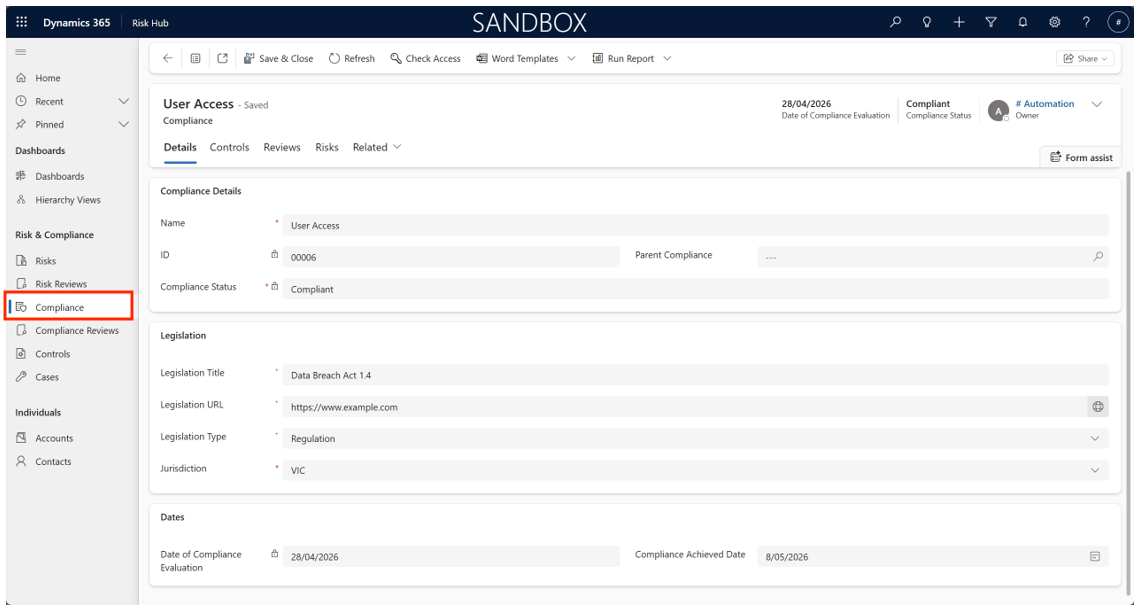
Creating Compliance
- Along the left-hand menu, select Compliance.
- Open an existing record to edit or select New on the command bar to create a new record.
- Enter the name of the compliance, along with any legislation details, and the parent compliance (if applicable).
- The Date of Compliance Evaluation and Compliance Status fields are locked and are set automatically by the system based on the related reviews. By default, there is no date and the compliance is Non-Compliant, but it will switch to Under Review when a non-completed review exists; when all reviews are completed the status switches to match the last review’s status and the Date of Compliance Evaluation field updates to match the review’s completion date. The Compliance Achieved Date is optional and is not set by any automatic processes.
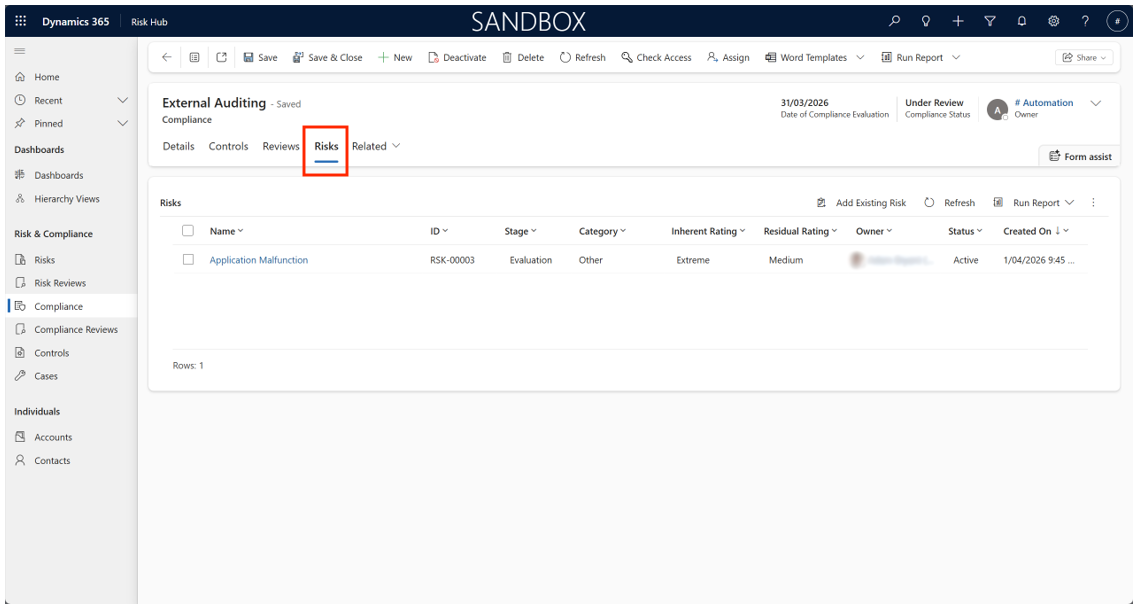
Linking Compliance to Risks
- In the compliance record within the Risks tab, select Add Existing Risk and select the risk(s) to associate with the compliance.
- Alternatively, within a risk record in the Compliance tab, select Add Existing Compliance and select one or more compliance to associate the risk with.
- Risk records can be associated with multiple compliance records and vice versa. There is no limit to the number of associations.
Compliance Reviews
Setting Up Compliance Review Settings
-
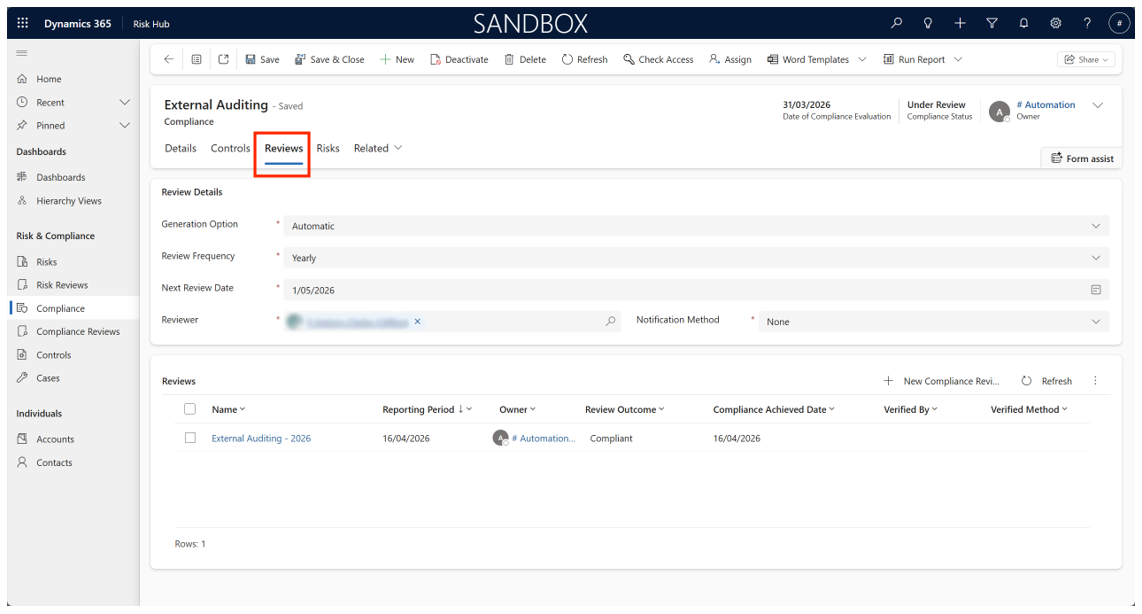
Within a compliance, under the Reviews tab, review generation options can be changed and setup.
-
Under the Generation Option field, select Manual for no automation, or Automatic for automation.
-
Select a review frequency, either Daily, Weekly, Monthly, Quarterly, or Yearly. This reflects how often a review should be generated. For automation, in addition to determining how often the reviews should generate, it also determines how long in advance it should generate before the date.
a. Daily – one day
b. Weekly – one week
c. Monthly – one week
d. Quarterly – one month
e. Yearly – one month -
Specify the next review date. This date represents what date the review is for rather than when it should generate. If automated, this date will be automatically updated as reviews are created.
-
Finally, specify the reviewer (user) who should be assigned to new reviews and how (if) they should be notified (either email or in-app notification) when the review is created.
-
The system will handle generating reviews when set to automatic, but manually created reviews can still be created regardless of the chosen option.
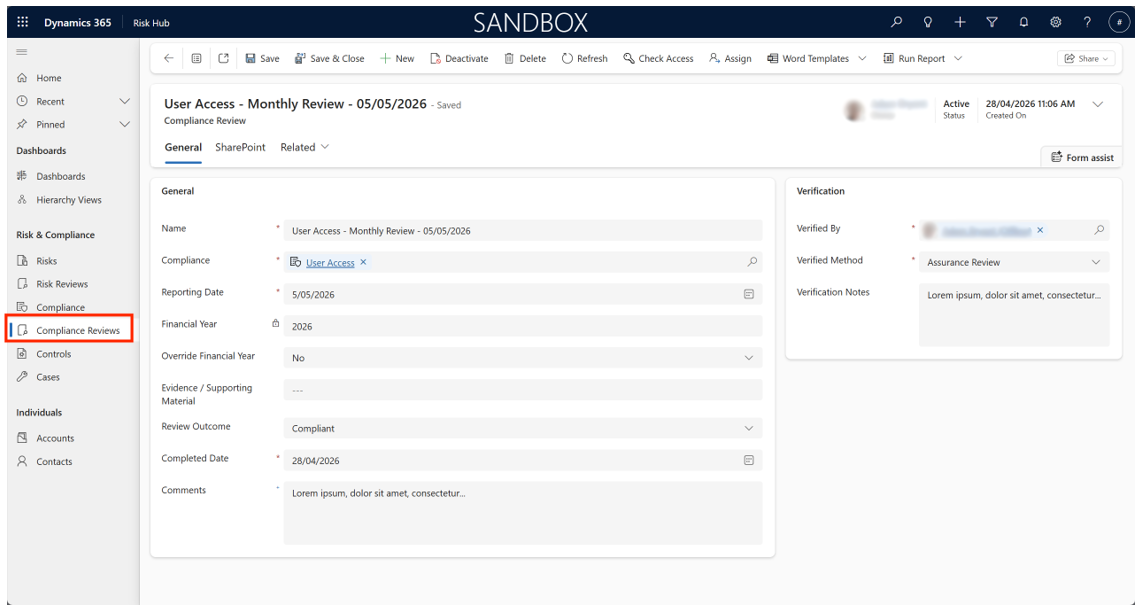
Compliance Reviews
- If manually creating a new compliance review, the name, compliance (if not already set), reporting date, and owner fields will need to be set or adjusted. These fields will be set when created automatically.
- The financial year is set based on the reporting date and is simply the year (e.g., “2026”), but if needed the Override Financial Year field can be set to Yes which will allow direct access to the field.
- When needed, the Review Outcome along with the verification information (person, method, and notes) can be set. The Completed Date must also be set when selecting an outcome.
Controls
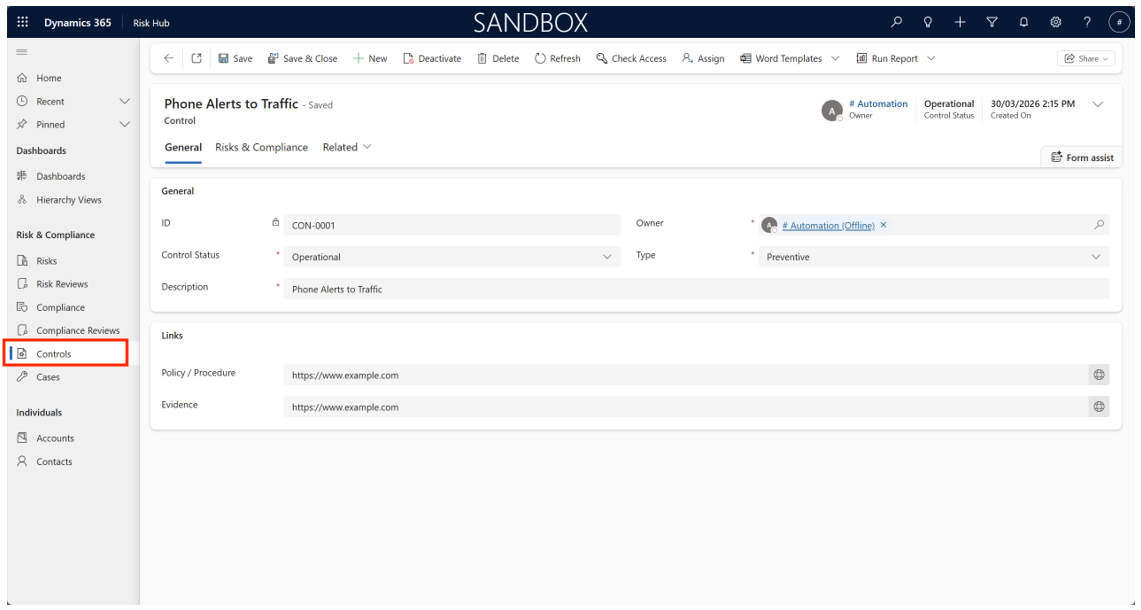
Creating Controls
- Select Controls on the left menu.
- Open an existing control to change it or select New on the command bar to create one.
- Enter the status, the type (corrective, detective, preventive), and a description of the control. Links to policies, procedures, or evidence can be added as well.
- When marked with the status Retired, the record will be automatically deactivated. It can be reactivated via the command bar if necessary.
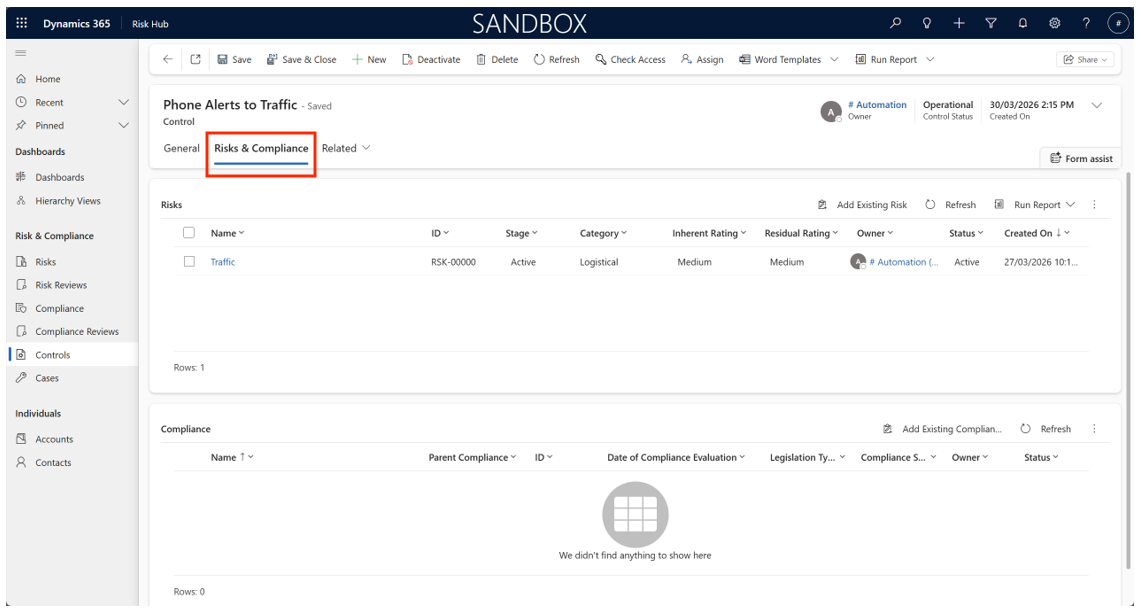
Mapping Controls to Risks and Compliance
- In a control, within the Risks & Compliance tab, multiple risks and compliance records can be associated with the control via their respective sub-grids.
- Controls can also be assigned via the risks and compliance records in their respective Controls tabs.
- Controls can be assigned to multiple risks and compliance records, and vice versa. There is no limit to the number of associations.
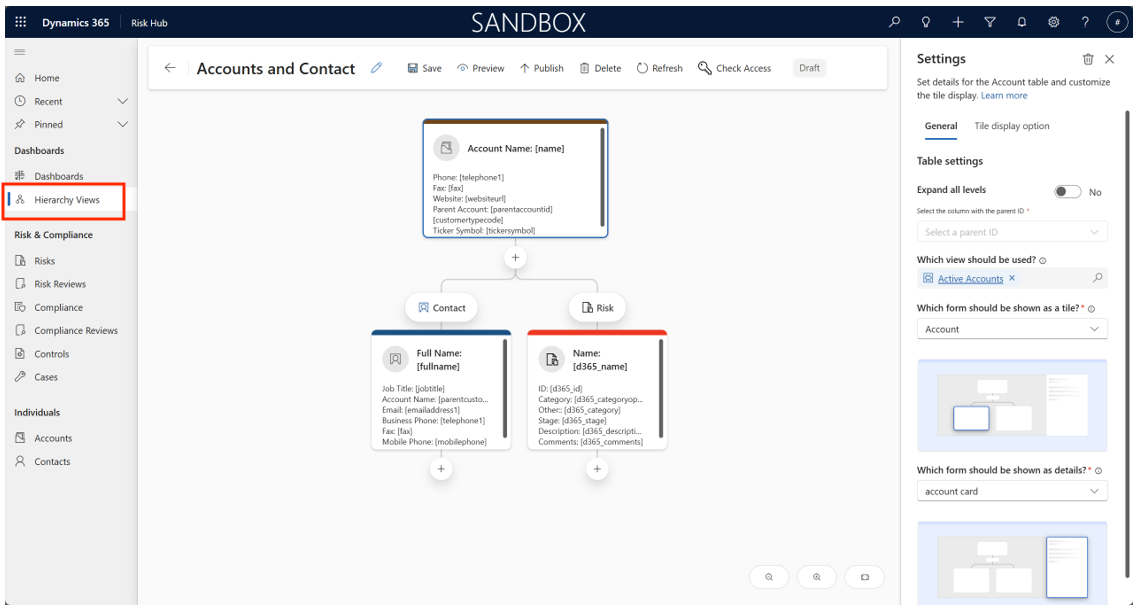
Hierarchy Views
Creating a New Hierarchy View
- In the Hierarchy Views section on the left-menu, select New to create a new hierarchy view or open an existing one to edit it.
- Select Add table (if creating a new record) and specify the main table.
- Under the main tile, select the plus icon to specify one or more related tables. Alternatively, you can use a self-referential relationship by selecting Expand all levels and the appropriate parent lookup on the main tile without needing to specify any related tables (so the editor will only show one tile).
- Specify the forms to be used in the tiles (Which form should be shown as a tile?; this determines which fields will appear in the tiles).
- Specify the forms to appear when a tile is selected (Which form should be shown as details?).
- Set any additional options in the Tile display option tab of a given tile, including the colour of the tile, the width and height, and if the record’s primary image should be shown (e.g., the user’s profile image for the user table).
- When completed, publish the hierarchy view.
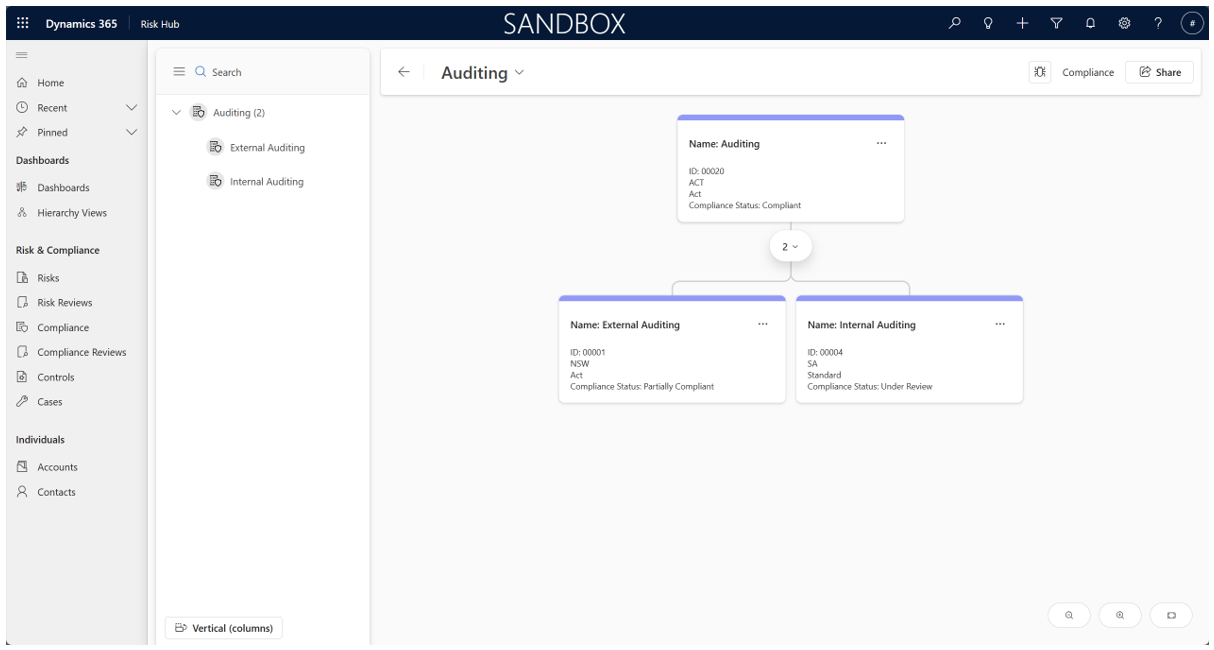
Viewing a Hierarchy View
- Open the hierarchy view you wish to view.
- Select Preview on the command bar above.
- A record will likely already be chosen for viewing. To change it, select the record’s name next to the back button (with a little down arrow next to it) and a pop-up will appear to select another record; select one and then select Add.
- If needed, you can expand and contract both the grid itself and certain paths within the hierarchy view. You can also change the direction the grid will show tiles (by default it shows them both vertically and then horizontally as the grid expands).
- Selecting a tile will open that record in a side-bar along side the hierarchy view.
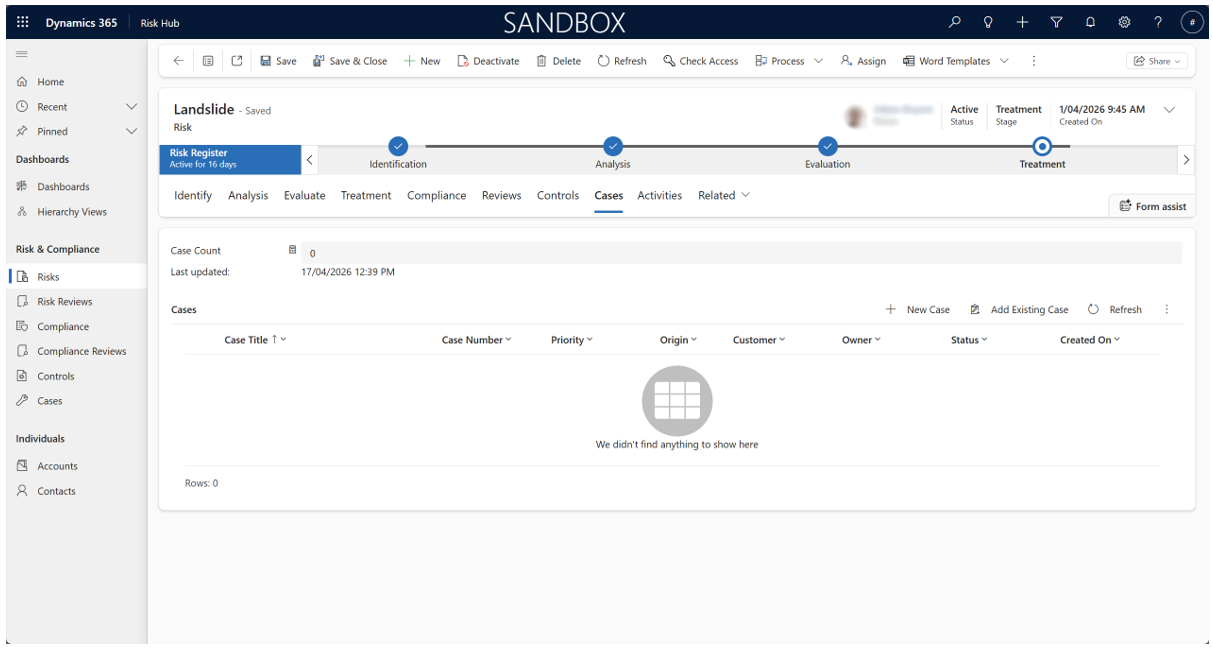
Incident Reporting
In the Risk Register the cases (which detail the incidents) related to a given risk can be seen in the Cases tab. This allows for easy access to incident details when reviewing a risk’s record.
Reporting a New Incident
This is the Incidents view under Risk Management in the main menu. You will see the category chart showing Active Incidents and Incidents by Category.
From the main menu, go to the Incidents module and click New Incident.
-
Fill in all mandatory fields: incident title, date and time, location, and a thorough description of what occurred.
-
Optional fields: add photos, documents, or witness information as needed.
-
Assign a criticality (e.g., low, moderate, high, critical) and select related risk categories for effective tracking.
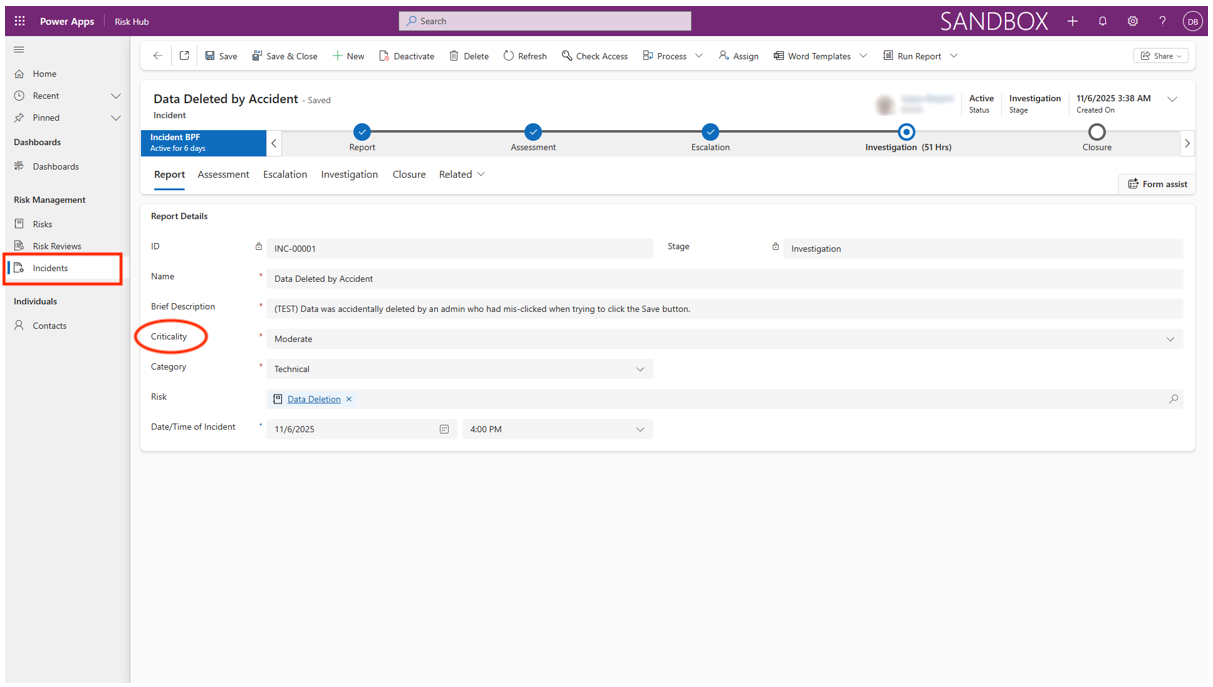
The Report tab is where the initial details of a realized risk event are formally logged and documented. It provides the initial logging and classification of a risk event that has happened.
In general, its purpose is to:
-
Identify the event (ID, Name, and Brief Description).
-
Classify its initial severity (Criticality) and type (Category).
-
Link it (Risk) to the pre-existing record (e.g. Transport delay) to start the formal process of investigation and subsequent review of the risk’s controls.
This information is found under the Report Details section in the Report tab.
Assessment and Escalation
This is under the Risk Management > Incidents which is found in the main menu.
The purpose is:
- Evaluate the incident’s immediate and potential impact using the built-in scoring system.
- If the incident meets pre-defined escalation criteria (such as high criticality, regulatory requirements, or media attention), assign it to higher management and notify relevant stakeholders using the escalation workflow.
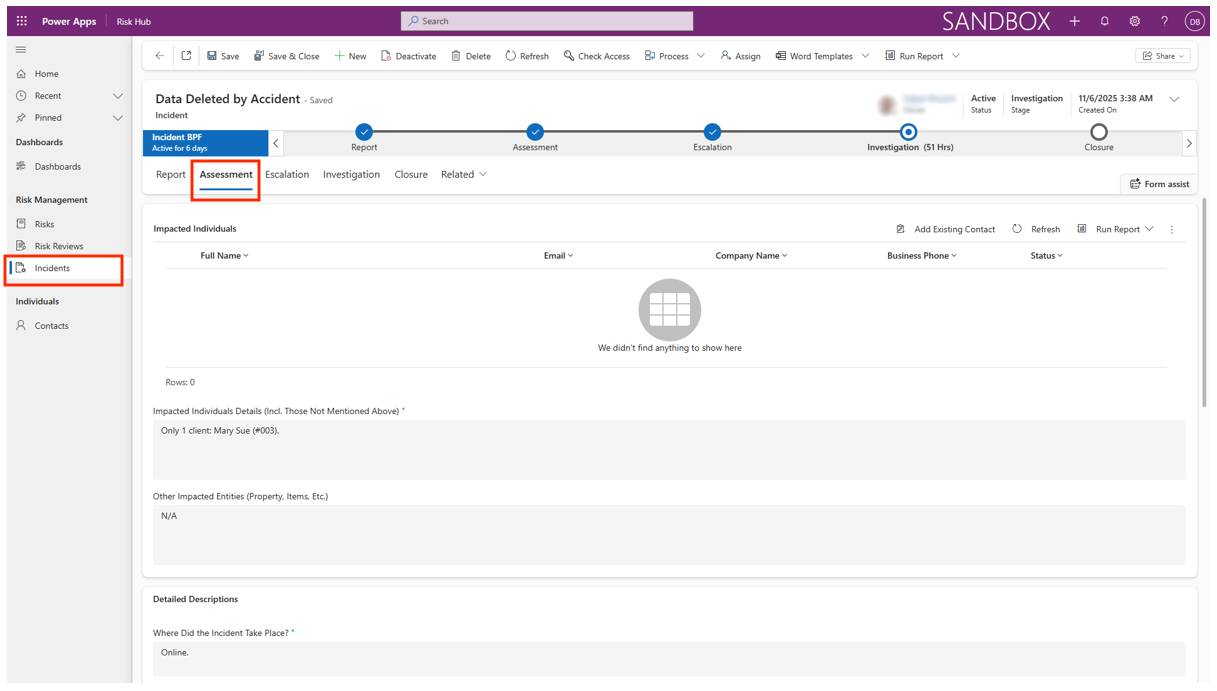
The Assessment tab contains the Impacted Individuals (the affected account) and the Contacts. From here we see who was affected, and who the contacts are to inform about the incident.
This information is essential for:
-
Notification: Ensuring the right people are communicated with regarding the incident.
-
Investigation: Providing key contacts for the subsequent investigation phase.
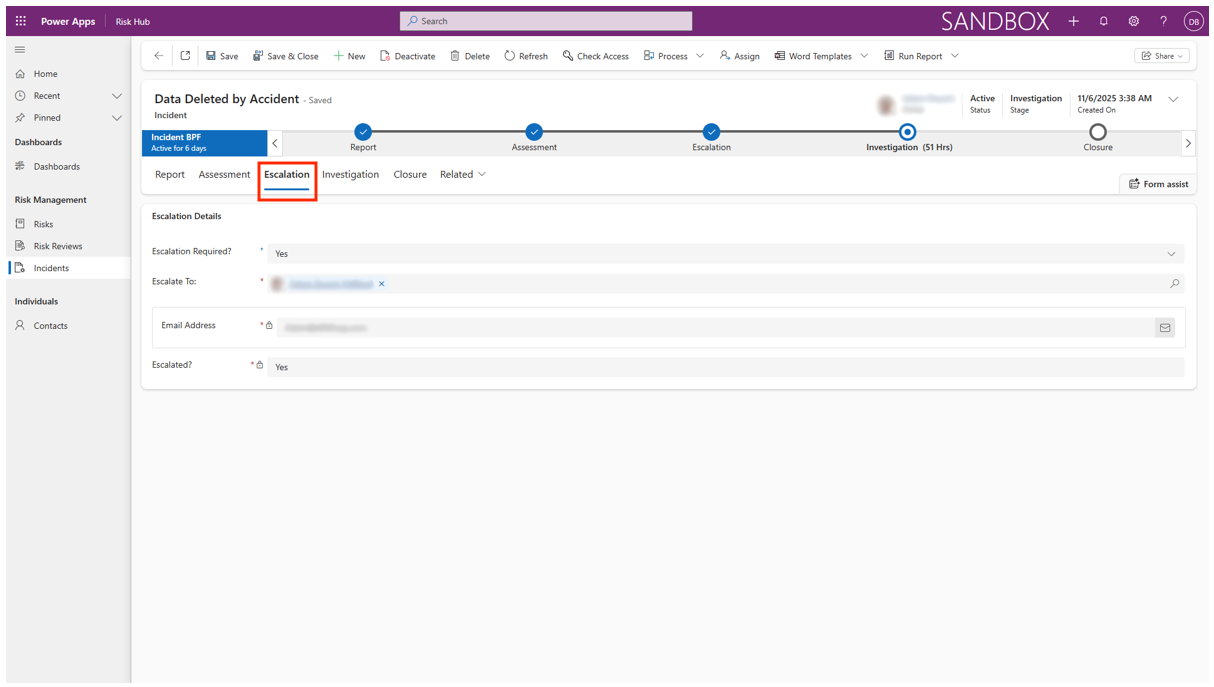
The Escalation tab is a critical feature that manages the process of raising the visibility and authority level required to address a risk. It provides a path for escalating an incident to a user when escalation is required, found in the Escalation Details. There is an email address field for that user in case the event needs to be escalated (when Escalation Required is Yes).
In summary, the Escalation tab is the control center for ensuring that high-priority or stagnant risks are not forgotten and are brought to the attention of the appropriate level of management before they materialize into a serious incident.
Investigation and Closure
This is under the Risk Management > Incidents which is found in the main menu.
- Designate an investigator, who will receive a task in their activity feed and email.
- Document findings, upload supporting files, and record all actions taken (corrective/preventive).
- Once all actions are completed and reviewed, set the incident status to Closed. The system will archive the incident for future reporting and compliance purposes.
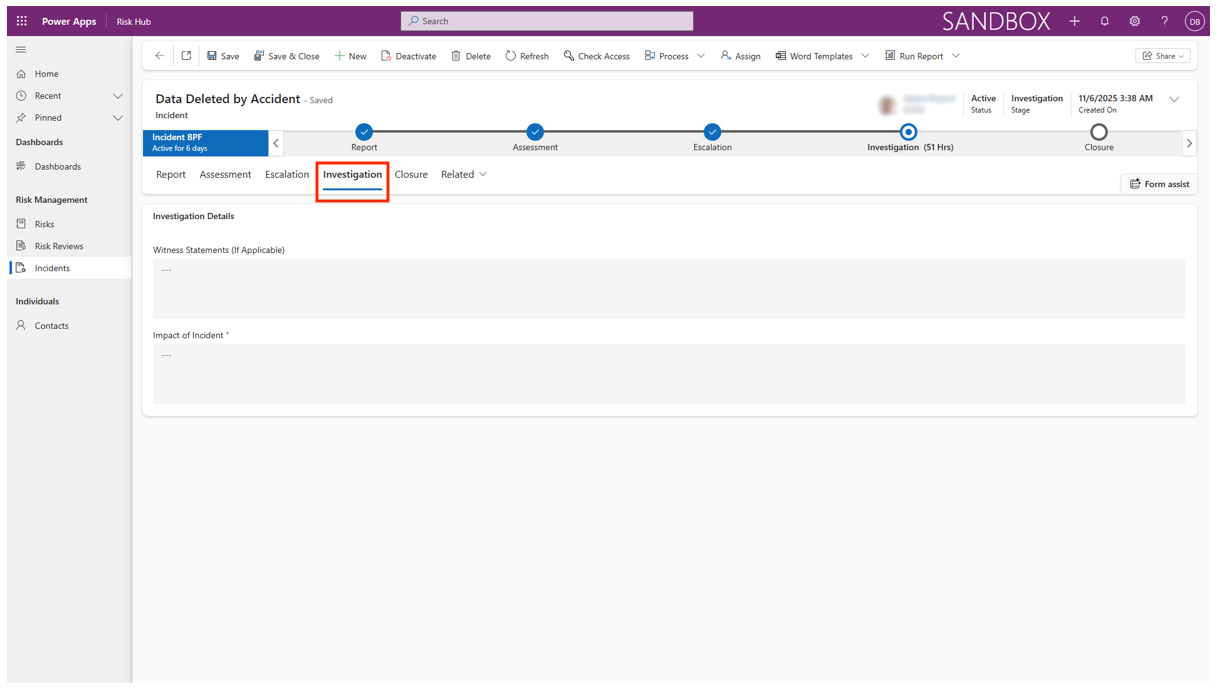
The Investigation tab records information about the incident in the Investigation Details section. This tab is typically dedicated to the process of thoroughly examining a risky event or incident that has occurred, or a significant finding from a control assessment. This function often integrates the risk management module with an Incident Management or Case Management module, allowing the risk team to formally analyze what went wrong, rather than just planning for what could go wrong.
In short, the Investigation tab transforms reactive incident data into proactive insights, ensuring the risk management framework learns from real-world failures and adapts its controls and assessments accordingly.
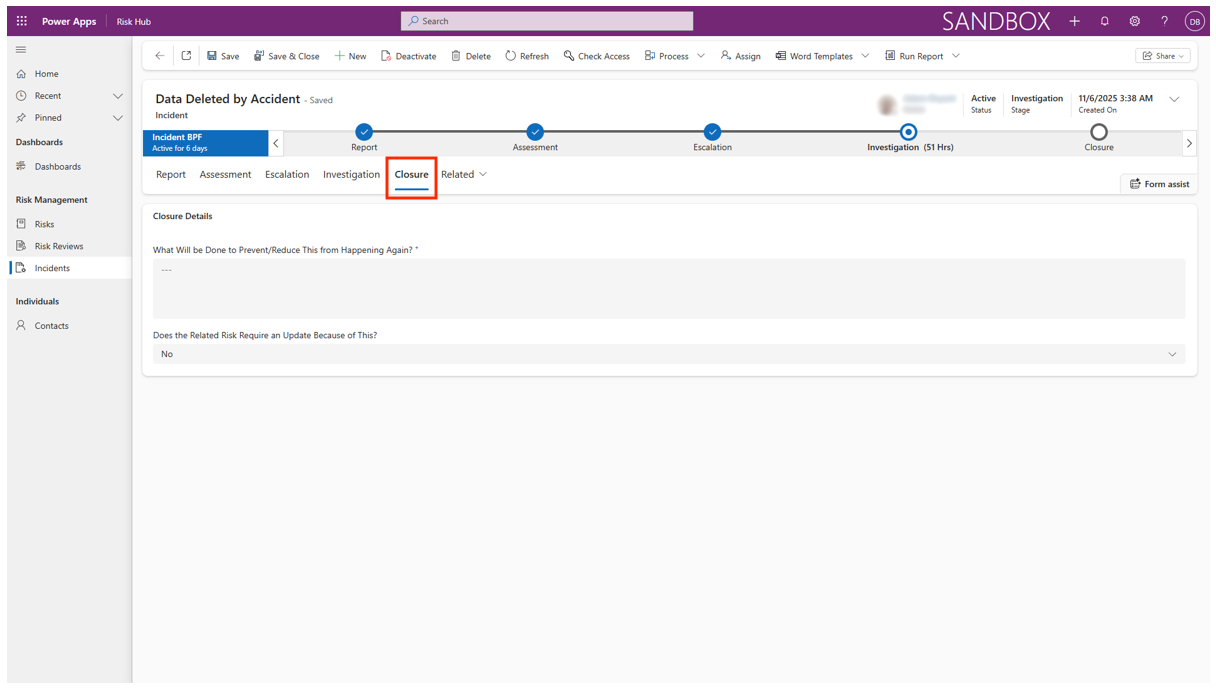
The Closure tab represents the final, formal stage of the risk’s lifecycle with information stored in the Closure Details. It is where the organization officially documents the decision to remove the risk from the active register.
This action is taken when the risk has been successfully mitigated, is no longer relevant, or has been formally accepted by management.
This serves as the official sign-off point, marking the conclusion of the formal risk management process for that specific threat. It ensures that risks are not prematurely dropped from the register, and that accountability for the final status is maintained.
Here is a quick summary of Investigation and Closure:
-
Designate an investigator who will receive a task in their activity feed and email.
-
Document findings, upload supporting files, and record all actions taken (corrective/preventive).
-
Once all actions are completed and reviewed, set the incident status to “Closed”. The system will archive the incident for future reporting and compliance purposes.
Incident Categorisation
- Assign one or more categorisations (e.g., safety, environmental, financial) to facilitate trend analysis, regulatory reporting, and root cause investigation.
Activity Management
From the main menu, under Risk Management > Risks, select the Activities tab.
Creating and Managing Activities
-
Go to the Activities module to view all current and past tasks, meetings, and reminders.
-
Click New Activity to create a new entry, specifying the activity type (meeting, task, call, etc.).
-
Provide all relevant details: title, description, associated risks/incidents, due date, assigned user(s).
-
Track status, mark as complete when finished, and attach relevant documents (e.g., meeting minutes, action plans).
-
Recurring activities (like periodic reviews or compliance checks) can be set with automatic recurrence options.
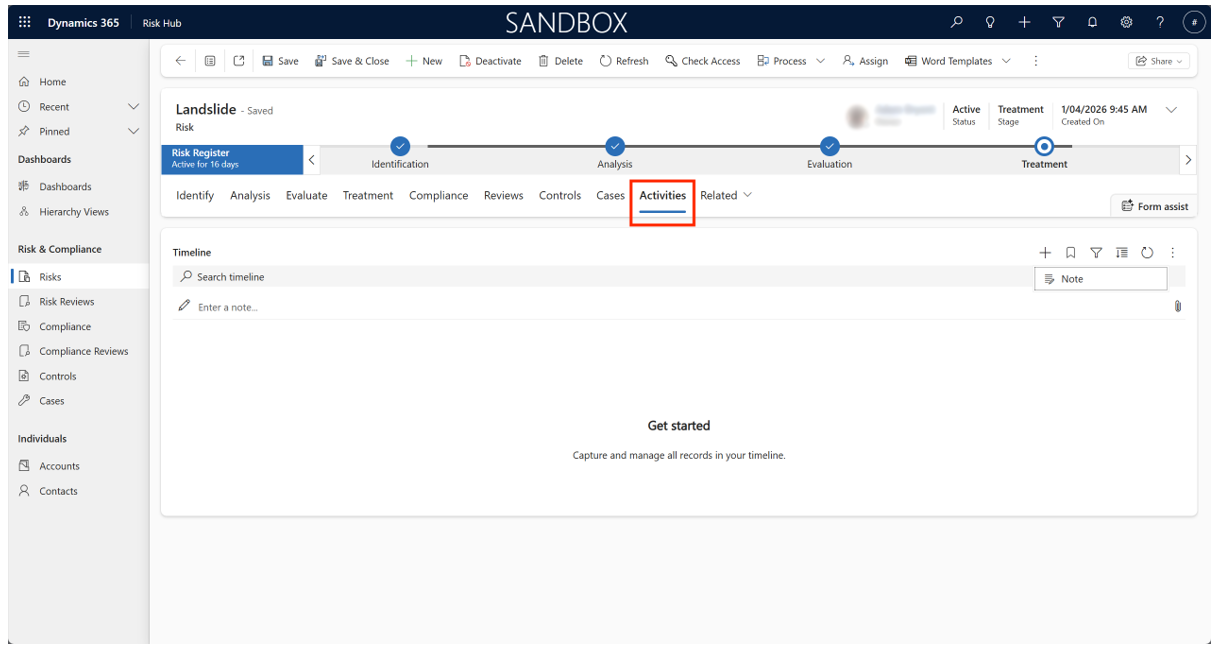
The Activities tab shows a trackable timeline. It serves as the central hub for managing all tasks, follow-ups, and documentation related to the risk record. It links the risk management framework directly to the standard productivity tools within the Dynamics 365/Power Apps platform.
Contact Management
From the main menu, under Individuals, select Contacts.
Adding and Managing Contacts
-
Navigate to the Contacts module and click New Contact.
-
Input comprehensive details: full name, title, role, organisation, business unit, email, phone, and address.
-
Add notes or attach documents for background or compliance purposes.
-
Link contacts to relevant risks, incidents, or activities via lookup fields for context and traceability.
-
Update or merge duplicate contacts as needed; inactive contacts can be archived.
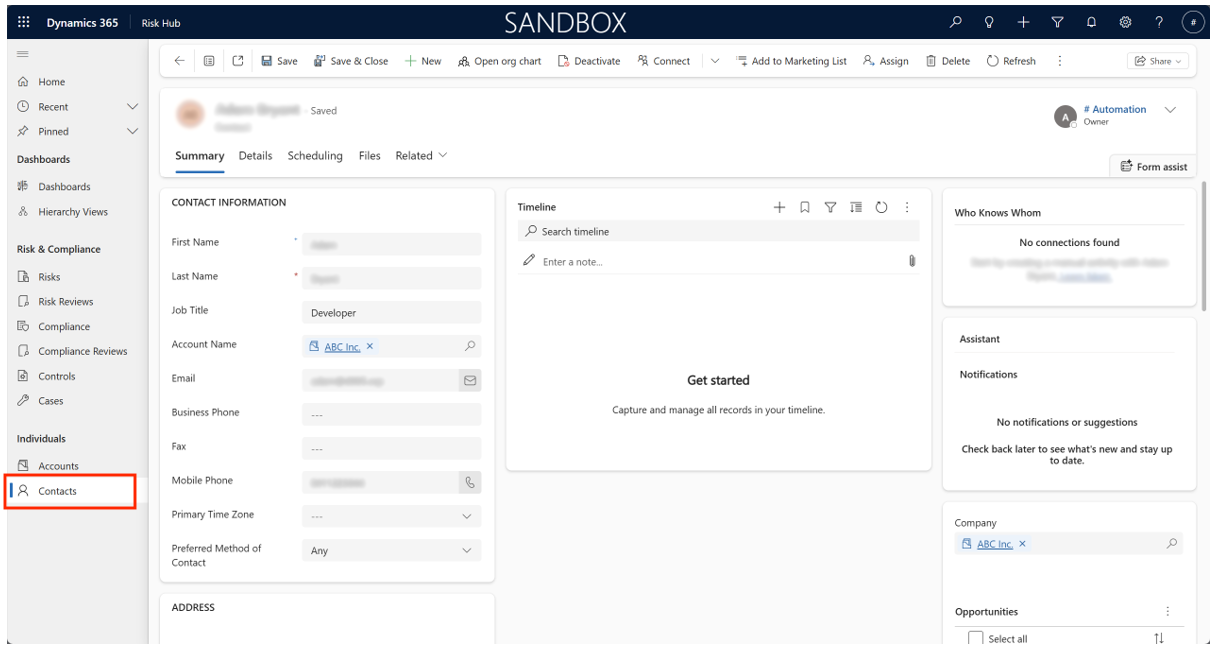
The Contact Management form is used to manage the details of individuals who are involved in or impacted by the risk management process.
In summary, the Contact Management form is the foundational record for managing people involved in the system. It is essential because it enables the system to assign accountability, manage workflows (like approvals and escalations), and report on who is responsible for which risks and controls across the entire risk register.
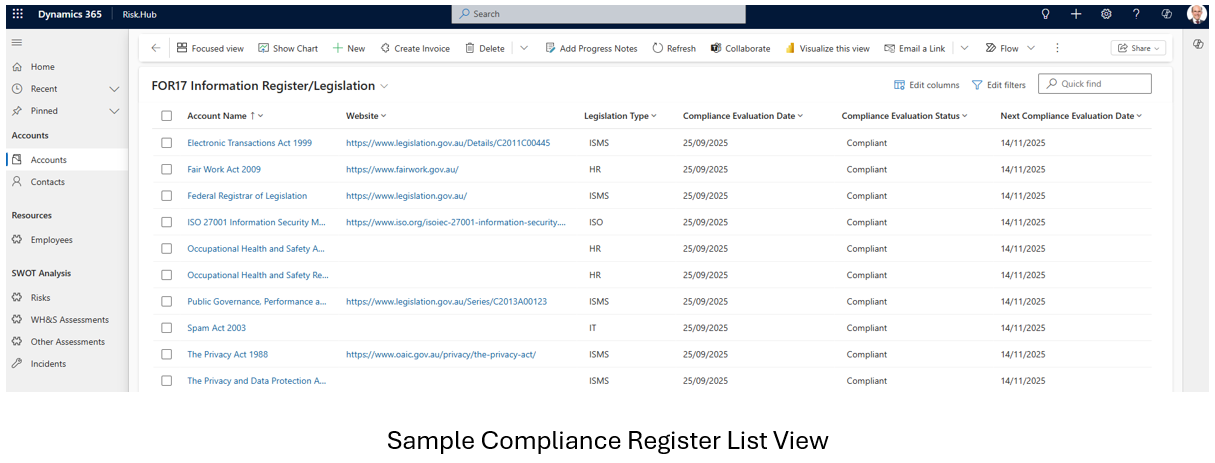
Compliance Register Extension
A Compliance Register is a structured repository that links specific risks to applicable legislative requirements. By integrating this feature within Dynamics 365, organizations can associate each risk record with detailed compliance information, including relevant legislation, reference links, legislation type, compliance status, and evaluation dates. This integration promotes proactive compliance management and supports audit readiness.
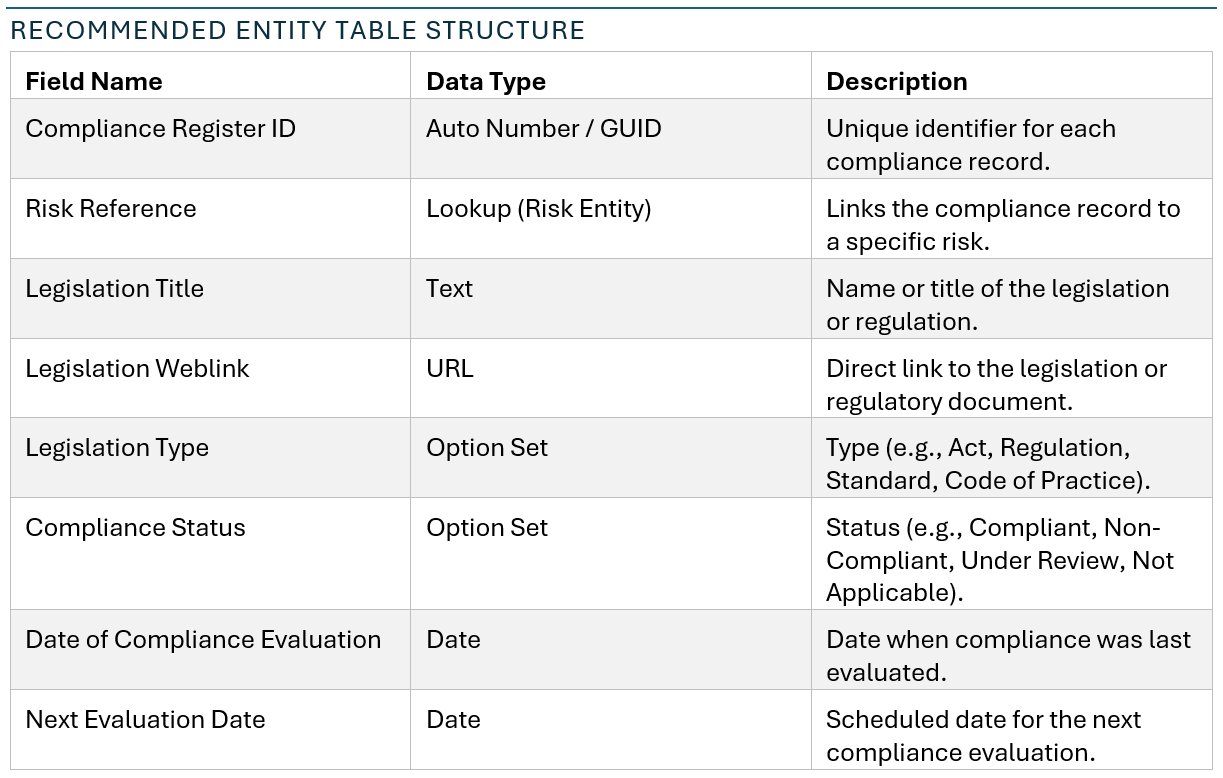
Designing the Compliance Register Entity Table
To implement a Compliance Register within Dynamics 365 for Risk Management, a custom entity table should be created. This table will serve as a child or associated entity to the existing risk records, ensuring each risk can be mapped to one or more compliance obligations.
Implementation Steps
Custom Entity Creation
- Use the Dynamics 365 Power Platform to create a new custom entity/table named “Compliance Register”. Ensure this entity has a lookup relationship to the Risk entity/table.
Field Configuration
- Configure the fields as described above, using appropriate data types and option sets for consistency and reporting.
Form and View Customization
- Customize forms and views to enable users to easily add, view, and update compliance records for each risk. Consider adding sub-grids to the Risk entity form to display related compliance records.
Automation and Workflows
- Implement business rules or workflows to send reminders for upcoming compliance evaluations, flag non-compliant statuses, or escalate overdue evaluations.
Reporting and Dashboards
- Create reports and dashboards to provide visibility into compliance status across risks, upcoming evaluation dates, and legislation coverage.
Sample Use Case
Suppose an organisation identifies a risk related to workplace health and safety. Using the Compliance Register, the risk record can be linked to the “Work Health and Safety Act 2011” with a direct weblink to the official legislation, classified under Act, with the current compliance status set to Compliant. The register would also record the last evaluation date (e.g., 01/09/2025) and schedule the next evaluation for 01/03/2026.
Benefits of the Compliance Register
- Centralises compliance obligations for each risk, improving traceability and accountability.
- Facilitates timely compliance evaluations and proactive management via reminders and dashboards.
- Supports audit and regulatory requirements by providing a clear record of compliance activities linked to risks.
- Enables rapid response to legislative changes by updating linked compliance records.
Appendix
Glossary
-
Incident: Any unplanned event that could result in harm, loss, or disruption to organisational objectives.
-
Risk: The effect of uncertainty on objectives, which can be positive or negative.
-
Risk Matrix: A visual tool mapping the probability and consequence of risk events to support objective scoring and prioritisation.
-
Risk Appetite: The degree of risk an organisation is willing to accept in pursuit of its objectives.
-
Risk Treatment: Actions or controls applied to modify risk, including accepting, mitigating, transferring, or avoiding it.
Further Resources
-
ISO 31000:2018 Risk Management — Guidelines
-
Microsoft Dynamics 365 Documentation
-
Organisation-specific risk management frameworks and policies
To learn more about d365 Risk and Incident Management solution
Visit on Microsoft Marketplace Risk Management for Microsoft Dynamics 365
Support
For technical troubleshooting, contact your IT support desk or Dynamics 365 system administrator. For risk policy clarification or escalation, consult your organisation’s risk management department or compliance lead.
AU: 1 Sussex St, Sydney NSW 2000
SG: 59 Ubi Avenue 1# 03-11, Singapore 408938
UK: 71-75 Shelton St, London, WC2H 9JQ
USA: 8 The Green # 20058, Dover DE 19901
Telephone:
AU +61 2 9037 2385 | SG +65 3 1251534 | UK +44 2036 953042 | USA +1
646 652 0780