Microsoft Dynamics 365 for Purchase Requisition User Guide
Introduction
Purpose
This guide provides steps to configure and use the d365 Purchase Requisition app (ver. 1.0.0.19). This app allows users to create Purchase Requisitions, send them for approval, and for each approved PR, the procurement user can send out purchase quotes (request) to 1-3 vendors.
When the vendor quote responses are received, the purchase quotes are updated and compared for the procurement team to select the best quote and convert the quote to a Purchase Order for the selected vendor.
Visit at Microsoft Marketplace Purchase Requisition for Microsoft Dynamics 365 Business Central
Feature Overview
Purchase Requisition allows:
-
Users to raise an internal request for purchases from pre-approved vendors (vendor card has been created in the system).
-
Purchases can be inventory items, Fixed Assets, or “new” items (not existing in inventory).
-
PR’s are submitted for review and approval before these are converted to Purchase Orders for selected vendors.
Process Flow
This diagram below illustrates the purchase requisition process flow.
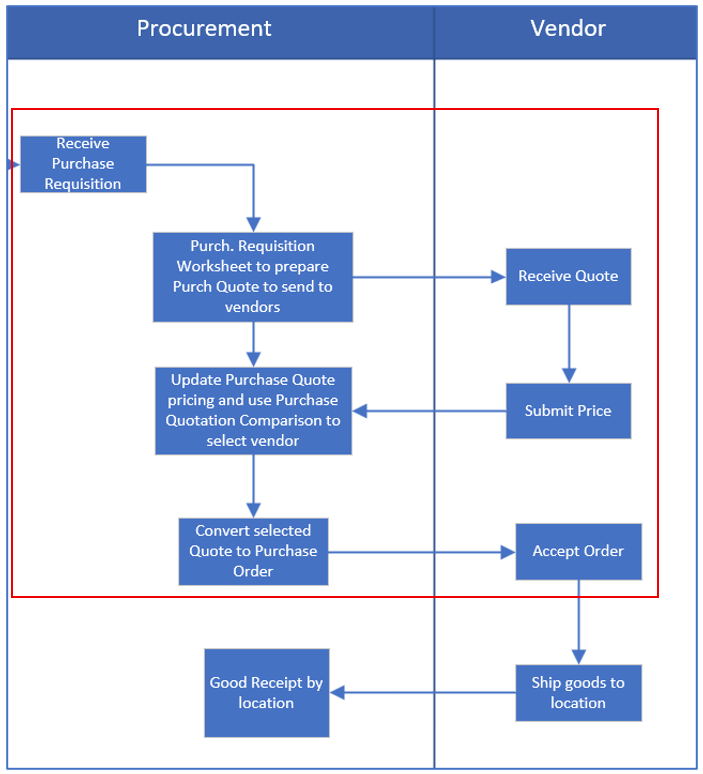
Purchase Requisition process flow is represented by the activities within the red highlighted box.
Following these activities, Purchase Quote and Purchase Order are created for the purchasing process.
Configuration
Purchases & Payables Setup
Search and navigate Purchases & Payables Setup and review the new Purchase Requisition fasttab section for configuration parameters.

-
Purchase Requisition Nos. — Select the no. series for Purchase Requisition document.
-
Default Item Template — Select the default Item Template used if a “new item” is requested in the Purchase Requisition.
NB: To validate posting, the template should default the relevant osting Group codes.
-
Use New Item No. as Item No. — Enable this flag if a new item number entered in the Purchase Requisition will override the auto-generated sequenced item number. Otherwise, the new item will be created with the next item number sequence.
-
Default Line Type — Select one of the value, usually Item as the default line type when creating a new Purchase Requisition.
-
RFQ Email Subject — Enter the default email subject used when sending Purchase Quotes from the Purchase Requisition worksheet.
-
RFQ Email Body — Enter the default email body (content) for emailing quotes to vendors.
-
Disable RFQ Functionality — This flag determines the Purchase Requisition and RFQ process:
a. Disable this flag (i.e. RFQ process is enabled and active) — When a Purchase Requisition is approved, the next step is to use the Purchase Requisition Worksheet to list vendors and email RFQ’s to these vendors from the Purchase Requisition Worksheet.
b. Enable this flag (i.e. RFQ process is disabled) — When a Purchase Requisition is approved, it auto-generates the next document (either a Purchase Quote or a Purchase Order)
NB: The vendor code is required in the Purchase Requisition.
-
Default Document on Approval — Select the document (Purchase Quote or Purchase Order) to be auto-generated when the Purchase Requisition is approved.
Requisition Categories
A new (optional) Requisition Category page is available to define different categories of purchase requisitions. Search and navigate to Requisition Categories to open the page.
Example:
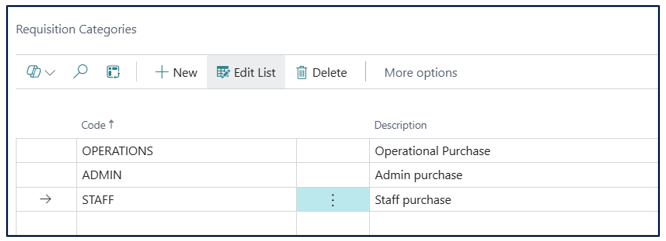
Enter a label for the code and the description. Category codes are displayed when entering purchase requisitions.
Item Categories
There is a new flag enabling selected categories of items to be available for selection in a Purchase Requisition (instead of displaying the entire item master). This is configured in Item Categories.
Search and navigate to Item Categories page and enable the flag.
Example:
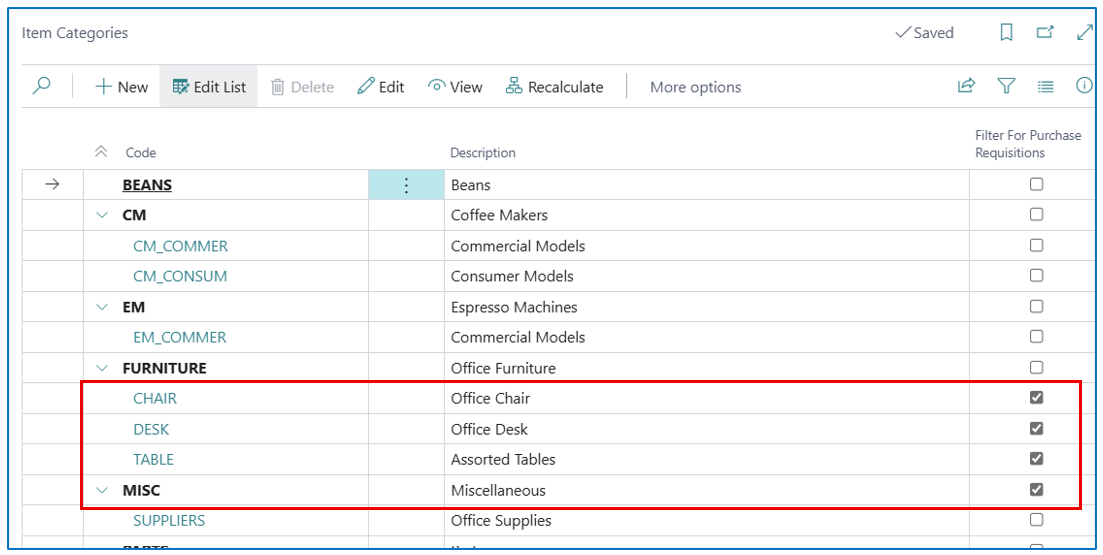
By selecting the item category (parent and/or child category), any items associated with this category will be available for selection in the Purchase Requisition line.
Catalog Item Setup and Catalog Item
If any pre-approved vendor provides a catalog of items which can be purchased, this item catalog can be added to the system for selection in the Purchase Requisition process.
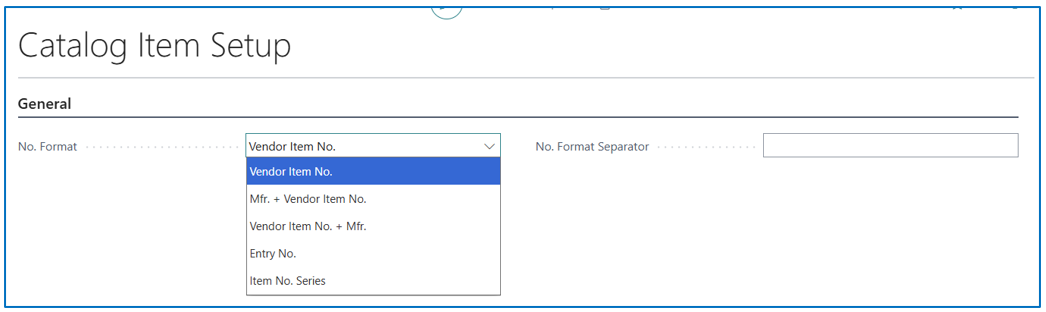
Catalog Item Setup
Select the number format to display when a catalog item is selected in the Purchase Requisition.
Catalog Items
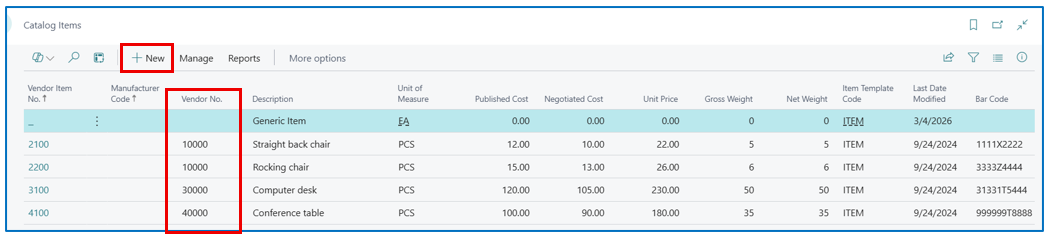
The catalog item page holds all the catalog items from approved vendors. Search and navigate to Catalog Items to display the list.
Example:
-
Filter on the Vendor No. field to view catalog items from a specific vendor
-
Click +New to add a new catalog item.
NB: The list can be mass imported (nonstock item table 5718) if provided.
Catalog Item Details
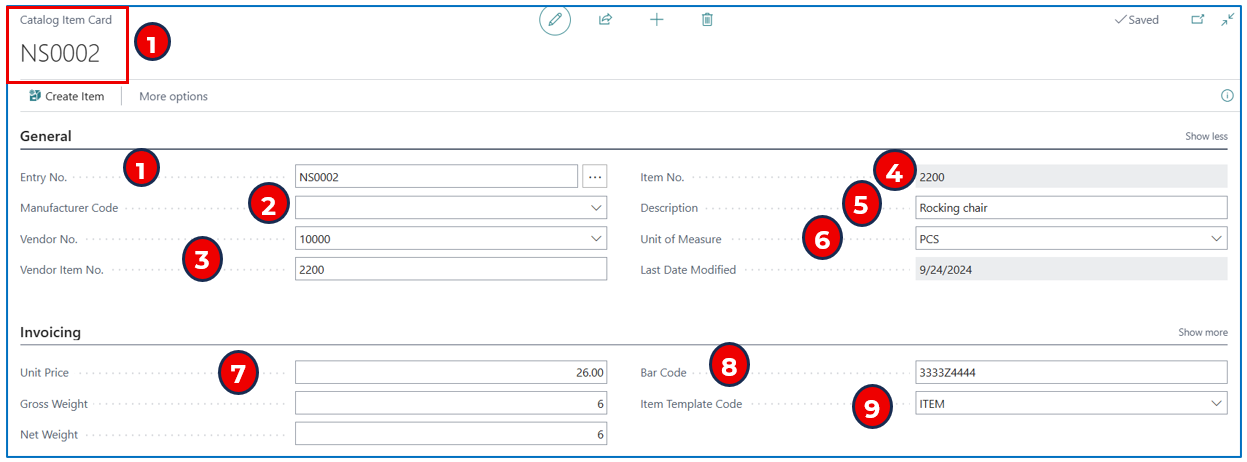
The catalog item provides several details for references, example of key fields:
-
Entry No. — Displays the auto-generated catalog item entry number.
-
Manufacturer Code — If a manufacturer code is pre-defined for the catalog item, select it here.
-
Vendor No. and Vendor Item No. — Select the vendor-specific code and item number for this catalog item.
-
Item No. — This is populated if the catalog item (nonstock item) has a linked item code.
-
Description — The product description from the vendor item catalog.
-
Unit of Measure — The purchase UOM to default for purchases.
-
Unit Price — The price of the product in the vendor catalog.
-
Bar Code — The product bar code (if available). This can be used in referencing the item by barcode scanning.
-
Item Template Code — This template is used when the nonstock/catalog item is used to create a stock item (particularly the default posting group for the item).
Purchase Requisition Process
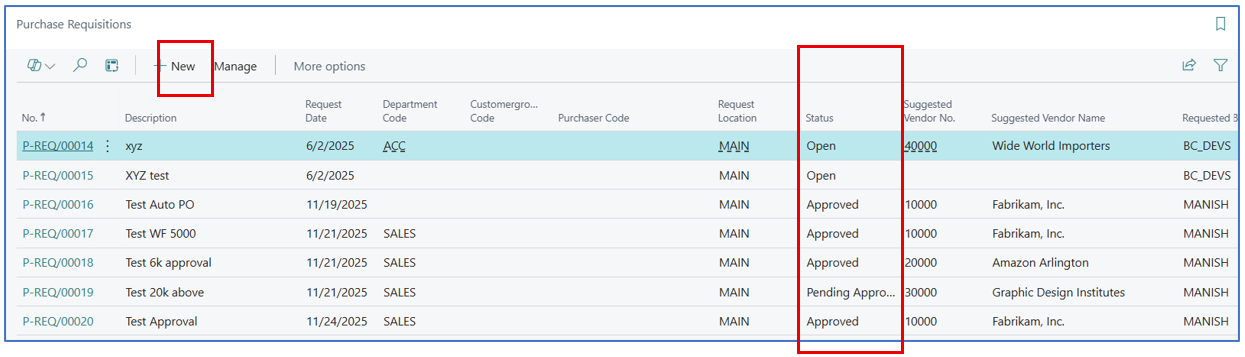
Search and navigate to Purchase Requisition to view the list of requisitions created.
For example:
-
Status — Filter on this column to view approved vs unapproved purchase requisitions.
NB: Approved requisitions auto-create either Purchase Quotes or Purchase Orders.
-
Click on +New to create a new requisition.
New Purchase Requisition
When you have opened the Purchase Requisition page by clicking on +New (to create a new purchase requistion) you will see the following window (in secction below).
Example:
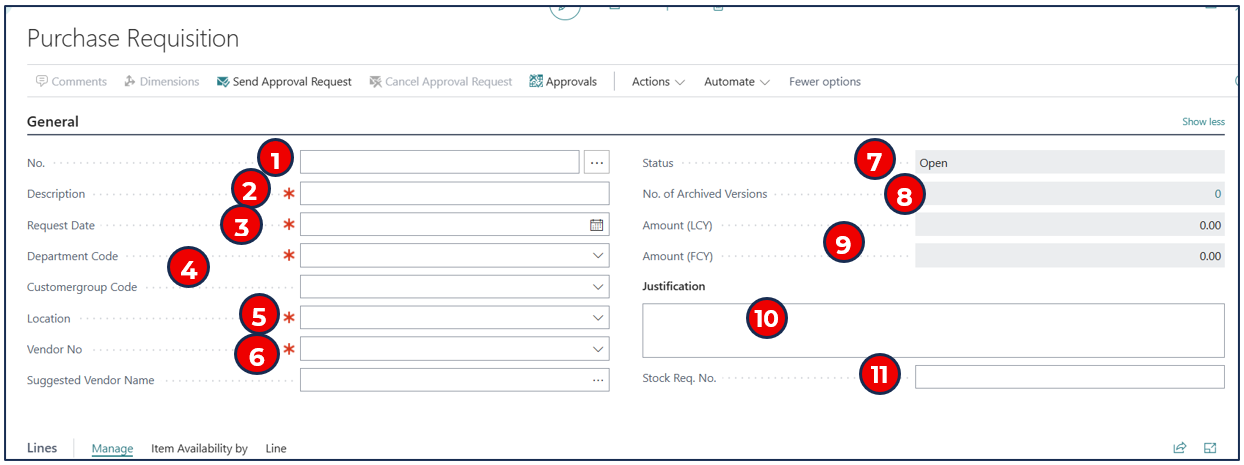
Key fields in the General Fasttab section:
-
No. — The Purchase Requisition document number is defaulted from the selected no. series when the description is entered.
-
Description — Enter a description to identify this Stock Requisition.
-
Date — The date defaults to the system date. Amend this if necessary.
-
Department Code and Customergroup Code — These are the labels for the 2 Global dimensions which can be used to track the purchase transaction. The use of these dimensions is optional.
-
Location — Select the default warehouse location for the purchase order/receipt of the stock requested.
-
Vendor No. — Select the pre-approved vendor for this purchase (this is dependent on the settings for the use of RFQ process)
-
Status — This defaults to Open for new Purchase Requisitions.
-
No. of Archived Versions — This flowfield displays the number of edited versions of the Purchase Requisition (i.e. versions of a Purchase Requisition can be created with menu option Actions > Function > Archive. Click through the field to view the versions.
-
Amounts — These amount fields display the total purchase requisition value in Local and Transaction Currency.
-
Justification — Enter the justification/reason for this purchase.
-
Stock Req. No. — This field will display the Stock Requisition number if this Purchase Requisition was auto-created by the Stock Requisition process.
Types of Purchases
The Purchase Requisition can be used to request for purchases of the following:
-
New Item
-
New Fixed Asset
-
Item
-
Fixed Asset
-
G/L Account
-
Catalog Item
This is done by selecting the relevant Request Item Type.
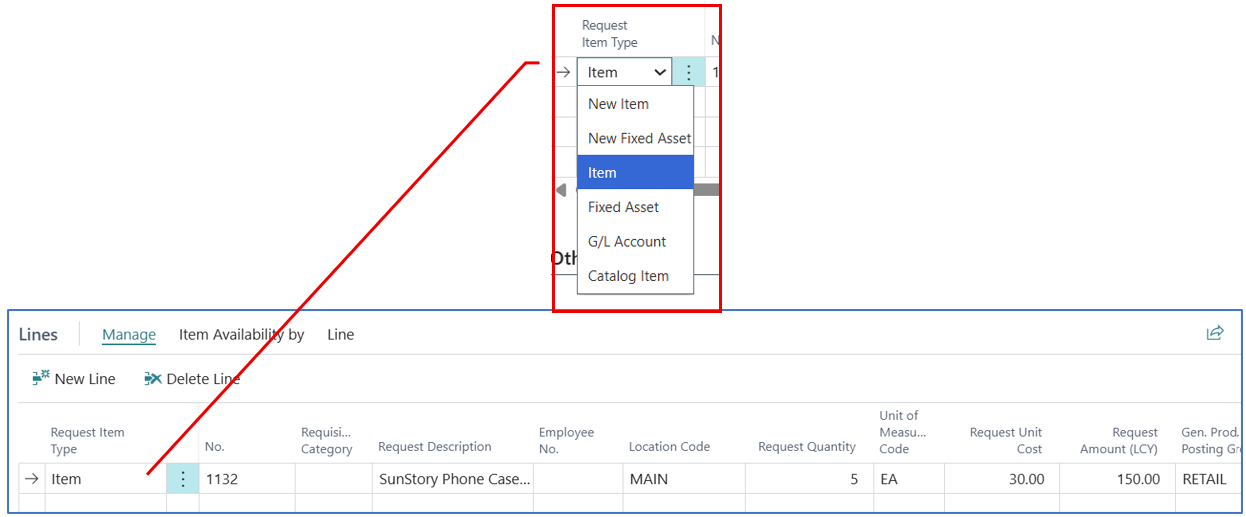
Purchase Requisition for New Item
To request the purchase of a nonstock new item, select New Item for the Request Item Type column in the Lines fasttab section.
Example:

-
Request Item Type — Select New Item (i.e. the item is not in inventory).
-
No. — (optional) Enter an item code.
NB: In the configuration, if the Use New Item No. as Item No. flag is enabled, the number entered here will become the item code for the new item created. (Refer to section Purchases & Payables Setup)
-
Request Description — Enter the item description.
-
Location Code — This is defaulted from the Purchase Requisition header.
-
Request Quantity — Enter the quantity to purchase.
-
Unit of Measure Code — Select the UOM for the purchase.
-
Request Unit Cost — Enter the expected purchase unit cost.
NB: If this type of purchase request is approved, a new item will be created in inventory (item code will either follow the no. series or the number entered in the PR line).
Purchase Requisition for New Fixed Asset
If the purchase is for a new asset (i.e. asset code has not been created), select New Fixed Asset in the Request Item Type.
Example:

-
Request Item Type — Select New Fixed Asset.
-
No. — Leave this blank. It will be populated with the new asset code when the PR is approved.
-
Request Description — Enter a description for the new asset.
-
Location Code — This is defaulted from the location in the Purchase Requisition header.
-
Request Quantity — Enter the purchase quantity.
-
Unit of Measure Code — Select the UOM for purchase.
-
Request Unit Cost — Enter the expected unit cost of purchase.
NB: if this type of purchase requisition is approved, a new asset will be created, and the asset code will be displayed on the Purchase Requisition line.
Purchase Requisition for Item
If the request is for purchases of an existing (in-stock) item from any pre-approved vendor, this option is selected in the Lines fasttab section.
Example:

-
Request Item Type — Select Item.
-
No. — Select the required item code.
NB: The item codes will display if the Item Category is tagged with “Filter for Purchase Requisitions”.
-
Request Description — The item description is defaulted.
-
Location Code — This is defaulted from the Purchase Requisition header.
-
Request Quantity — Enter the Purchase Request quantity.
-
Unit of Measure Code — Select the purchase UOM.
-
Request Unit Cost — Enter the expected purchase unit cost.
Purchase Requisition for Fixed Asset
If the Fixed Asset is defined and waiting for purchase approval, a Purchase Requisition can be created for the fixed asset purchase. In the Lines fasttab section, select Fixed Asset in the Request Item Type column.
Example:

-
Request Item Type — Select Fixed Asset.
-
No. — Select the asset code for this purchase.
NB: Only assets that are not acquired will display.
-
Request Description — The asset description is defaulted.
-
Location Code — This defaults from the Purchase Requisition header.
-
Request Quantity — Enter the quantity to purchase.
-
Unit of Measure — Select the UOM for the purchase.
-
Request Unit Cost — Enter the expected unit (acquisition) cost for the asset purchase.
Purchase Requisition for Expense
If the Purchase Requisition is for any other expense item (e.g. office expenses), an expense G/L Account should be used. In the Lines fasttab section, select G/L Account and complete the other required fields.
Example:

-
Request Item Type — select G/L Account
-
No. — select the G/L expense account to be charged for this purchase
-
Request Description — The G/L Account description will display as defaulted.
-
Location Code — This defaults from the Purchase Requisition header.
-
Request Quantity — Enter the quantity to purchase (normally qty=1).
-
Unit of Measure — Select the UOM for the purchase.
-
Request Unit Cost — Enter the expected unit cost for the expense.
Purchase Requisition for Catalog Item
NB: A list of vendor catalog items (nonstock items) must be created to be using this option.
If a request is created to purchase a nonstock/catalog item from the vendor, the Catalog Item type is used.
Example:
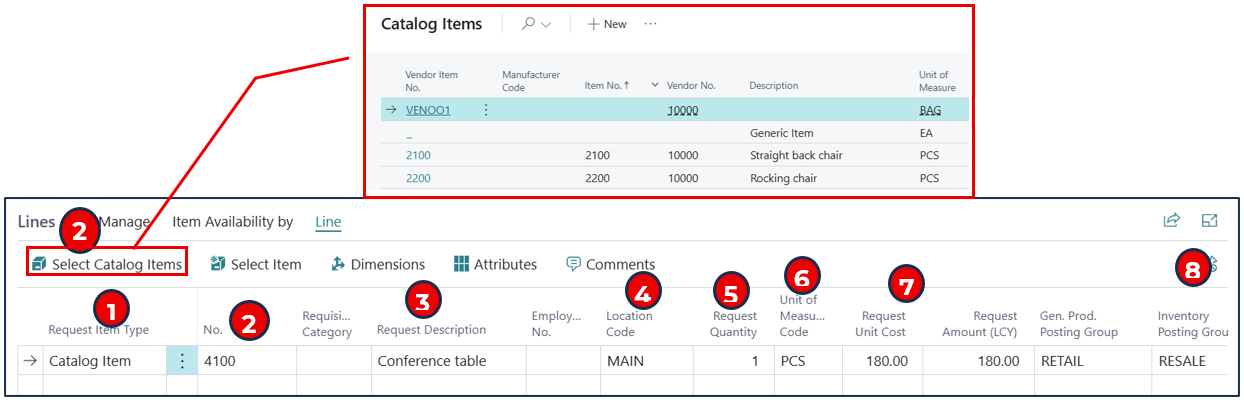
-
Request Item Type — Select “Catalog Item”.
-
No. — to select the catalog item, select menu option in the Lines fasttab section Line > Select Catalog Items.
This opens the list of pre-defined vendor catalog items. Select the needed catalog item for the purchase requisition.
NB: During the PR approval process, the catalog item will be converted to a stock item.
-
Request Description — The catalog item description defaults in this field.
-
Location Code — Select the Location code for this purchase requisition line.
-
Request Quantity — Enter the requested purchase quantity.
-
Unit of Measure Code — Select the purchase UOM.
-
Request Unit Cost — Enter the purchase unit price.
-
Gen. Prod. Posting Group and Inventory Posting Group — These fields must be populated with the Posting Group code for the catalog item.
NB: The list of vendor catalog items is defined on the Catalog Items page (refer to Catalog Items).
Purchase Requisition Approval Workflow
When a new purchase requisition is created, the status defaults to Open.
Select menu option Send Approval Request.

This sends the purchase requisition to the approval workflow, and the PR status updates to Pending Approval.
Example:

Catalog (Nonstock) Item — Creating Inventory During Approval
During the Purchase Requisition approval process, the approver must decide on the conversion of the vendor catalog item to an inventory stock item.
The approver search and navigate to Requests to Approve to view the list of Purchase Requisitions to approve.
Example:

Highlight the purchase requisition record and select menu option Open Record to open the Purchase Requisition.
Example:
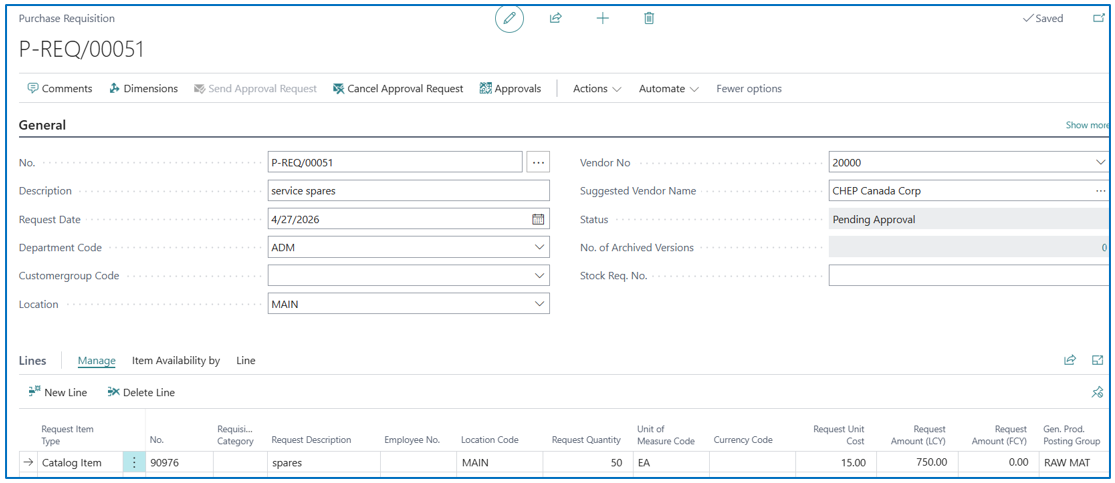
There are 2 options to convert the catalog item to an inventory stock item from the Purchase Requisition Lines fasttab section BEFORE the purchase requisition is “Approved”.
Convert Catalog Item as a New Item
Example:

-
Update the Request Item Type from Catalog Item to New Item.
-
The No. field value becomes the Item code if the setup flag Use New Item No. as Item No is enabled. Otherwise, the new item code will be defaulted from the Item No. Series.
-
Once approved, the Purchase Requisition line Request Item Type will automatically be converted to Item i.e. the item code exists in inventory for the purchasing process.
Use “Select Item” to Convert the Catalog Item
Example:

Select menu option Line > Select Item to open the dialog box to use either option below:
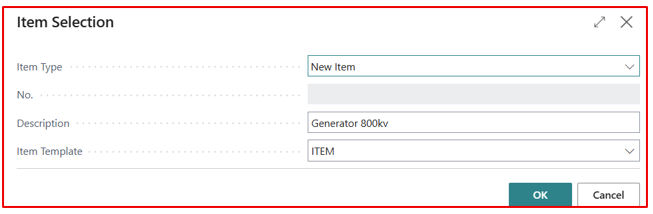
-
Item Type — use New Item to convert the catalog item to a new item.
-
The new item code will default from the Item No. Series.
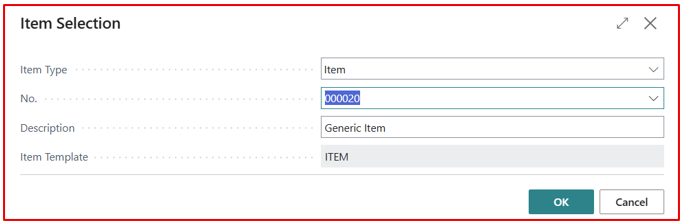
-
Item Type — Select Item to provide an alternative inventory item.
-
No. — When the Item type is selected, select the alternative Item code for the purchase requisition.
-
The selected alternative item code will be replaced in the Purchase Requisition line with the existing requisition line description.
After purchase requisition approval, the catalog item will be converted to an Item type (in the original Purchase Requisition) for purchase processing.
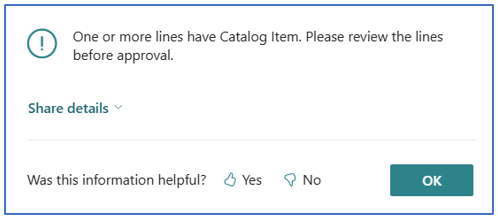
If the approver Approves the purchase requisition without reviewing the Purchase Requisition to convert the catalog item, the following error message will be encountered:
Purchase Quote or Purchase Order
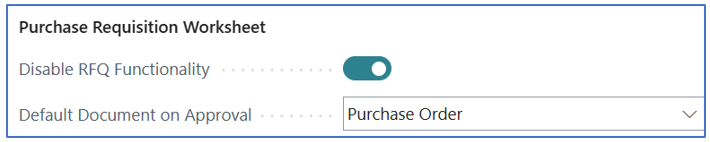
When the Purchase Requisition is approved, there are 2 possible workflow routes, depending on the Disable RFQ Functionality flag in the setup (refer to section Purchases & Payables Setup).
-
If enabled, this disables the RFQ Functionality i.e. the approved purchase requisition directly converts to a Purchase Quote or Purchase Order and is emailed to the vendor selected on the purchase requisition.
-
If disabled, this enables the RFQ Functionality i.e. the requisition worksheet will be used to source for vendor quotes (1 to 3 quotes) and purchase quotes can be created to send off to these vendors. These quotes can also be compared using Purchase Quotation Comparison. The final purchase quote will then be converted to a Purchase Order.
Auto-Creation of Purchase Quote or Purchase Order
If the Disable RFQ Functionality flag is enabled, the approved purchase requisition converts to either a Purchase Quote or a Purchase Order, depending on the selected setup option.
If Purchase Order is selected, the Purchase Requisition number will be referenced in the PO header.
Use Requisition Worksheet to Obtain Up To 3 quotes
NB: Ensure that Disable RFQ Functionality is disabled in Purchases & Payables Setup.
Search and navigate to Purchase Requisition Worksheet and select menu option Actions > Get Requisition Lines.
Example:

This opens the dialog box to filter and select the approved Purchase Requisitions (unapproved purchase requisition will not be visible or selected).
Example:
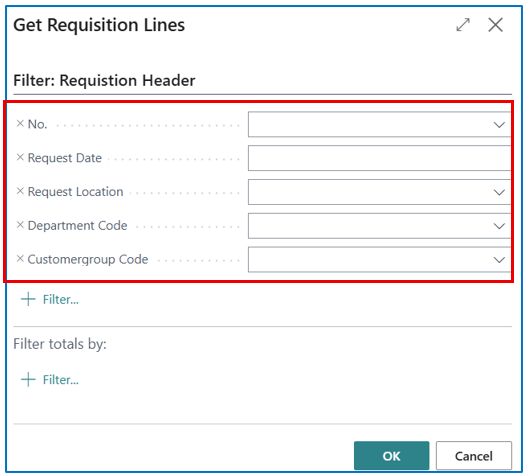
Use the No. field to filter for specific purchase requisition or Request Location to view all purchase requisitions from the specific location.
If filtering by Location, this step retrieves all approved purchase requisitions for that location.
Example:
-
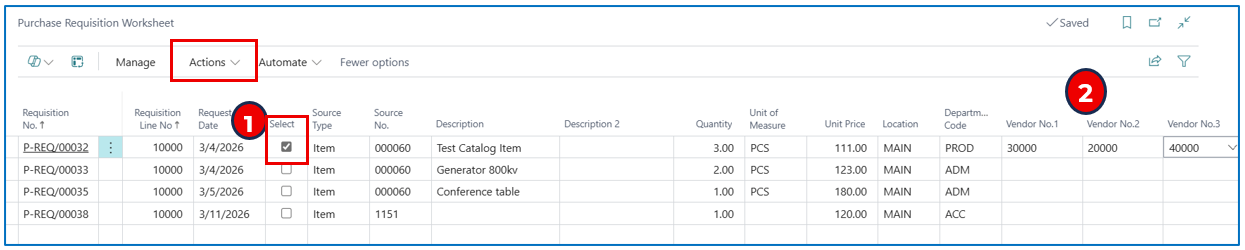
Select one (or more) purchase requisition to nominate the vendor(s) to send purchase quotes.
-
Vendor No.1, Vendor No.2, Vendor No. 3 — Select one to three pre-approved vendors for sending the purchase quote (converted from the selected purchase requisition).
-
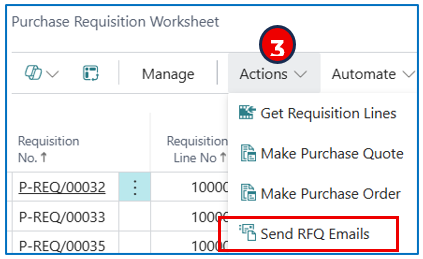
Select menu option Actions > Send RFQ Emails.
Creating Purchase Quote for Selected Vendors
-
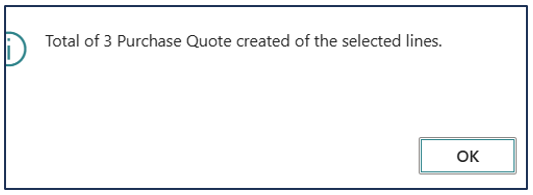
When vendor quotes are received, select menu option Actions > Make Purchase Quote to generate a purchase quote for each selected vendor (from step 2).
-
A confirmation prompt will be displayed for the purchase quote created.
Example:
- For each Purchase Quote, review and update the vendor price, discount (if any) and available quantity to purchase for the urchase Quote line item.
Comparing Vendor Quotes for the Purchase Requisition
-
Search and navigate to Purchase Quotation Comparison to open the Purchase Quotation Comparison page.
Example:

-
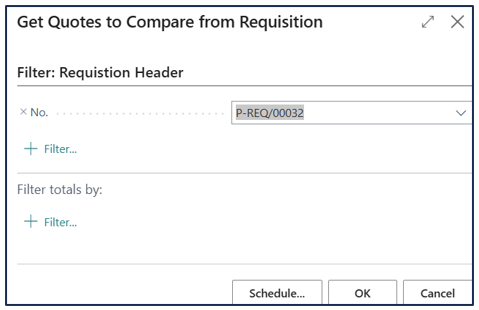
Select menu option Actions > Get Quotes to Compare to retrieve quotes based on purchase requisition number. Select Pull Quotes to Compare to retrieve specific Purchase Quote numbers.
Example: Using Get Quotes to Compare.
- Select the purchase requisition where purchase quotes have been created for selected vendors.
-
This will retrieve all the Purchase Quotes linked to the selected approved purchase requisition.
Example:

-
From these vendor quotes, a comparison is made on unit price, discount (if any) and available quantity (these values are updated in step 6 above).
-
At this point, a comparison report can be generated using menu option Reports > Quote Comparison Report.
-
To open the Purchase Quote card for review, select menu option Related > Open Purchase Quote.
-
Once a decision is made on the selected vendor quote, create a Purchase Order to send to the vendor.
a.) Highlight the selected quote (in the above comparison list). Select menu option Related > Open Purchase Quote.
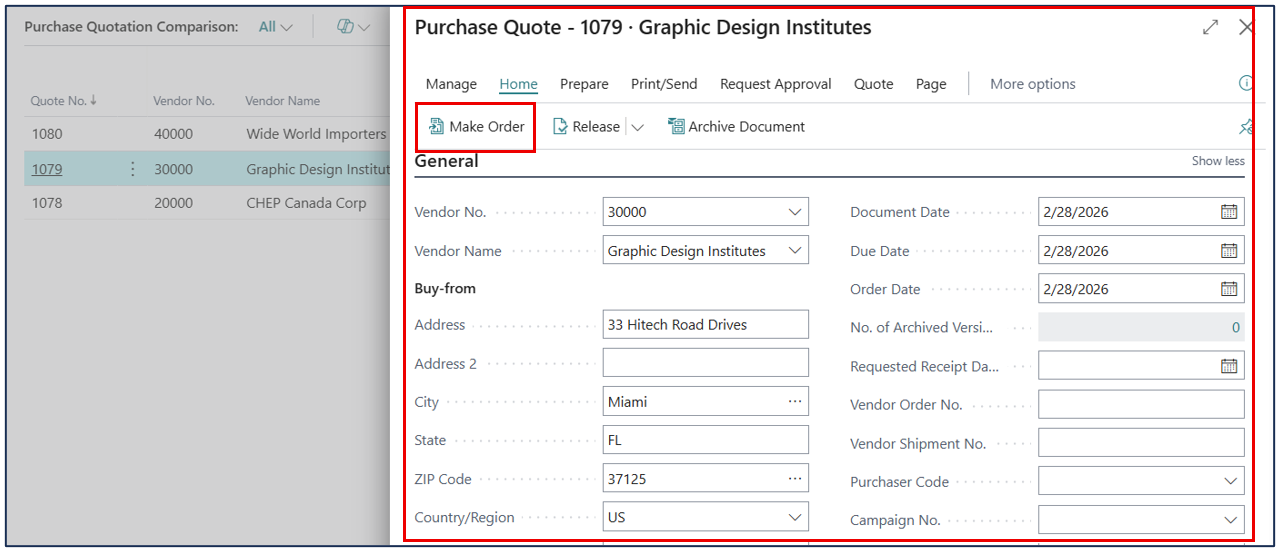
b.) Within the selected Purchase Quote, select menu option Make Order to convert the Purchase Quote to a Purchase Order for the selected vendor.