Microsoft Dynamics 365 for Wealth Management
Introduction to Dynamics 365 Wealth Management
Microsoft Dynamics 365 for Wealth Management is a robust CRM solution tailored for the unique needs of wealth management professionals, powered by Dynamics 365 Sales. It enables marketing and solicitation, efficient client relationship and pipeline management, seamless tracking of opportunities, as well as project, service and administration functions — all in one system working with Outlook, Teams and SharePoint. This guide delves into each feature, providing you with actionable insights, illustrative examples, and step-by-step processes to help you master the platform and maximize your productivity.
Getting Started
Logging In and Accessing the Platform
-
Navigate to your firms Microsoft Dynamics 365 login URL in your preferred browser.
-
Enter your user credentials (company email and password) and proceed to authentication. If multi-factor authentication is enabled, complete verification using your registered device.
-
Upon successful login, you will be directed to the default Home Page or dashboard assigned to your profile.
Basic Navigation in Dynamics 365 for Wealth CRM
-
Navigation Bar: Found at the top, this bar gives you quick access to modules such as Sales, Accounts, Contacts, Opportunities, Dashboards, Activities, and Marketing.
-
Site Map/Panel: Click the menu icon to expand the site map for a structured view of all modules and entities. You can collapse and expand this as needed for more workspace.
-
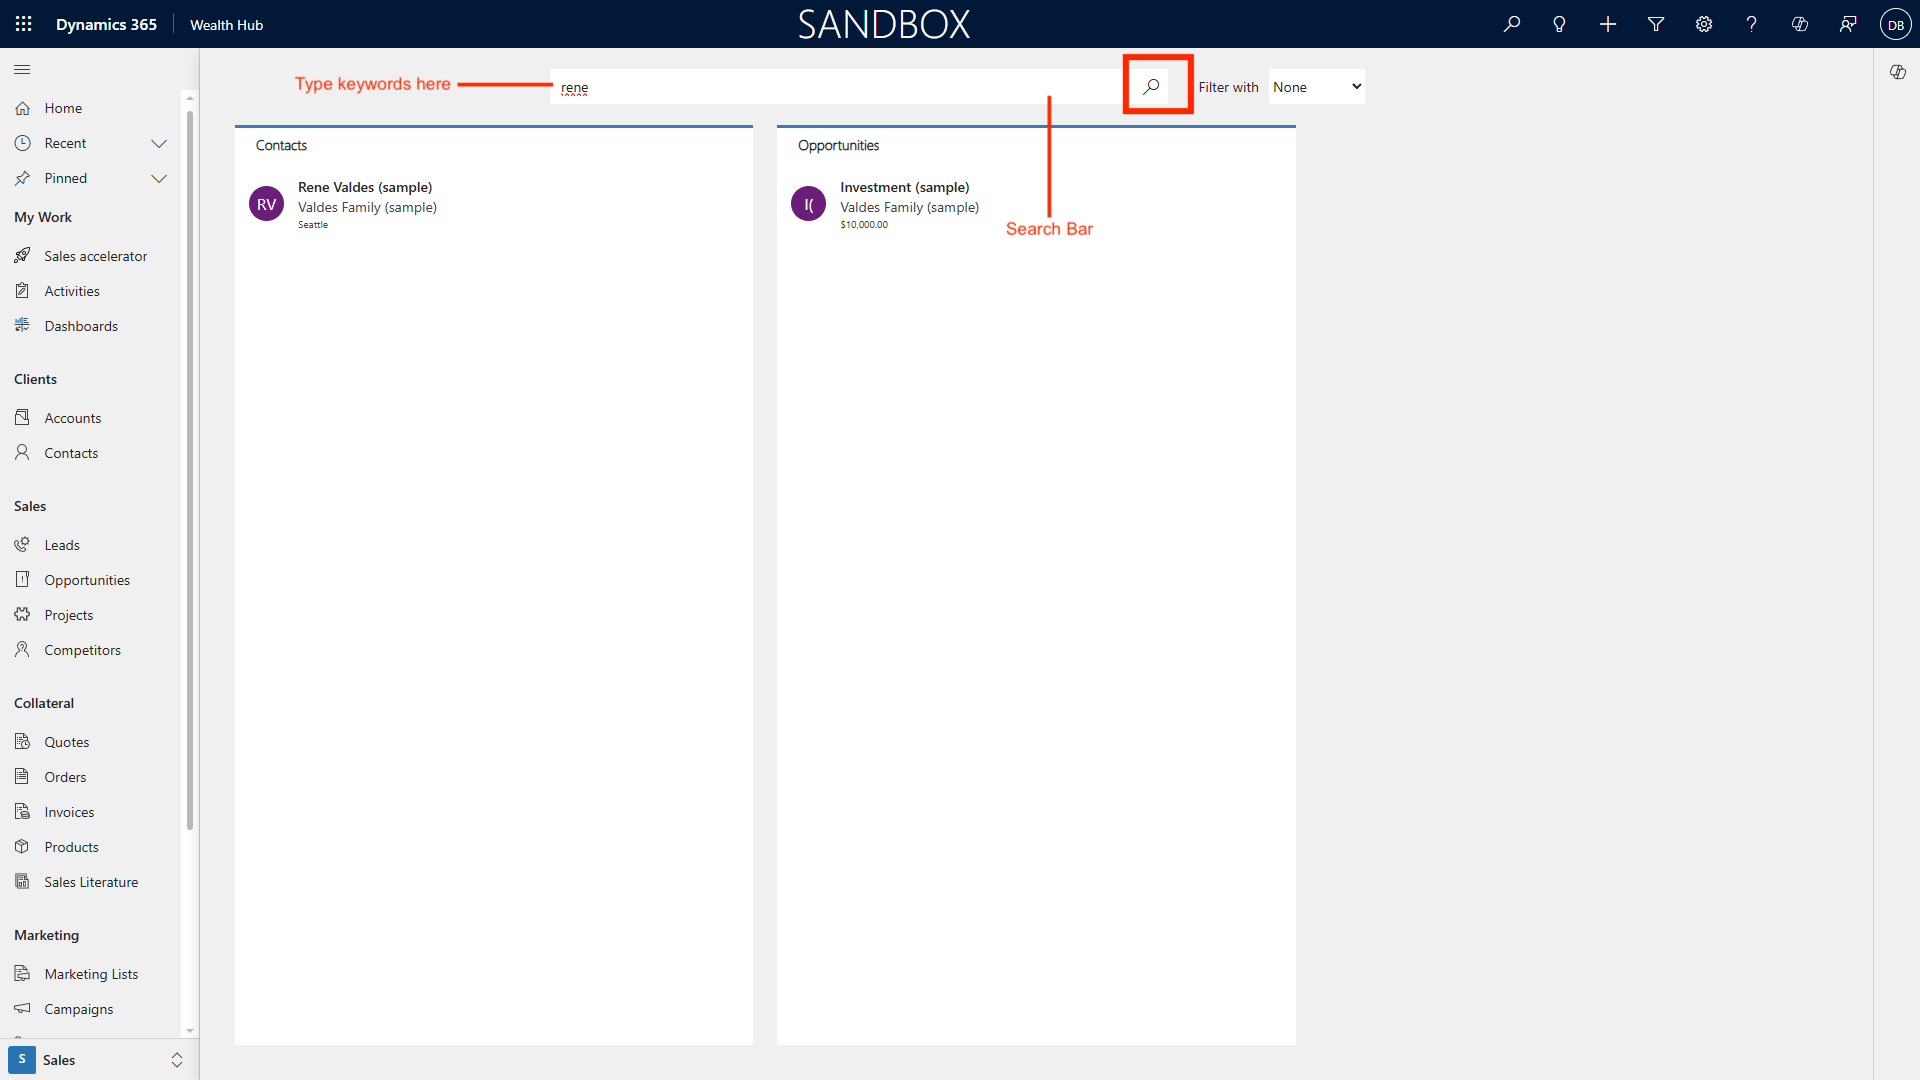
Search Function: The search bar enables you to locate records across all modules. Type keywords, names, account numbers, or opportunity IDs to search globally.
-
Recent Records: Clicking your avatar or profile icon reveals a dropdown of recently accessed records and personal settings.
-
Settings Gear: Located on the upper right, where you adjust personal preferences and access user options.
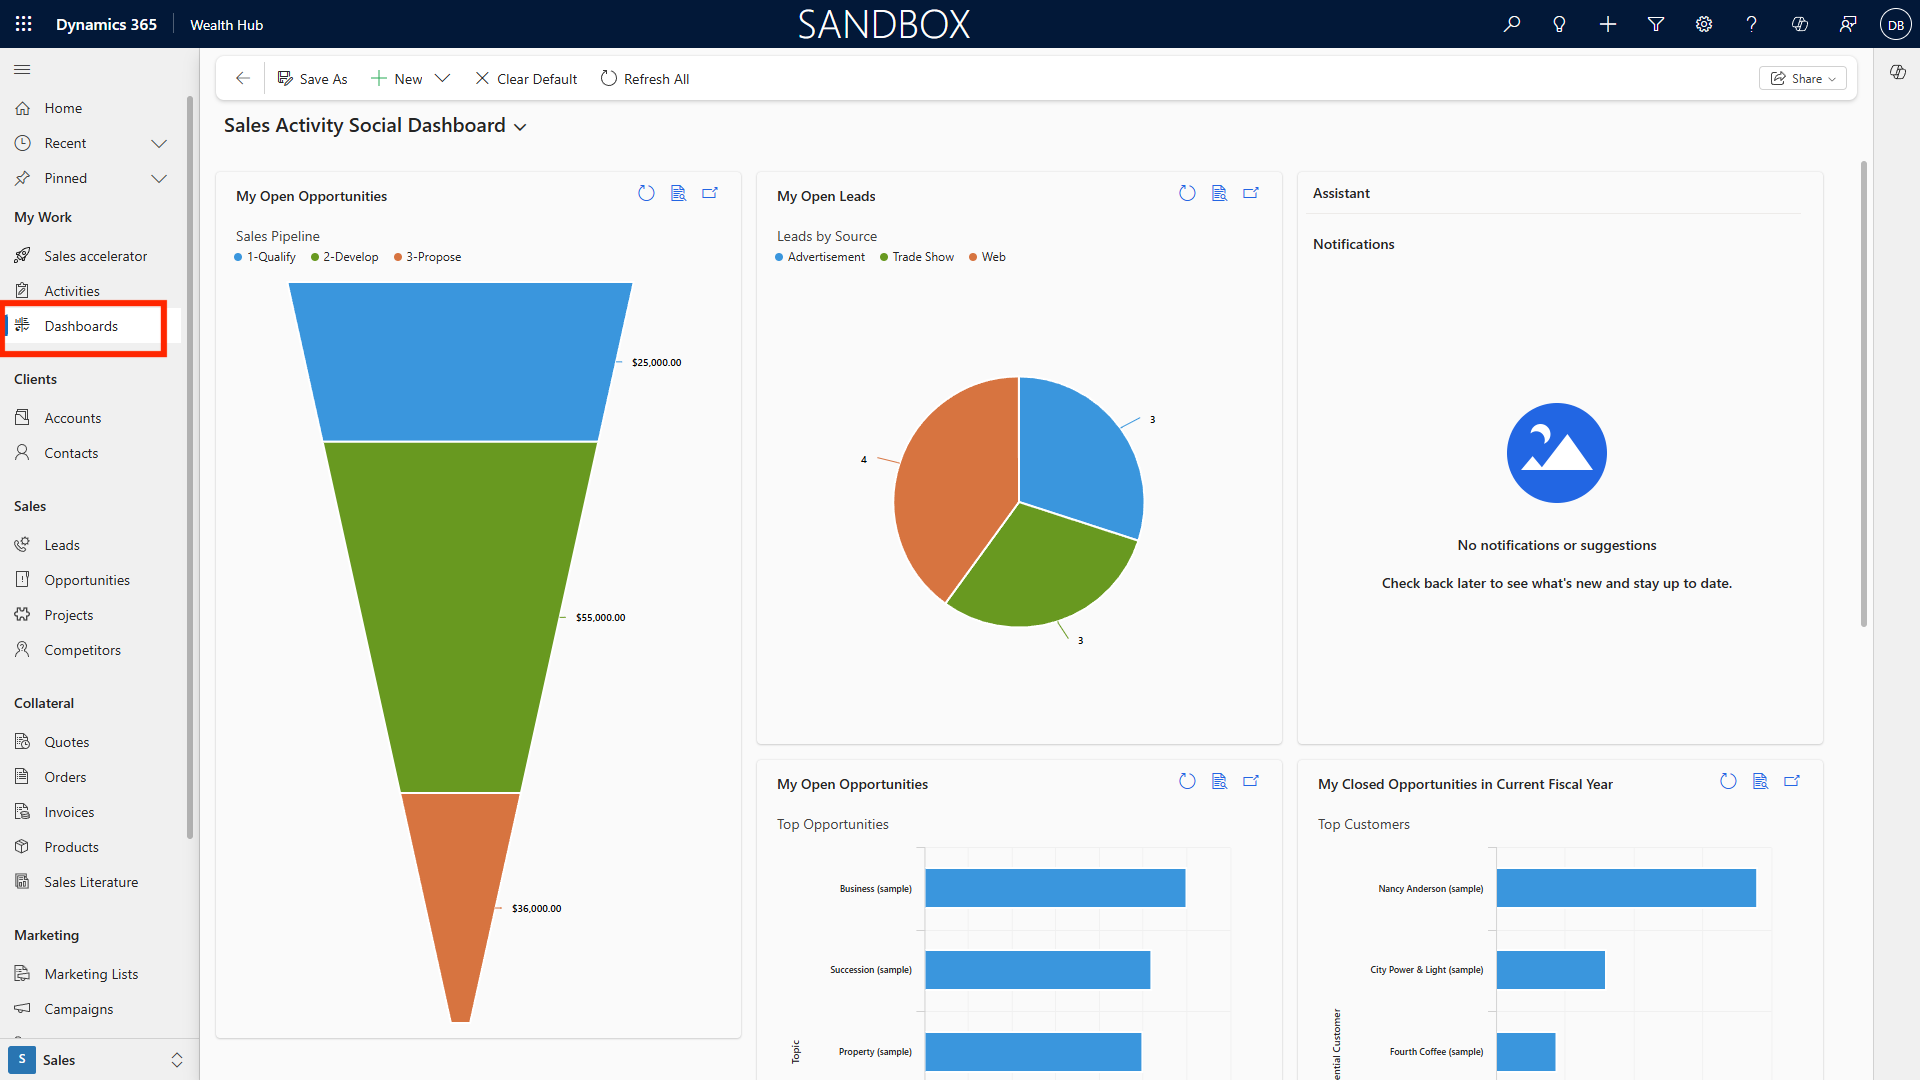
Dashboard View/Home Page and Creation
Viewing Dashboards
-
From the main navigation, click Dashboards or select the dashboard module from the site map.
-
The dashboard displays a collection of visual widgets, charts, KPIs, and lists. Common dashboards include My Pipeline, Team Performance, and Client Overview.
-
You can toggle between available dashboards using the dropdown at the top of the dashboard view.
Creating a Custom Dashboard
-
Click New Dashboard within the dashboard module.
-
Choose a layout (e.g., 2-columns, 4-columns, tabbed dashboard).
-
Add components by selecting data visualizations: charts, list views, tiles, web resources, or iFrames for external content.
-
For each component, select the related entity (e.g., Opportunities, Accounts), define the criteria, and select the visualization type (bar chart, pie chart, grid, etc.).
-
Set filters (e.g., show only active opportunities above $1M).
-
Click Save and name your dashboard. It will now appear in your dashboard list.
-
You can customize and share dashboards with teams or individuals to facilitate collaborative tracking.
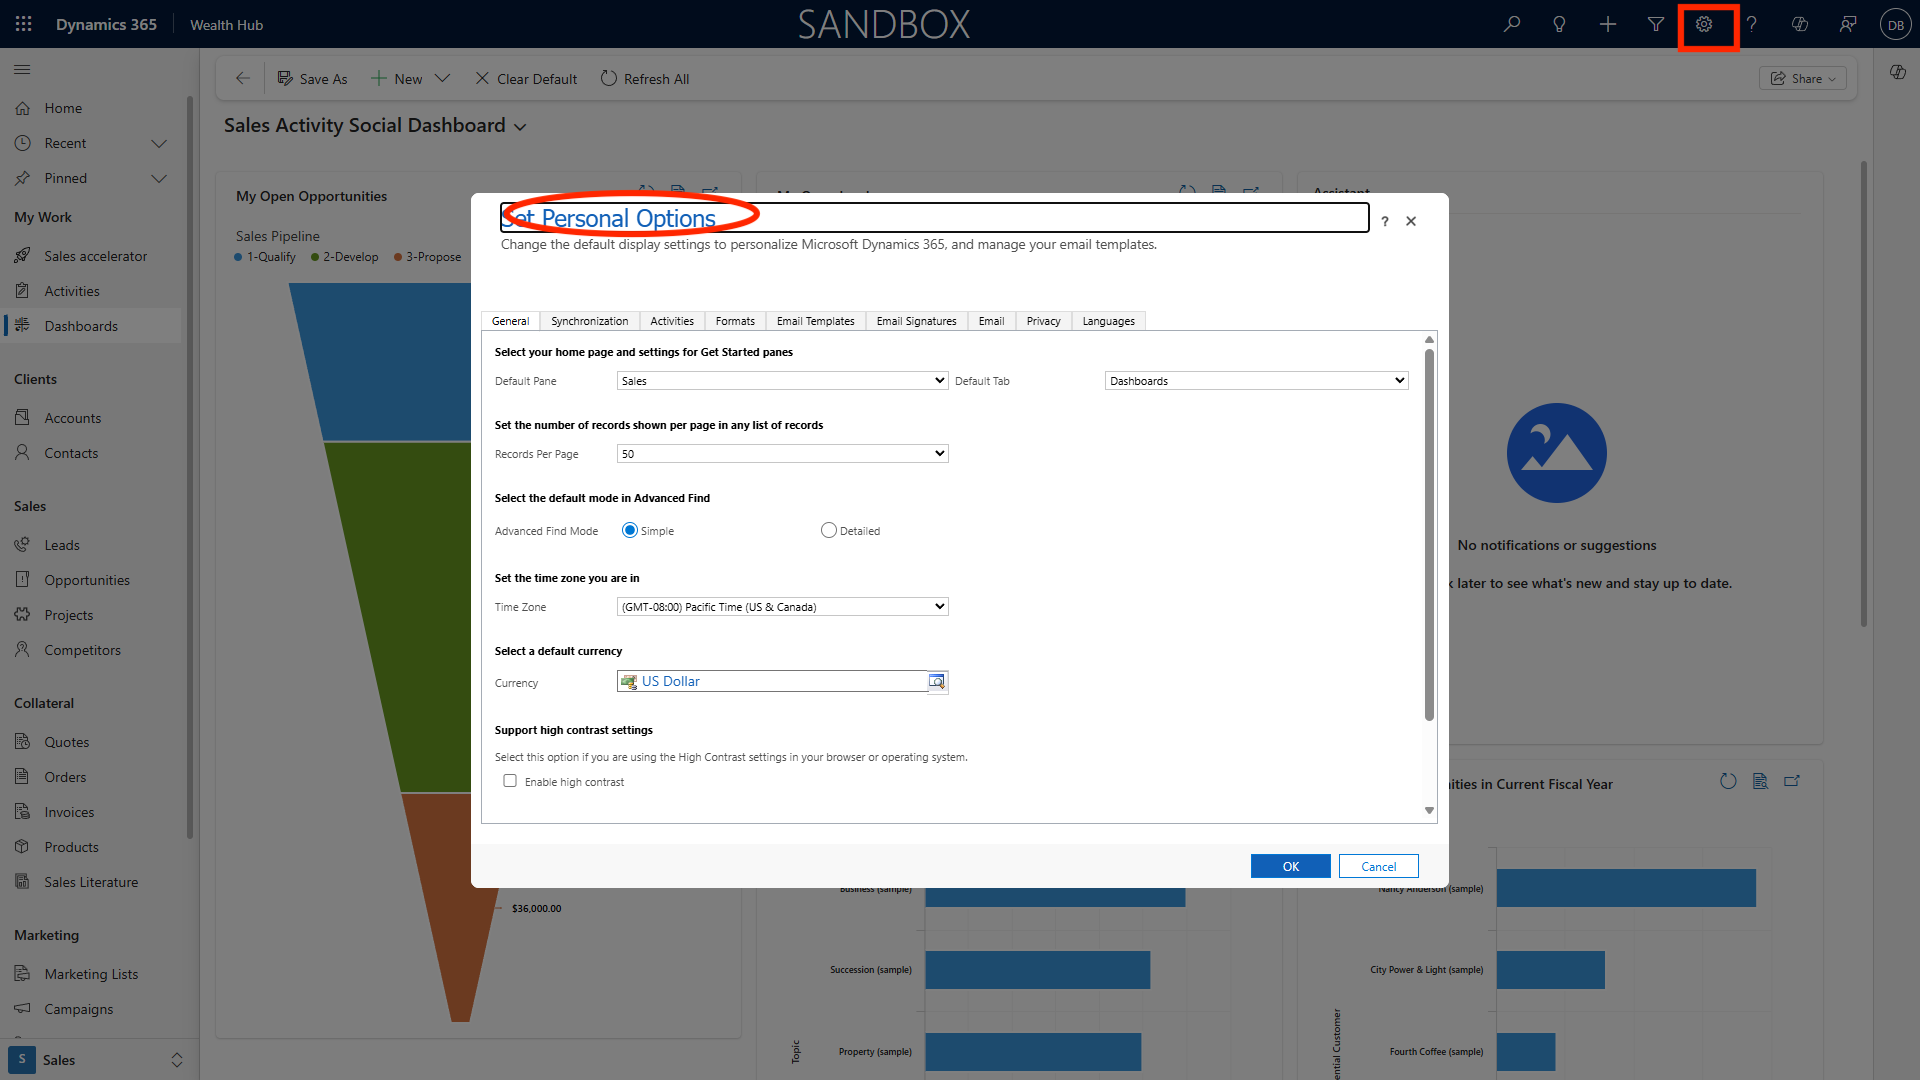
Dashboard Personalization and Home Page Setup
-
Click your profile icon and select Personalize this view or navigate to Settings > Personal Options.
-
Choose your preferred dashboard, list view, or entity as your default Home Page. For instance, wealth managers may set their High Net Worth Pipeline dashboard as default.
-
Click Save to apply changes, ensuring you land on your preferred starting view upon login.
Personalization Settings/Set Personal Options
Accessing and Configuring Personal Options
-
Navigate to the Settings gear in the upper right corner and select Personal Options.
-
Adjust region-specific settings: language, date/time format, currency, and timezone for accurate record keeping.
-
Set email preferences, notification settings, and activity reminders to streamline your workflow.
-
Customize navigation panes and Home Page for faster access to frequently used modules.
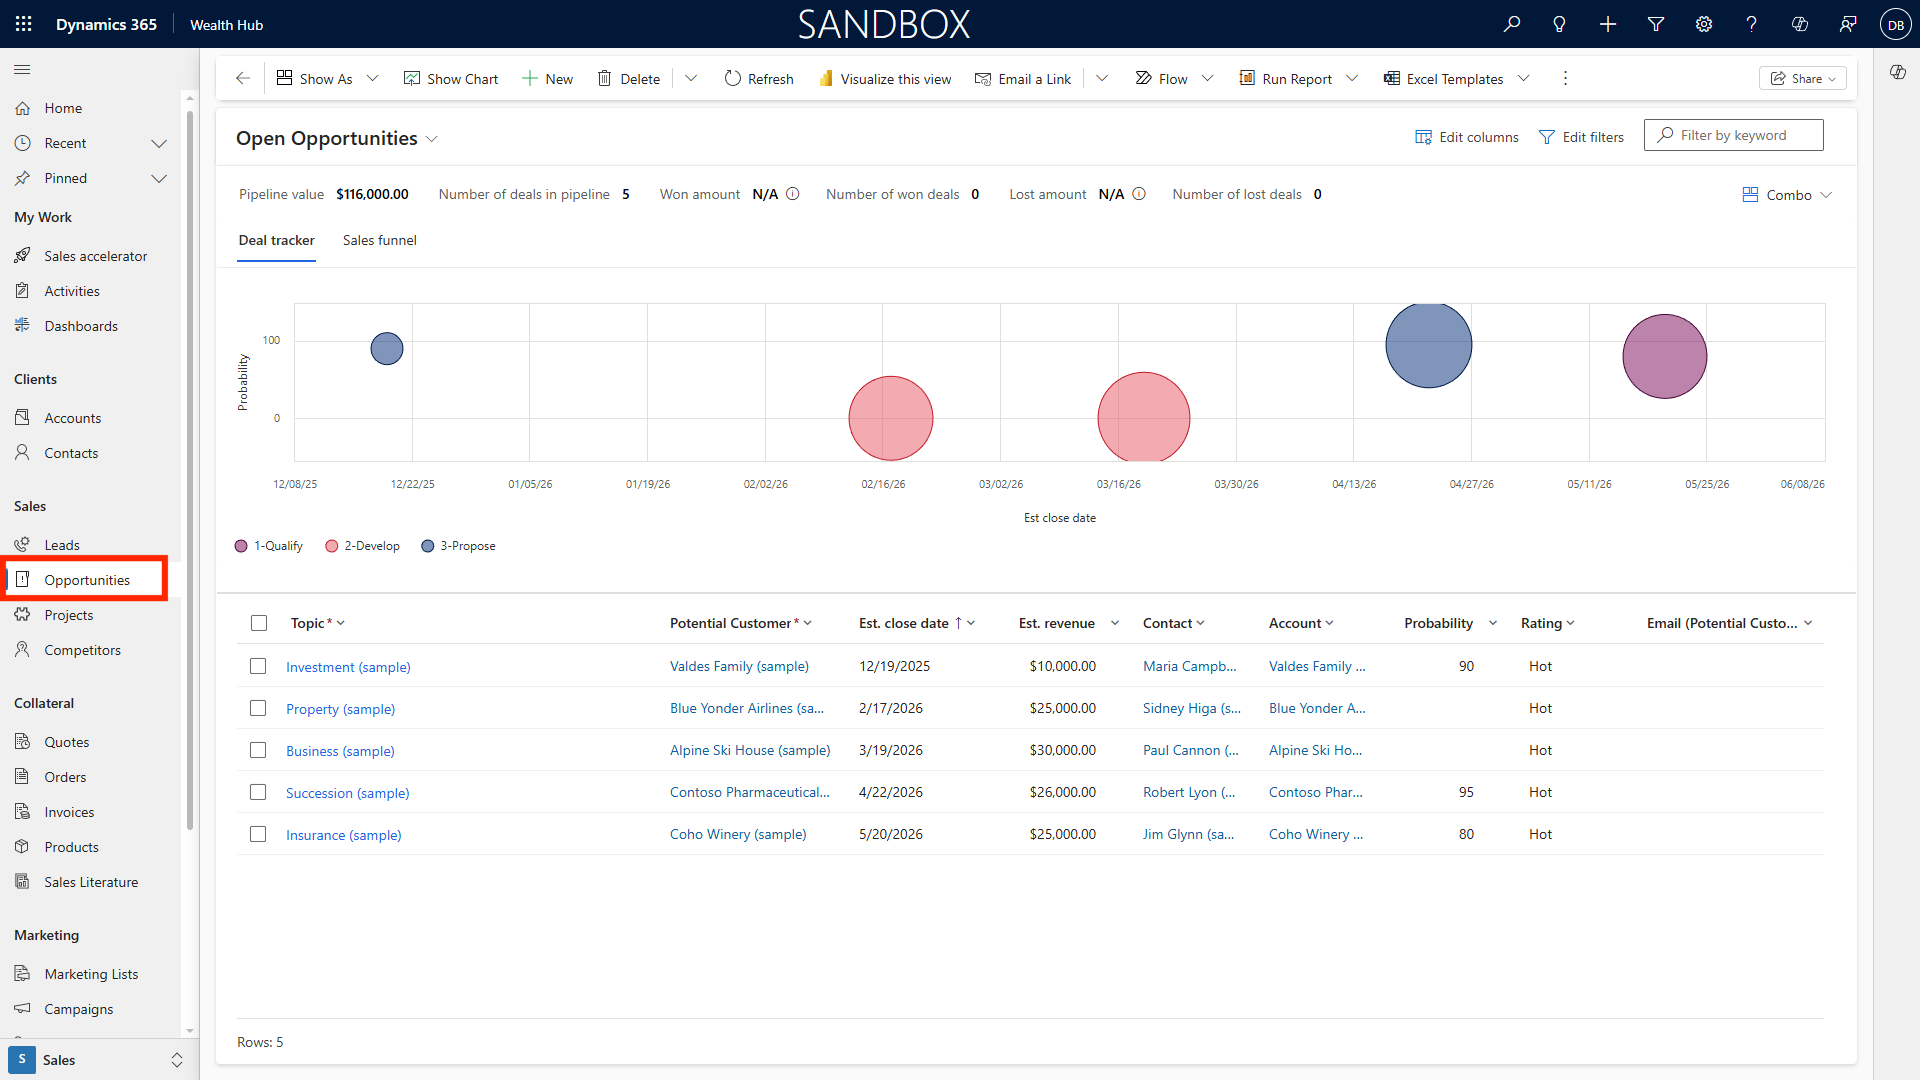
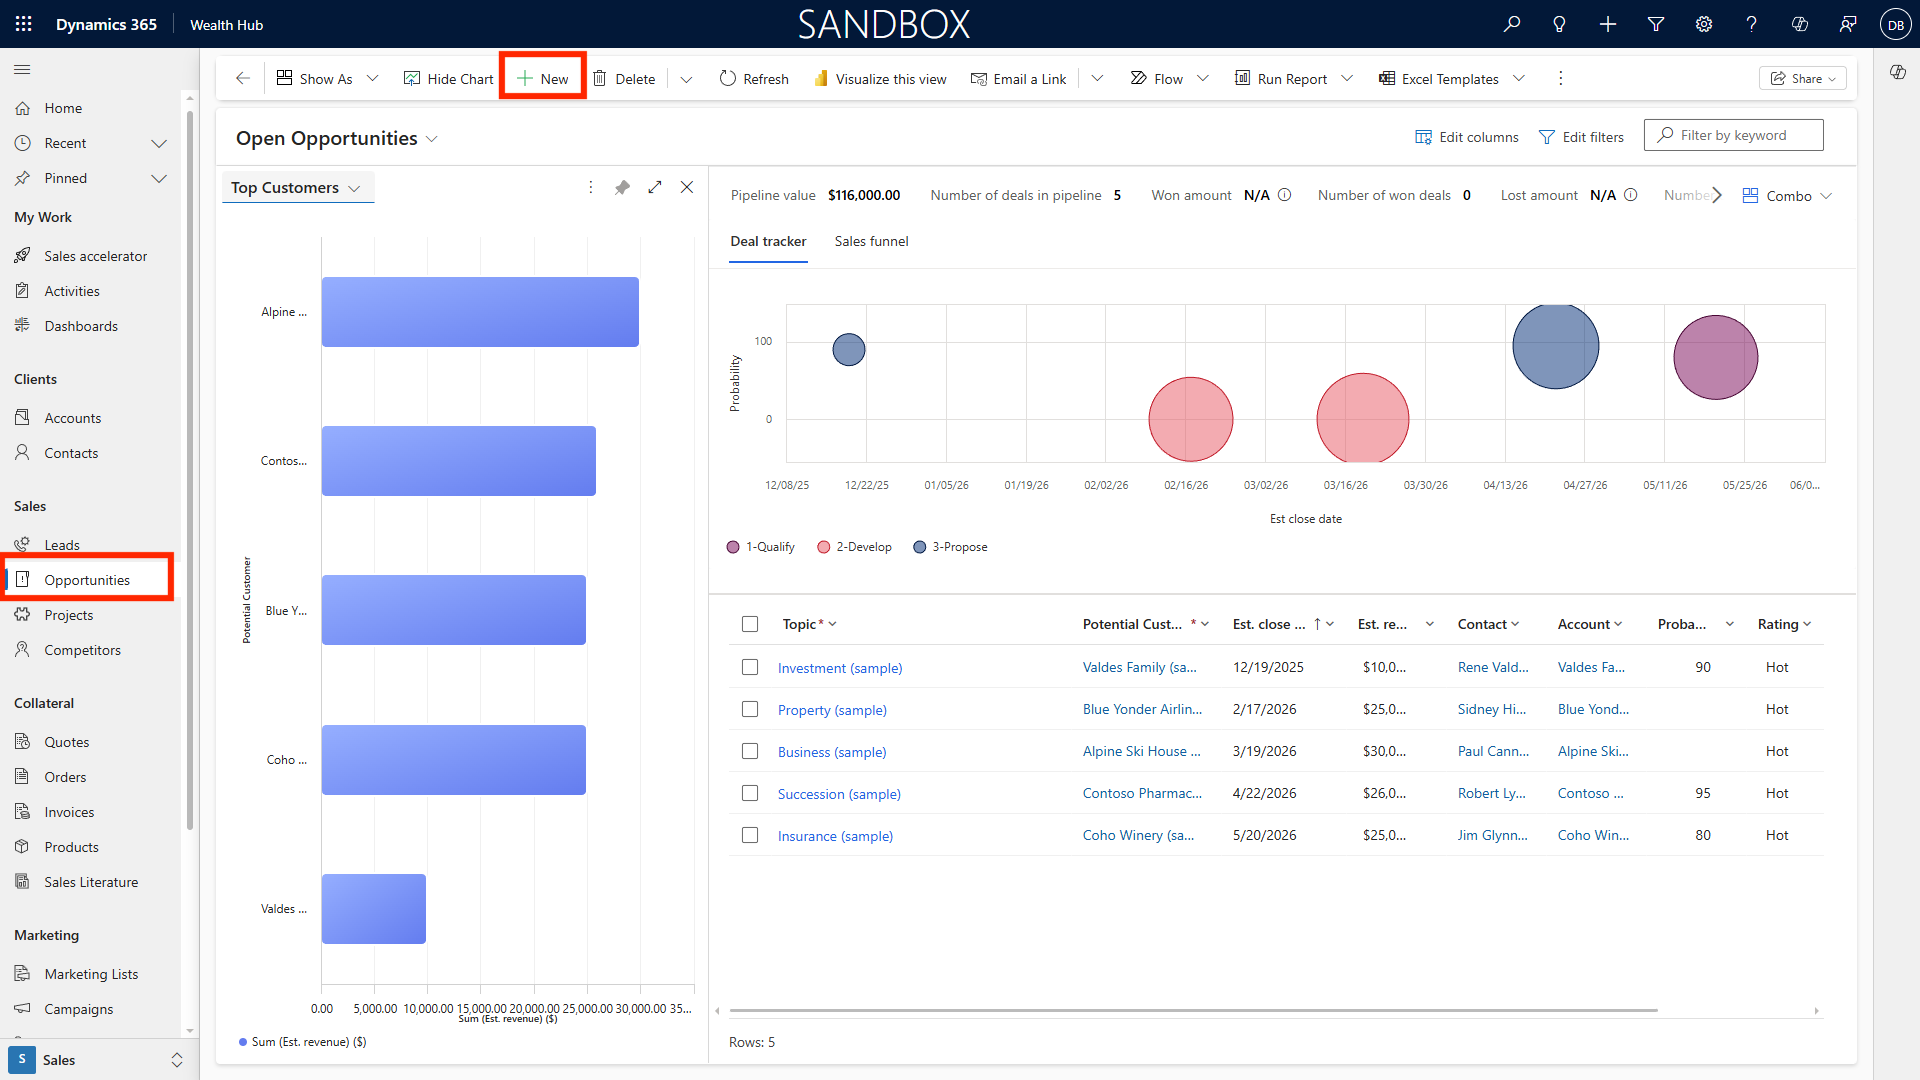
Opportunity Deal Flow View
Viewing Opportunities: Grid, Pipeline, and Kanban
-
Click Opportunities in the navigation bar. You will see a tabular grid view by default.
-
Grid View: Displays a sortable, filterable list of opportunities, with columns for owner, client, deal size, stage, and close date.
-
Pipeline View: Shows deals as a flow chart segmented by stages (e.g., Prospect, Qualification, Proposal, Closed).
-
Kanban View: Opportunities are shown as cards in columns representing stages. Drag and drop cards to progress deals.
-
Edit columns using Edit Columns above the grid, adding fields such as Investment Type or Expected ROI.
-
Apply filters to focus on deals by team, geography, or value; save custom views for recurring use.
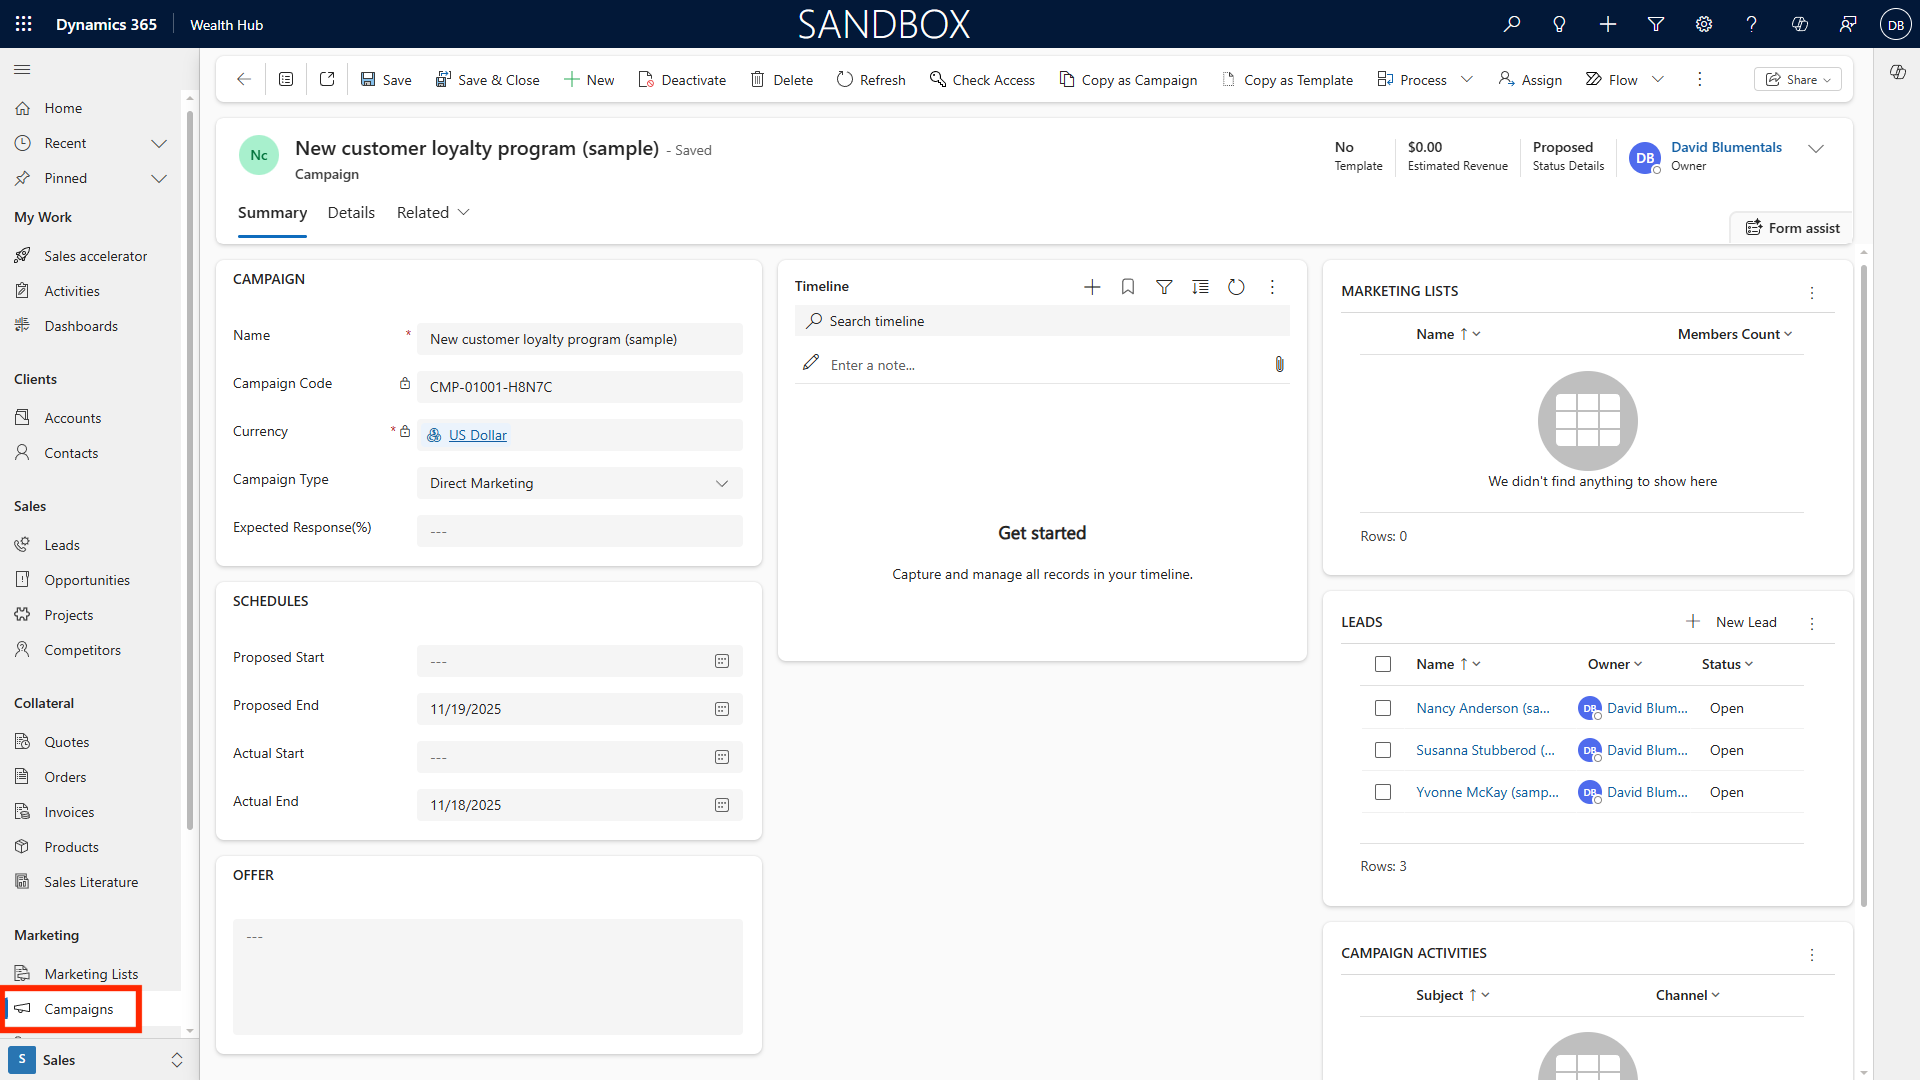
Opportunity Record Creation and Editing
Creating and Editing Opportunities
-
Click New Opportunity in the Opportunities module.
-
Complete required fields: Opportunity Name, Account/Client, Estimated Value, Expected Close Date, Opportunity Type, and add any custom fields (e.g., Wealth Segment, Investment Vehicle, Relationship Manager).
-
Attach relevant documents and link news articles or meeting notes to the opportunity record.
-
Select or update the Business Process Flow: The system may have different flows for opportunities based on deal size, such as a more complex approval for high-value deals.
-
Click Save to create the record.
-
To edit, open the opportunity and make changes as needed. All updates are tracked in the record’s timeline.
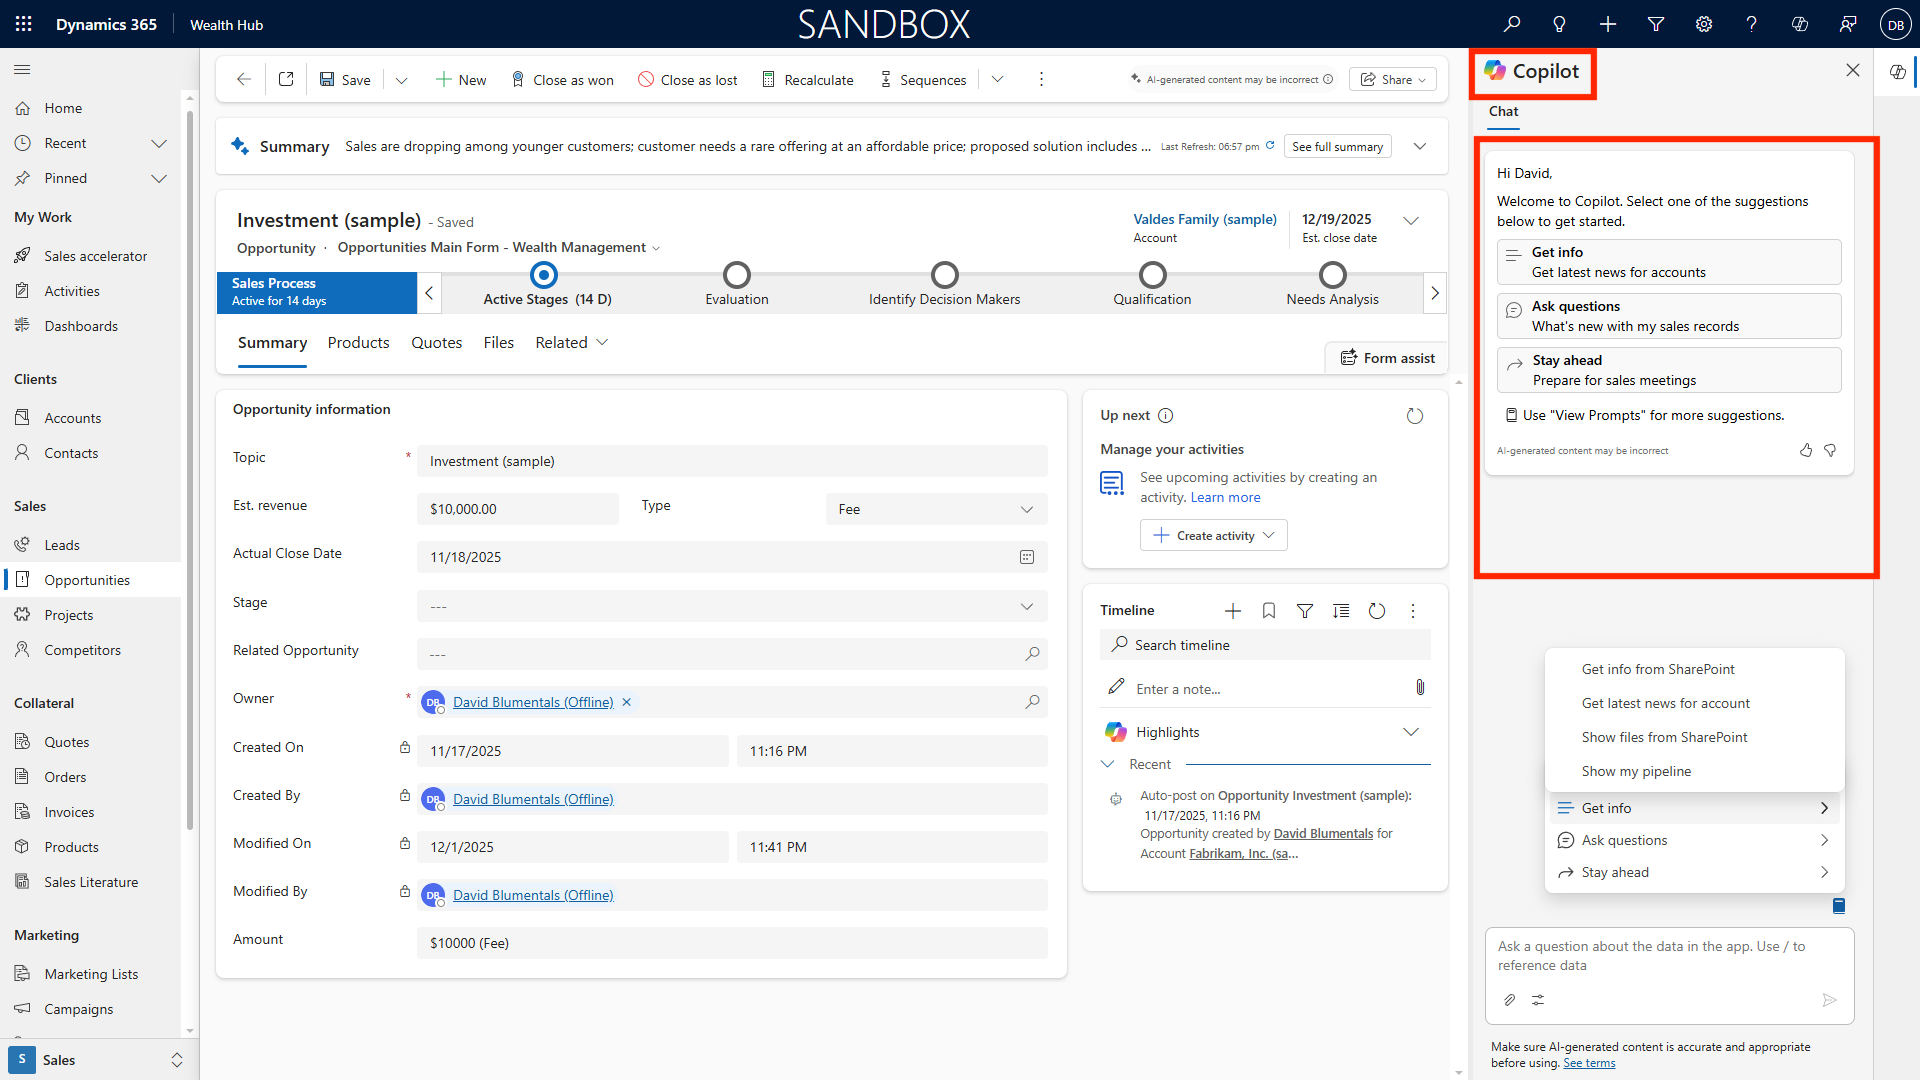
Copilot AI Chat for Wealth Management
-
Access Copilot AI Chat via the chat icon in the opportunity record.
-
Engage with Copilot for summarizing opportunity details, surfacing news, or capturing meeting notes. For example, ask Copilot: “Summarize major client news impacting this deal.”
-
Copilot can auto-populate wealth management custom fields and recommend next steps based on deal type or client segment.
-
Use Copilot to update Business Process Flow stages, ensuring compliance with internal policies for different opportunity types.
Related Account Organisation/Family Details
-
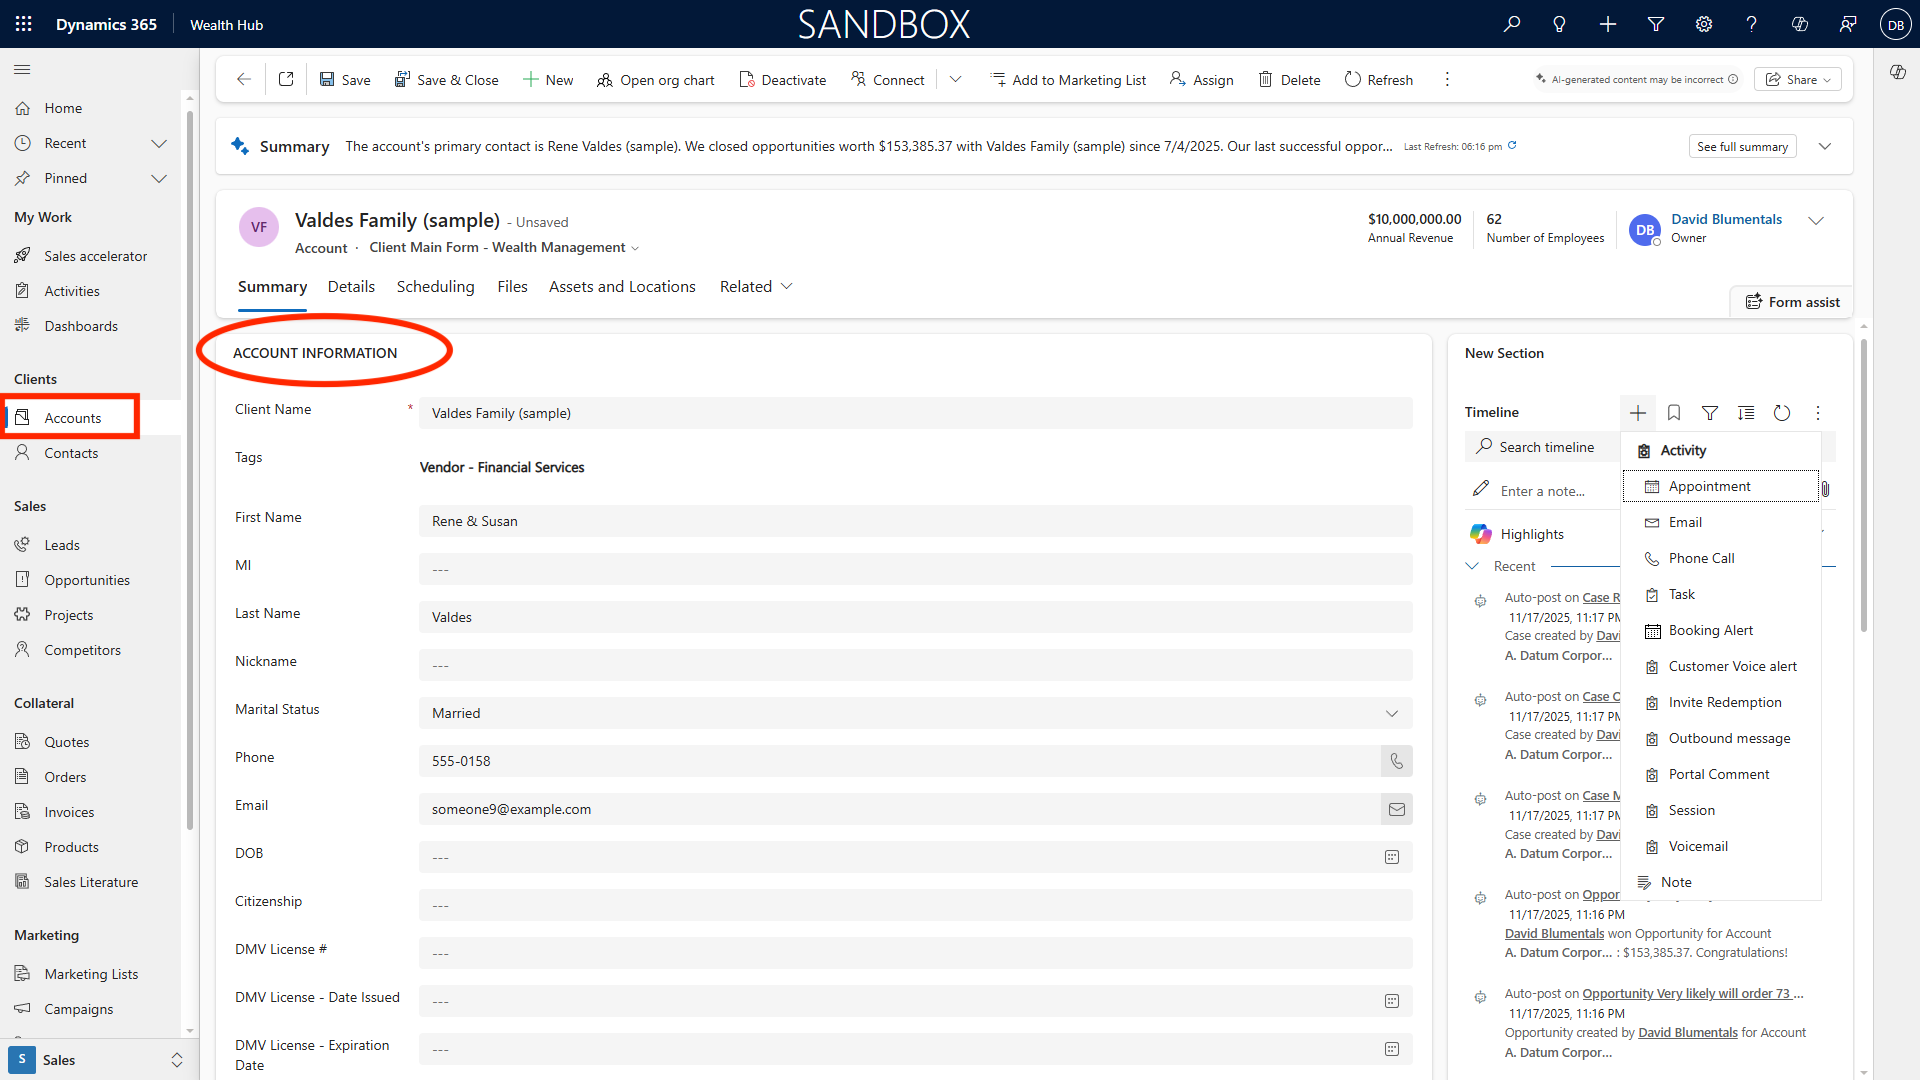
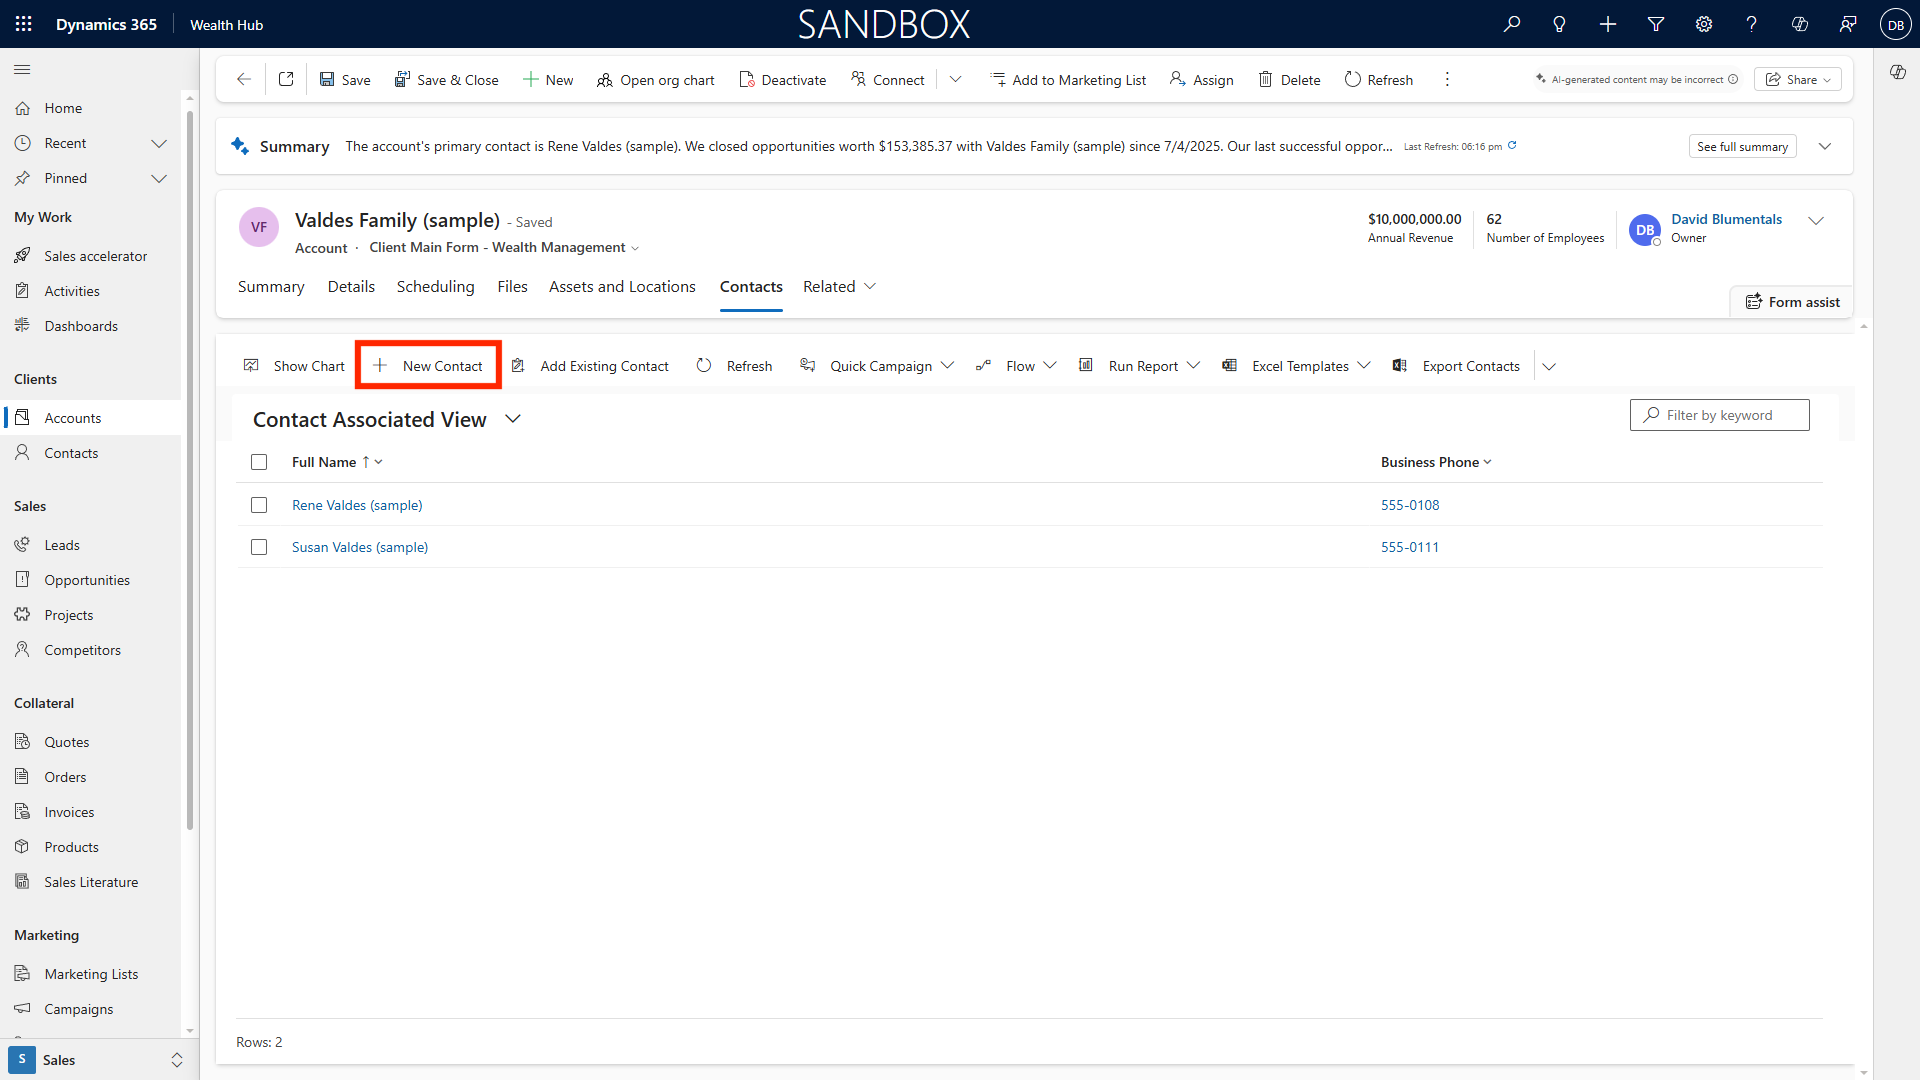
Open Accounts; select any account to view its full record.
-
Review profile information, including organization structure and family relationships (parent/child accounts).
-
Examine the Timeline for interactions, meetings, and notes related to the account.
-
Access related links, physical address, and geolocation via the Address Locations tab.
-
Use Account List Views to browse and filter organizations by type, sector, or relationship status.
Creating and Editing Account Organization Records
-
Click New Account to create an organization record.
-
Complete all relevant fields: Organization Name, Type, Primary Contact, Business Profile, Address, Family Relationships, and custom fields (e.g., Wealth Classification).
-
Click Save and the new account will appear in the Accounts list.
-
Edit existing accounts to add parent or child relationships to reflect complex family or organizational structures.
-
Link related opportunities, contacts, and projects for a 360-degree client view.
Contact Management
Contact List View, Editing Columns, and Filters
-
Navigate to Contacts. Choose your preferred list view (e.g., All Contacts, My Clients, Recently Active Contacts).
-
Edit columns to display fields such as Title, Email, Account, Relationship Status, and Last Contact Date.
-
Apply filters to segment contacts by location, account, investment interest, or other attributes.
-
Save custom views for quick reference.
Creating and Editing Contact Records
-
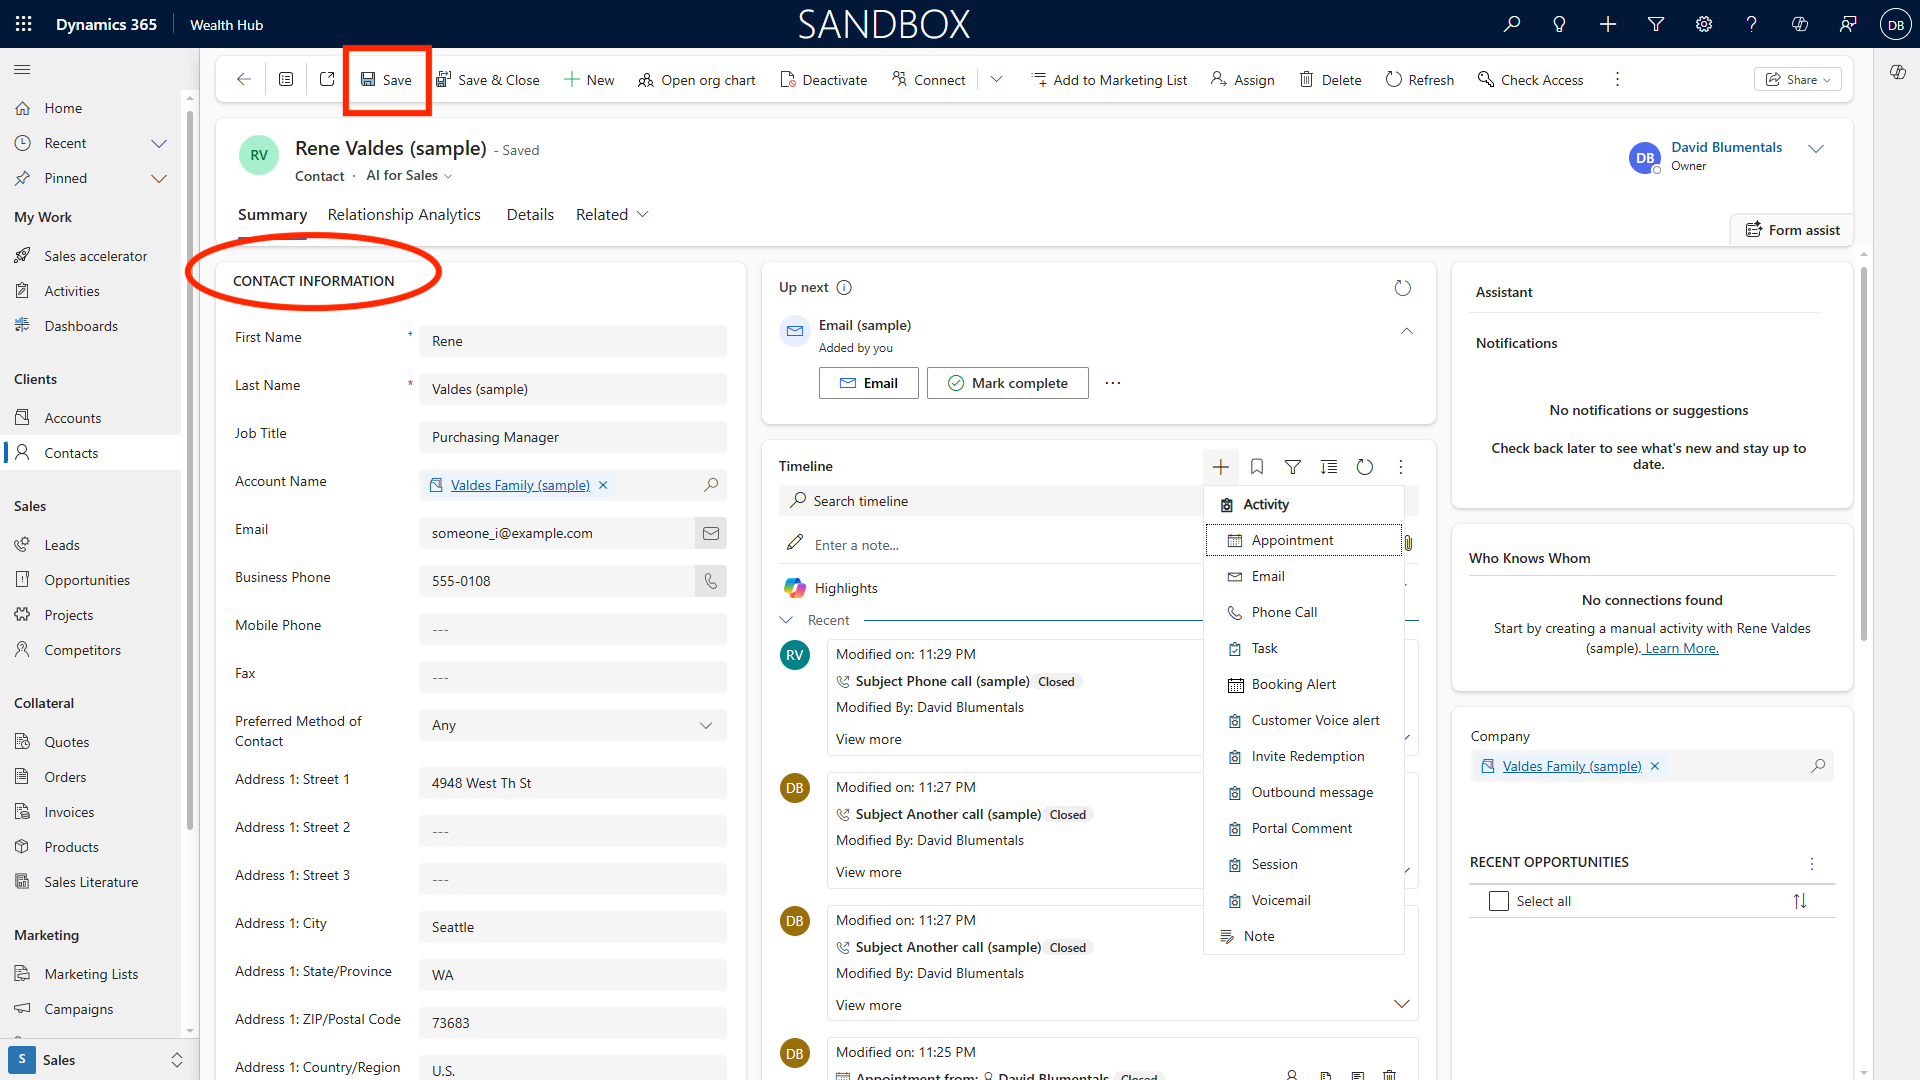
Click New Contact and fill in details: Name, Email, Phone, Address, and link to the relevant Account.
-
Click Save to add the contact to your CRM.
-
Edit contacts as needed, updating information or linking additional accounts and opportunities.
Linking Contacts to Related Account Organization
-
Open a contact record and use the Account field to select and link the corresponding organization.
-
Save changes to establish the relationship, enabling visibility of all related activities and opportunities.
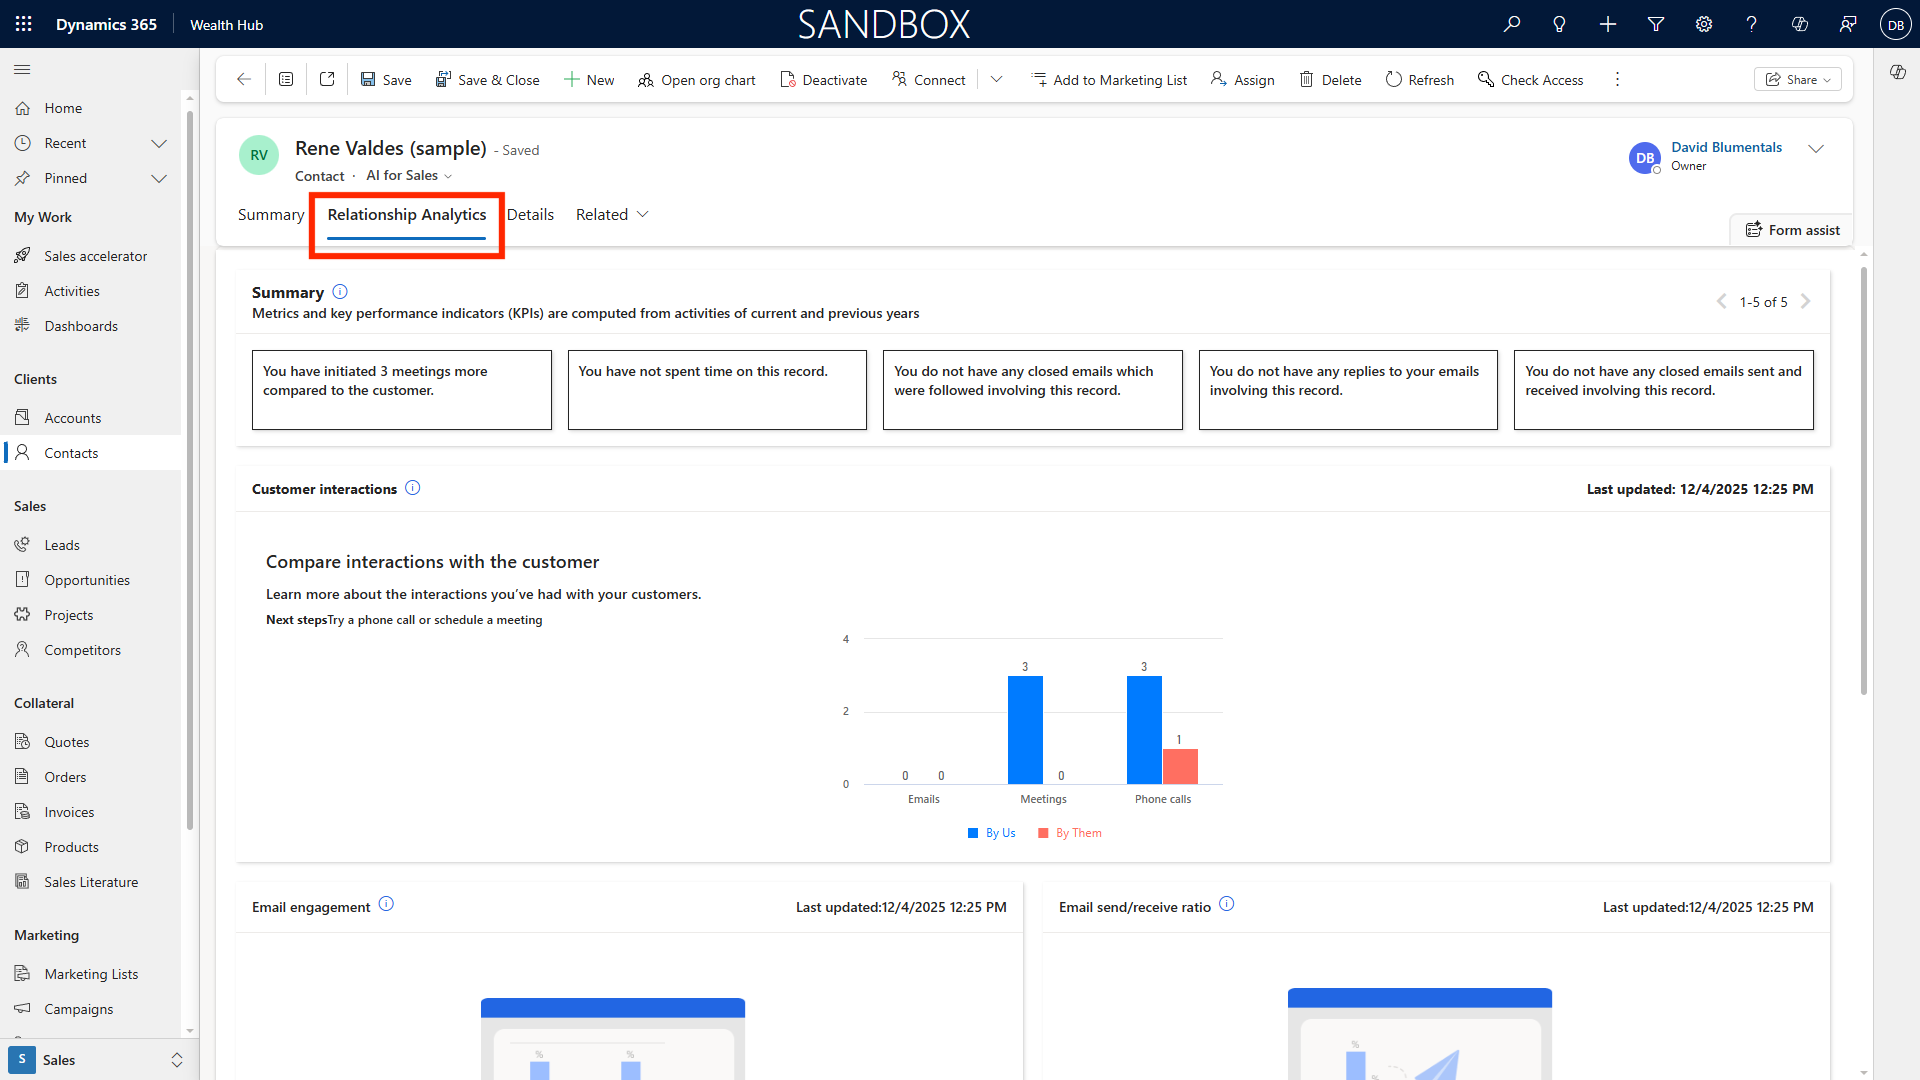
AI for Sales Relationship Analytics
-
Within a contact record, access Relationship Analytics to view engagement metrics---such as email frequency, meeting cadence, and sentiment analysis.
-
Review AI-driven recommendations for strengthening relationship health, identifying at-risk clients, and uncovering upsell opportunities.
-
Use these insights to tailor communication strategies and maximize client satisfaction.
SharePoint Document Management within Dynamics 365
-
From any record (opportunity, account, contact), select the Documents tab.
-
Upload files directly to integrated SharePoint storage---contracts, reports, client presentations, etc.
-
View, edit, or collaborate on documents within Dynamics 365, leveraging version control and access permissions.
-
Share documents easily with internal teams or clients via secure links.
Global Dataverse Search
-
Use the search bar at the top of the Dynamics 365 interface to initiate a global search.
-
Enter keywords, names, or identifiers for opportunities, accounts, contacts, documents, or custom entities.
-
Refine results using filters: Record Type, Created Date, Owner, Status, etc.
-
Leverage advanced search options to locate specific information across your entire organization’s data set.
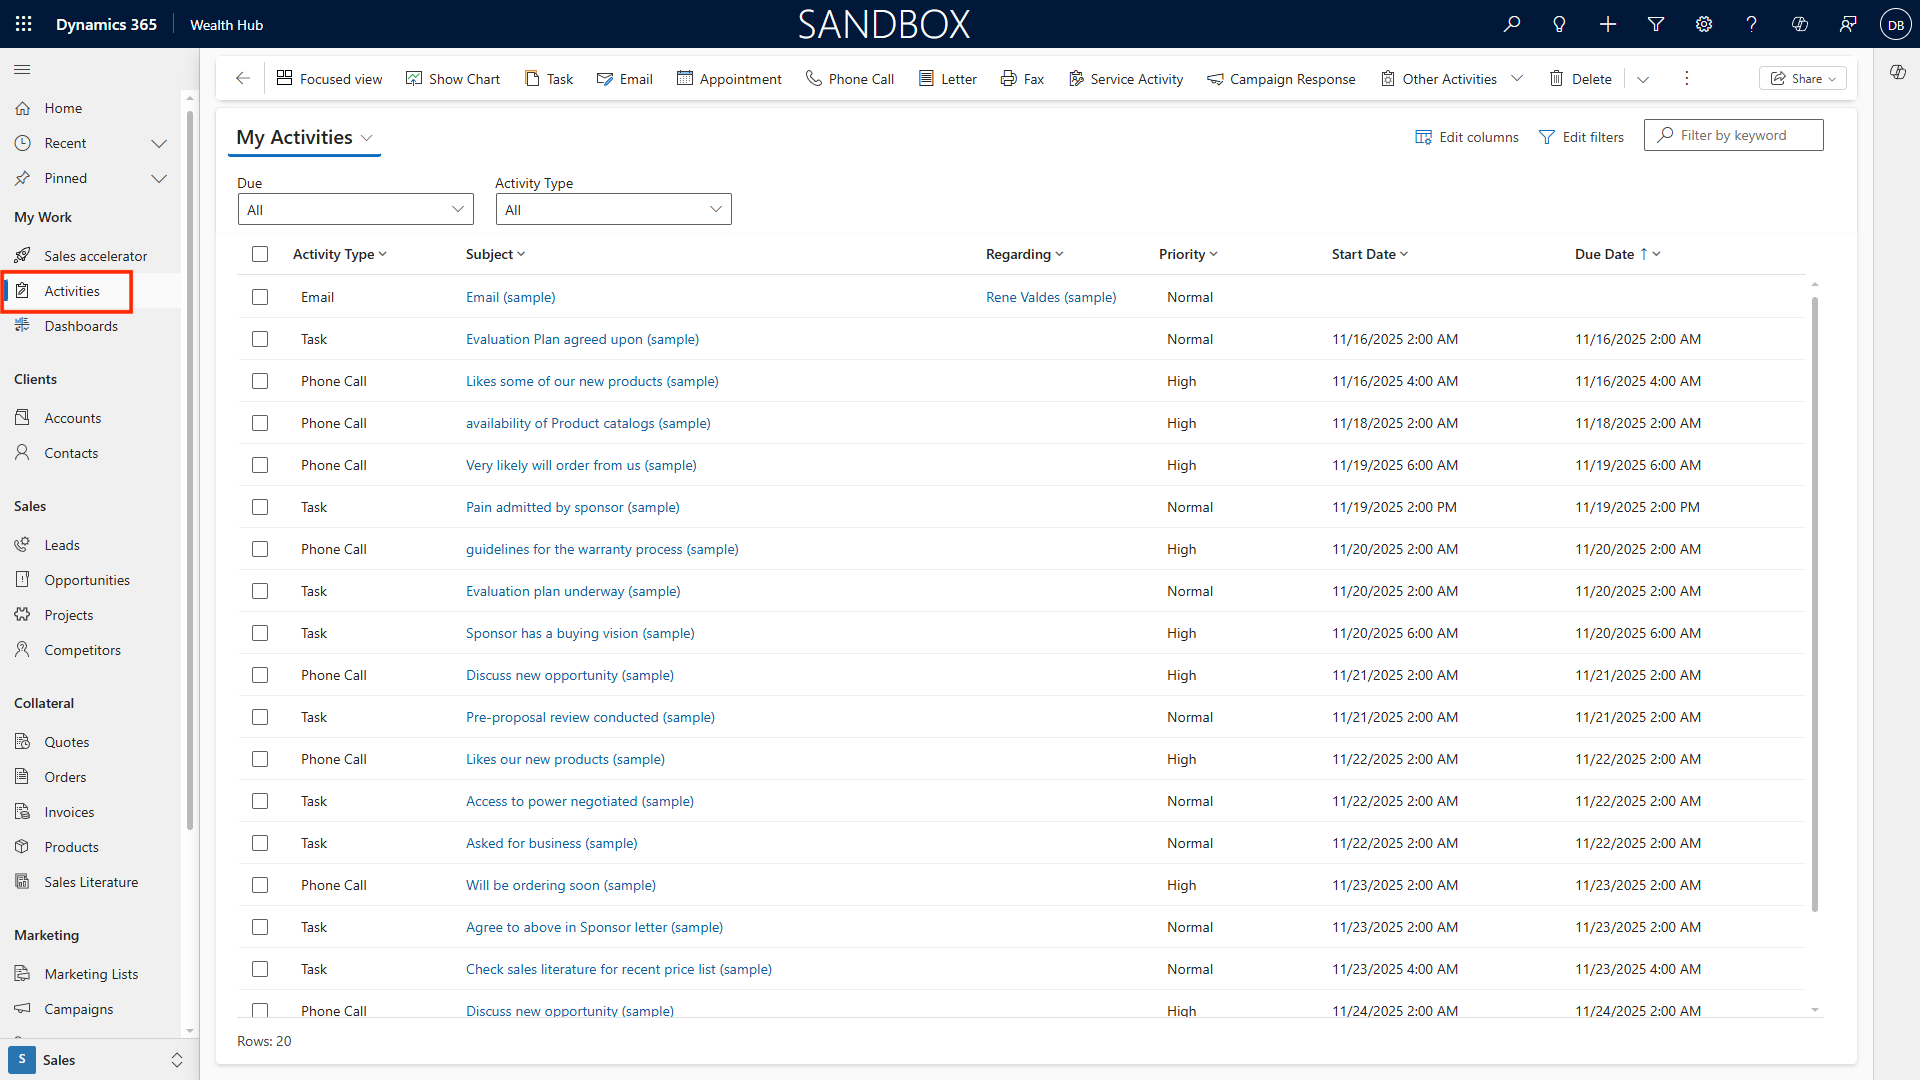
Activity Recording for Business Development Follow-Up
-
Open any CRM record and click + New Activity. Options include Task, Phone Call, Meeting, or Email.
-
Input the details, set priority and due date, and assign to yourself or a colleague.
-
Set reminders for automatic follow-up notifications.
-
Track completed activities in each record’s Timeline, ensuring comprehensive documentation of client interactions.
Dynamics 365 App for Outlook
Installation and Setup
-
Go to Microsoft AppSource and install the Dynamics 365 App for Outlook.
-
Open Outlook and sign in. The Dynamics 365 pane appears beside your inbox, giving access to CRM data.
Using Dynamics 365 from Outlook
-
Track emails to CRM records, creating contacts, opportunities, or activities directly from Outlook.
-
View and update client data without leaving your inbox.
-
Quickly log follow-up actions and schedule meetings linked to CRM records.
-
Benefit from seamless integration---ensure all communications are recorded and actionable in Dynamics 365.
Teams Integration
The integration of Microsoft Dynamics 365 with Microsoft Teams delivers a unified platform that transforms collaboration and communication across your firm. With this integration, users can view, share, and update Dynamics 365 records directly within Teams chats, channels, and meetings---eliminating the need to switch between applications. This seamless connection enables teams to co-author documents, discuss client cases, and manage sales opportunities in real time, all while maintaining a single source of truth.
Embedded Teams chat and calling features allow for instant communication linked to specific business records, while notifications and activity tracking ensure everyone stays aligned on tasks and updates. The result is enhanced productivity, faster decision-making, and improved visibility across departments. By centralizing conversations and business data, Dynamics 365 and Teams integration fosters context-rich collaboration, simplifies workflows, and empowers teams to deliver better outcomes for clients and stakeholders.
Dynamics 365 Sales Mobile App
Downloading and Installing the App
-
Visit the App Store (iOS) or Google Play Store (Android).
-
Search for Dynamics 365 Sales and install the app.
-
Log in using your company credentials; enable biometric or PIN authentication for ease of access.
Using the Mobile App
-
Access opportunities, accounts, contacts, and activities from anywhere.
-
Create, edit, and complete tasks or notes on the go---ideal for meetings and travel.
-
Receive push notifications for urgent reminders and follow-ups.
-
Use voice commands or dictation to enter notes quickly.
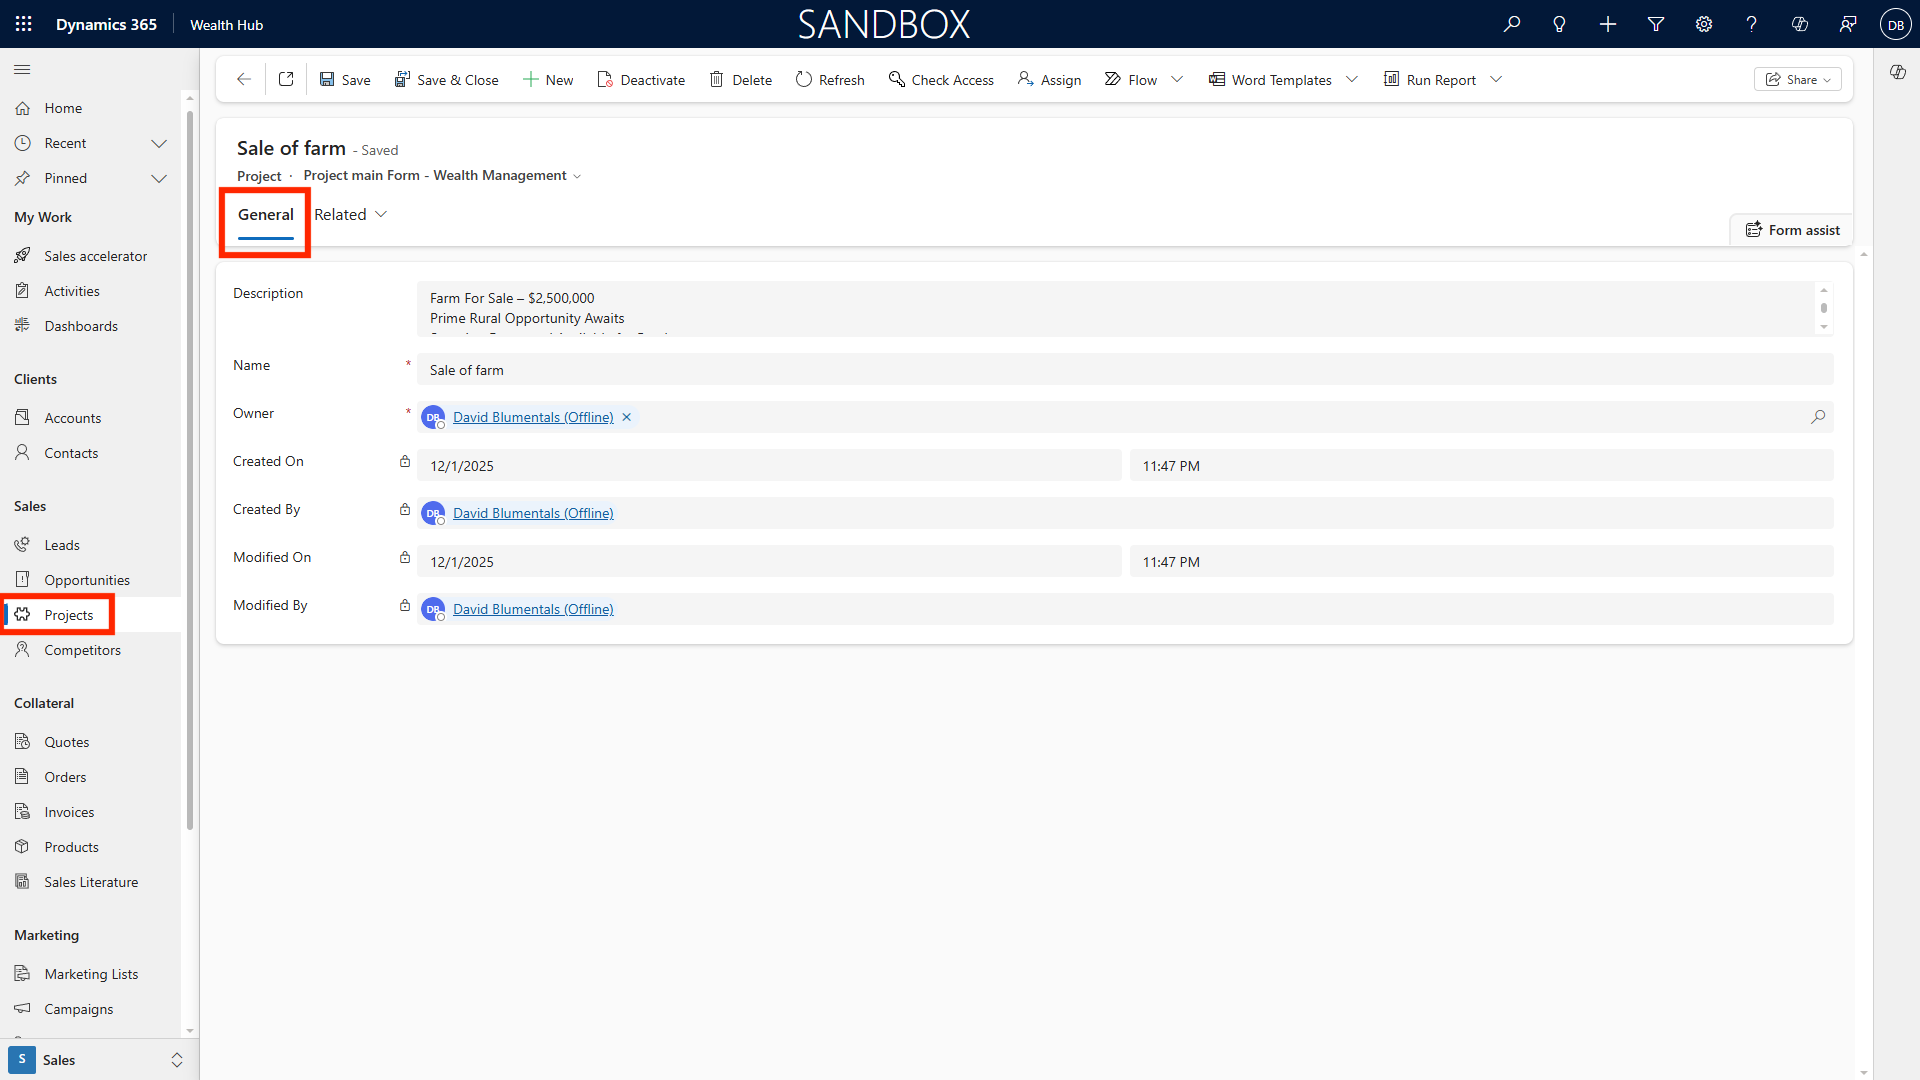
Extending to Custom Entities (e.g., Projects)
-
From the site map, choose custom entities like ‘Projects’ or any bespoke modules your organization has enabled.
-
View project records, add new projects, and link them to opportunities, accounts, or contacts for integrated management.
-
Customize project fields and workflows to match your team’s requirements.
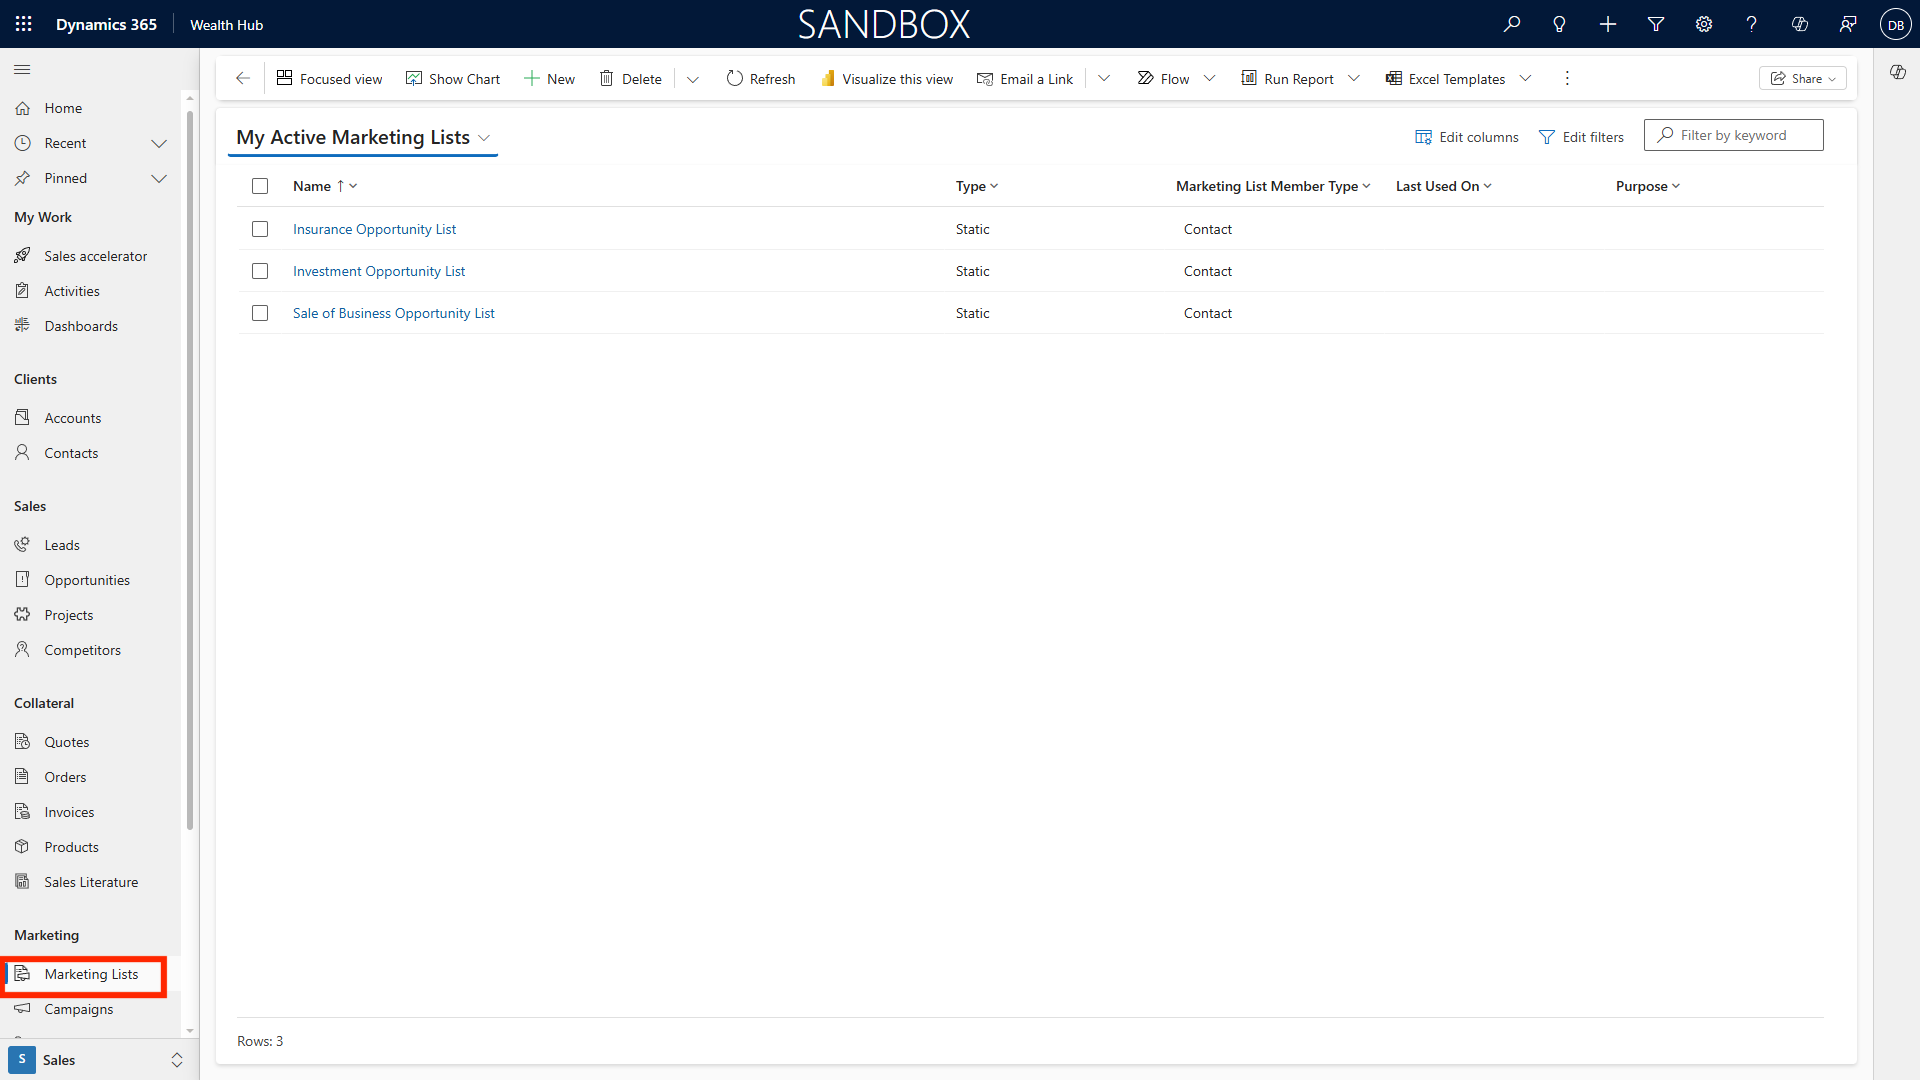
Marketing Lists and Quick Campaigns
Creating and Managing Marketing Lists
-
Navigate to Marketing Lists from the site map.
-
Click New Marketing List, provide a descriptive name and objectives.
-
Add members by searching for and selecting accounts, contacts, or leads based on filters (e.g., region, segment, relationship status).
-
Segment clients for targeted outreach, events, or product launches.
Running Quick Campaigns
-
Choose your marketing list and click Quick Campaign.
-
Select the campaign type: bulk email, phone call campaign, or follow-up task.
-
Configure message templates, schedule timing, and assign owners.
-
Monitor campaign progress and response directly within Dynamics 365.
-
Analyze results using built-in dashboards and reporting features.
Servicing and Case Management
Case Management offers a robust, end-to-end solution for tracking, managing, and resolving customer service issues across multiple channels and agents.
At its core, Case Management centralizes all customer interactions---whether via email, phone, chat, or social media---into a single, unified record, ensuring that every inquiry is logged, prioritized, and routed to the most appropriate representative.
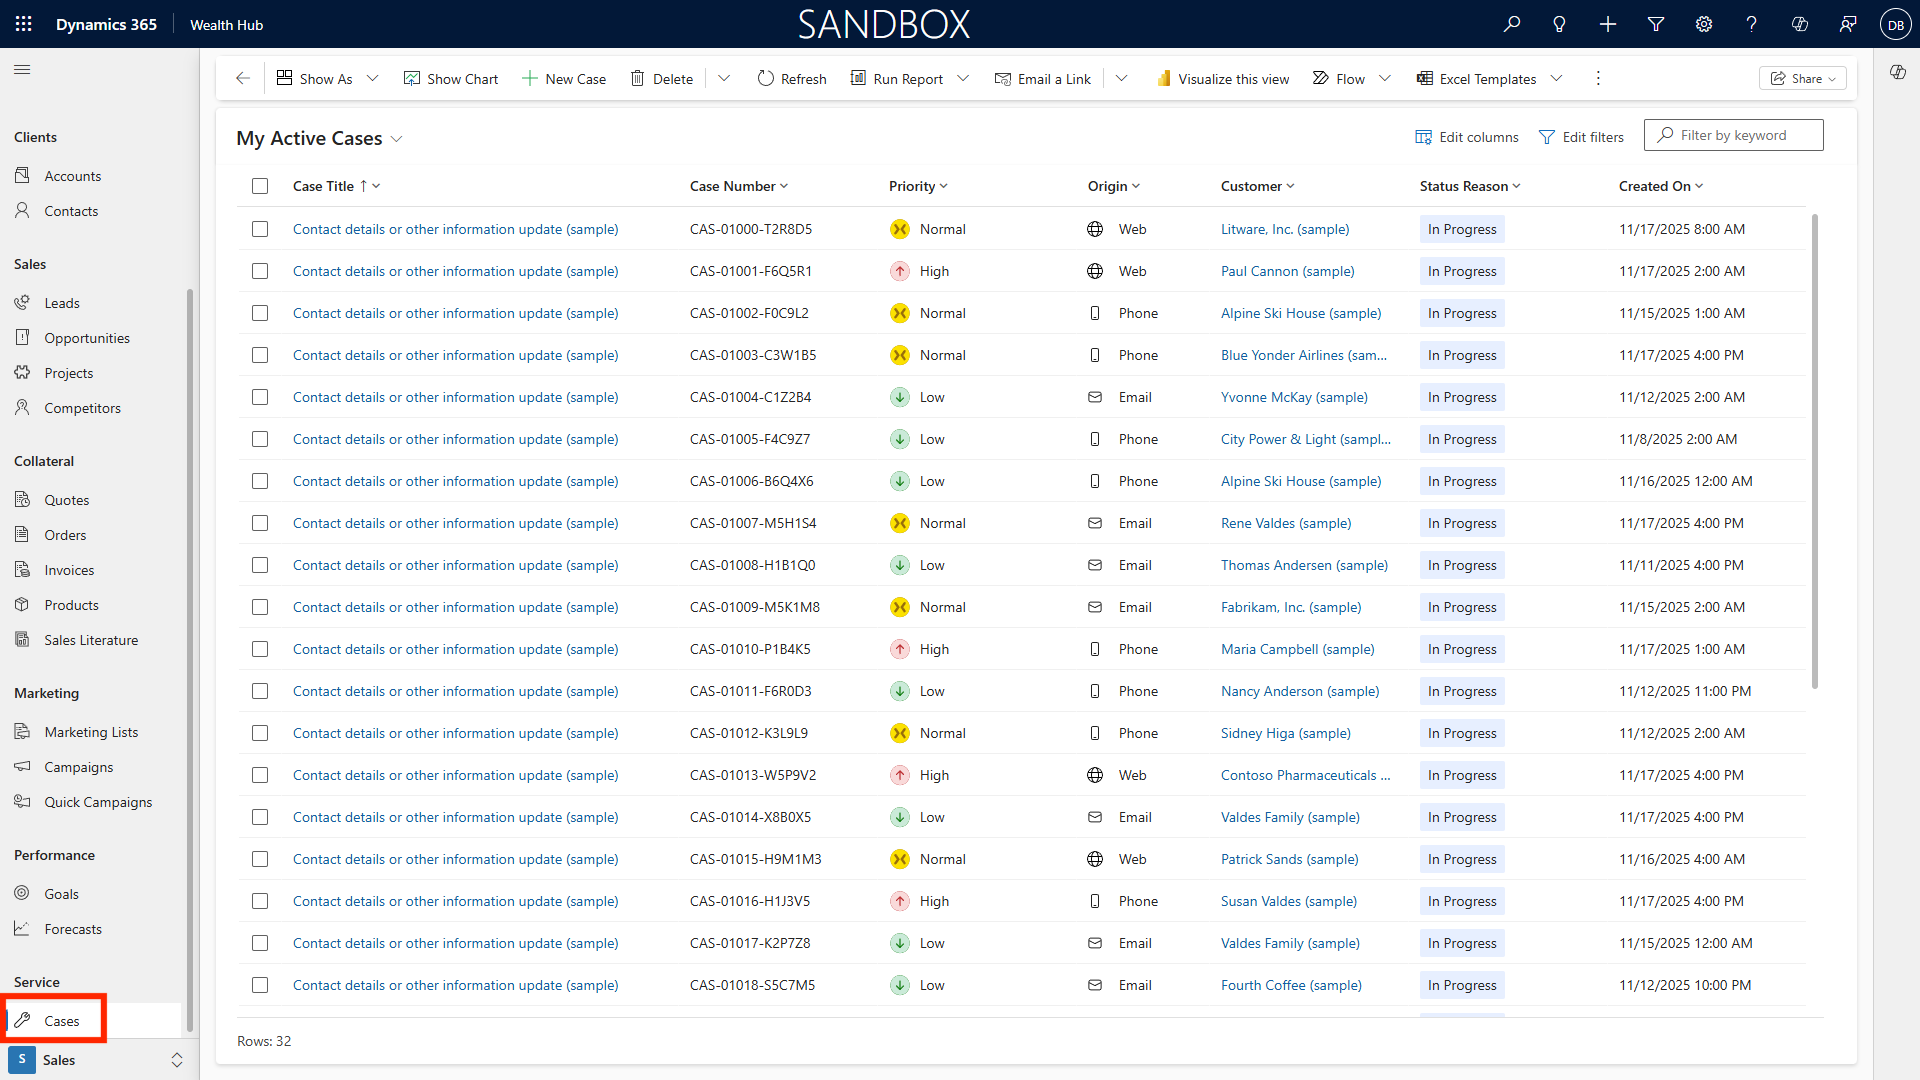
Key features include automated case creation from incoming communications, intelligent routing and service-level agreement (SLA) rules, and a comprehensive timeline that captures all related activities and updates. The platform integrates a knowledge base for quick access to solutions, customizable case resolution forms to standardize closure processes, and AI-powered Copilot summaries that help agents quickly understand case context and next steps.
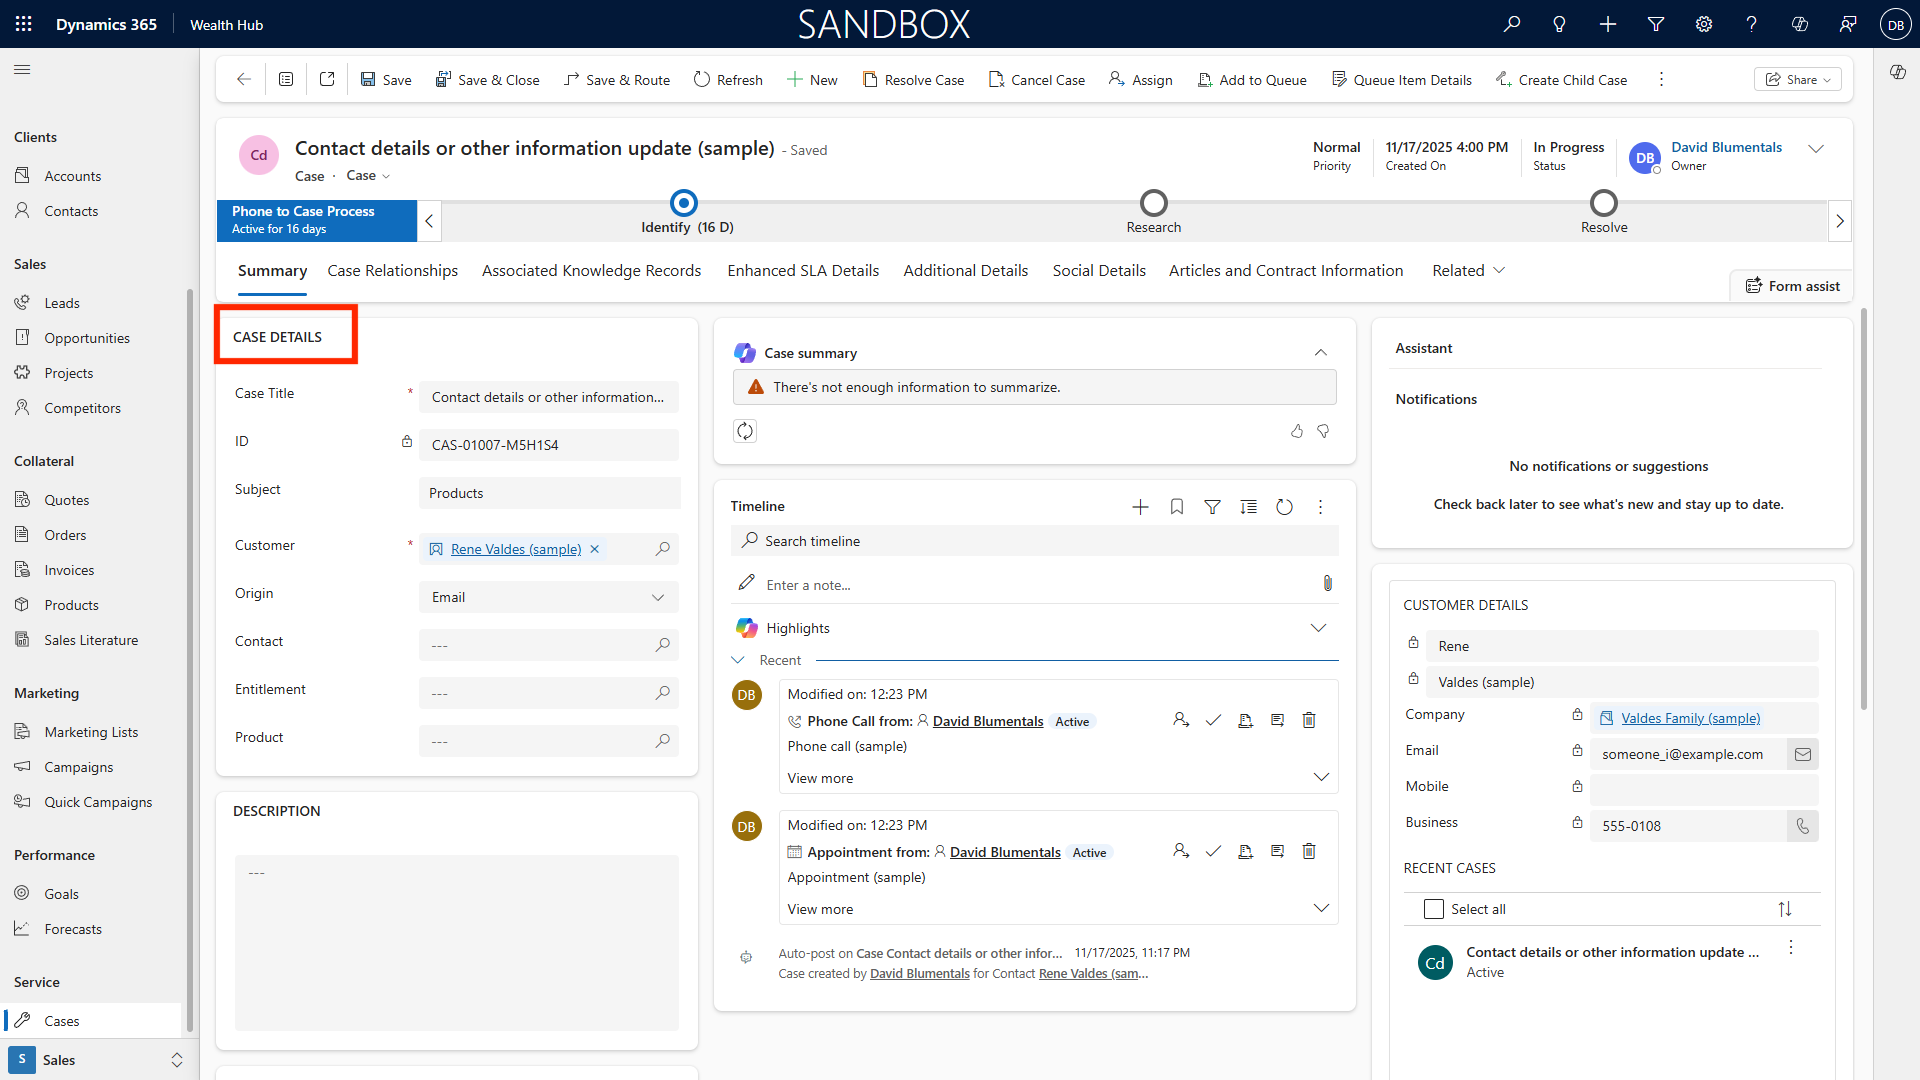
These capabilities streamline administrative tracking, improve agent productivity, and ensure consistent, high-quality service delivery. Ultimately, wealth managers benefit from faster issue resolution, improved client satisfaction, and actionable analytics that drive continuous service improvement.
Conclusion
This guide provides a detailed roadmap for navigating, personalizing, and leveraging Microsoft Dynamics 365 for Wealth Management. By applying these instructions, you can unlock the full potential of CRM capabilities, streamline client management, enrich deal flow visibility, and bolster business development efforts. For ongoing mastery, refer to Microsoft’s documentation, attend training sessions, and collaborate with your internal support team.
Appendix: Additional Resources and Support Contacts
Additional Resources
Dynamics 365 Sales: https://learn.microsoft.com/en-us/dynamics365/sales/
Dynamics 365 App for Outlook: https://learn.microsoft.com/en-us/dynamics365/outlook-app/deploy-dynamics-365-app-for-outlook
Dynamics 365 Sales Mobile App: https://learn.microsoft.com/en-us/dynamics365/sales/sales-mobile/install-mobile-app
Support Contacts
For technical troubleshooting, contact your IT support desk or Dynamics 365 system administrator.
AU: 1 Sussex St, Sydney NSW 2000
SG: 59 Ubi Avenue 1# 03-11, Singapore 408938
UK: 71-75 Shelton St, London, WC2H 9JQ
USA: 8 The Green # 20058, Dover DE 19901
AU +61 2 9037 2385 | SG +65 3 1251534 | UK +44 2036 953042 | USA +1 646 652 0780