Purchase and Payables Basic User Training Guide for Dynamics 365 Business Central
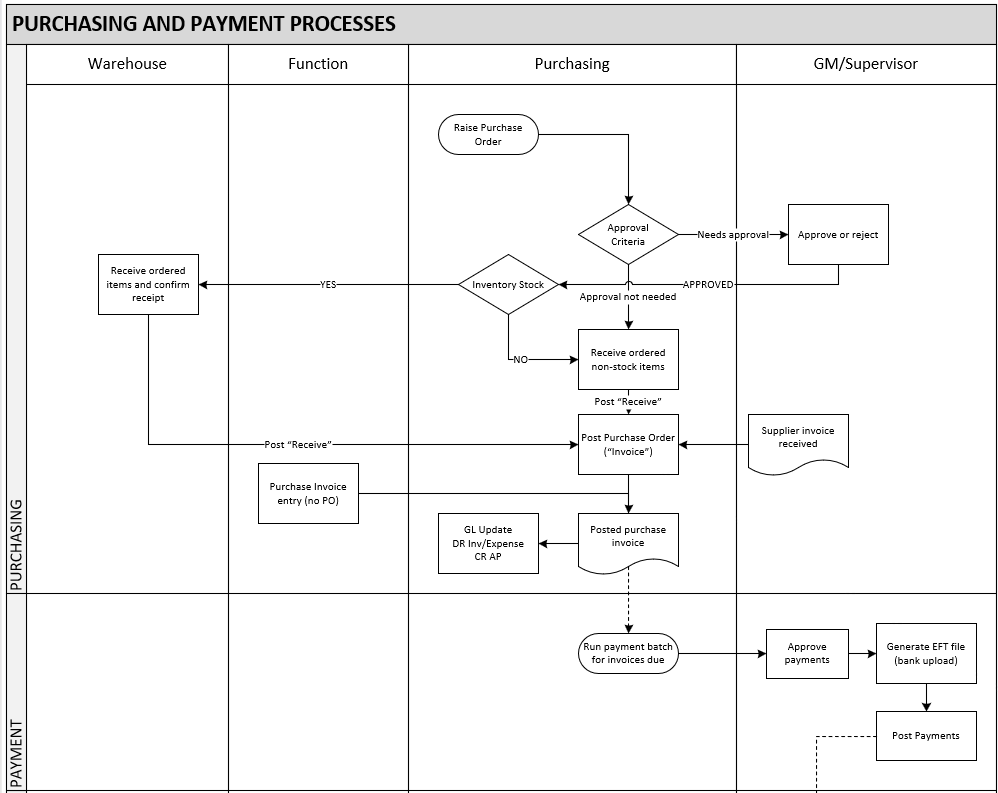
Purchasing Process
Process Overview
As shown in the diagram below, the standard sales process allows for:
-
Creation of a Purchase Order with purchase order lines for each item (location is optional).
-
Posting of this Purchase Order to create a posted receipt and a posted purchase invoice.
-
(Optional) Creation of a Purchase Invoice (i.e. without a Purchase Order).
-
Combining purchase order lines into one warehouse receipt (i.e. batch receipt).
-
Processing a Payment Run for invoices due.
Purchase Order
A Purchase Order involves both stock receiving and invoice tracking.
To enter a new purchase order:
-
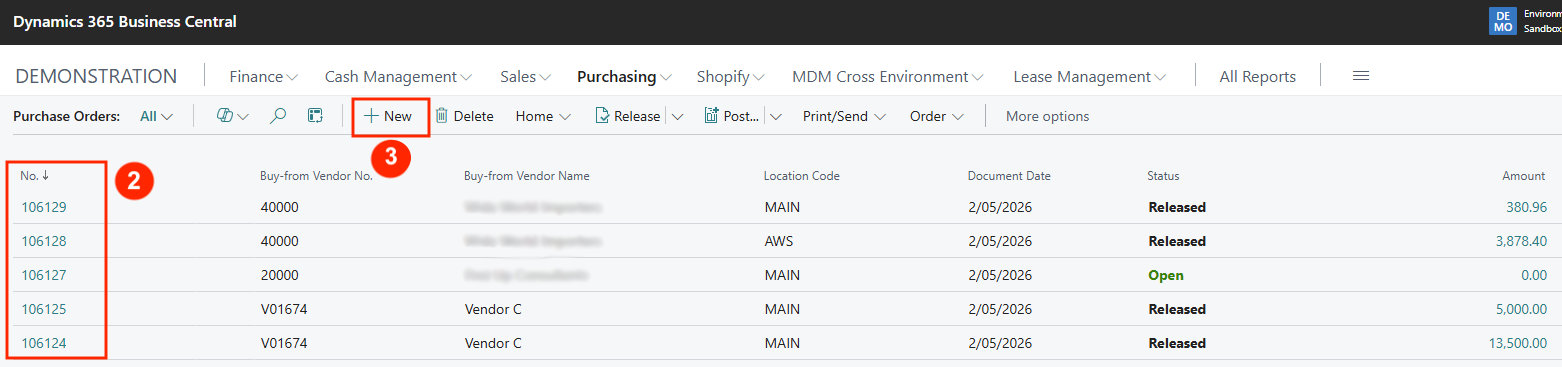
Select sub-menu option Purchase Orders to open the purchase order list page. This page lists all unposted purchase orders that can be amended (if the status is Open).

-
To edit an existing unposted purchase order, click on the No. flowlink.
-
To create a new purchase order, click on +New in the sub-menu. This opens a new Purchase Order document.
-
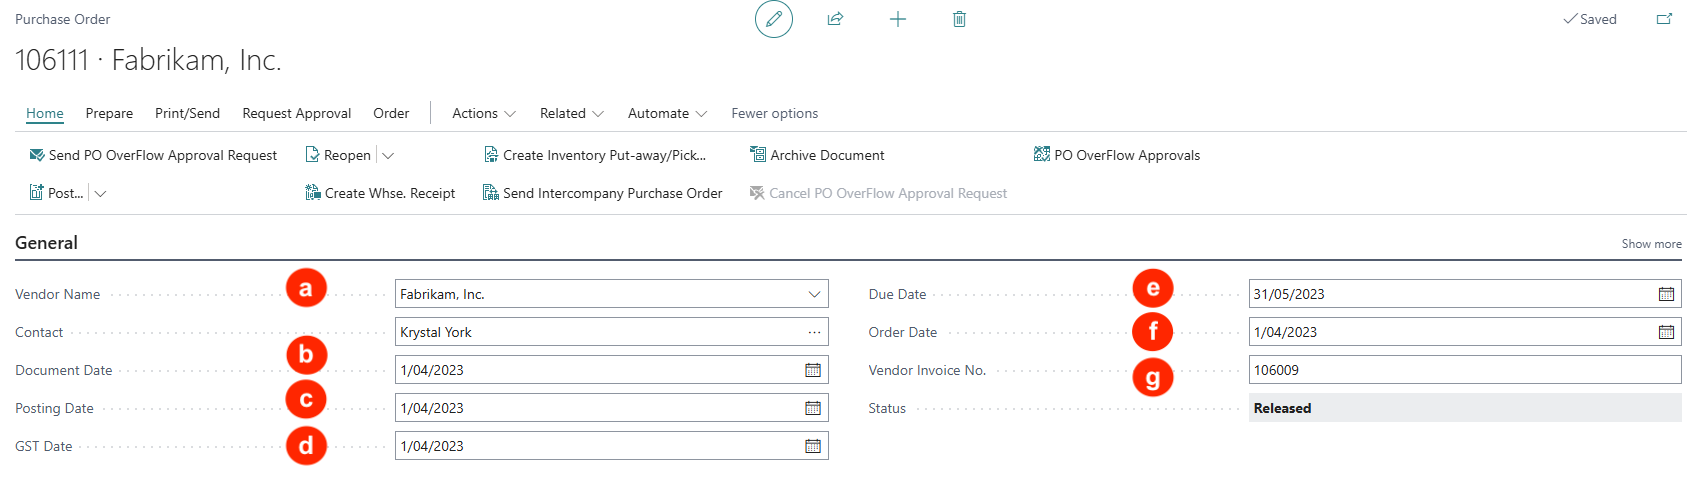
Enter the following Purchase Order header information:
NB: Date fields auto-populate with the working date.
a) Vendor Name — Enter the name or run a text search.
b) Document Date — Accept the default or enter the date of transaction.
c) Posting Date — Accept the default or enter the date to post into the accounting period.
d) GST Date — Accept the default or enter the date to post Purchase Tax into the tax reporting period.
e) Due Date — This is automatically calculated from the Document Date and the payment term of the vendor.
f) Order Date — Accept the default or enter the date that the order is made.
g) Vendor Invoice No. — When the vendor invoice is received, it is mandatory for the Purchase Order before it can be posted.
-
In the purchase order lines FastTab (section), the Type and No. fields allow you to enter one of the following options selected:

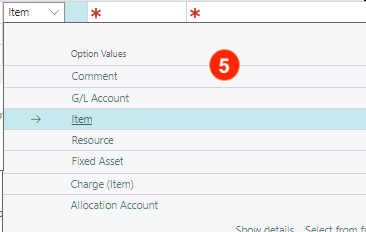
-
Comment — Select this option if the line description is to be printed as a Comment.
-
G/L Account — Select this option if the line amount is to be posted into a specific GL account code. The account code is then selected in the No. field.
-
Item — Select this option if the line is for an inventory item purchased. The No. field will be used to select the item number.
-
Resource — Select this option if a resource (hours) is to be purchased. Resources must first be defined.
-
Fixed Asset — Select this option if the purchase line is for a Fixed Asset. The No. field will be used to select the asset code for acquisition (cost).
-
Charge (Item) — Select this option for a pre-defined order charge (e.g. landed costs). The No. field will be used to select the pre-defined charge item. The charge item value is then pro-rated to the purchase lines to assign this charge amount to the items purchased.
-
Allocation Account — select this option if the purchase value is to be allocated to different departments. The allocation distribution code must be pre-defined and selected in the No. field.
-
-
After selecting and entering Type and No. fields, the following fields need to be entered (minimum)
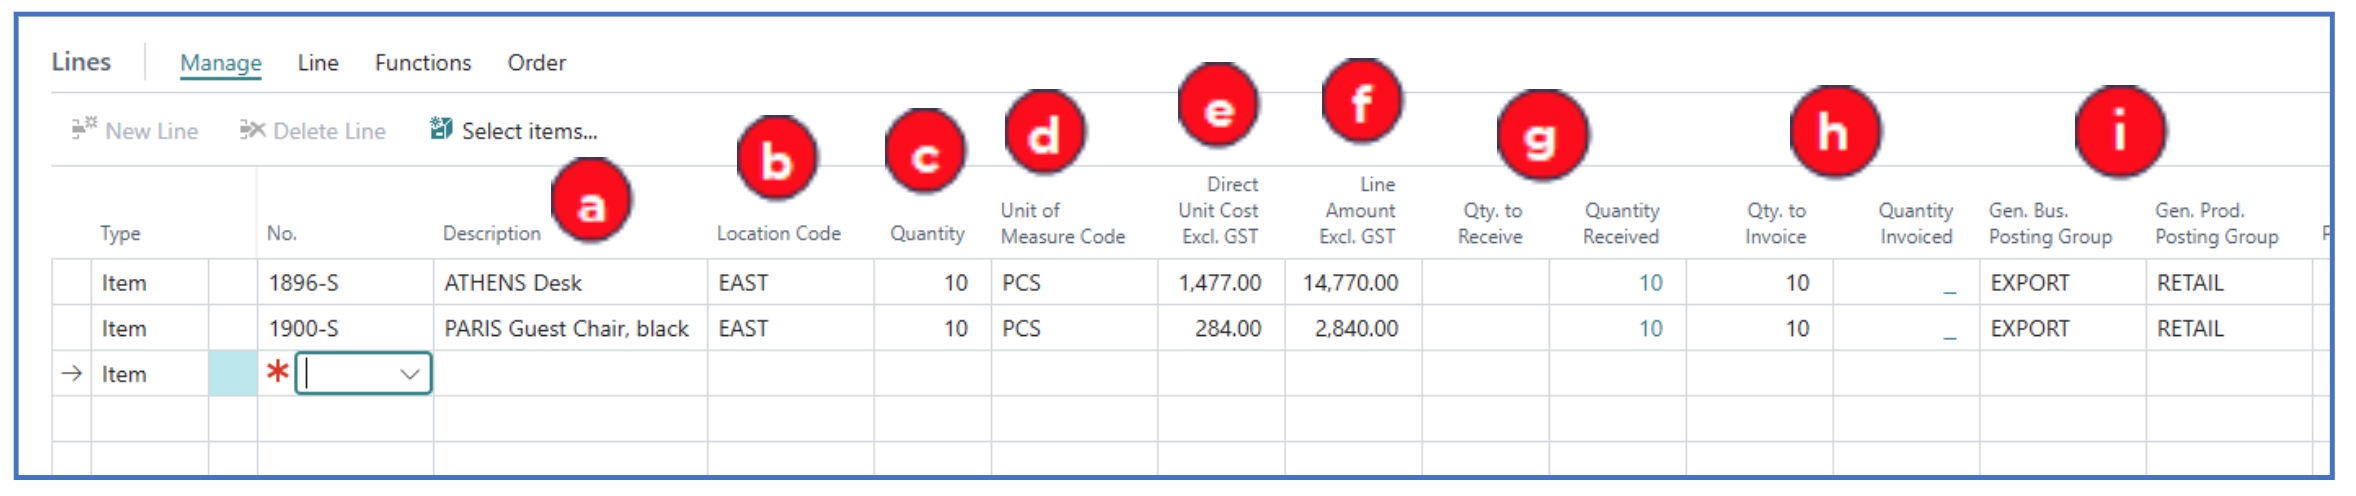
a) Description — The item description is defaulted. You can type over a new description.
b) Location Code — Select the (warehouse) location where the item will be picked for delivery
c) Quantity — Enter the quantity sold and to be delivered.
d) UOM — This is defaulted from the default UOM of the selected item.
e) Direct Unit Cost Excl GST — This should be defaulted from the item unit cost but if not, enter the unit cost.
f) Line Amount Excl. VAT — This is the extended amount for the purchase line.
g) Qty to Receive and Quantity Received — These fields are used to tally between the quantity ordered and quantity received. The ordered quantity should default to the Qty to Receive and once the order receipt (quantity) is posted, the Qty to Receive will be “moved” to Quantity Received. This process checks a 2-way match between ordered quantity and received quantity. If receiving less than ordered quantity, the value of Quantity Received will be less than the Qty to Receive.
h) Qty to Invoice and Quantity Invoiced — The quantity ordered should default to the Qty to Invoice (i.e. expecting to be invoiced for the ordered quantity). If quantity received is less, the Qty to Invoice should be made equal to the received quantity — this way, when posted, the value in the vendor ledger will equate to the actual received quantity. This also forms a check against the vendor’s invoice — 3-way match on ordered quantity, received quantity and quantity on invoice.
i) Gen. Bus. Posting Group and Gen. Prod. Posting Group — These are default posting groups from the selected item (Prod. Posting Group) and vendor (Bus. Posting Group). The combination of these 2 codes provides the purchase and COGS default accounts.
-
More Purchase Order header information is displayed after the purchase order line FastTab.
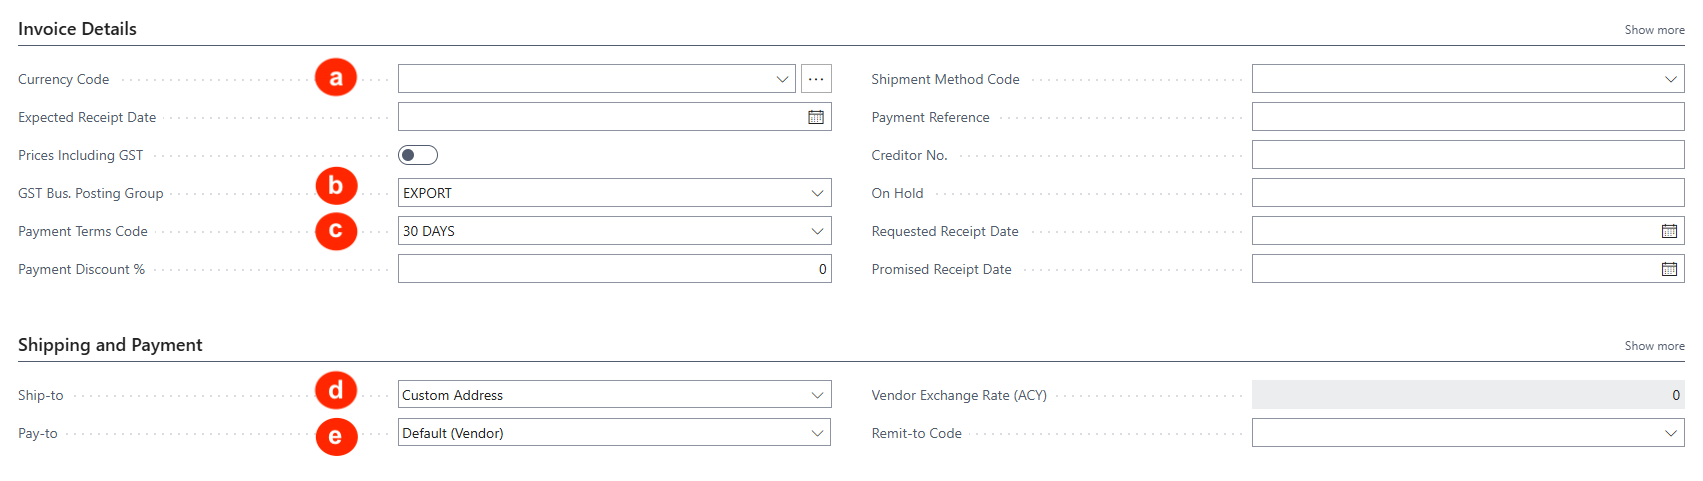
Invoice Details FastTab:
a) Currency Code — Leave this blank for local currency sales. If the sale is in a foreign currency, select the Currency code.
b) GST Bus. Posting Group — This GST code defaults from the vendor master.
c) Payment Terms code — Confirm the default payment (credit) terms from this vendor.
Shipping and Billing FastTab:
d) Ship-to — The default shipping address to receive the order from the vendor.
e) Pay-to — The default vendor code/address where the vendor invoice will be received from (e.g. payment made to HQ for orders placed with the local branch).
f) Remit-to-Code — This is the address for Remittance Advice.
-
After completing the data entry for the Purchase Order header and lines FastTabs, release the Purchase Order to lock it for shipment and invoice processing.
This is done in the sub-menu option:
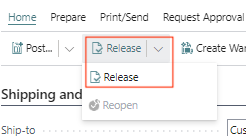
The sales order status will change to Released. To make further edits, the sales order must be Reopened.
NB: If approval workflow is defined, the approval of the PO will auto-release it.
Purchase Order with Prepayment (Advance Payment)
If the purchase involve prepayment required by the vendor (i.e. before order fulfilment), the next step after entering the Purchase Order is to create a proforma prepayment invoice against which a vendor advance payment is made.
The prepayment invoice will then be processed in a payment run so that the debit is shown in the vendor account for offsetting with the final invoice.
To trigger this prepayment for the Purchase Order, complete the fields in the Prepayment FastTab:
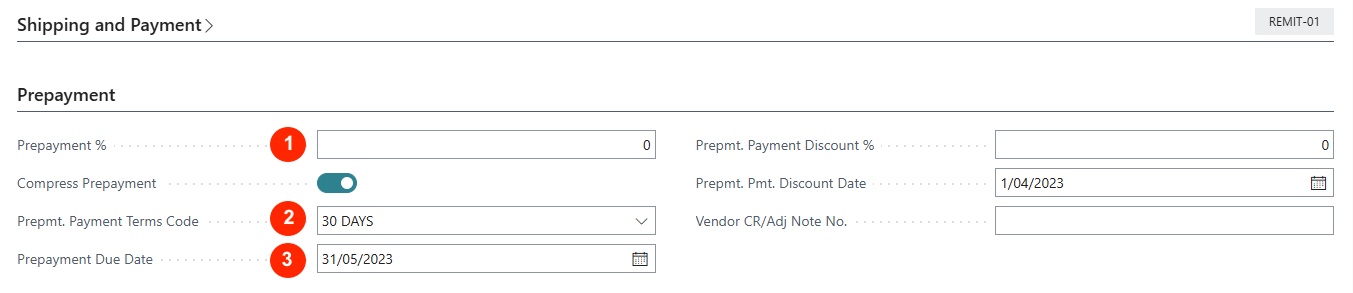
-
Prepayment % - Enter the % of prepayment requird (from 1% to 100%). Once entered, accept the prompt to update the prepayment % for all order lines so that the prepayment value is applied.
-
Prepaymt. Payment Terms Code — Confirm the payment terms applied to the prepayment, or change this to CASH.
-
Prepayment Due Date — Confirm the default date or update a new date.
Purchase Order Entry of Multiple Lines
-
To be able to select several items from the inventory into the Purchase Order lines, click on Select Items in the Purchase Lines FastTab menu to open the Items list pop-up.
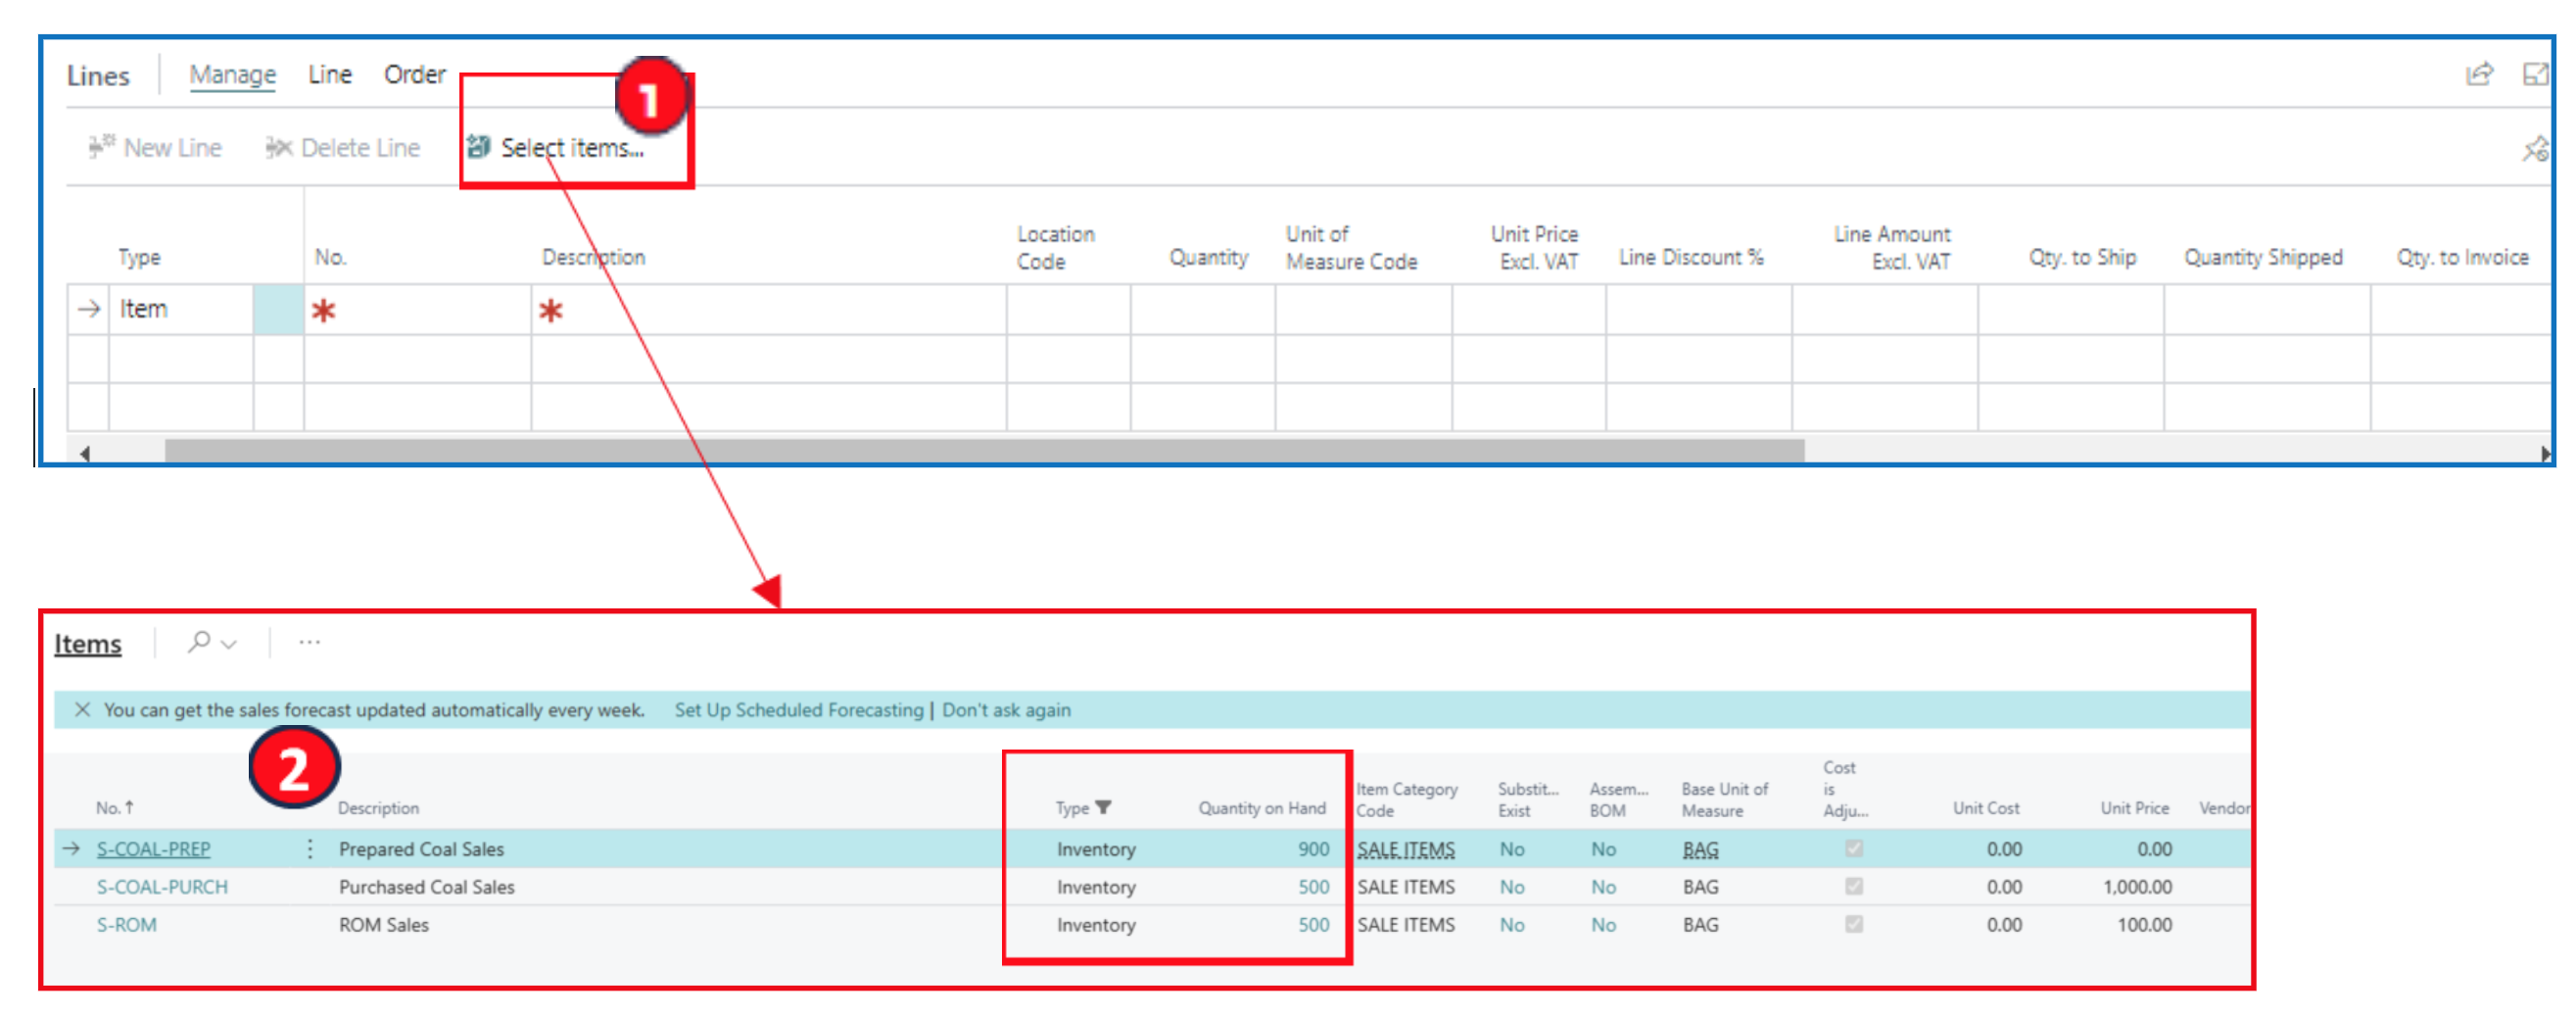
Tip: Filter by Type=Inventory and check Quantity on Hand value for the item.
-
From this Items list page, click on the 3-dot next to any item, to display the menu option and choose Select More. This action displays the selection buttons for each item row.
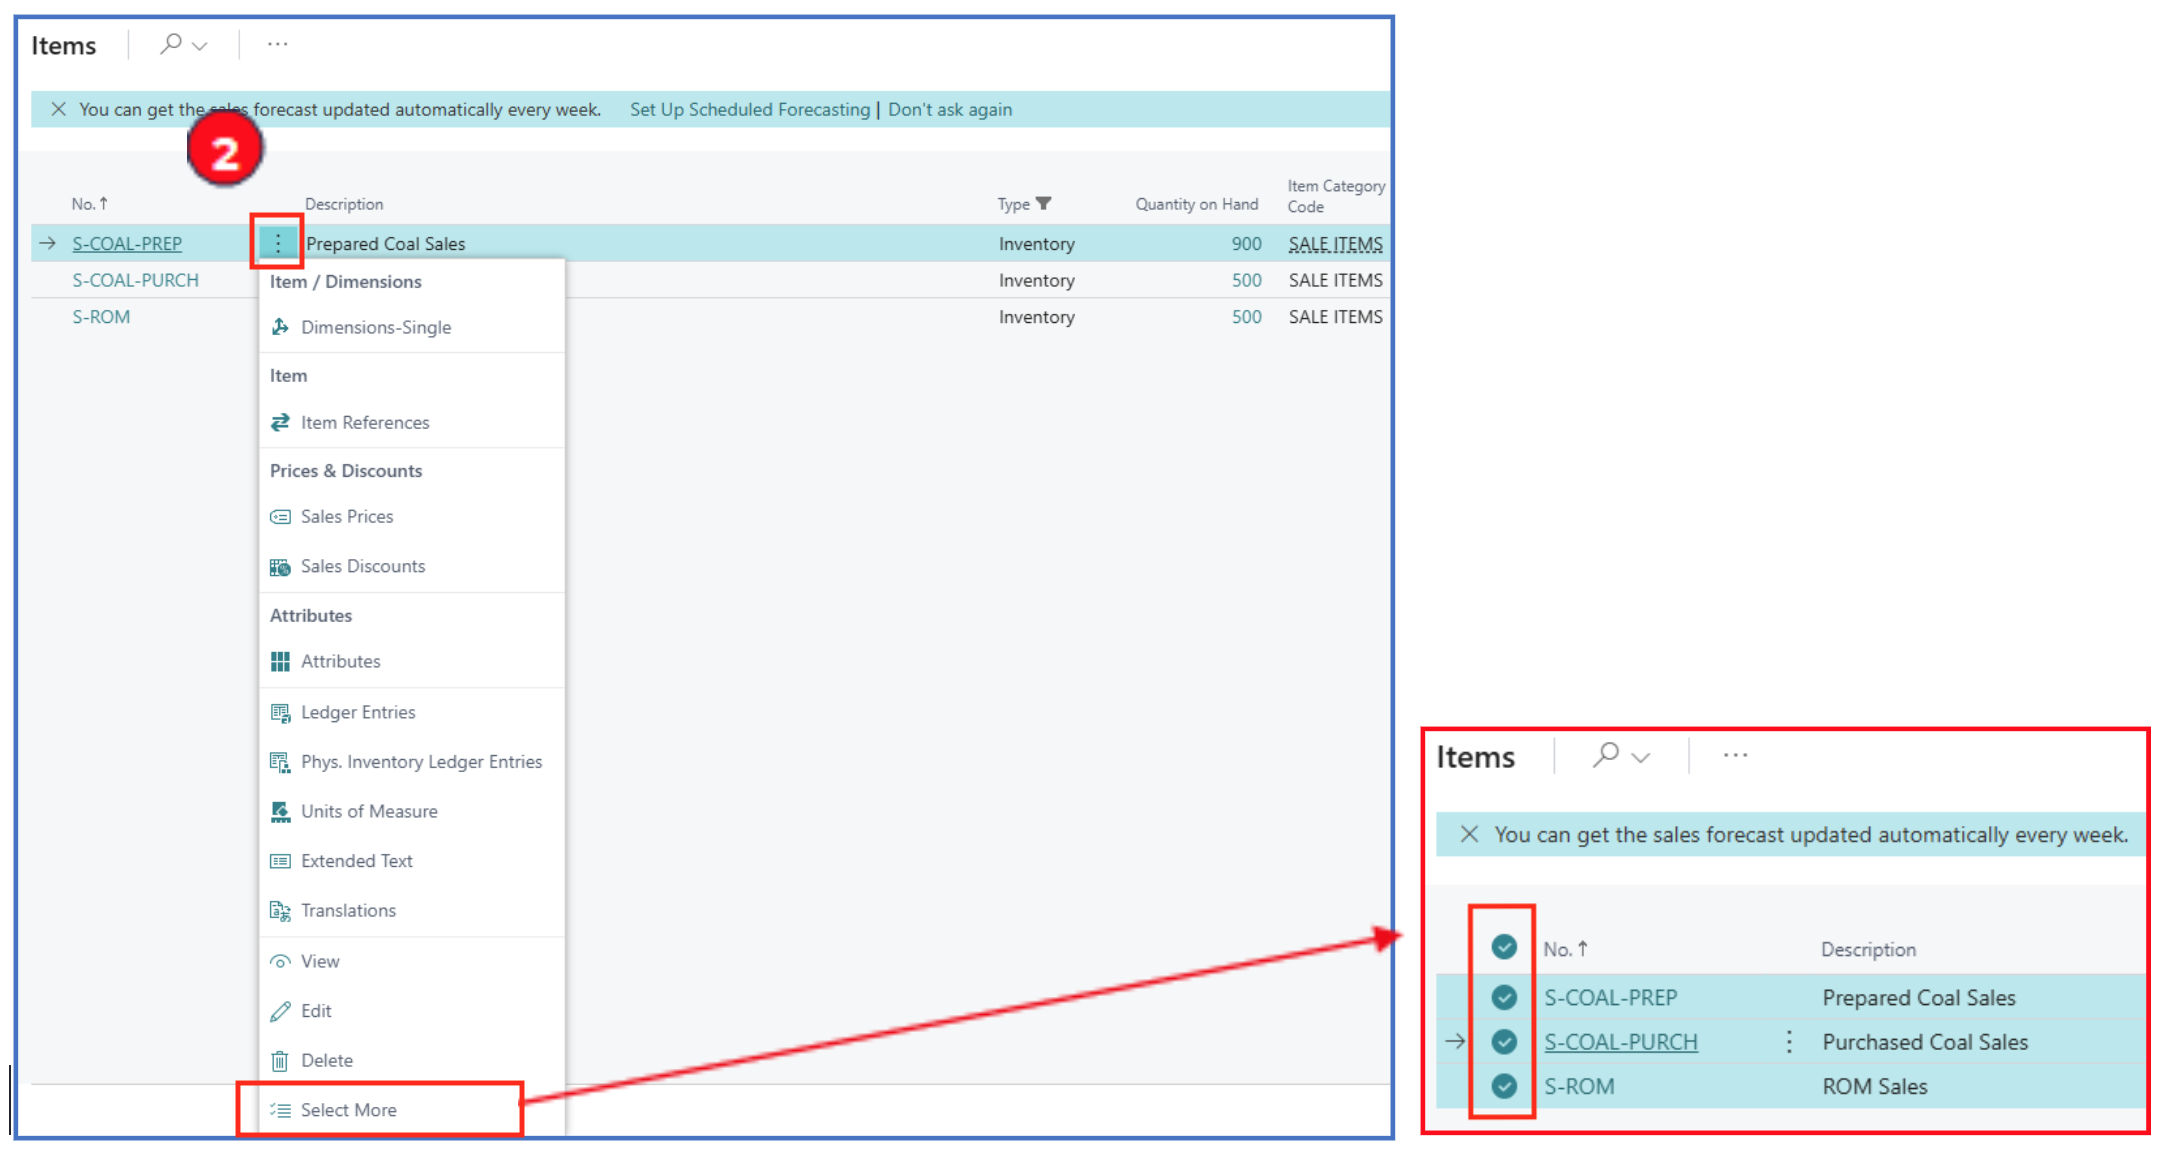
- Click OK to add the selected lines to the Purchase Order Lines FastTab, and update the purchase quantity per line to complete the Purchase Order.
Purchase Order Emailing
The released purchase order can be emailed to the vendor. The vendor card defaults the email account used. Each vendor can have a different PO layout format if needed.
Navigate to open a vendor card and select menu option Vendor > Document Layouts.
Example:
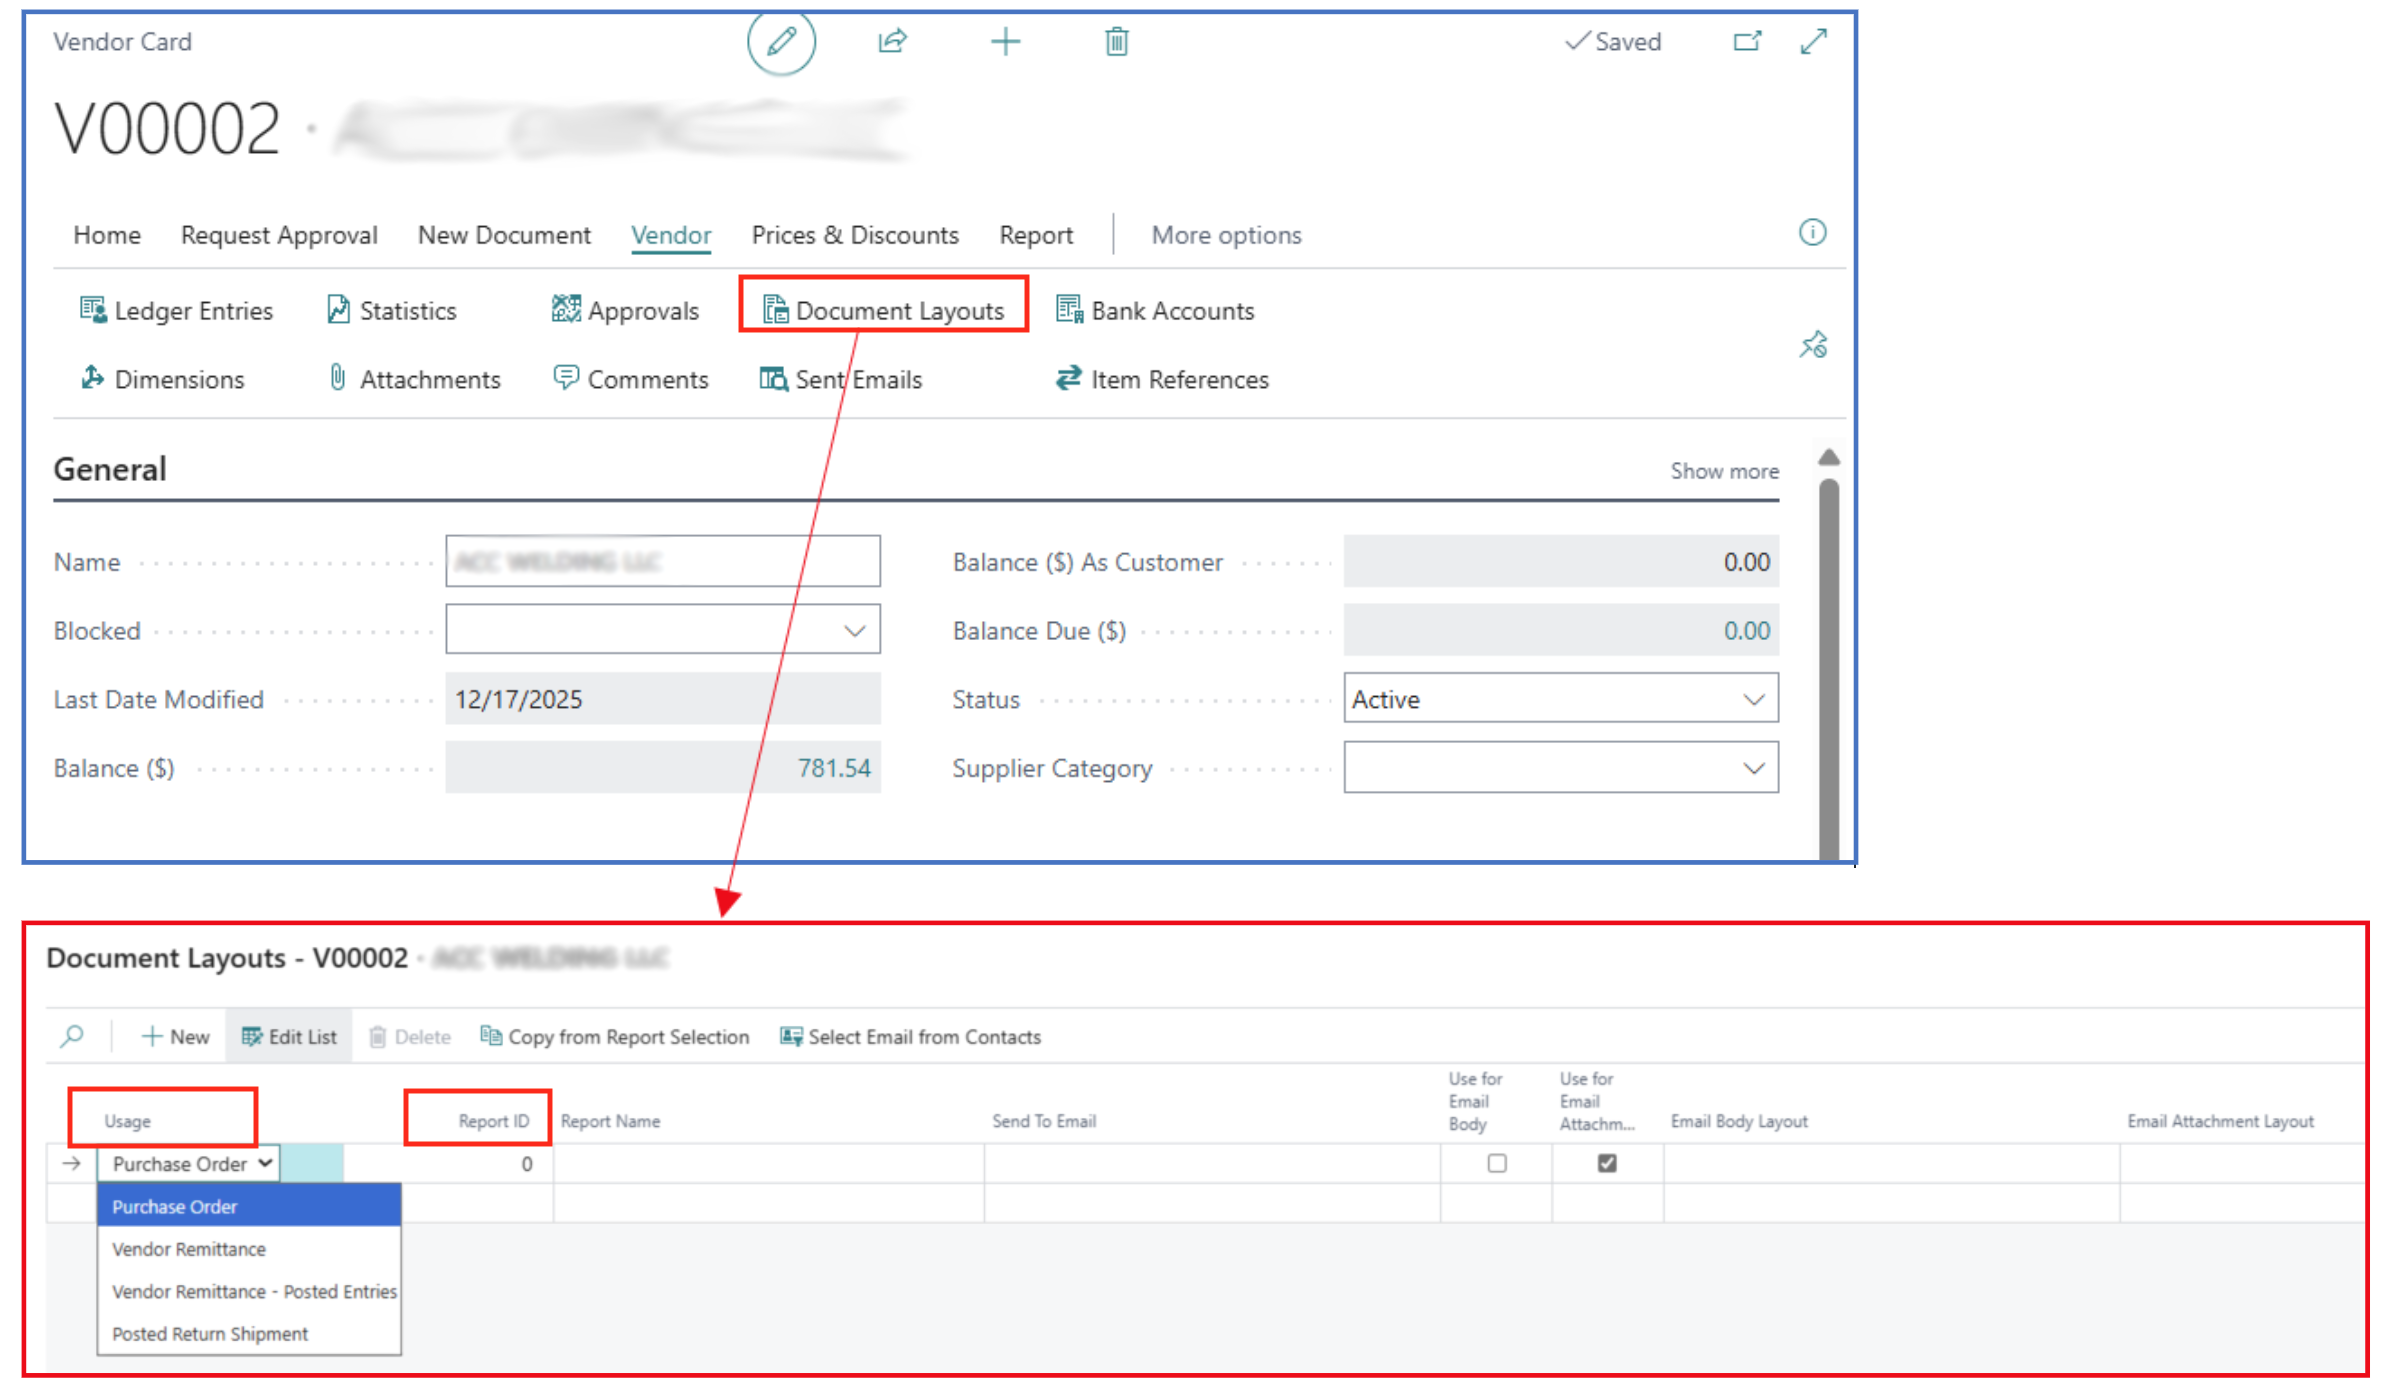
This opens the Document Layouts page to define the default document layout format for the vendor.
-
Usage — Select the purpose of the document e.g. Purchase Order
-
Report ID — drilldown to the field to search for the report ID e.g. 1322 for Purchase Order
To send the Purchase Order by email, navigate to the Purchase Order list page and select any PO. Then use menu option Print/Send > Send by Email:.
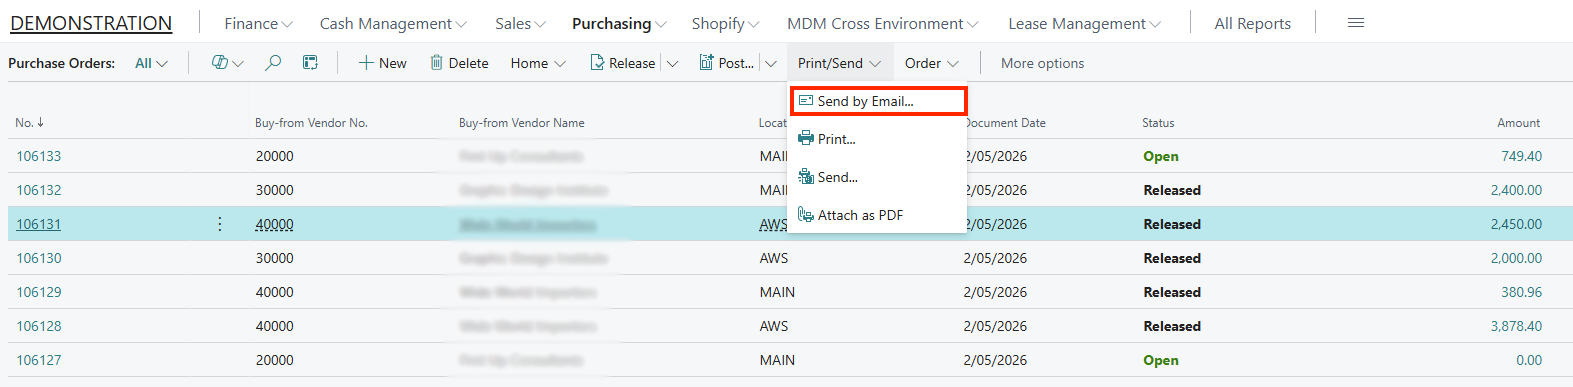
Otherwise, in a Purchase Order page, the same menu option can be used.
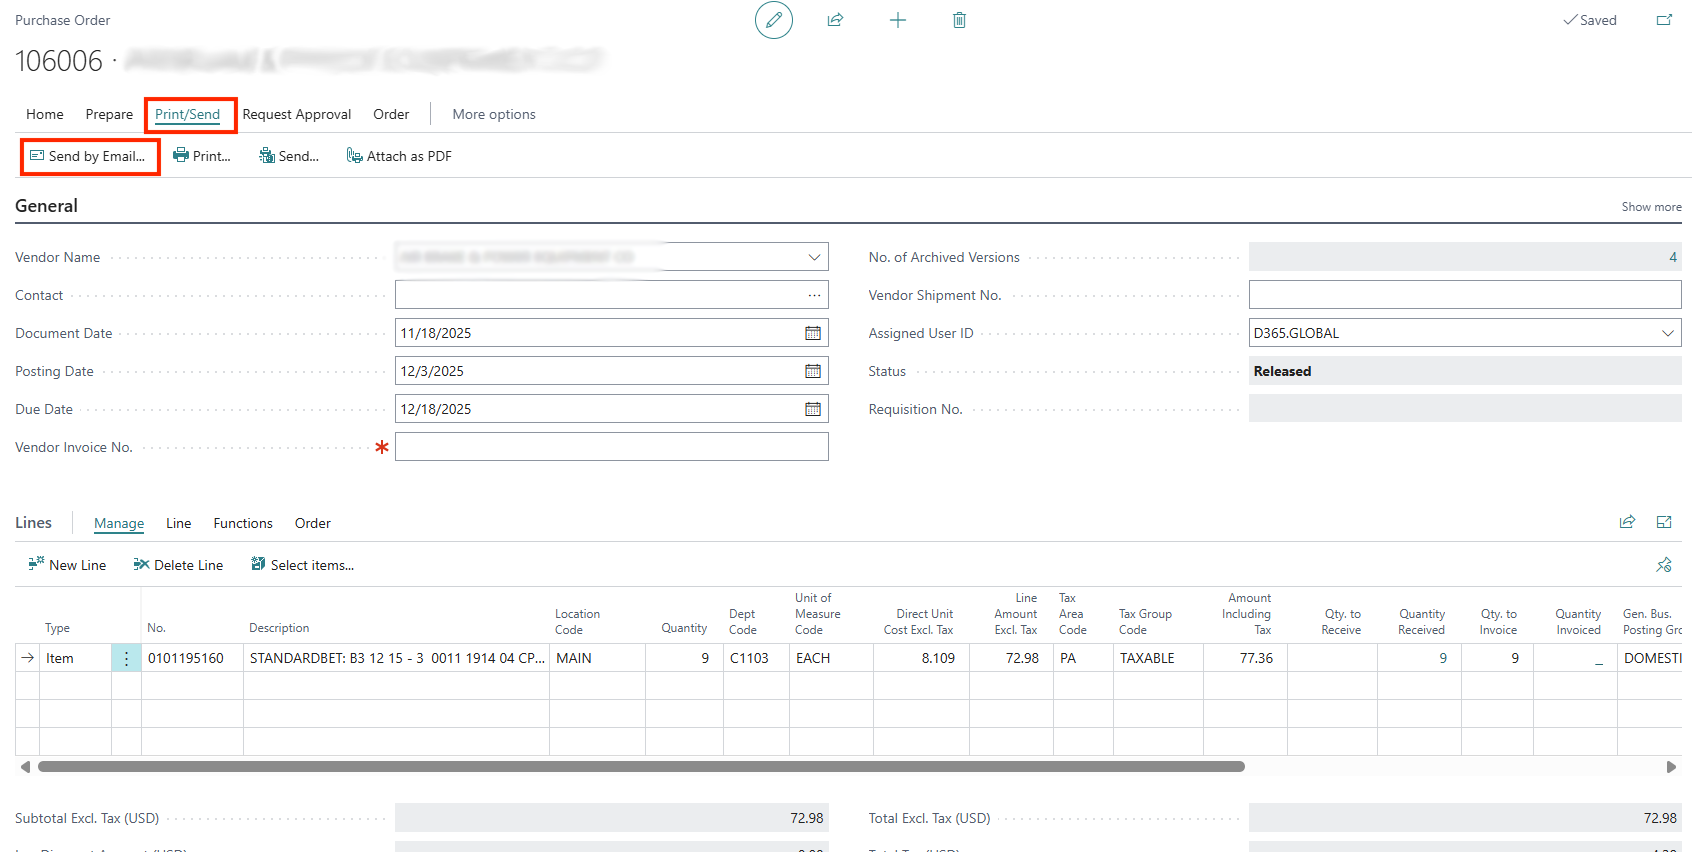
Both options open the email prompt to complete:
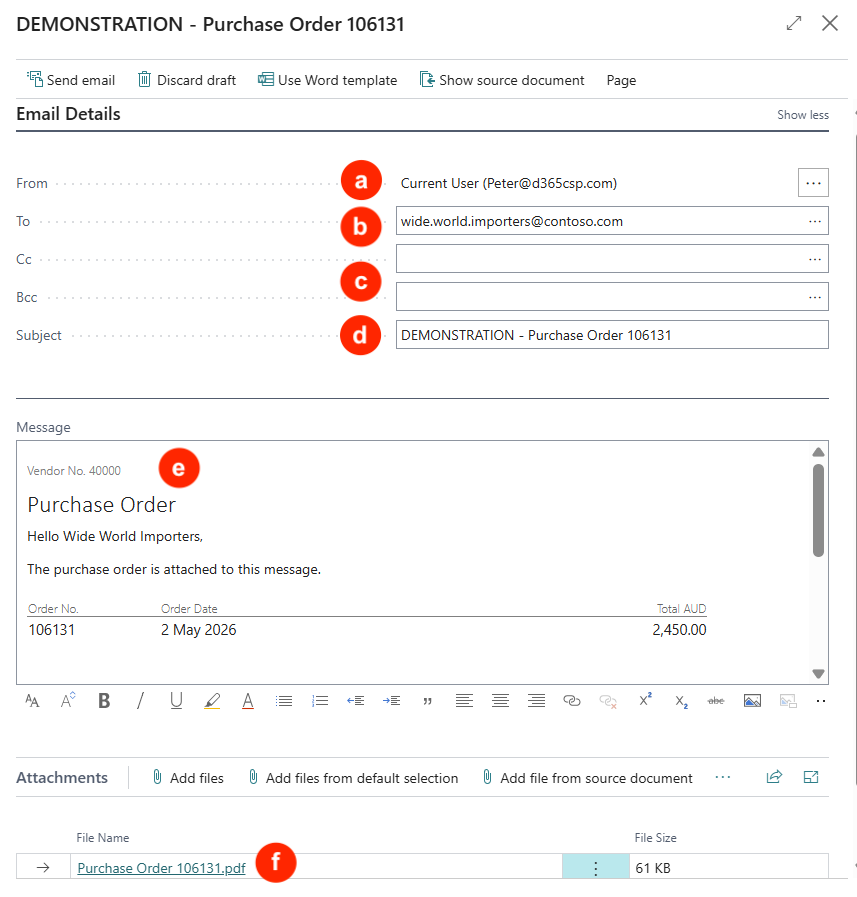
a) From — The email address will be the user’s email address.
b) To — This default from the email on the Vendor’s card (multiple emails can be used with a semi-colon separator).
c) Cc and Bcc — These are visible when you click on Show more (top right corner).
d) Subject — This defaults to the PO number.
e) Message — Type your message to send with the PO.
f) Attachments — By default, the PO pdf will be attached.
Purchase Invoice (Posted)
NB: The Location code used in the Purchase Order line is configured with Require Receipt disabled.
When a Purchase Order is posted, it automatically creates and posts a (stock) receipt and an invoice for the order. The Post sub-menu has several options:
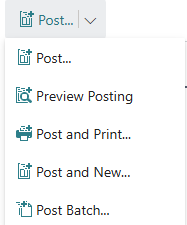
-
Post — Commits the purchase order and creates receipt and invoice transactions that post into the GL.
-
Preview Posting — This option is used to review the various GL posting accounts before final commitment through Post.
-
Post and Print — Commits the Purchase Order and prints the Purchase Invoice.
-
Post and New — Commits the Purchase Order and refreshes the screen for a new PO entry.
-
Post Batch — This opens a prompt for batching (multi-selected) Purchase Orders for posting.
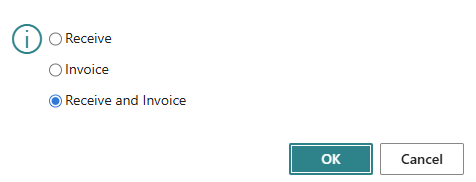
If the Post or Post and Print is selected, there will be a prompt to create either or both receipt and invoice.
-
If Receive is selected, the purchase (stock) receipt is posted, and inventory quantities are increased.
-
Invoice should only be selected when the vendor’s invoice is received and quantities compared to the Quantities Received (i.e. Receipt is posted).
-
Receive and Invoice — This is the default option to post both the receipt and the invoice at the same time.
After posting is completed, the posted purchase receipt and posted purchase invoice can be retrieved from the respective list page.
Creating Purchase Invoice Without a Purchase Order
If the transaction does not involve stock receipt tracking, the purchase can also be completed through a Purchase Invoice (example, invoice for rent or utilities). This sub-menu option is selected from Purchasing.

Select Purchase Invoices to open the Purchase Invoices list page. This page will display all unposted purchase invoices (not generated through Purchase Orders).

Click on any purchase invoice number to open the invoice document page or click New to create a new Purchase Invoice.
A new Purchase Invoice document page opens. The data entry for a purchase invoice is like that of Purchase Order as mentioned above (ref: Purchase Order).
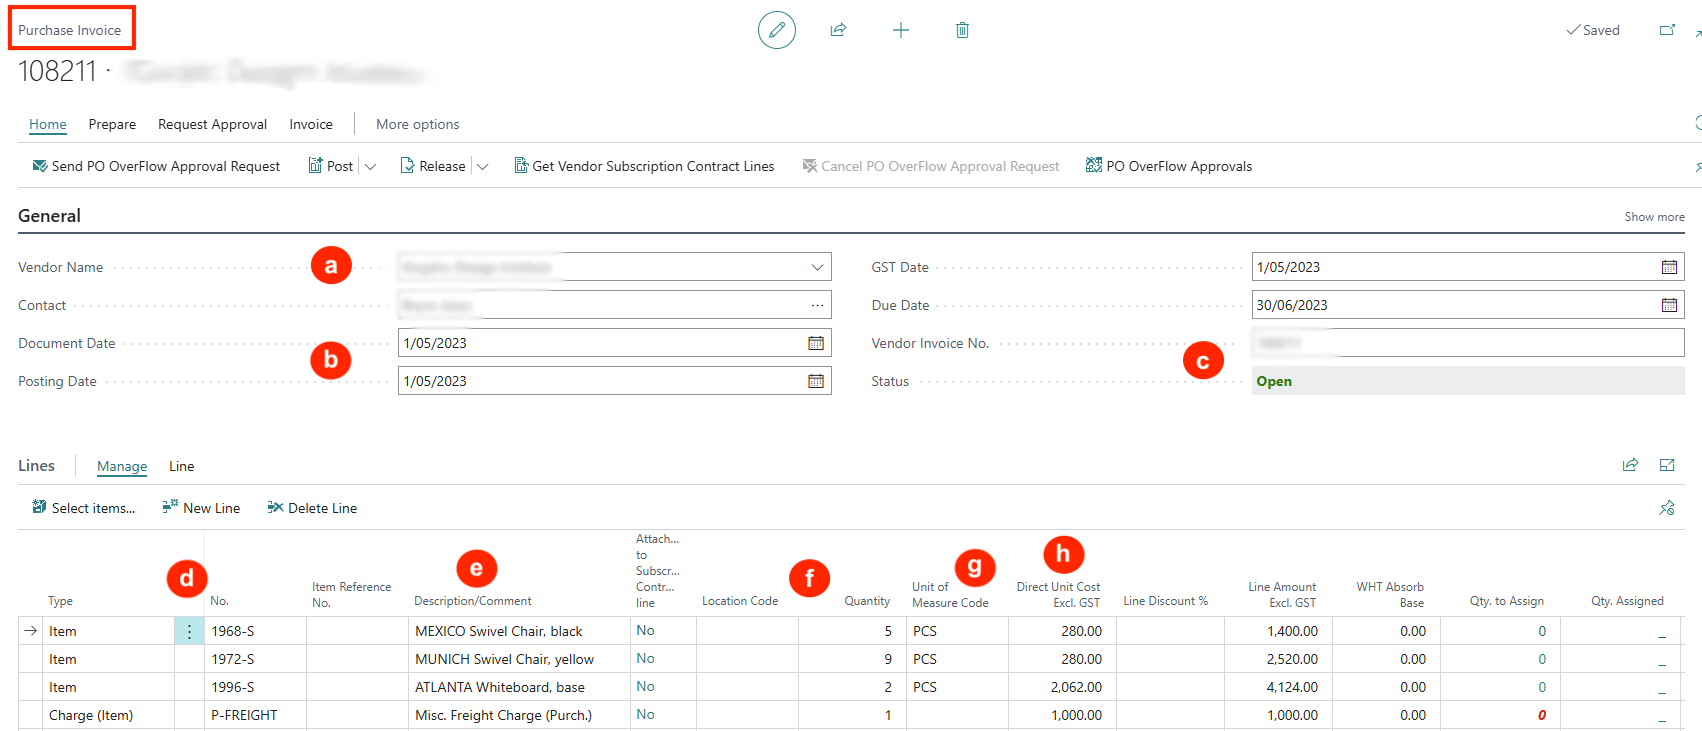
Purchase Invoice Header General
a) Select or enter the vendor’s name.
b) Document Date, Posting Date, and GST Date — Enter the Document Date and the Posting Date will default to this date.
c) Vendor Invoice No. — Enter the invoice number from the vendor.
Purchase Invoice Lines
d) Select the Type and No. for the purchase line (i.e. Item, Comment, G/L Account)
e) Update the line description if needed.
f) Select location code (stock to be updated into this location upon receipt), and enter Quantity ordered.
g) UOM — This should default from the item but a different UOM for purchase can be selected.
h) Direct Unit Cost — This is the latest purchase cost. Update the cost if necessary.
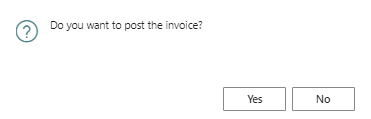
Posting a Purchase Invoice
-
When the purchase invoice is ready, click on [Post]
-
The posting prompt will only show the option to Post (but not to Receive)
Prepayment (Proforma) Invoice for Purchase Order
After the Prepayment details are entered in the Purchase Order header, the prepayment proforma invoice can be generated for the prepayment % as follows:
-
In the Purchase Order menu option, click Actions to navigate to the sub-menu option Posting > Prepayment.
-
Under this option, there are several Prepayment options:
a) Prepayment Test Report — This is a preview report showing all prepayment data.
b) Post Prepayment Invoice — This only posts the prepayment invoice.
c) Post and Print Prepmt Invoice — Select this to post and print the prepayment invoice when all information is correct.
d) Preview Prepayment Invoice Posting — This is a preview of the posting to GL when the proforma invoice is posted.
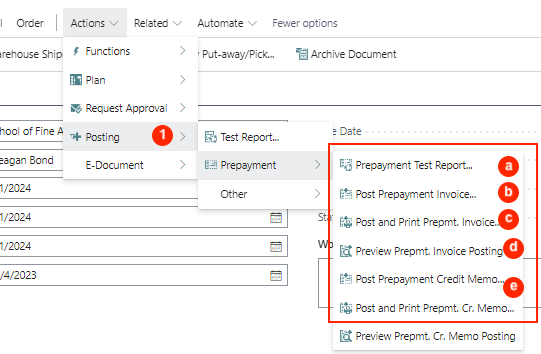
e) If a correcting credit note is needed to offset the prepayment invoice, it can also be created with the Credit Memo options.
Written By:
Peter Loo
Team Leader, Business Central
Connect on LinkedIn