Microsoft Dynamics 365 Business Central Managing Accounting Periods
How to Manage Accounting Periods in Business Central
The economic operations of any business must be registered in a certain period. This period is known as accounting period. As a rule, it lasts one year and runs from July 1 to June 30. Depending on the type of business, you can work with different accounting periods such as month, semester, quarter, among others or may not coincide with the calendar year. For example, the accounting year could end on December 31 instead of June 30.
The accounting periods allow us to measure the performance of the company and buy it with other previous periods. Based on this comparison of results, information can be analysed and economic and financial decisions made in an informed manner.
Business Central requires accounting periods if you want to close an income statement, or run data compression tasks.
Creating a New Fiscal Year
You can create accounting periods in bulk, by using a Create Fiscal Year batch job, or manually. Use the Create Fiscal Year batch job to divide a fiscal year into periods of equal length.
- Choose the Search for Page or Report icon, enter Accounting Periods, and then choose the related link.
- Choose Process > Create Year action.
- In the Starting Date field, enter the date on which the fiscal year starts.
- In the No. of Periods field, enter the number of accounting periods to divide the fiscal year into. There can be up to 365 periods in a year.
- In the Period Length field, enter a duration for each period. For example, 1M for one month, 1Q for one quarter, and 1Y for one year.
- Choose OK.

Creating Accounting Periods Manually
If the accounting periods in your fiscal year have different durations, like the 4-4-5 calendar used in retail, you can manually set it up.
- Choose the Search for Page or Report icon, enter Accounting Periods, and then choose the related link.
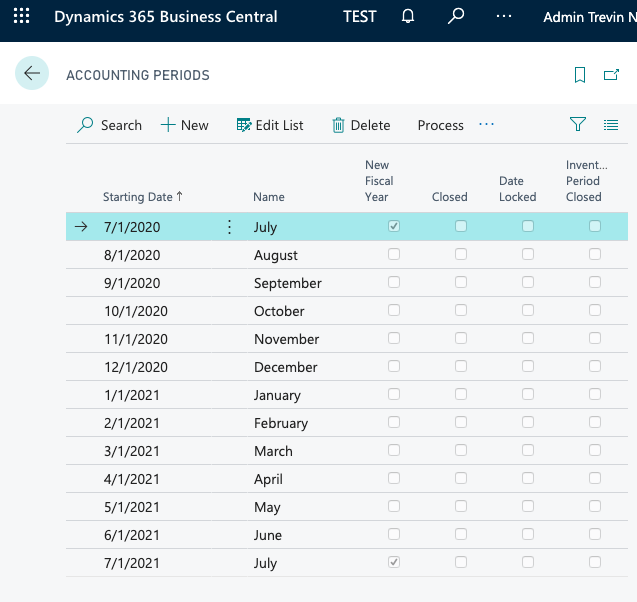
- In the Starting Date field, enter the date on which the fiscal year starts. The Name field will show the name of the month.
- Choose the New Fiscal Year check box to indicate that this is the first period in the year. Business Central will use this period to determine which periods to close at year-end.
- Repeat steps 2 and 3 for each remaining period.
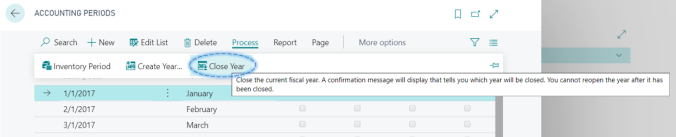
Closing Accounting Periods
To close accounting periods:
- Choose the Search for Page or Report icon, enter Accounting Periods, and then choose the related link.
- On the Accounting Periods page, choose the Close Year action.
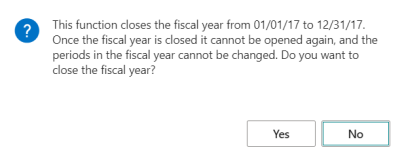
If more than one fiscal year is open, the earliest one is automatically selected to be closed. A message displays identifying the year that will close and the consequences of closing the year.
- To close the year, choose the Yes button.
The fiscal year is closed, and the Closed and Date Locked fields for all the periods in the year are selected.
The fiscal year cannot be opened again and you cannot remove the check mark from the Closed or Date Locked fields.
Even though a fiscal year has been closed, you can still post general ledger entries to it. When you do this, the entries will be marked as posted to a closed fiscal year and the Prior-Year Entry field will be selected.
After a fiscal year is closed, you must close the income statement accounts and transfer the year’s results to an account in the balance sheet. You can repeat this every time that you post to the closed fiscal year.
The following dialogue box will appear (similar to the example shown).
Closing Single Accounting Periods
You can close individual accounting periods without closing the entire fiscal year. This is useful if you want to prevent posting to a period that has already been reported to tax authorities.
Here Closing Single Accounting Period basically means to Stop Posting of transactions for a particular month. This can be achieved in two ways:
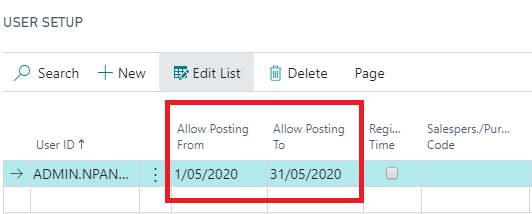
User Setup
To limit the posting periods by user:
- Choose the Search for Page or Report icon, enter User Setup, and then choose the related link.
- To specify the start of the period, choose the Allow Posting From field, and then enter the earliest date on which the user can post to the company.
- To specify the end of the period, choose the Allow Posting To field, and then enter the last date the user will be able to post to the company.
- Suggested User Setup reason being if we want to set different ranges for several users or if we want to allow users to Post in past dates of previous month then it is achieved by User Setup.
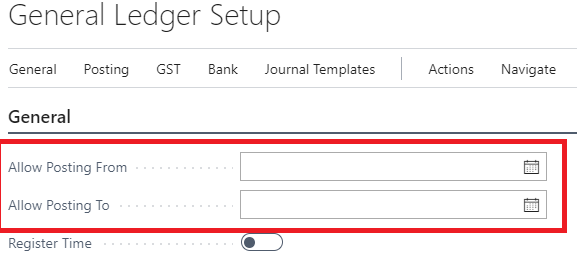
General Ledger Setup
To limit the posting periods by company:
- Choose the Search for Page or Report icon, enter General Ledger Setup, and then choose the related link.
- To specify the start of the period, choose the Allow Posting From field, and then enter the earliest date on which posting to the company is enabled.
- To specify the end of the period, choose the Allow Posting To field, and then enter the last date on which posting to the company is enabled.