Microsoft Dynamics 365 for Legal User Guide
Introduction to Dynamics 365 for Legal
Microsoft Dynamics 365 for Legal helps law firms and legal professionals streamline client management, case workflows, opportunity tracking, document management, and business development. This guide delivers step-by-step instructions for everyday tasks, advanced features such as AI Copilot integration, and practical advice to help legal teams maximize Dynamics 365’s capabilities.
Getting Started
Logging In
-
Launch your preferred web browser (e.g., Microsoft Edge, Chrome, Firefox).
-
Enter your firms unique Dynamics 365 URL (usually provided by your IT team).
-
On the login or sign in page, input your work email address and password.
-
If multi-factor authentication is required, follow the prompts to verify your identity (such as a code sent to your mobile device or authenticator app).
-
Upon successful login, you will be directed to the default Dashboard or Home Page.
Basic Navigation in Dynamics 365 for Legal CRM
-
Menu Bar: The top bar gives access to major modules (Sales, Accounts, Contacts, Opportunities, Cases, Marketing, Settings). Hover over or click each to view submodules.
-
Navigation Pane: On the left side, displays quick links to key areas. You can collapse or pin this pane for convenience.
-
Global Search Bar: At the top right, use this bar to quickly find records across all entities (client accounts, contacts, opportunity/pitches, etc.).
-
Settings/Gear Icon: Access your personal settings, preferences, and customization options here.
-
Breadcrumbs: Use the navigation trail at the top to trace your navigation path and quickly return to previous screens.
Dashboard View/Home Page and Creation
Using Dashboards and the Home Page
-
Dashboards provide at-a-glance summaries, charts, and lists of Key Performance Indicators (KPIs).
-
The default Home Page is typically set to a dashboard tailored to your role (e.g., Fee Earner, Business Development, Legal Assistant).

Creating a New Dashboard
-
Click Dashboards in the navigation pane.
-
Click New Dashboard. Select a layout (e.g., 2-column, 3-column, 4-column).
-
Give your dashboard a unique name that reflects its purpose (e.g., “Litigation Practice Team Overview”).
-
For each section, click Add Component and select from charts, lists, or graphics. Example: Add an “Open Matters by Practice Area” chart or a “Pipeline by Stage” list.
-
Configure each component by choosing the relevant view, filter, and display style.
-
Click Save to make your dashboard accessible. It now appears in your dashboard list.
Personalization Settings/Set Personal Options (Set Home Page)
-
Click the gear icon (Settings) in the top right corner and select Personal Options.
-
Navigate to the General tab.
-
Under Default Pane and Tab, select your preferred default pane (e.g., BD, Service, Marketing) and tab (e.g., specific dashboard).
-
To set your Home Page, pin your chosen dashboard by selecting Set as Default within the dashboard view.
-
Click OK or Save and Close to apply changes.

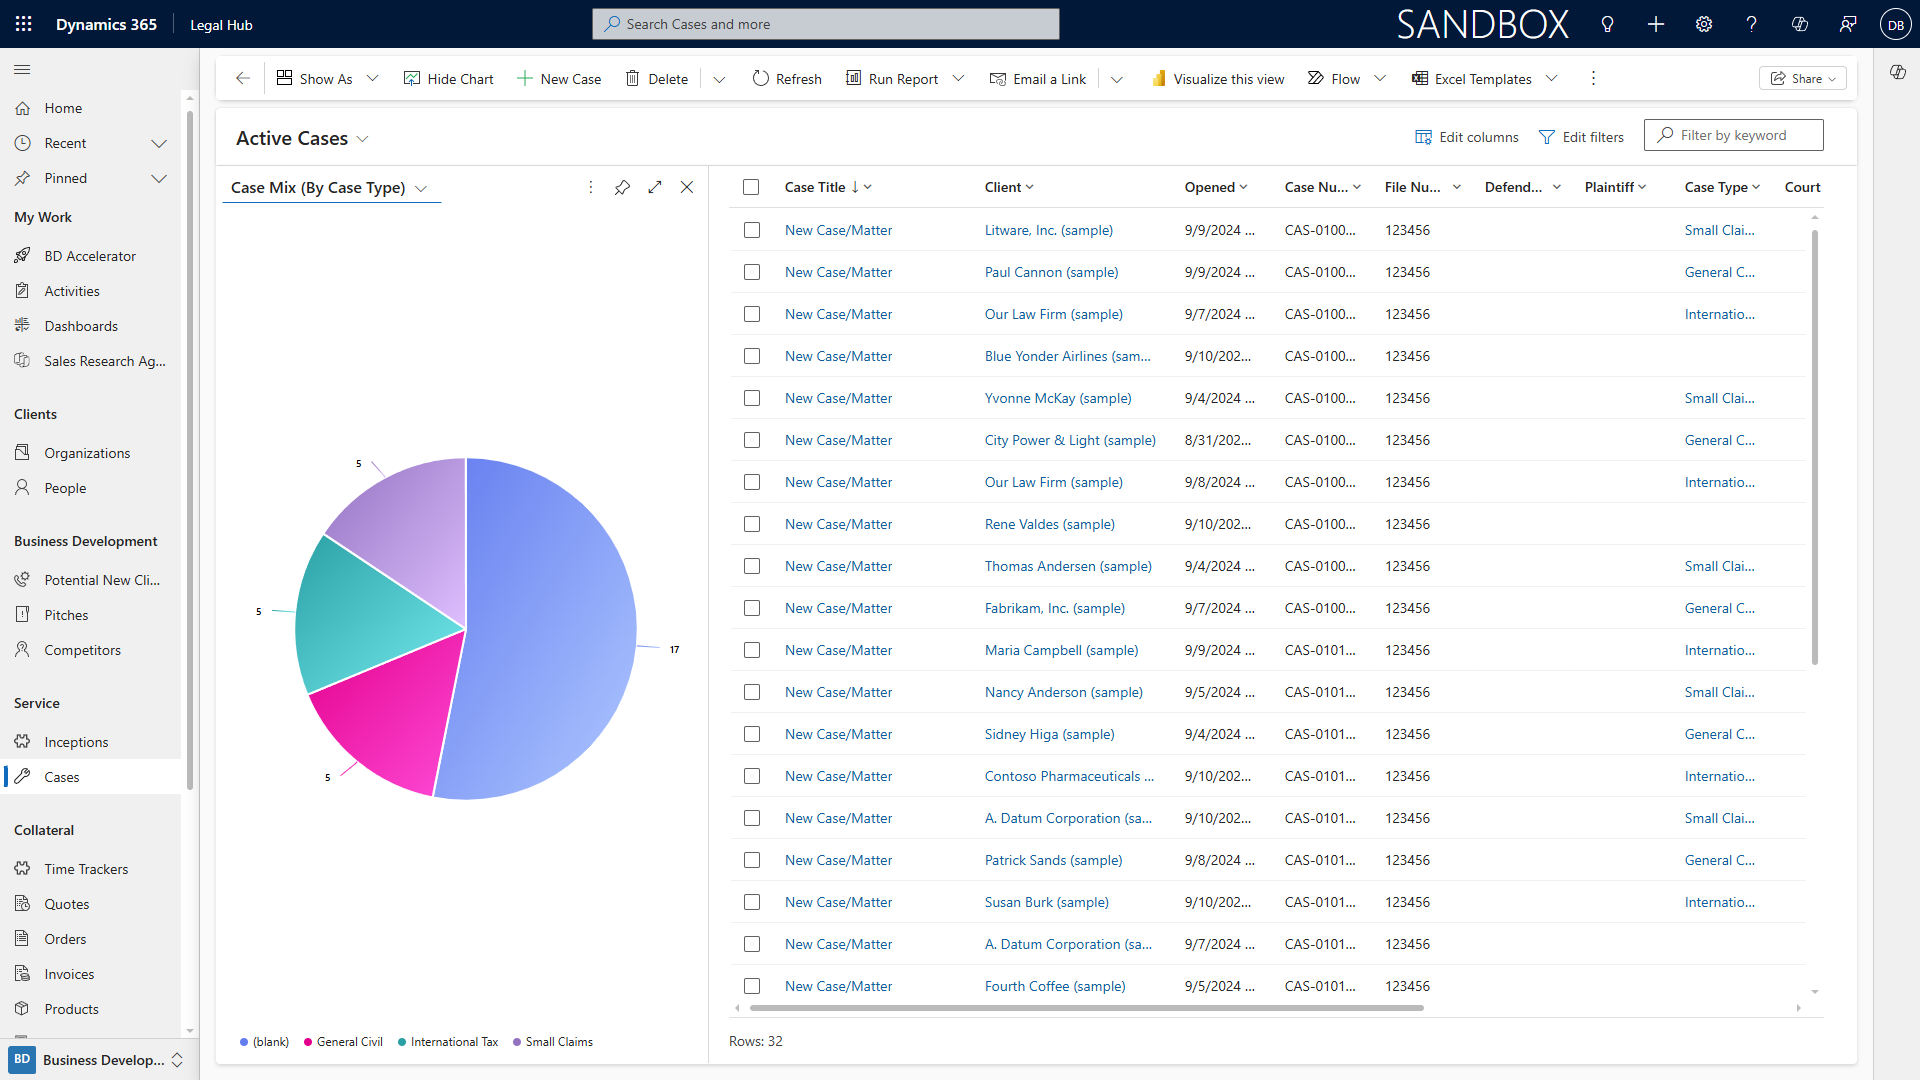
Opportunity Pitch Deal Flow View
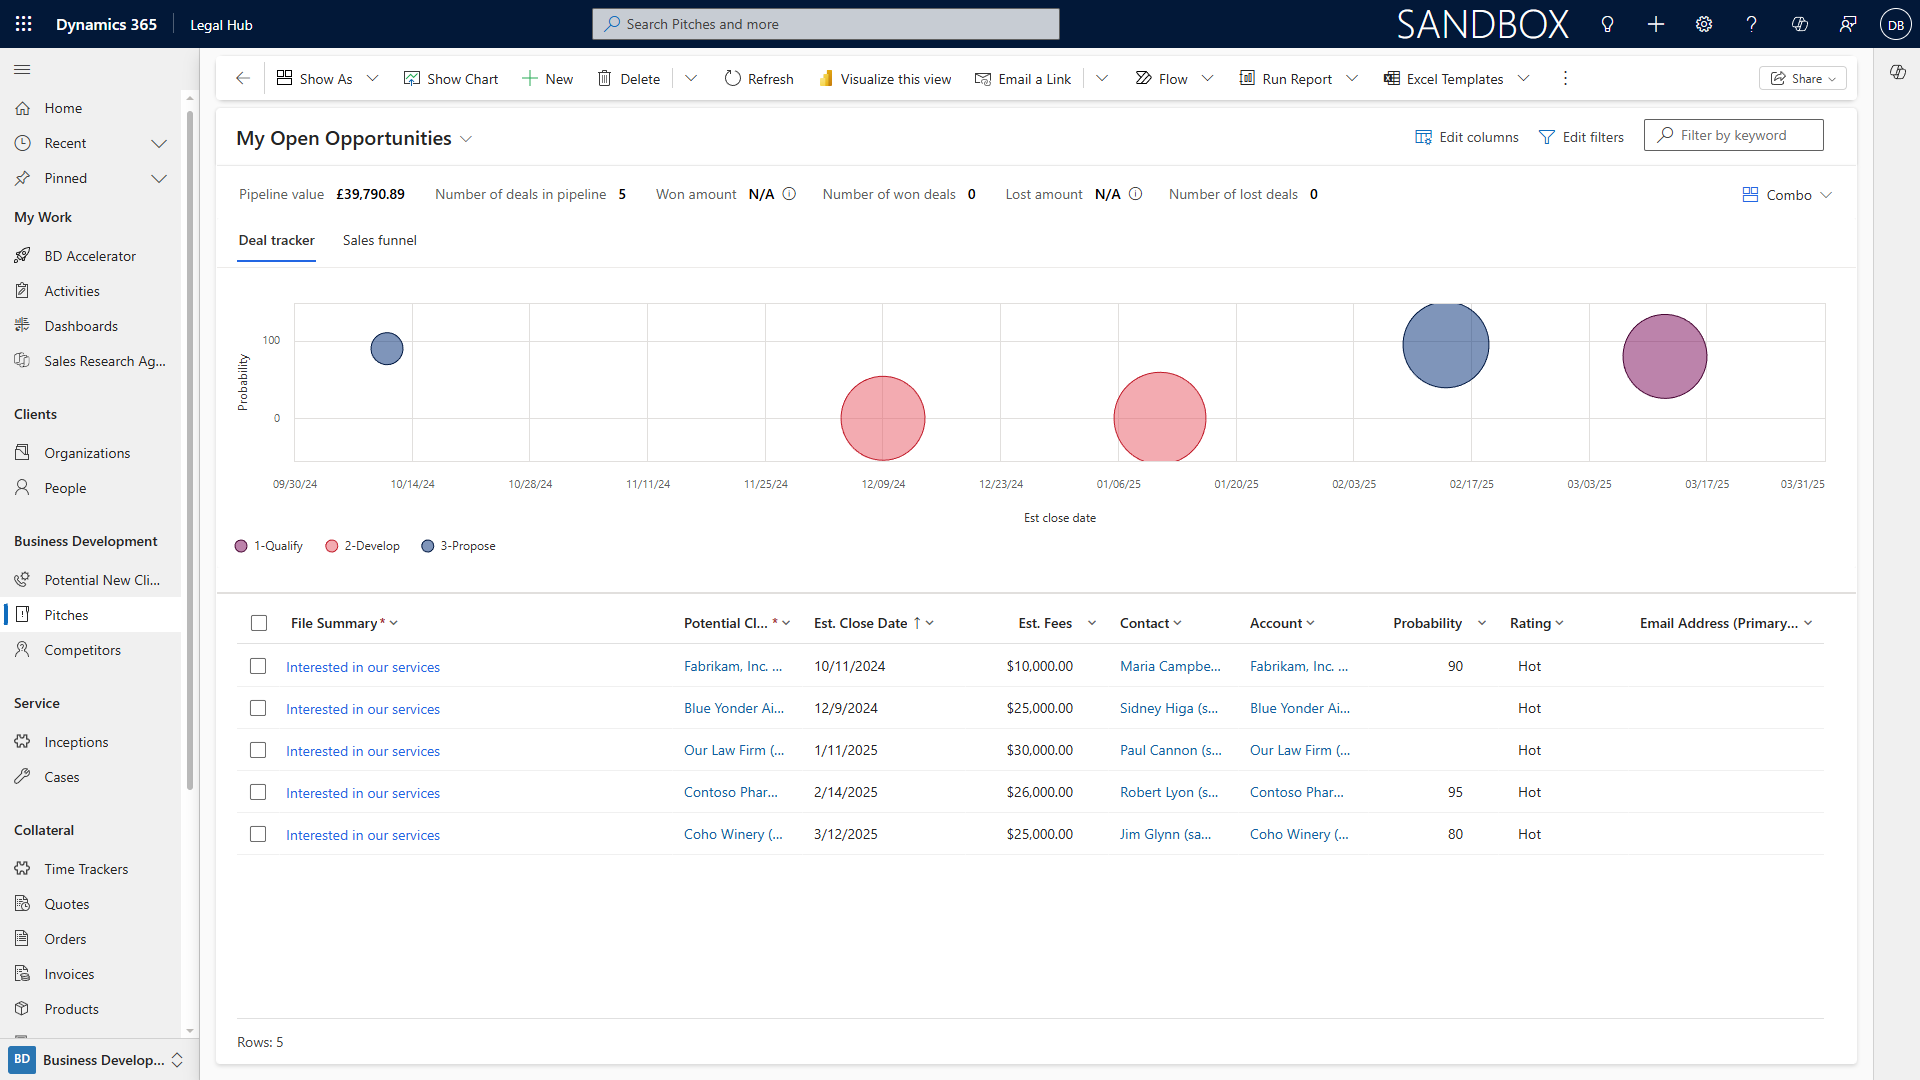
Displaying the Opportunity Pipeline
-
Read Only Grid View: Offers a table/grid of all opportunities with sortable columns such as Name, Client, Stage, Value, Owner, and Expected Close Date.
-
Pipeline View: Visualizes the flow of opportunities by deal stage (e.g., Prospecting, Qualification, Proposal, Negotiation, Won/Lost) using funnel or bar charts.
-
Kanban View: Presents opportunities as cards arranged by stage; drag and drop cards to move opportunities through the pipeline.
Follow these steps:
-
Click Opportunities from the main menu.
-
At the top, use the View Selector to switch between Read Only Grid, Pipeline, or Kanban.
-
Click Column Options to add, remove, or reorder columns in grid and Kanban views.
-
Click the Filter icon to filter by criteria including status (Open,Won, Lost), owner, practice area, client type, or expected value.
-
Save custom views for future access by clicking Save View As.
Opportunity Pitch Record Creation and Editing
Creating a New Opportunity
-
Navigate to Opportunities, then click New Opportunity.
-
Fill in required information:
-
Opportunity Name
-
Client/Law Firm (search or create new if needed)
-
Expected Value (in local currency)
-
Practice Area
-
Deal Size
-
Stage (select from dropdown)
-
Custom fields unique to your firm (e.g., jurisdiction, billing type, risk profile)
-
-
Attach supporting documents via the SharePoint integration panel by clicking Add Document.
-
Click Save to create the record.
Editing an Opportunity Record
-
Open the relevant opportunity from the list.
-
Click Edit in the toolbar.
-
Update necessary fields, add new notes, change stage, or upload additional documents.
-
Click Save when finished.
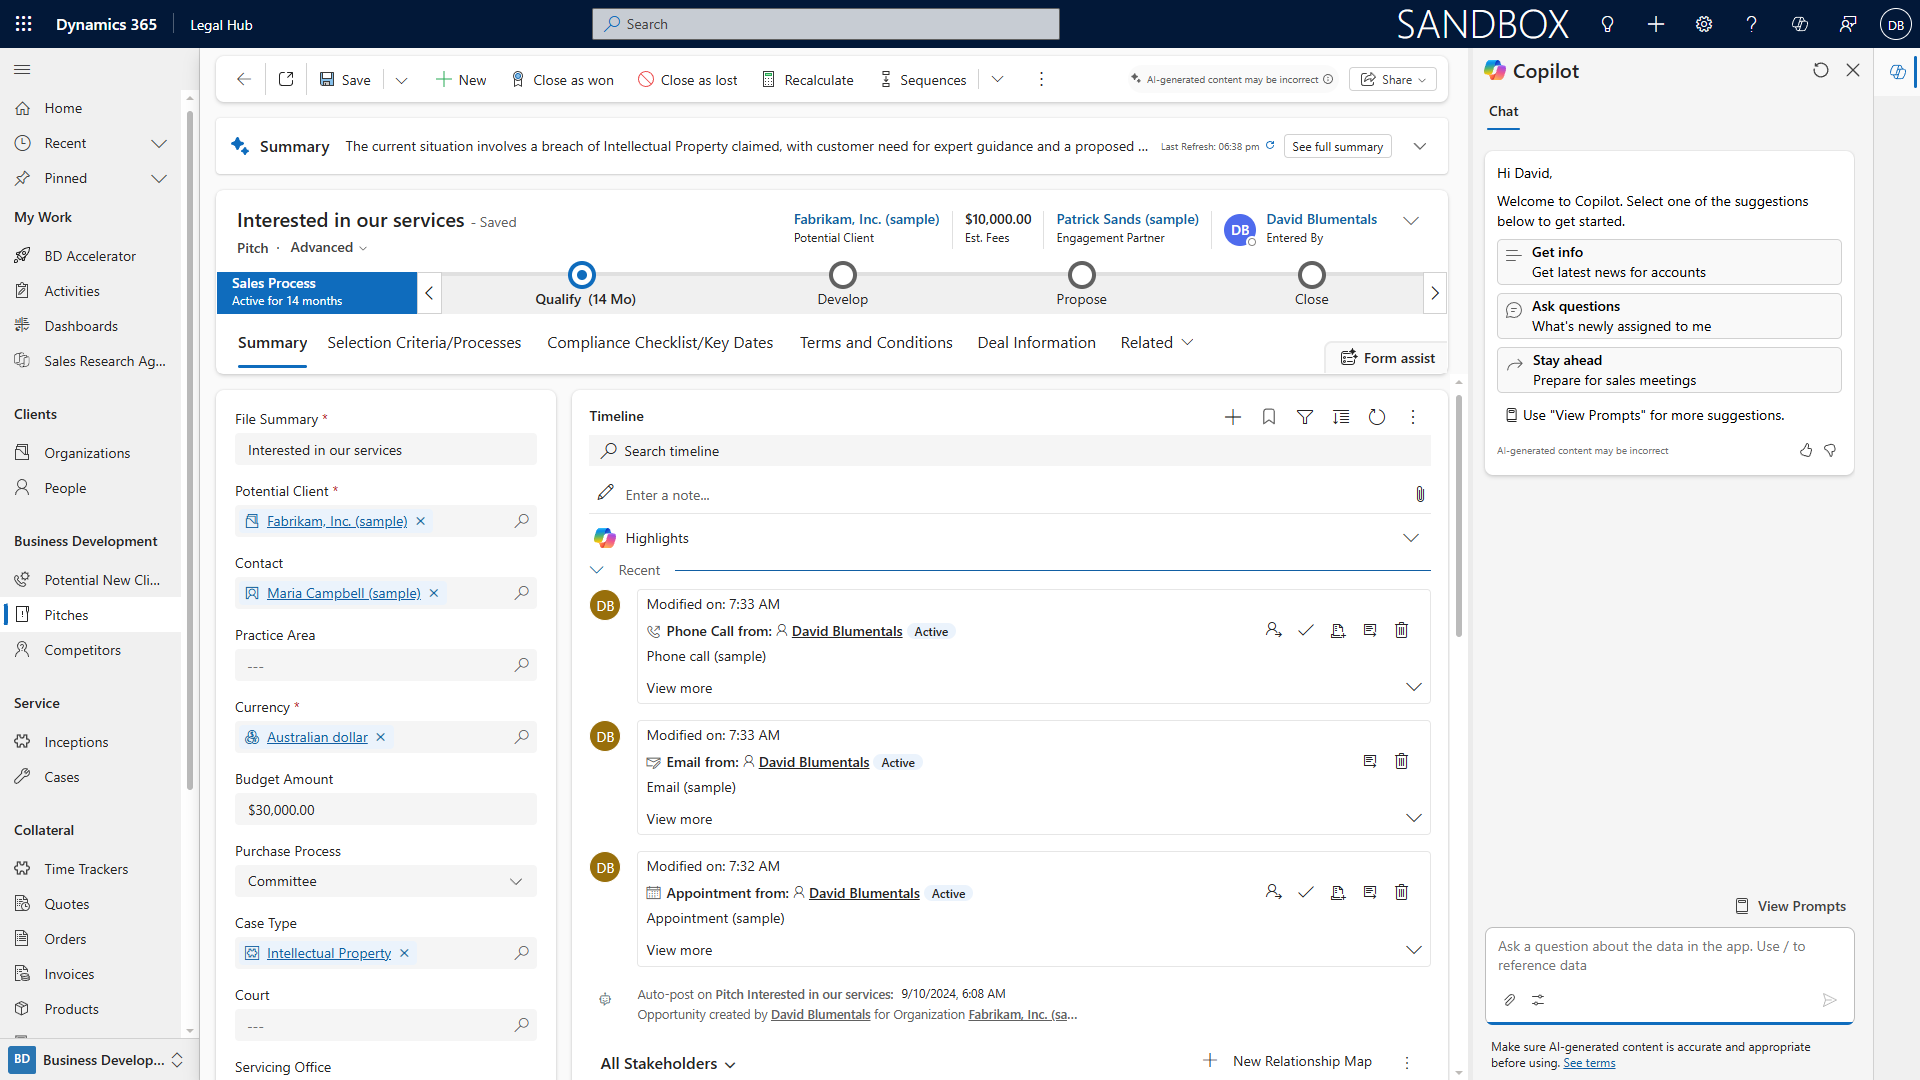
Copilot AI Chat Integration
-
Within the opportunity record, locate the Copilot AI Chat widget or panel.
-
Type queries such as “Summarize recent activity on this pitch” or “Draft follow-up email to client.”
-
Copilot can:
-
Summarize meeting notes automatically.
-
Suggest next steps or reminders for follow-up.
-
Draft pitches or status updates based on record data.
-
Review, edit, and save AI-generated content back to the record.
-
Capturing Law Firm-Specific Custom Fields, News & Meeting Notes
-
Locate custom fields (e.g., jurisdiction, billing arrangement, internal reference, referral in/out) in the opportunity form and complete as required.
-
To add firm-related news or updates, use the Add News option, pasting relevant links or summaries.
-
Use the Notes tab to record meeting notes, tagging attendees and capturing decisions or action items. Attach documents or emails as needed.
Business Process Flows (BPFs) Based on Practice Area and Deal Size
-
At the top of the opportunity record, follow the BPF bar (usually visualized as a horizontal stage progression).
-
Stages may include: Intake → Conflict Check → Pitch → Proposal → Negotiation → Engagement.
-
Depending on the practice area (e.g., Litigation, Corporate) and deal size, Dynamics may present different BPFs with fields tailored to the type of work.
-
Complete required fields at each stage and click Next Stage to advance.
-
BPFs can be customized by your firm’s Dynamics 365 administrator.
Account Organization Management
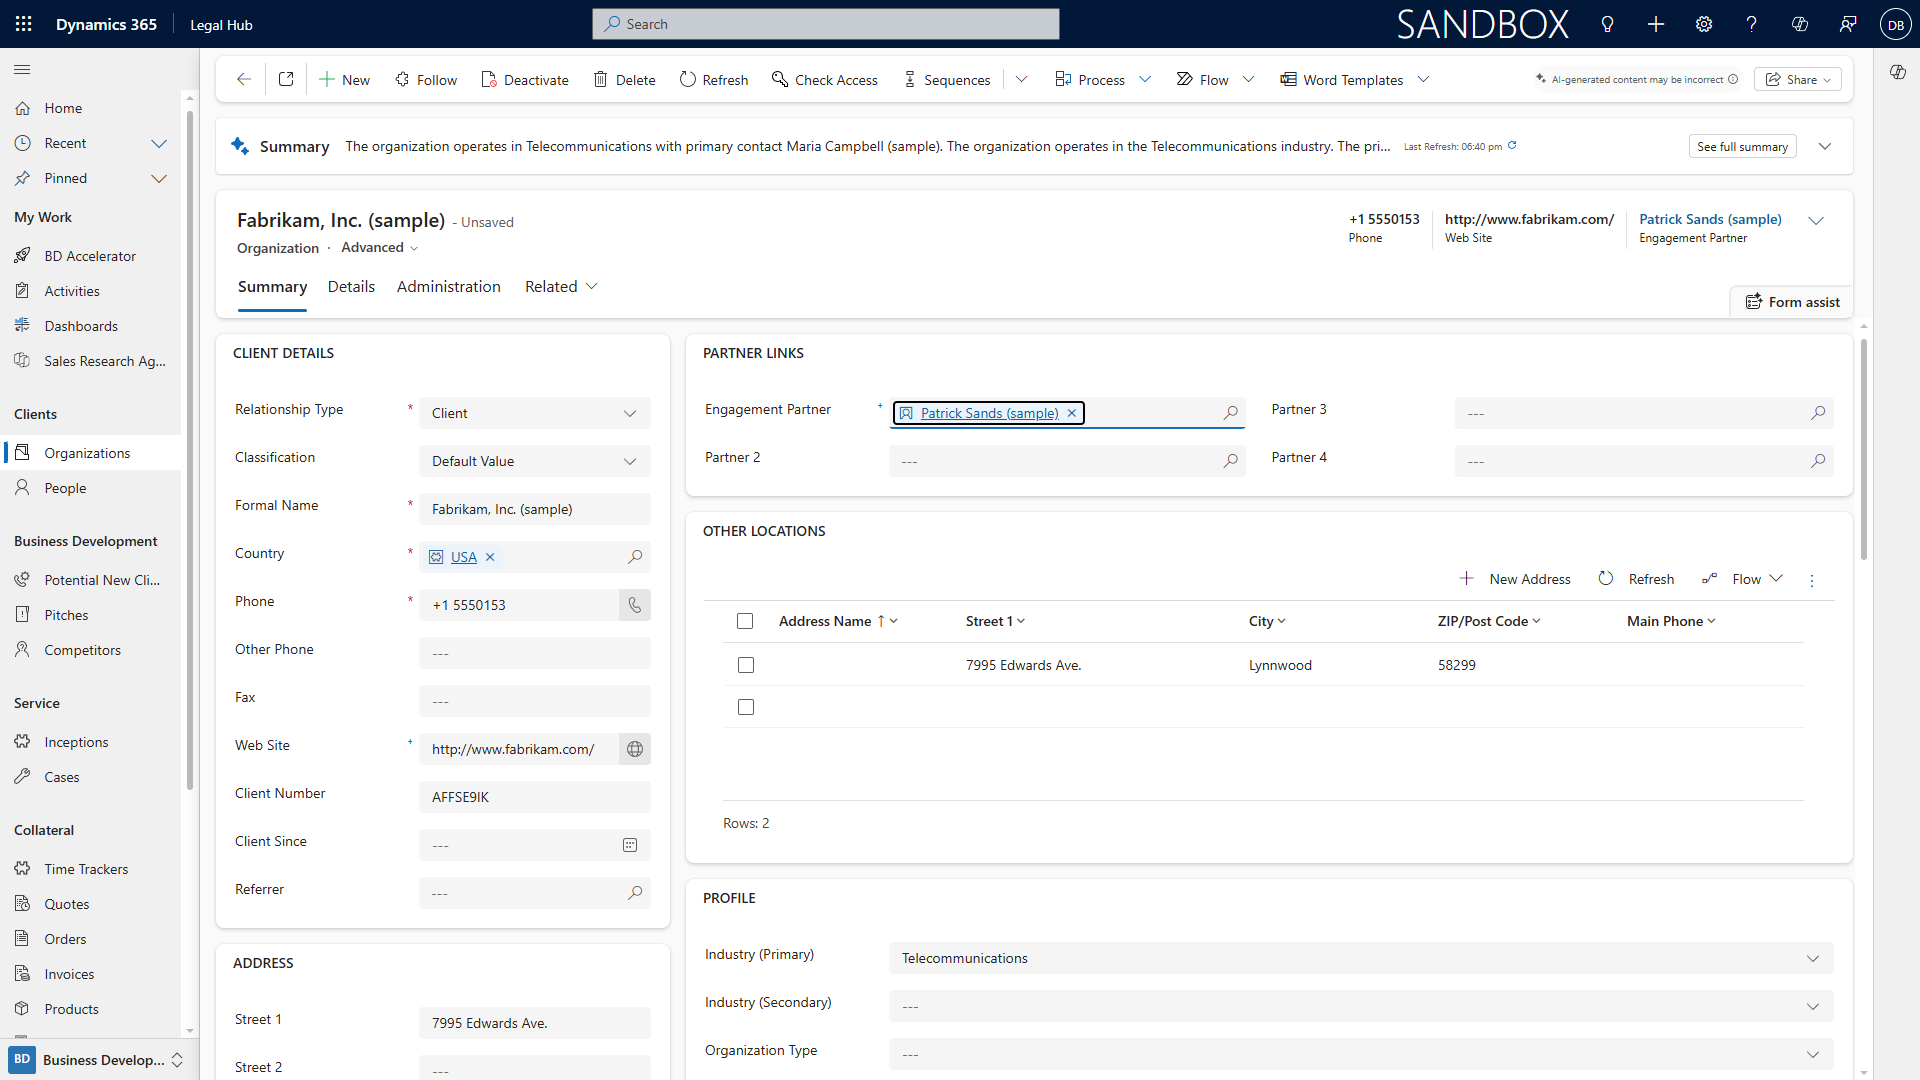
Viewing Account Details
-
In the Accounts module, click an account name to open its profile.
-
Review the Timeline for recent activities, meetings, emails, and updates.
-
Check Partner Links for relationships with other firms, clients, or vendors.
-
See Address Locations (main, branch offices) and Profile Information (industry, size, main contacts).
-
Use the Related Contacts tab to view individuals linked to the organization.
Account List View
-
From Accounts, use the View Selector (dropdown) to switch between different default and custom views (e.g., All Accounts, My Accounts, Key Clients, Prospects).
-
Edit columns in the list by clicking Column Options. Add or remove fields such as Address, Industry, Account Owner.
-
Filter the view by type, location, size, or practice area using the Filter icon.
-
Save custom views for later by clicking Save View As.
Creating and Editing Account Records
-
Click New Account in the Accounts module.
-
Enter the account’s legal name, address, profile details, and additional fields (industry, registration number, partnership links).
-
If the organisation is part of a group, add its Parent Account by searching or creating a new parent entity.
-
Attach documents (e.g., engagement letters, contracts) via SharePoint.
-
Click Save to create the account record.
-
Edit existing accounts by opening the record and selecting Edit, updating fields as needed.
Contact Management
Contact List View, Editing Columns, and Filters
-
Click Contacts from the navigation menu.
-
Use the View Selector to switch between built-in views (All Contacts, My Contacts, Recently Added, etc.).
-
Edit which columns appear by clicking Column Options; add fields such as Practice Area, Title, or Social Interests.
-
Filter contacts by criteria such as last activity, location, or firm role using the Filter icon.
-
Save and share custom views as needed.

Creating and Editing Contact Records

-
Click New Contact.
-
Fill in all relevant information:
-
Professional: Title, Email, Direct Line, Office Location, Linked Account Organization.
-
Personal: Mobile, Home Address, Areas of Interest, Social Interests, Hobbies.
-
Other: Preferred Contact Method, Notes, Social Media Handles.
-
-
Link the contact to the relevant Account Organization using the lookup field.
-
Click Save.
-
Edit contacts by opening the record and selecting Edit. Update fields, link to new accounts, or add additional notes as necessary.

SharePoint Document Management within Dynamics 365
Using SharePoint Integration
-
Within any record (opportunity, account, contact, or case), locate the Documents tab.
-
Click Upload to add files from your desktop or cloud storage.
-
To view documents, click the file name or preview icon.
-
Create folders or use tags to organize documents logically (e.g., by matter, year, or document type).
-
Set document access permissions for users or teams as required — e.g., restrict sensitive matter files to certain partners.
-
All documents are stored in SharePoint but accessible directly from within Dynamics 365 records, ensuring version control and compliance.
Global Dataverse Search
Searching Across Your Legal CRM
-
Click the Search bar at the top right of any Dynamics screen.
-
Enter keywords, such as a client name, matter number, or address.
-
Results display grouped by entity (Opportunities, Accounts, Contacts, Cases, Documents).
-
Refine results further using advanced filters or by specifying the entity type in your query.
-
Use Recent Searches or Saved Searches for frequently accessed queries.

Activity Recording for Business Development
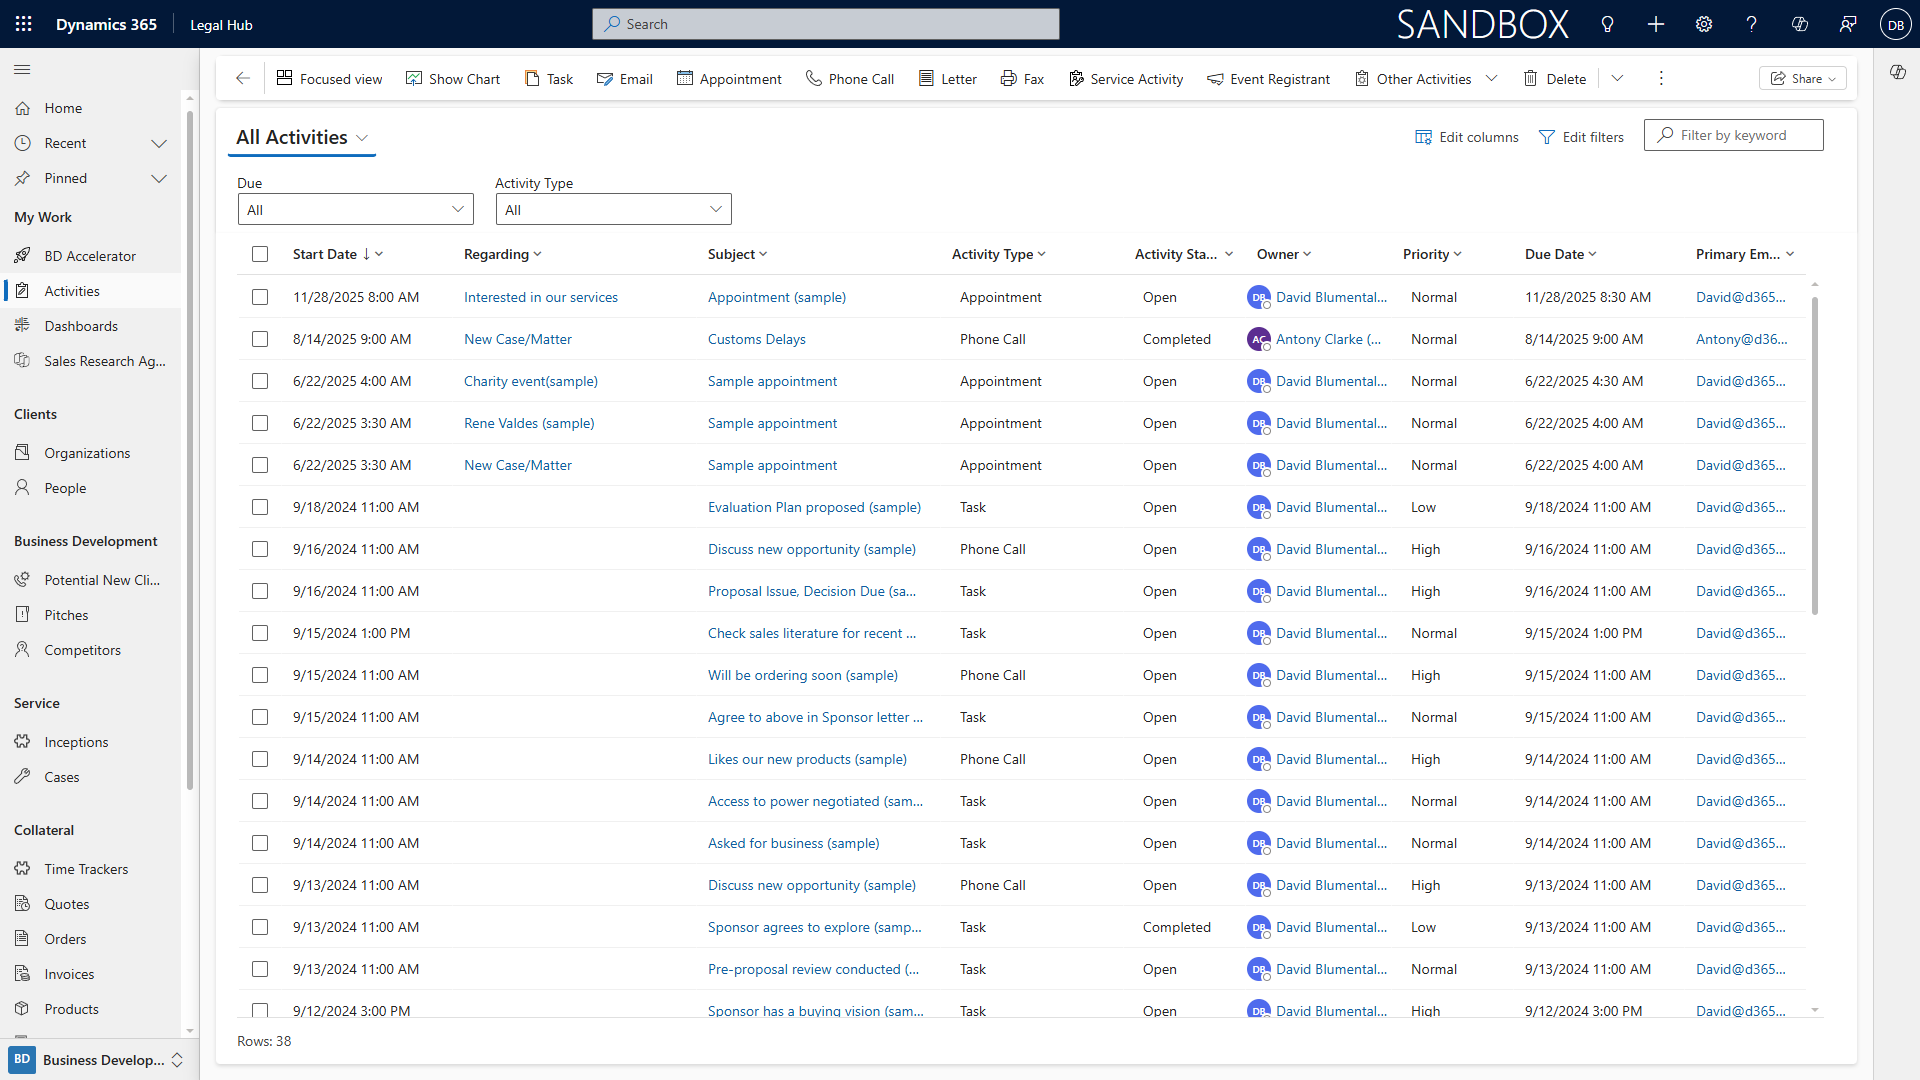
Logging Activities and Follow-up
-
Within the relevant record (account, opportunity, contact, or case), click New Activity.
-
Choose the activity type: Phone Call, Email, Meeting, Task, or Appointment.
-
Fill in details: subject, description, related contacts/accounts, start and end times, and reminders.
-
Link the activity to one or more records for comprehensive tracking.
-
Click Save; the activity appears in the Timeline.
-
Use the Timeline to monitor ongoing interactions and ensure timely follow-up for business development.
Dynamics 365 App for Outlook
Installation and Key Benefits
-
In Outlook, go to Get Add-ins (Web) or Add-ins (Desktop).
-
Search for Dynamics 365 and click Add or Install.
-
Once installed, sign in with your Dynamics 365 credentials.
-
Within Outlook, open any email and click the Dynamics 365 icon in the toolbar.
-
You can track emails, add contacts, create opportunities, and link communications directly to Dynamics 365 records without leaving Outlook.
The benefits are:
-
Automatic email tracking and filing to the appropriate client or matter.
-
Quick creation of new records from emails.
-
Access to client and matter details directly within your inbox to improve client interactions.
-
Dynamics 365 Sales Mobile App
Download, Set Up, and Usage
-
On your mobile device, open the App Store (iOS) or Google Play (Android).
-
Search for Dynamics 365 Sales and tap Download or Install.
-
Launch the app and sign in using your Dynamics 365 credentials.
-
Access modules such as Opportunities, Accounts, Contacts, and Cases.
-
Log calls, add notes, update records, and view dashboards while away from your desk.
-
App supports offline mode for access and updates even when not connected to the internet.
-
Sync changes automatically when reconnected.
Marketing Lists and Quick Campaigns
Creating and Managing Marketing Lists
-
Go to the Marketing area and select Marketing Lists.
-
Click New Marketing List.
-
Choose between Static (manually managed) or Dynamic (automatically updated based on criteria) list types.
-
Fill in the list name, description, target entity (Contacts, Accounts, or Leads), and other required fields.
-
Add members by searching for and selecting contacts, or set dynamic criteria such as practice area, location, or client type.
-
Save your list for future campaigns and activity tracking.
Running Quick Campaigns
-
From the Marketing list, click More Commands and select** Quick Campaign**.
-
Define the activity: select type (email, call, task), assign an activity owner, and set a due date.
-
Write your message or call script, attach any required documents, and define recipients using the list members.
-
Launch the campaign; activities are created and assigned to users for follow-up.
-
Track responses and measure effectiveness using campaign reports.
Extending to New Client/Matter Inception Management
Managing New Clients and Matters
-
Open the Cases module to begin intake for a new client or matter.
-
Click New Case and enter details such as client name, matter type, referral source, and initial details.
-
Assign the case to an appropriate team member or department.
-
Use custom business process flows for structured intake (including conflict checks, client due diligence, and approvals).
-
Attach relevant documents and notes (ID verification, engagement letter, etc.).
-
Once complete, mark the intake stage as finished to trigger the next steps (onboarding, matter opening, etc.).
Managing Cases/Matters
Case/Matter Details, Resources, Billing, Services, and Costs
-
Navigate to Cases and select an open matter or click New Case to create one.
-
Fill in incident details: matter description, relevant dates, client and opposing party, and key contacts.
-
Assign resources: add timekeepers, paralegals, external counsel, and other participants.
-
Record services provided and work completed. Add billing events as they occur (e.g., milestone billing, hourly rates, fixed fees).
-
Track costs incurred: filing fees, court costs, third-party expenses, travel, etc.
-
Use the Timeline to monitor progress, communications, and deadlines.
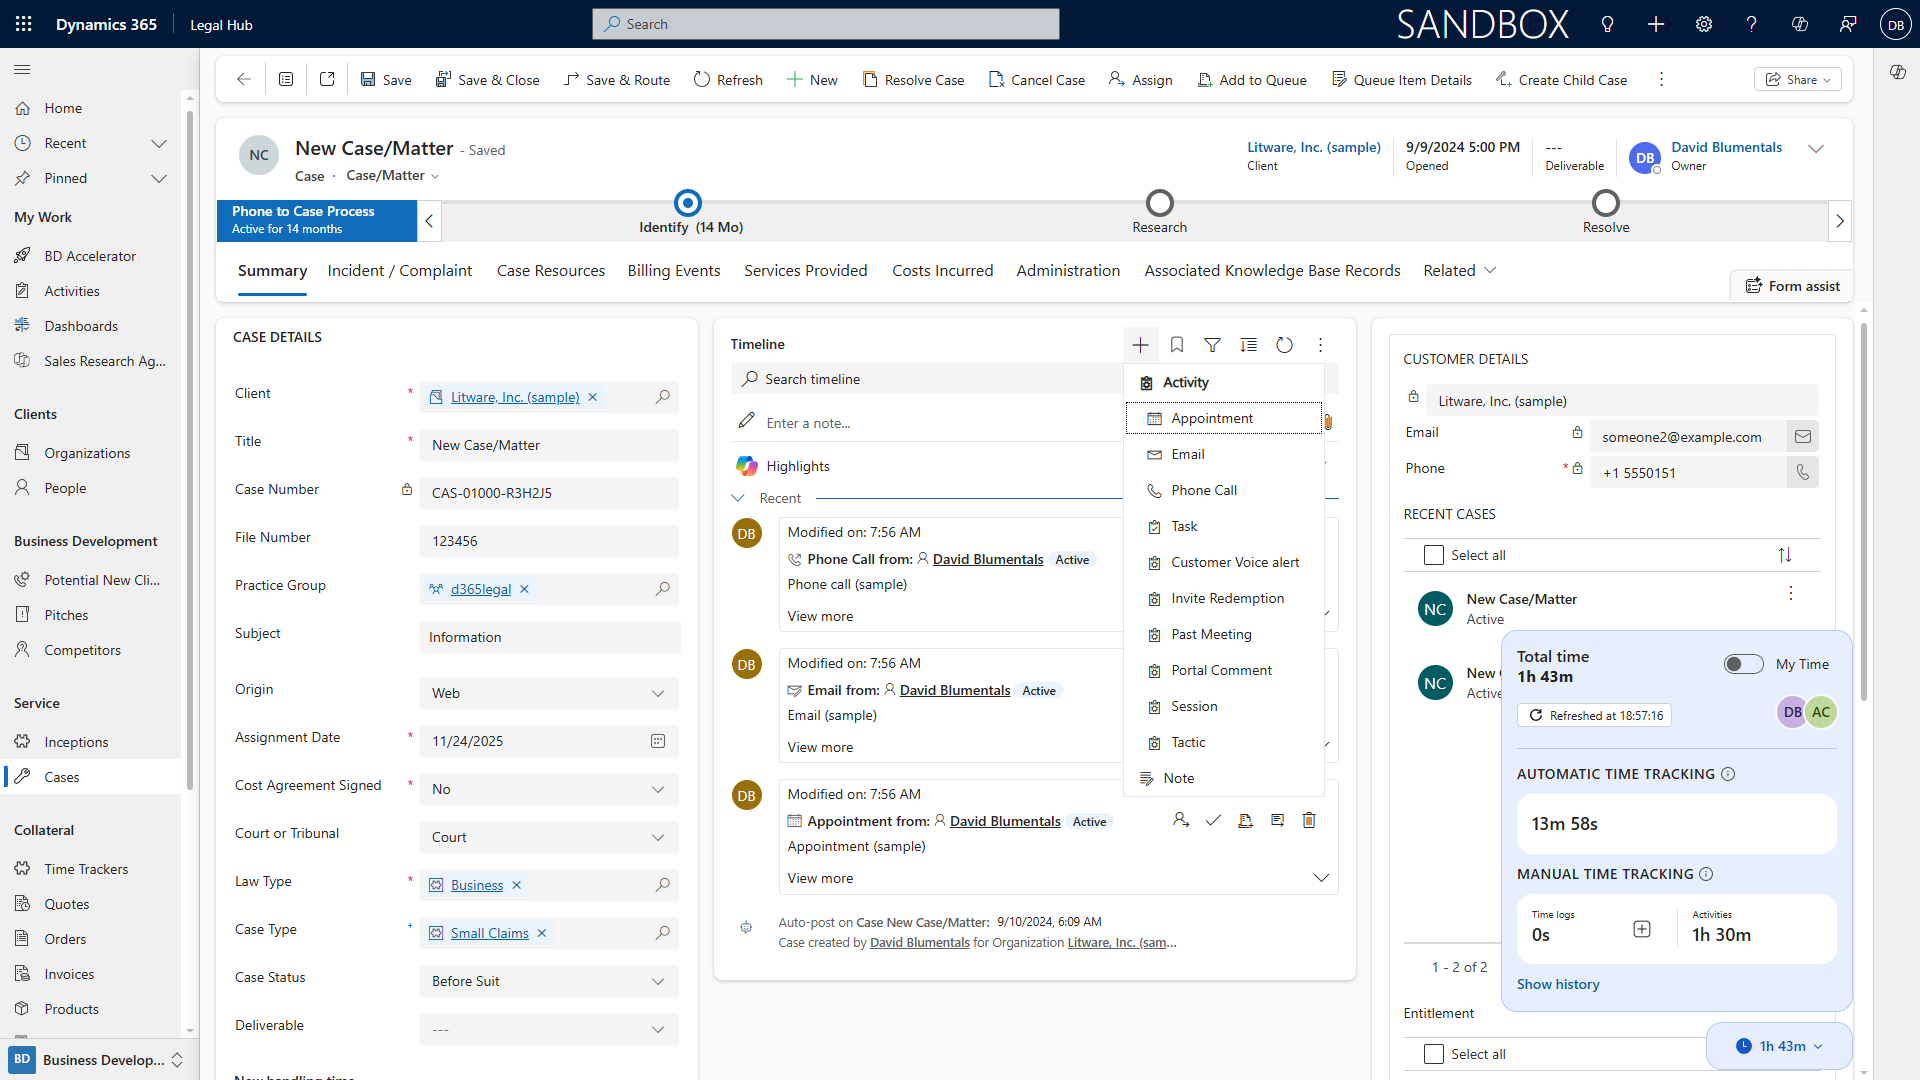
AI-Enabled Legal Time Tracking & Seamless Invoicing
-
Within the case, activate the Dynamics 365 Case Handling Time Widget for time tracking.
-
Log time entries manually or utilize AI suggestions based on your calendar events, meetings, and emails.
-
Review suggested entries, edit as required, and approve for billing.
-
Compile billable time and expenses; generate invoices directly from within the case record.
-
Send invoices to clients via email or integrated e-billing systems.
-
Monitor payment status and follow up from the case dashboard.
Conclusion
This guide offers step-by-step instructions and explanations for all major functions in Microsoft Dynamics 365 for Legal, designed specifically for legal professionals. By following these procedures, legal teams can streamline client management, case workflows,opportunity tracking, document handling, and business developmentefforts. Leveraging AI capabilities such as Copilot and time tracking further enhances productivity and efficiency. With this knowledge, legal professionals can maximize the benefits of Dynamics 365 to drive their firm’s success.