Rebates Management in Dynamics 365 Business Central User Guide
Introduction
Rebates Management is an add-on extension for Business Central. It is used to facilitate the computation of sales rebates granted to qualified sales from your distribution channel or rebates expected from suppliers. Without this add-on, the usual method is to either use Power BI reports or export posted sales and purchase data to Excel to compute your rebates.
Changes to rebate quantum (amount per item or % of item sales/purchase) are easily managed through new setup pages (Customer Rebate Setup and Vendor Rebate Setup), and accounting of rebates in 3 different rebate accounts can also be configured.
After rebates are calculated, they can be posted to a journal to credit the customers’ account or debit the vendor’s account with a single button click. The Bal. Account will automatically pick the rebate value from the Rebate setup.
Visit on Microsoft AppSource Rebates Management
Rebate Configuration
Sales & Receivables Setup
Rebates are posted through general journal (document type CR/Adj Note). The default journal template and journal batch are defined in the Sales & Receivables Setup.
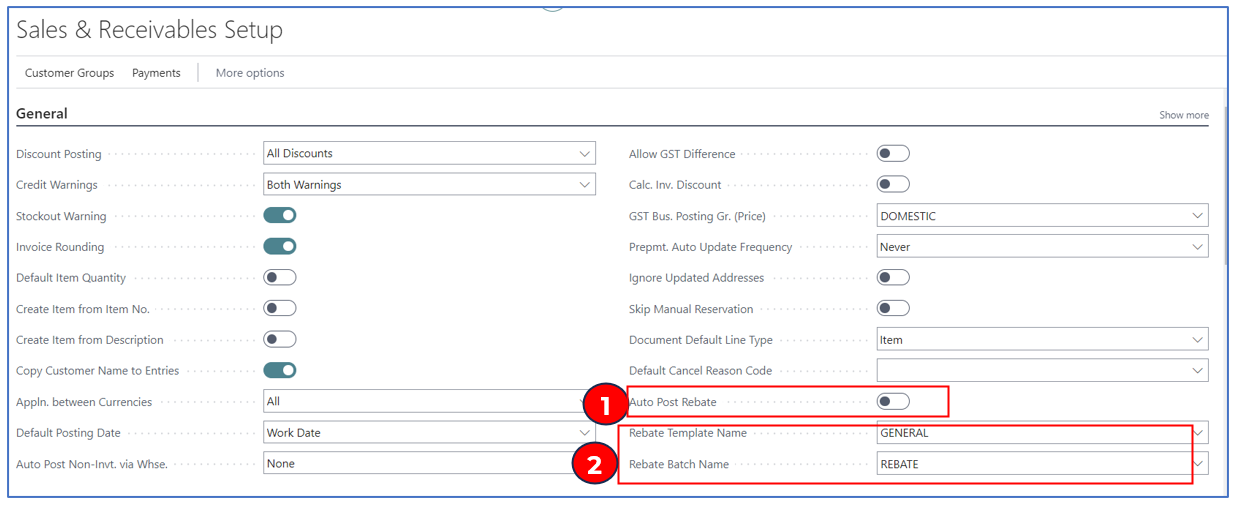
- Auto Post Rebate – this defines the method of posting your rebate CR/Adj journals. If disabled, the journal lines are created in the Journal Batch to be reviewed before the final posting. Enable this flag if you want to post the journal batch without review.
- Rebate Template and Batch Names – if you want to track posted journals for rebates, a unique Journal Batch Name can be created.
Purchase & Payables Setup
Rebates are posted through general journal (document type CR/Adj Note). The default journal template and journal batch are defined in the Purchase & Payables Setup.
Example:
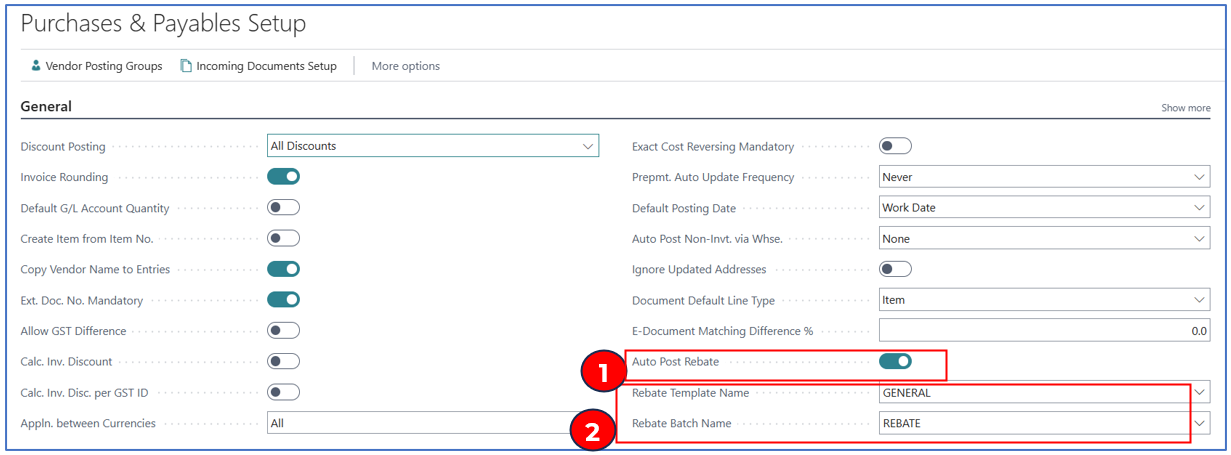
- Auto Post Rebate – this defines the method of posting your rebate CR/Adj journals. If disabled, the journal lines are created in the Journal Batch to be reviewed before the final posting. Enable this flag if you want to post the journal batch without review.
- Rebate Template and Batch Names – if you want to track posted journals for rebates, a unique Journal Batch Name can be created.
Customer Rebate Groups
Among your list of customers, you may want only to reward some customers – you need to create a Rebate Group to categorise these customers. Customers must be associated with the group since the computation of rebates will run only for customers in this group.
Example:
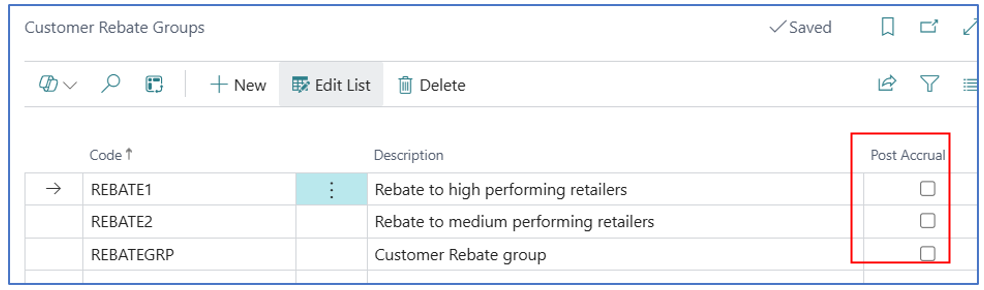
If you would like to post an accrual for the rebate, check the “Post Accrual” box against the Customer Rebate Group.
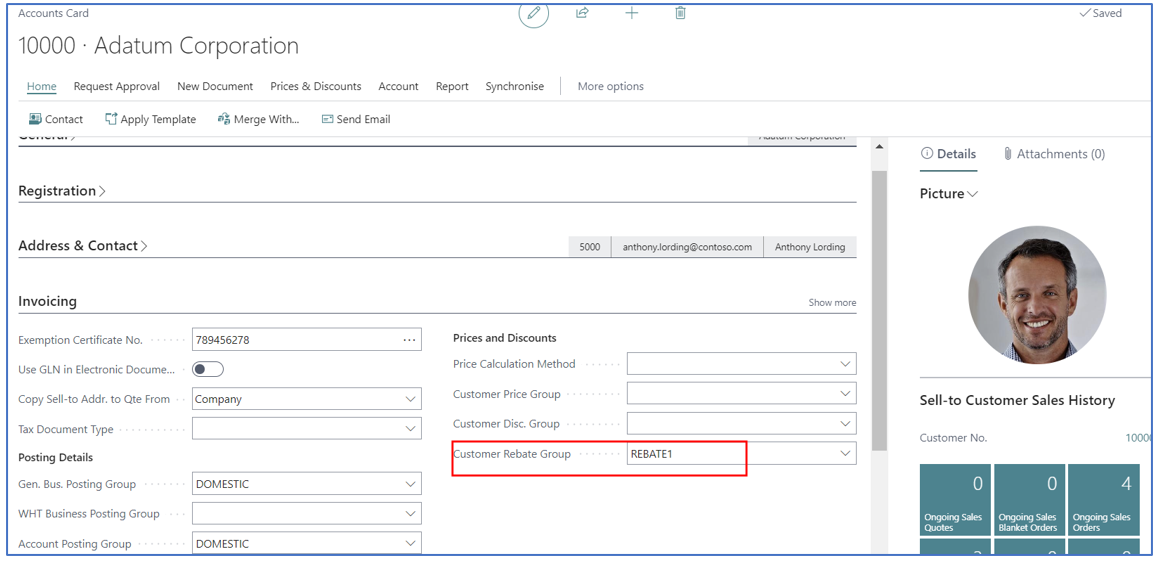
After creating the customer rebate group code, assign this to the customer card before running rebate calculations.
Vendor Rebate Groups
Among your list of vendors, you may have a rebate arrangement with any vendor(s) – you need to create a Rebate Group to categorise rebate vendor(s). Vendor account must be associated with the group since the computation of rebates will run only for vendors in the group.
Example:
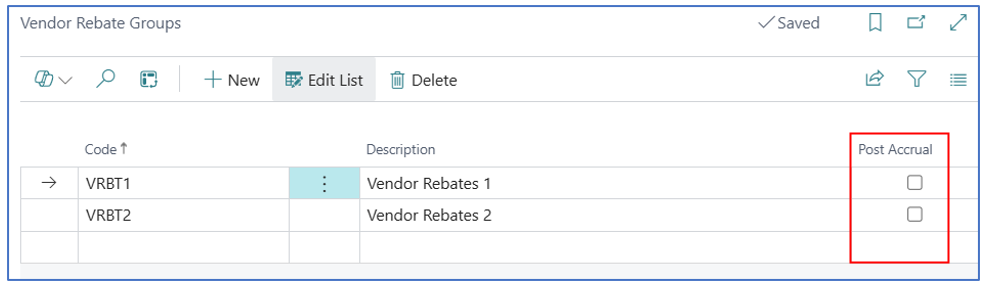
If you would like to post an accrual for the rebate, check the “Post Accrual” box against the Vendor Rebate Group.
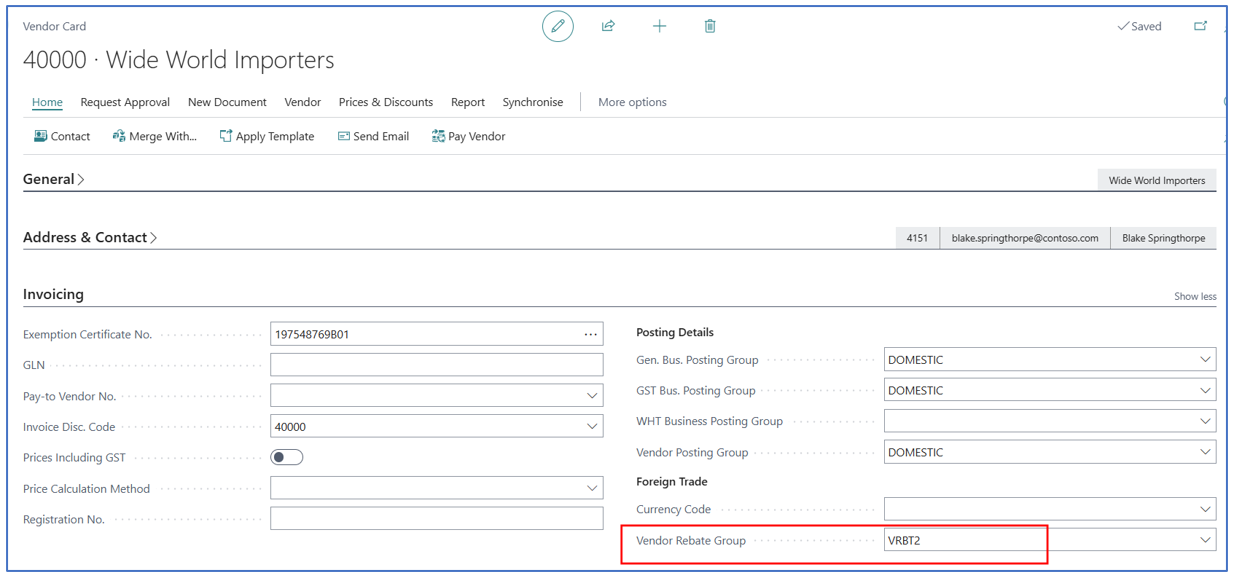
After creating the vendor rebate group code, assign this to the vendor card before running rebate calculations.
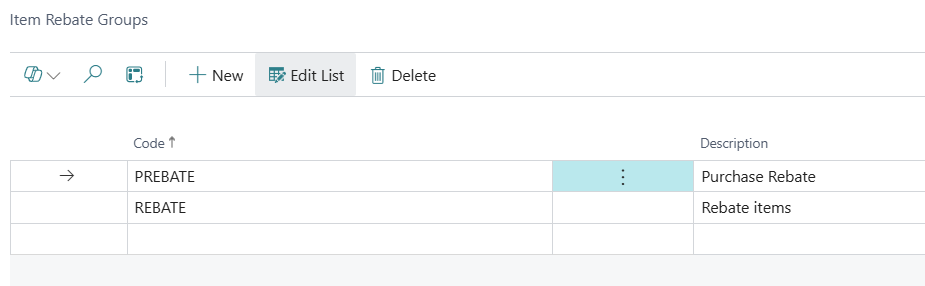
Item Rebate Groups
Items that are included in computation of rebates should be grouped. If downline customers are given rebates on the sales volume of certain items, these should be grouped into specific categories with each category having different rebate plans (if applicable).
Similarly, if the supplier is granting rebates for the purchase volume of certain products, group these into specific Item Rebate Groups.
Example:
After defining the Item Rebate Groups, assign the codes to the Item in the Item Master. The code can be used for the Purchase Item Rebate and/or Sales Item Rebate, depending on which rebate calculation is required.
Example:
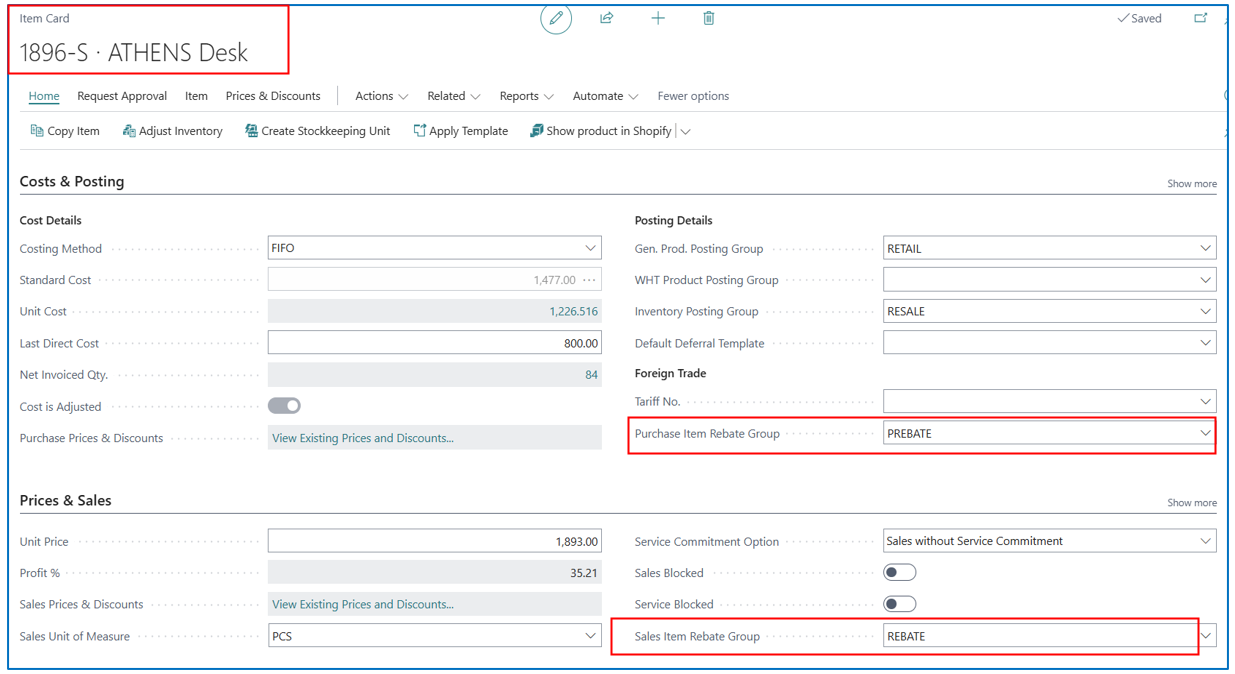
NB: The Item Rebate Group code must be assigned to either Purchase or Sales Rebate before performing the rebates calculation.
Rebate Setup (Downstream or Upstream)
Customer Rebate Setup
This is a new setup page to define the rebate computation % and the GL account for the rebate type. A maximum of 3 rebate types can be defined. You can also define different Customer Rebate Groups to group customers into different rebate schemes.
Example:
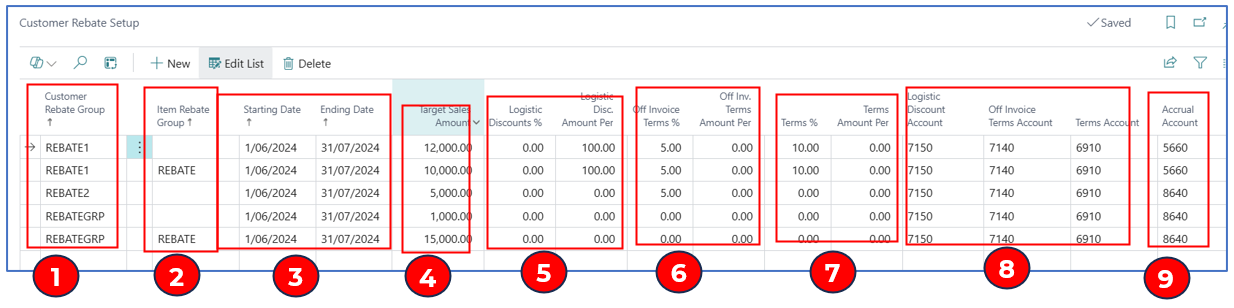
- Customer Rebate Group – select the group code assigned in the Customer card.
- Item Rebate Group – select an Item Rebate Group defined for customer rebate (Sales Item Rebate Group). NB: if blank, it will indicate all items are to be included for the rebate calculation
- Start Date and Ending Date – these dates (Rebate Period) determine the posted sales invoice lines to be included in the rebate calculation.
- Target Sales Amount – this is to set the rebate qualifying minimum sales volume ($) that must be met in the “Rebate Period” from all posted item sales (cumulatively for items in the Item Rebate Group).
NB: should there be any posted sales return credits, these will net off the posted sales invoices before the rebate value is calculated for the Net Sales volume.
- Logistics Disc % or Logistics Disc Amount – use either of these fields to define the amount of rebate given per posted sales invoice item line amount. If % is used, rebate is calculated as a percentage of the line amount. If amount is used, rebate is a fixed amount per item line amount.
- Off-invoice Terms % or Off-Invoice Terms Amount – use either field to define the 2nd rebate type for the posted sales invoice item line amount.
- Terms % or Terms Amount – use either field to define the 3rd rebate type for the posted sales invoice item line amount.
- Logistic Disc Account, Off-invoice Terms Account, Terms Account – select the relevant GL account to post the respective calculated rebate values. You can set all to the same GL account or to different GL accounts to monitor rebates given.
- Accrual Account – if the “Post Accrual” flag is enabled for the Customer Rebate Group, the posting of rebates will debit this accrual account instead of the customer receivable account.
NB: although 3 different rebate types can be setup, the calculation will treat each type individually – i.e. it will not calculate rebate over another rebate.
Vendor Rebate Setup
This is a new setup page to define the rebate computation % and the GL account for the rebate type. A maximum of 3 rebate types can be defined.
You can also define different Vendor Rebate Groups to group customers into different rebate schemes.
Example:
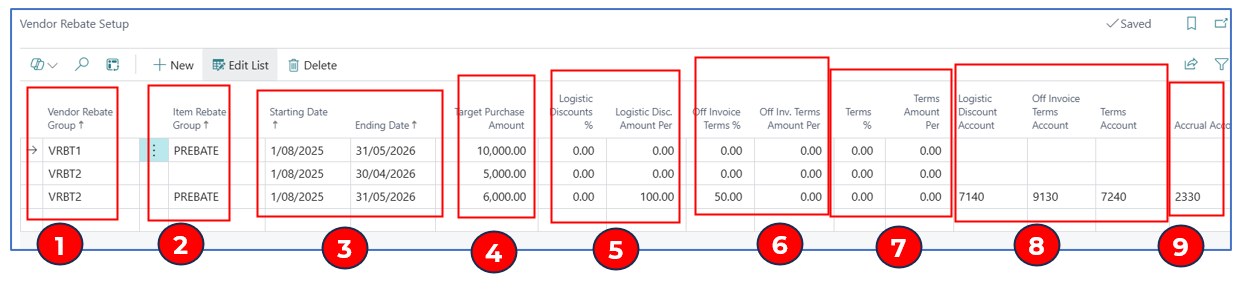
- Vendor Rebate Group – select the group code to be assigned in the Vendor card.
- Item Rebate Group – select an Item Rebate Group defined for vendor rebate (Purchase Item Rebate Group).
NB: if blank, it will indicate all items are to be included for the rebate calculation
- Start Date and Ending Date – these dates (Rebate Period) determine the posted sales invoice lines to be included in the rebate calculation.
- Target Purchase Amount – this is to set the rebate qualifying minimum purchase volume ($) that must be met in the “Rebate Period” from all posted item purchases (cumulatively for items in the Item Rebate Group).
NB: should there be any posted purchase return credits, these will net off the posted purchase invoices before the rebate value is calculated for the Net Purchase volume.
- Logistics Disc % or Logistics Disc Amount – use either of these fields to define the amount of rebate given per posted purchase invoice item line amount. If % is used, rebate is calculated as a percentage of the line amount. If amount is used, rebate is a fixed amount per item line amount.
- Off-invoice Terms % or Off-Invoice Terms Amount – use either field to define the 2nd rebate type for the posted purchase invoice item line amount.
- Terms % or Terms Amount – use either field to define the 3rd rebate type for the posted purchase invoice item line amount.
- Logistic Disc Account, Off-invoice Terms Account, Terms Account – select the relevant GL account to post the respective calculated rebate values. You can set all to the same GL account or to different GL accounts to monitor rebates given.
- Accrual Account – if the “Post Accrual” flag is enabled for the Vendor Rebate Group, the posting of rebates will debit this accrual account instead of the vendor payable account.
NB: although 3 different rebate types can be setup, the calculation will treat each type individually – i.e. it will not calculate rebate over another rebate.
Running Rebate Calculation
Customer Rebate
Once the required setup is completed; you can run the rebate calculations in the new Customer Rebate page.
Search for “Customer Rebate” and use the link to navigate to the page.
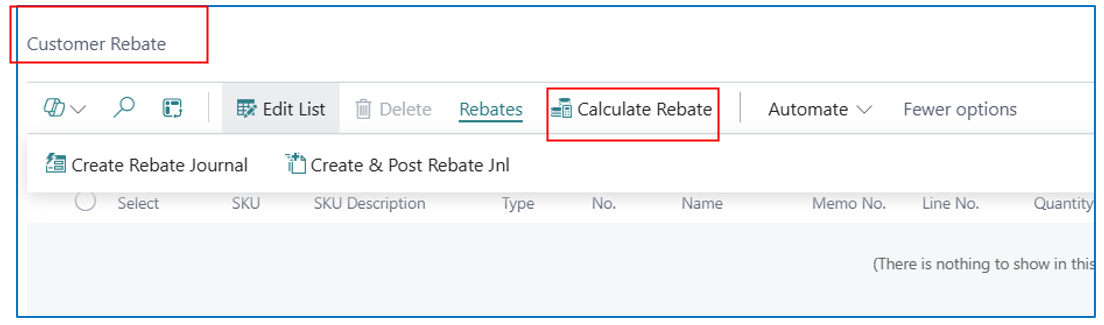
When “Calculate Rebate” menu option is selected, the report prompt appears:

- Select the Customer Rebate Group – this will be the group of customers included in rebate calculations
- Item Rebate Group – select the item group that comprises all the items entitled to the rebate
- Start Date and End Date –
- These dates must match the Rebate Setup period (start and end dates)
- These dates filter the invoices to be included in calculating rebates for the period where the sum of all sales lines is at least meeting the Target Sales Amount. Invoices are selected based on posted dates in the Rebate Period defined.
- Sell-to Customer No – (optional) if you just want to run rebate calculation for a particular customer in the Rebate Period, select the customer code. This customer must belong in the Customer Rebate Group as well.
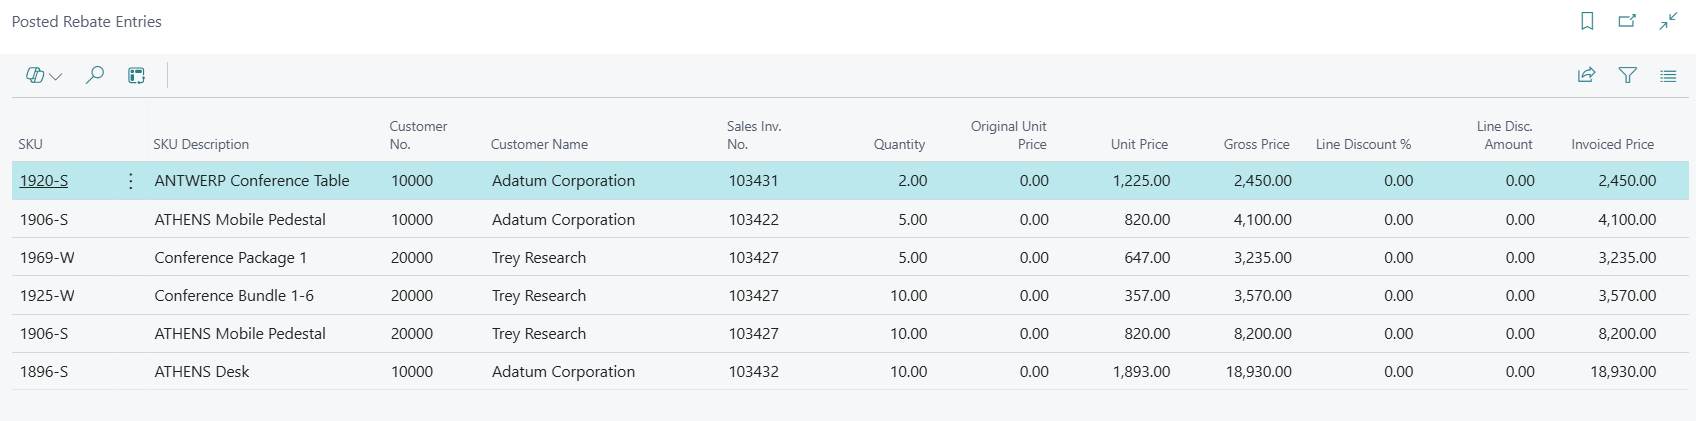
An example of a rebate calculation run:
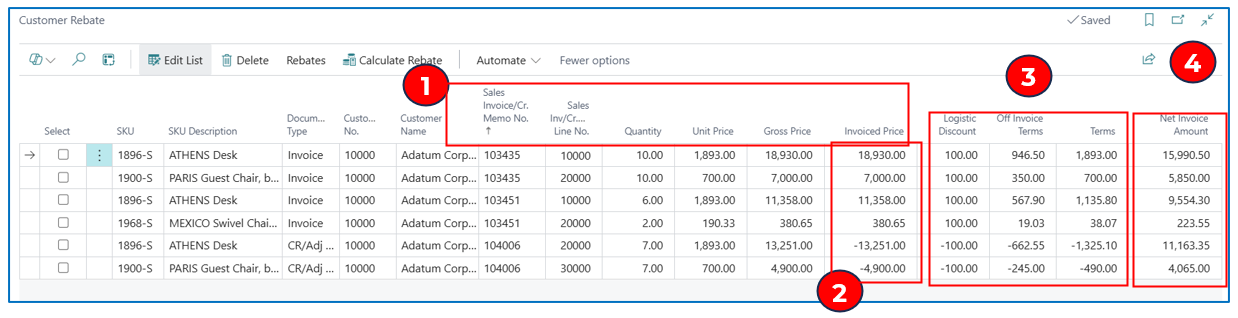
- Each line in this report represents a posted sales invoice line with an item sold. The quantity sold, unit price and invoiced price are also shown.
- For each customer, the “Invoiced Price” of all posted sales invoice lines are totalled and compared to the “Target Sales Amount” per customer. If the customer’s sales meet target, the posted sales invoice lines will be included in the rebate calculation.
In this example, there are sales return credit lines (negative values) that are added to calculate the Net Sales Volume ($37,668.65 less $18,151cr) – the Net Sales Volume is still greater than the Sales Target ($10,000) – hence, the sales lines qualify for the rebate (less the return credit).
- The 3 types of rebates are calculated per sales invoice line amount and displayed in separate columns.
NB: if only one rebate type is used, then the rebate amounts will display only in that column.
NB: for Sales Return credit item lines, the rebates calculated are negative (to offset the positive rebate values)
- For each posted sales invoice line, the rebates are deducted from the “Invoiced Price” to derive the “Net Invoice Amount” for the item line.
NB: if the rebate amounts are greater than the “Invoiced Price” amount, the “Net Invoice Amount” will be negative – this indicates that the rebates are exceeding sales for that item.
NB: when you re-run the “Calculate Rebate” menu option, the existing lines will be removed and replaced by the lines from the new calculation.
Vendor Rebate
Once the required setup is completed; you can run the rebate calculations in the new Vendor Rebate page.
Search for “Vendor Rebate” and use the link to navigate to the page.
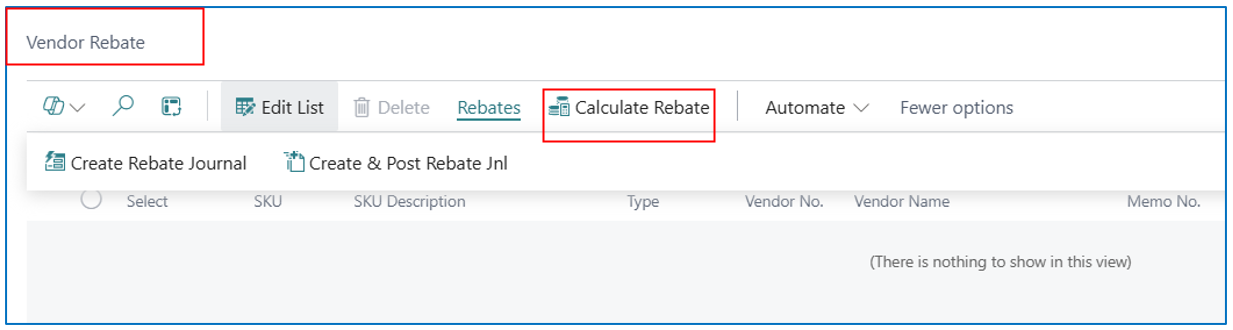
When “Calculate Rebate” menu option is selected, the report prompt appears:
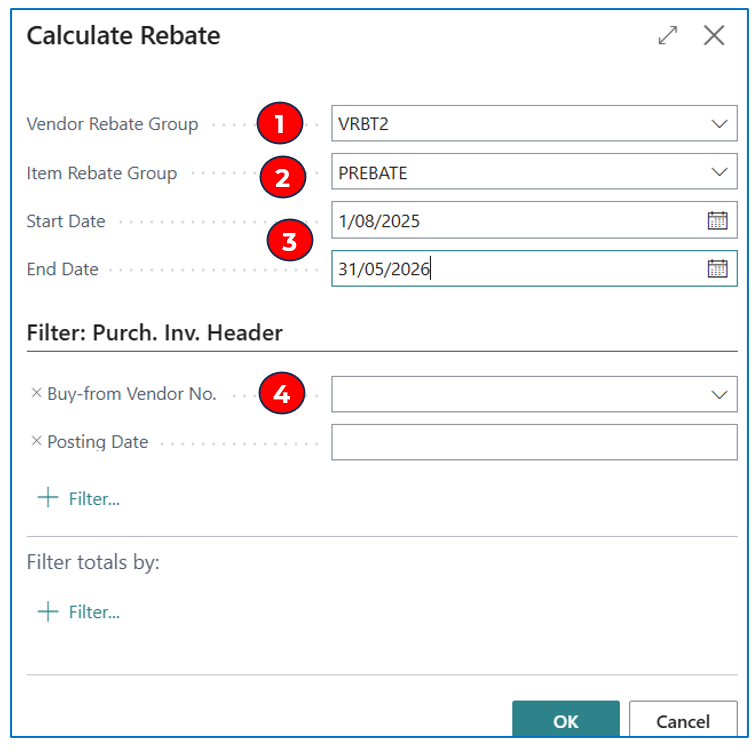
- Select the Vendor Rebate Group – this will be the group of vendors included in rebate calculations
- Item Rebate Group – select the item group that comprises all the items entitled to the rebate
- Start Date and End Date –
- These dates must match the Rebate Setup period (start and end dates)
- These dates filter the invoices to be included in calculating rebates for the period where the sum of all item purchase lines is at least meeting the Target Purchase Amount (in Vendor Rebate Setup). Posted Purchase Invoices are selected based on posted dates in the Rebate Period defined.
- Buy-from Vendor No – (optional) if you just want to run rebate calculation for a particular vendor in the Rebate Period, select the vendor code. This vendor must belong in the Vendor Rebate Group as well.
An example of a rebate calculation run:
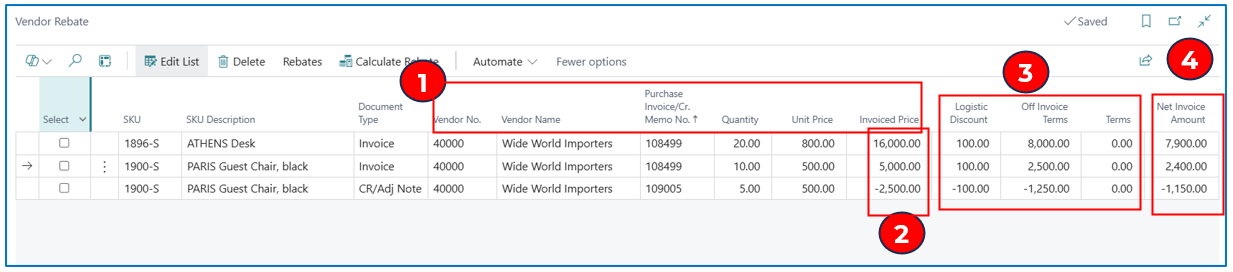
- Each line in this report represents a posted purchase invoice line with an item purchased. The quantity sold, unit price and invoiced price are also shown.
- For each vendor, the “Invoiced Price” of all posted purchase invoice lines are totalled and compared to the “Target Purchase Amount”. If the vendor’s purchases meet target, the posted purchase invoice lines will be included in the rebate calculation.
In this example, there are purchase return credit lines (negative values) that are added to calculate the Net Purchase Volume per vendor (total $21,000 less $2,500cr) – the Net Purchase Volume per vendor is still greater than the Purchase Target ($6,000) – hence, the posted purchase lines qualify for the rebate (less the return credit).
- The 3 types of rebates are calculated per sales invoice line amount and displayed in separate columns.
NB: if only one rebate type is used, then the rebate amounts will display only in that column.
NB: for Purchase Return item credit lines, the rebates calculated are negative (to offset the positive rebate values)
- For each posted purchase invoice line, the rebates are deducted from the “Invoiced Price” to derive the “Net Invoice Amount” for the item line.
NB: if the rebate amounts are greater than the “Invoiced Price” amount, the “Net Invoice Amount” will be negative – this indicates that the rebates are exceeding sales for that item.
NB: when you re-run the “Calculate Rebate” menu option, the existing lines will be removed and replaced by the lines from the new calculation.
Posting Final Rebates
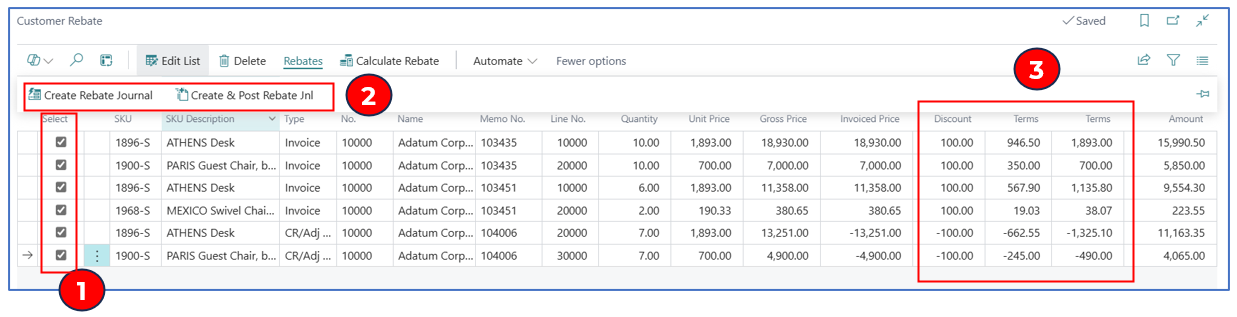
Posting Customer Rebates
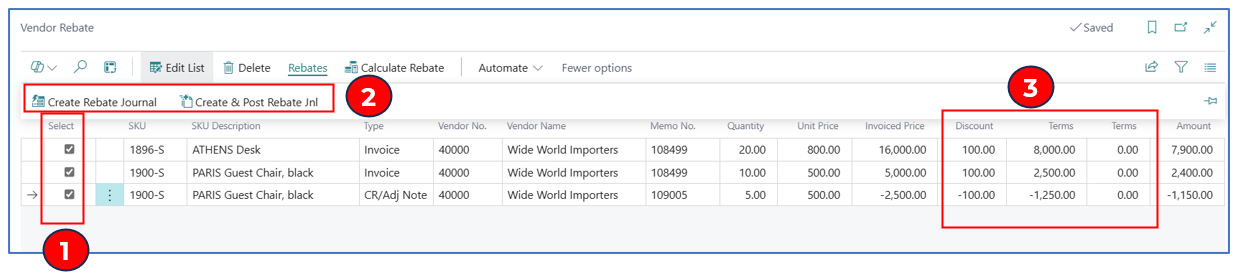
After the rebates are calculated in “Customer Rebate” page, the approved rebate can be posted to GL to recognise the credit given to the customer. There are 2 options for creating GL journal lines for the rebates – “Create Rebate Journal” and “Create & Post Rebate Jnl”.
-
Select the rebate lines to credit the customer – select all customers or individual customer
-
Select either Create Rebate Journal or Create & Post Rebate Jnl:
- Click on menu item “Create Rebate Journal” – this will create a GL batch with lines for the selected rebates. Each column of rebate value will have a GL line posting to the account defined in the Setup for that rebate.
- Click on menu item “Create & Post Rebate Jnl” – this will create and post the rebate GL journal batch.
NB: The journal will be created using the template and batch defined in Sales & Receivables Setup:

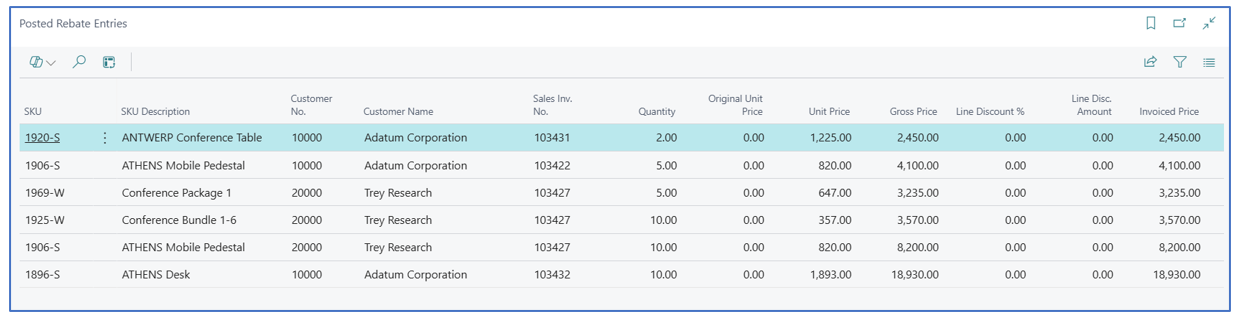
NB: The setup flag “Auto Post Rebate” must be enabled to use the “Create & Post Rebate Jnl” option. Once posted, the rebate lines will be archived in “Posted Rebate Entries”.
Example:
- The rebate amounts are credited to the customer and debited to the rebate accounts as defined in Customer Rebate Setup. The rebate amounts are credited as individual amount per rebate type per posted invoice line. The external document number references the customer account.
Recognition of Rebate Credit in Customer Account
When the General Ledger “Rebate” batch is created, each line references the rebate amount computed for the rebate type based on the posted sales invoice line amount.
Example of a Rebate journal batch:
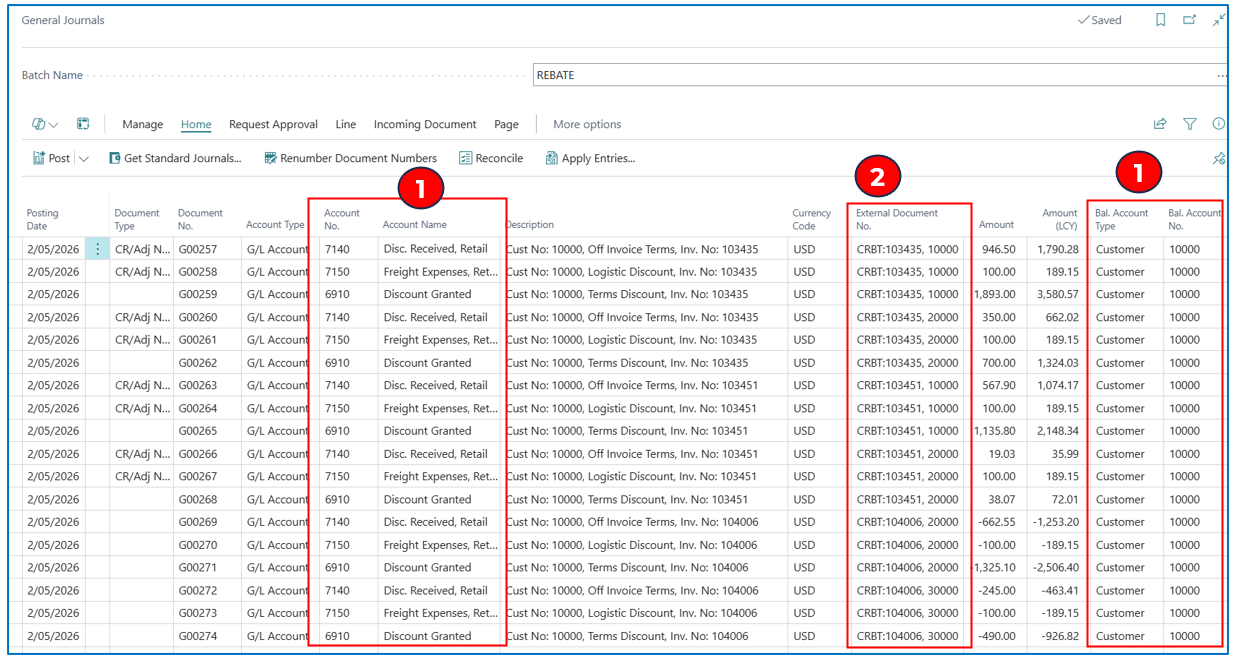
- The Account No. of each rebate amount is debited, and the Bal. Account No. is the customer code. This recognises the rebate amount credited to the customer account.
- The External Document references the original invoice number and the customer code.
NB: (optional) for each journal line that credits the customer account, you can use the “Apply Entries” menu option to offset the rebate credits with existing invoices before posting the journal lines.
After the General Journal “Rebate” batch is posted, the posted sales invoice lines that were referenced in the posted journal will not be re-selected in the next Customer Rebate calculation run.
Posting Vendor Rebates
After the rebates are calculated in “Vendor Rebate” page, the approved rebate can be posted to GL to recognise the debit to the vendor account. There are 2 options for creating GL journal lines for the rebates – “Create Rebate Journal” and “Create & Post Rebate Jnl”.
- Select the rebate lines to debit the vendor – select all vendors or individual vendor.
- Select either Create Rebate Journal or Create & Post Rebate Jnl:
- Click on menu item “Create Rebate Journal” – this will create a GL batch with lines for the selected rebates. Each column of rebate value will have a GL line posting to the account defined in the Setup for that rebate.
- Click on menu item “Create & Post Rebate Jnl” – this will create and post the rebate GL journal batch.
NB: The journal will be created using the template and batch defined in Purchase & Payables Setup:

NB: The setup flag “Auto Post Rebate” must be enabled to use the “Create & Post Rebate Jnl” option. Once posted, the rebate lines will be archived in “Posted Rebate Entries”.
Example:
- The rebate amounts are debited against the vendor account and credited to the rebate accounts as defined in Vendor Rebate Setup. The rebate amounts are credited as individual amount per rebate type per posted invoice line. The external document number references the vendor account.
Recognition of Rebate Debit in Vendor Account
When the General Ledger “Rebate” batch is created, each line references the rebate amount computed for the rebate type based on the posted purchase invoice line amount.
Example of a Rebate journal batch:
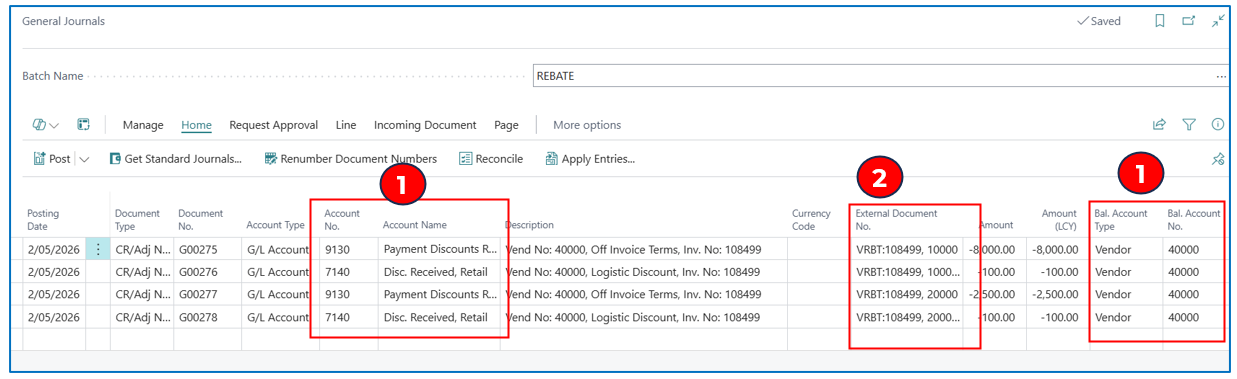
- The Account No. of each rebate amount is credited, and the Bal. Account No. is the vendor code. This recognises the rebate amount debited to the vendor account.
- The External Document references the original invoice number and the vendor code.
NB: (optional) for each journal line that debits the vendor account, you can use the “Apply Entries” menu option to offset the rebate debits with existing invoices (credits) before posting the journal lines.
After the General Journal “Rebate” batch is posted, the posted purchase invoice lines that were referenced in the posted journal will not be re-selected in the next Vendor Rebate calculation run.