Legal User Guide for Microsoft Dynamics 365
Legal Case Management Section
Invoices
The invoicing process in the Legal Solution converts eligible billing items and expenses into formal invoices that can be reviewed, shared with clients, and tracked through to payment.
Invoices are generated based on invoiceable records linked to the Matter. Depending on the Matter’s Billing Type, these records may come from different sources.
Invoices may be generated from:
-
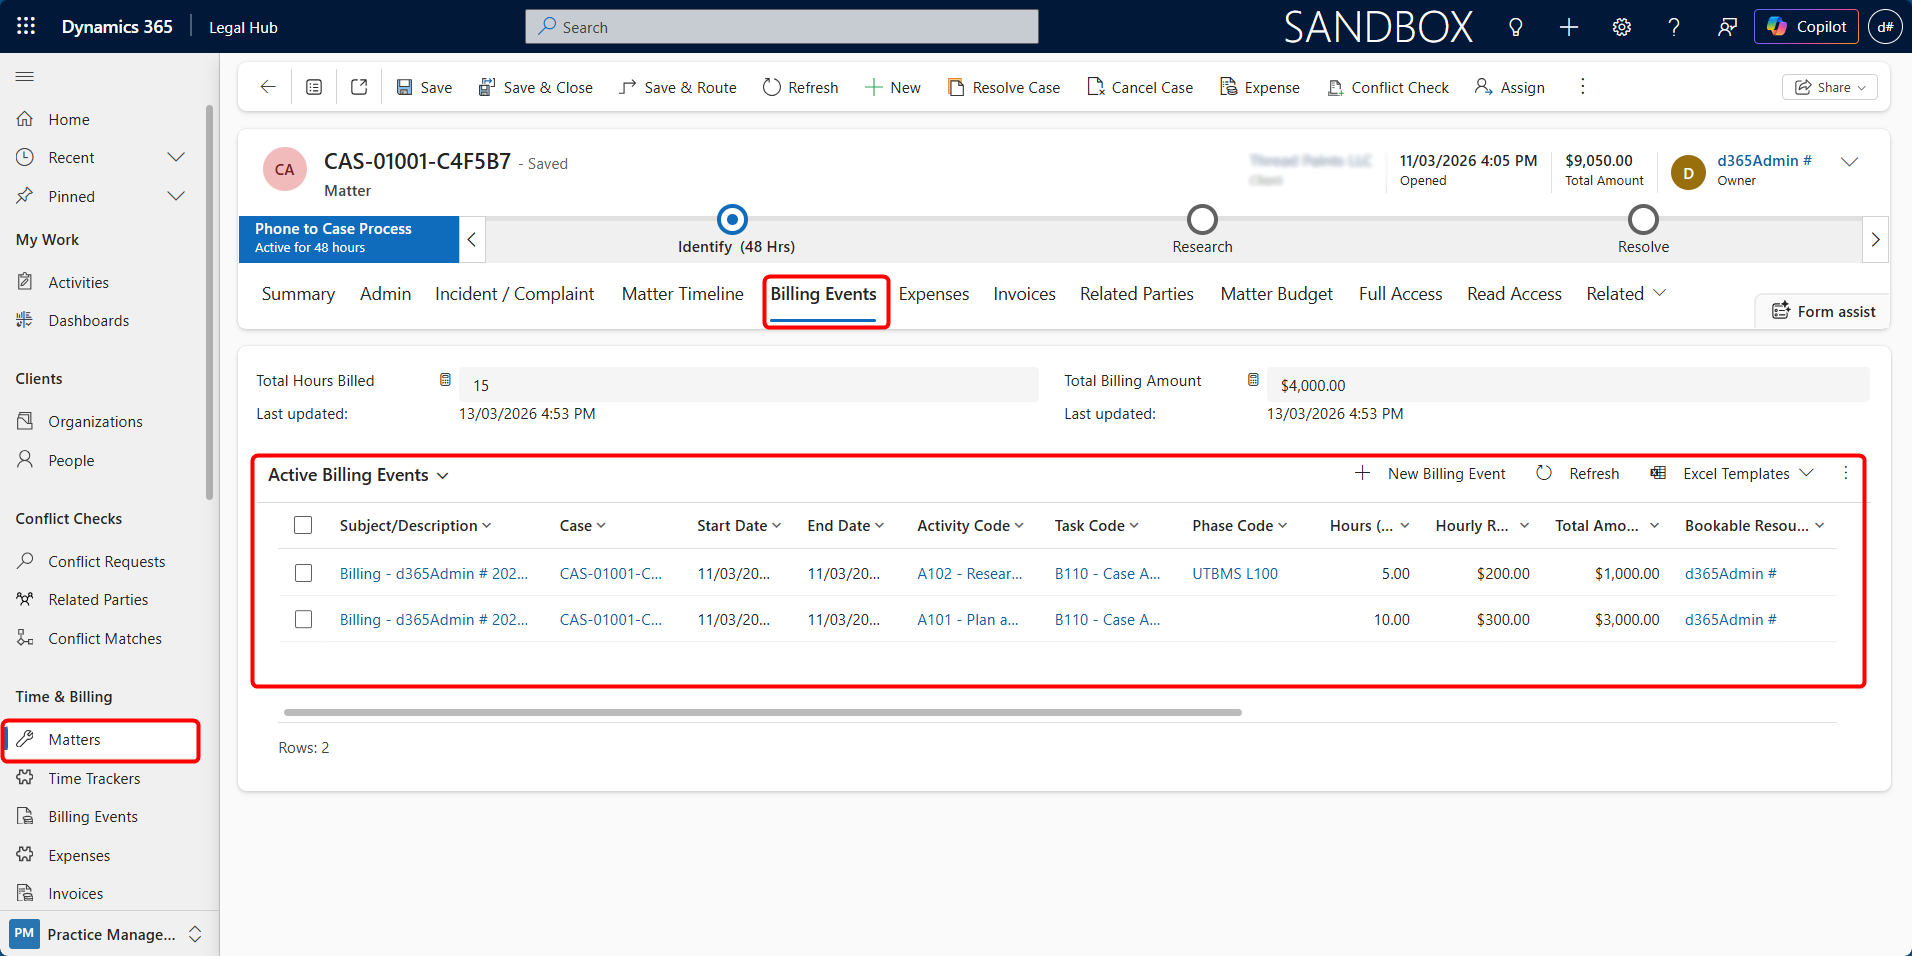
Billing Events — Billable fee records linked to the Matter.
-
Time-based Billing Events — Billable time recorded by lawyers and staff.
-
Fixed Fee Billing Events — Billing events generated from fixed fee schedule instalments.
-
Contingent Fee Billing Events — Settlement-based billing events generated for contingent fee matter.
-
Retainer Billing Events — Recurring or retainer-based billing records, where configured.
-
Expenses — Disbursements and external costs linked to the Matter.
These records are combined to produce a structured invoice with detailed line items.
The invoice process remains the same once eligible billing events and expenses exist. However, the way those billing events are created may differ depending on whether the Matter is billed as Per Diem (Time & Charges), Fixed Fee, Contingent Fee, or Retainer.
How Invoicing Fits Into the Workflow
Invoicing is the final stage of the Matter lifecycle from a financial perspective. It follows a structured process to ensure accuracy, compliance, and proper financial tracking.
The typical flow is:
-
Record or Generate Billing Events and Expenses
-
Billable fees and costs are recorded or generated against the Matter.
-
For Per Diem (Time & Charges) matters, this is usually based on time entries.
-
For Fixed Fee matters, billing events are generated from fixed fee schedule instalments.
-
For Contingent Fee matters, billing events are generated when the settlement-based fee is created.
-
-
Approve Billing Entries
- Only approved or eligible Billing Events and Expenses are included in the invoice process.
-
Generate Invoice
- The system creates an invoice using eligible billing events and expenses.
-
Review and Adjust Invoice
- Invoice line items can be reviewed and updated if required.
-
Generate Invoice Documents
- Invoice files, such as PDF, Word, or LEDES, are created for sharing or record keeping.
-
Update Invoice Status
- The invoice is finalised and tracked through its lifecycle, including billing, payment, and outstanding balance status.
Where Invoices Are Managed
Invoices can be accessed and managed from:
-
Matter Record → Invoices tab Used when working within a specific Matter
-
My Work → Invoice List Used to manage and process invoices across multiple Matters
-
My Work → Invoice Process Used to generate invoices in bulk for multiple Matters
Before You Generate an Invoice
Before generating an invoice, it is important to ensure that all relevant billing and expense records are complete, approved, and ready for invoicing.
Invoices are created from eligible Billing Events and Expenses recorded against a Matter. The source of the Billing Events may differ depending on the Matter’s Billing Type.
For example:
| Billing Type | What must be ready before invoicing |
|---|---|
| Per Diem (Time & Charges) | Billing Events from billable time entries must be recorded and approved |
| Fixed Fee | Fixed Fee Schedule instalments must be raised into Billing Events |
| Contingent Fee | A settlement-based Billing Event must be created |
| Retainer | Retainer or recurring Billing Events must exist, where configured |
| Expenses | All recoverable expenses must be recorded and approved |
Only records that meet the required criteria will be included in the invoice.
Required Steps
Before proceeding with invoice generation, ensure the following:
- Billing Events are recorded or generated — All billable time entries must be added under the Billing Events tab.
Depending on the Matter’s Billing Type, Billing Events may be:
-
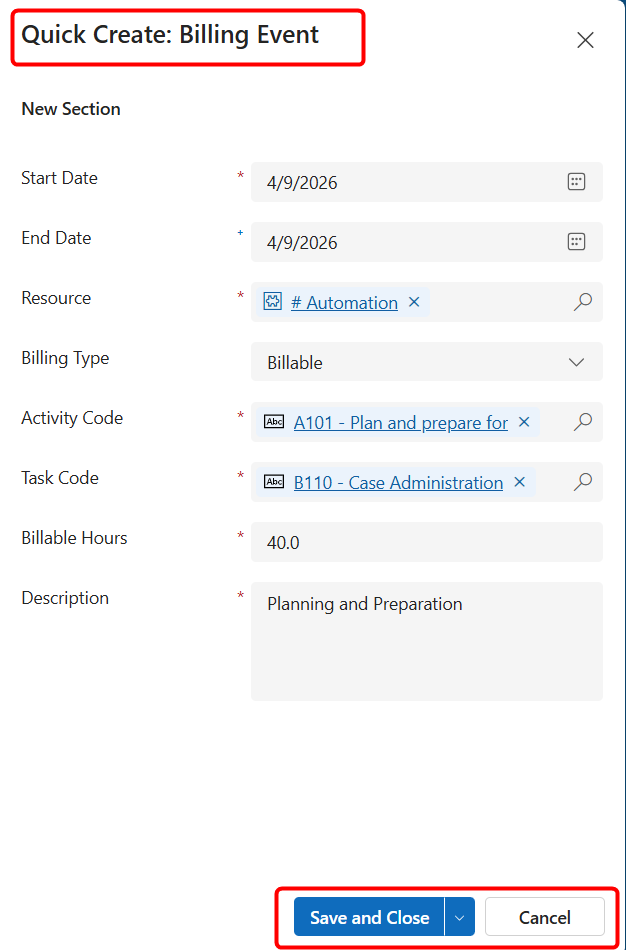
Manually created under the Billing Events tab
-
Generated from billable time entries
-
Generated from Fixed Fee Schedule instalments
-
Generated automatically when a Contingent Fee matter reaches settlement
-
Generated from retainer or recurring billing configuration, where applicable
For Fixed Fee matters, scheduled installments must first be raised into Billing Events before they can be invoiced. For Contingent Fee matters, the settlement-based Billing Event must exist before the Matter can be invoiced.
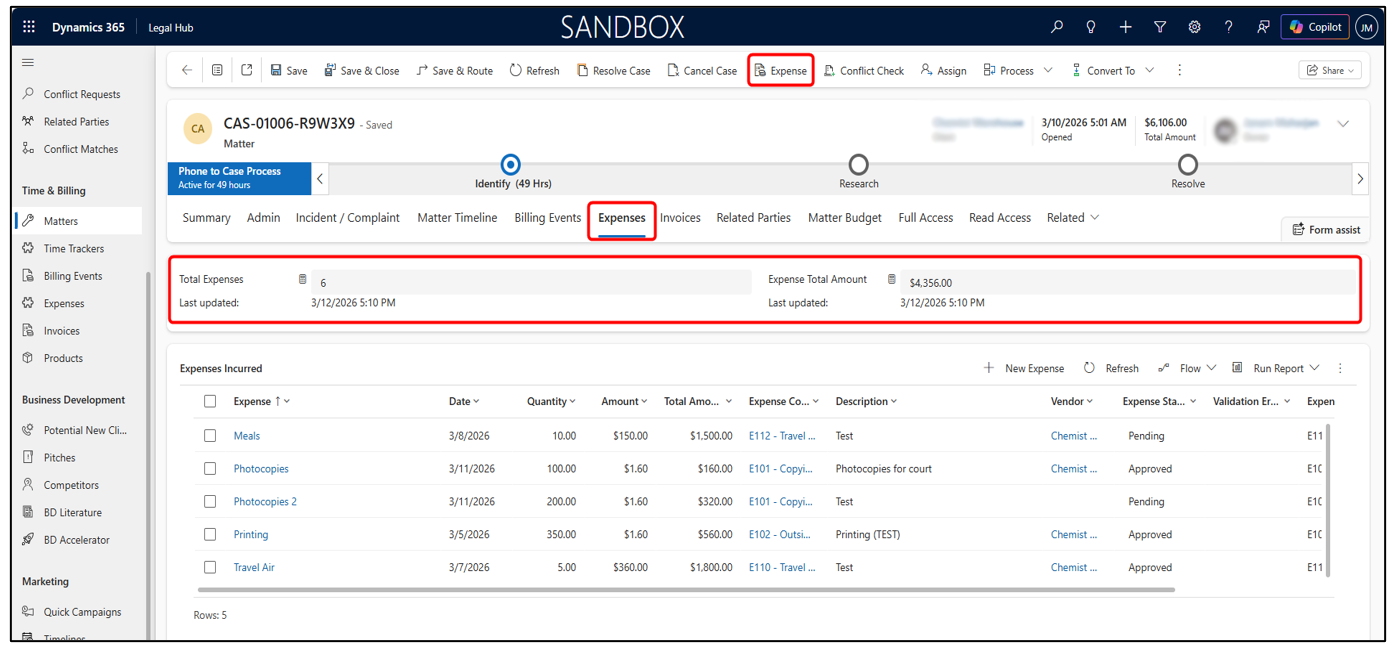
- Expenses are recorded (if applicable) — Any disbursements or external costs should be added under the Expenses tab.
-
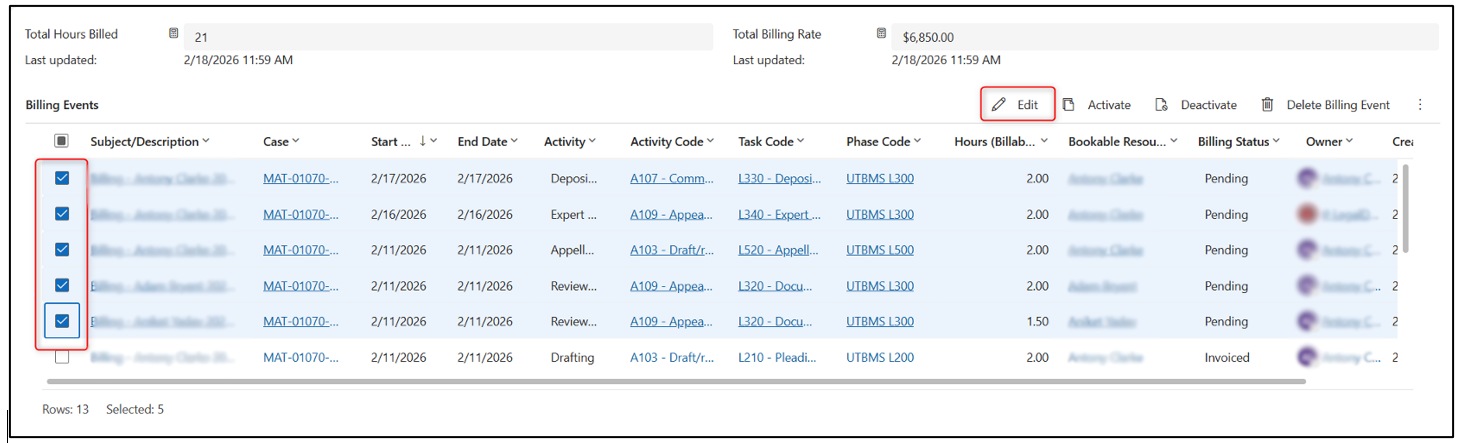
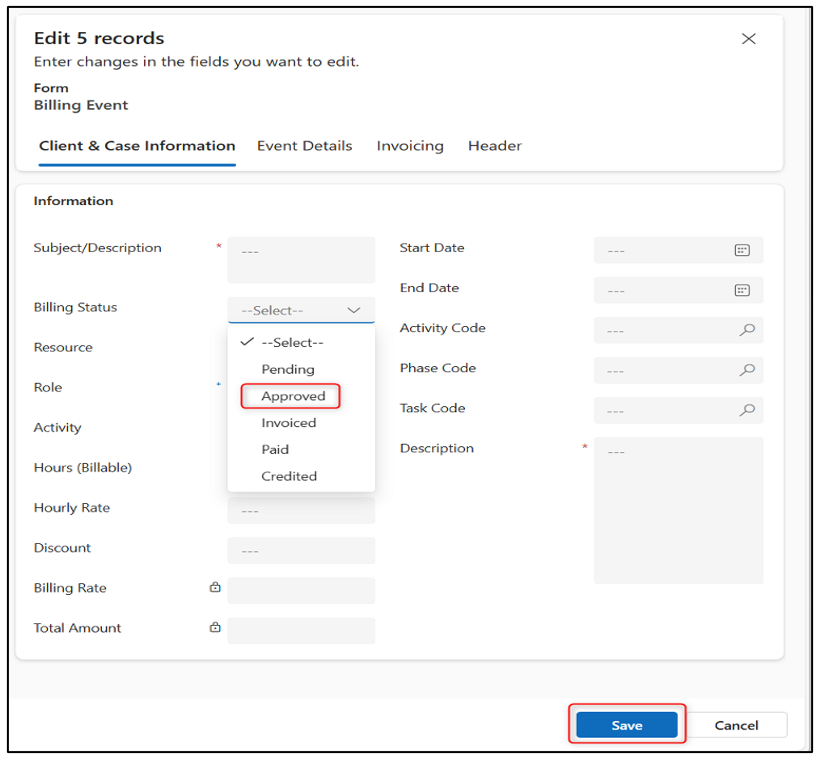
Records are Approved
-
Only Billing Events and Expenses with the required approved or eligible status will be included in the invoice process.
-
Users should review the relevant records and approve them before generating the invoice.
-
-
No validation errors exist — Any incomplete or invalid records will be skipped during invoice generation.
Important Notes
-
Billing Events and Expenses that are not approved or eligible will not be included in the invoice.
-
Multiple records can be approved at once using bulk edit functionality, where available.
-
It is recommended to review all billing and expense entries before approval to ensure accuracy.
-
For Fixed Fee matters, check the Fixed Fee Schedule tab to confirm that due instalments have been raised.
-
For Contingent Fee matters, check the Financial tab and Billing Events tab to confirm that the settlement amount and contingent fee Billing Event are correct.
-
The invoice process remains the same once eligible Billing Events and Expenses are available.
Generating Invoices
Invoices can be generated either for a single Matter or in bulk across multiple Matters. The system uses approved Billing Events and Expenses to automatically create invoice records.
Follow these steps.
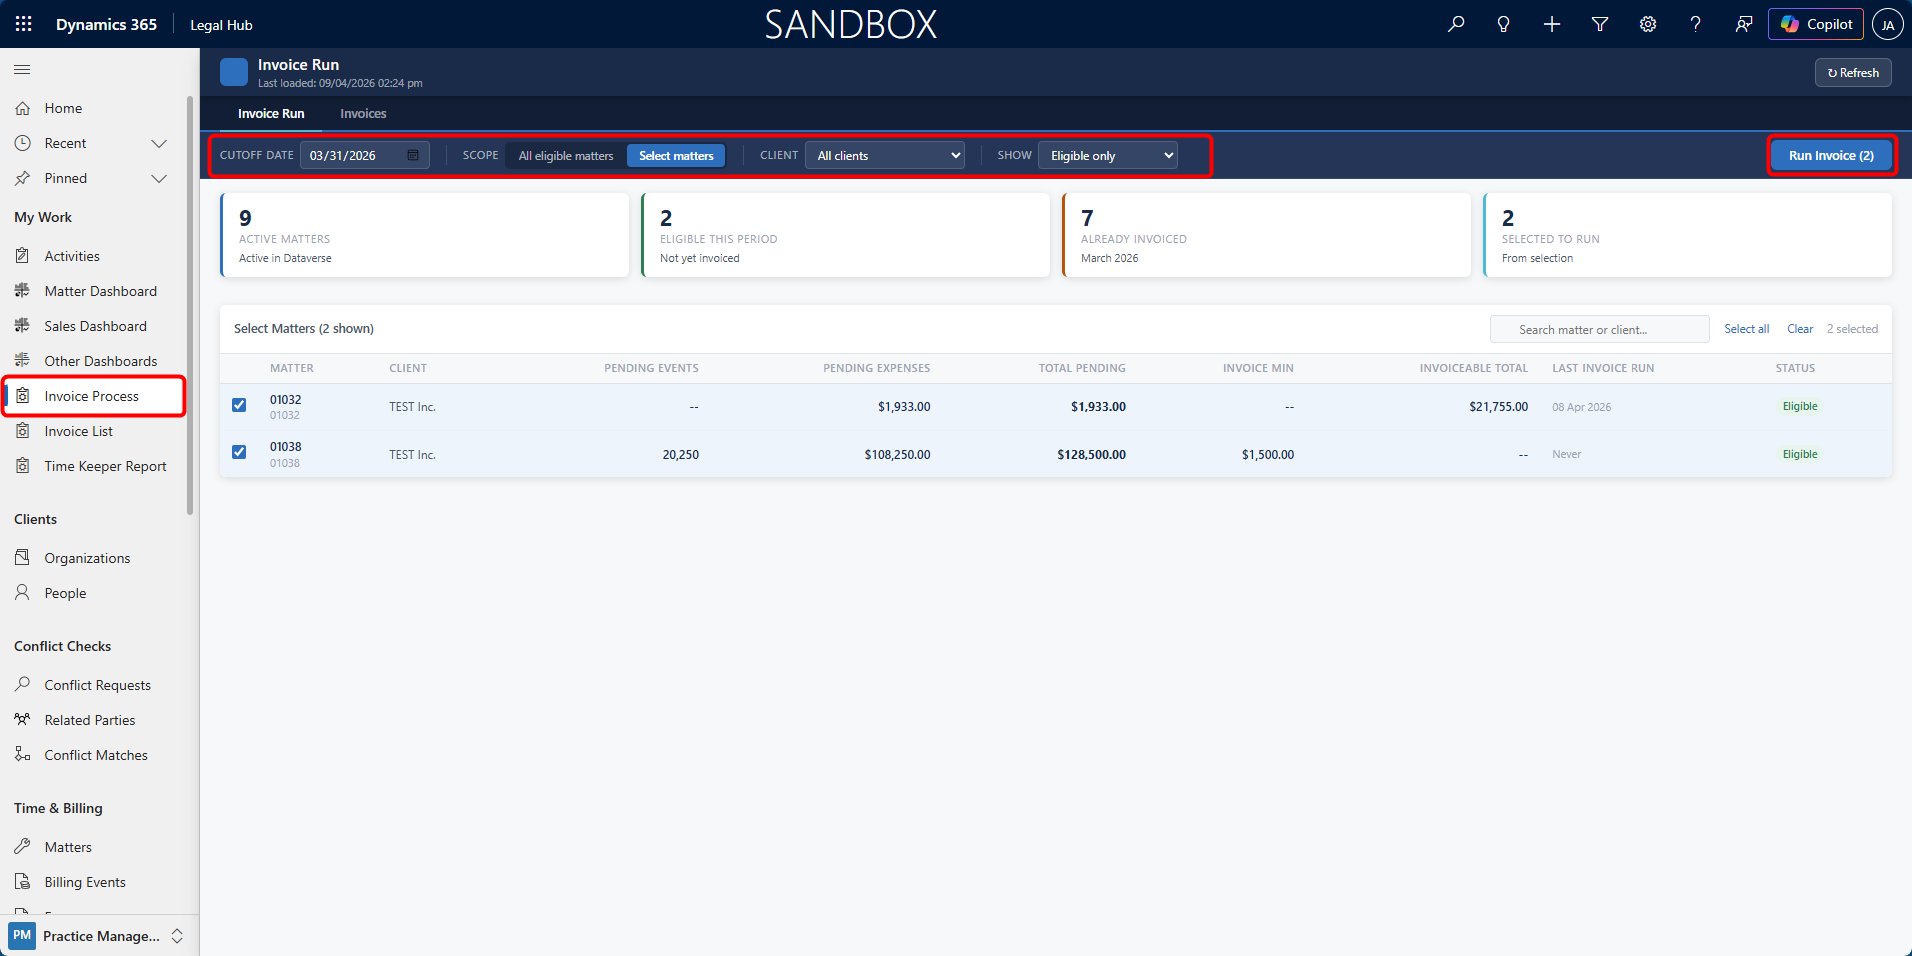
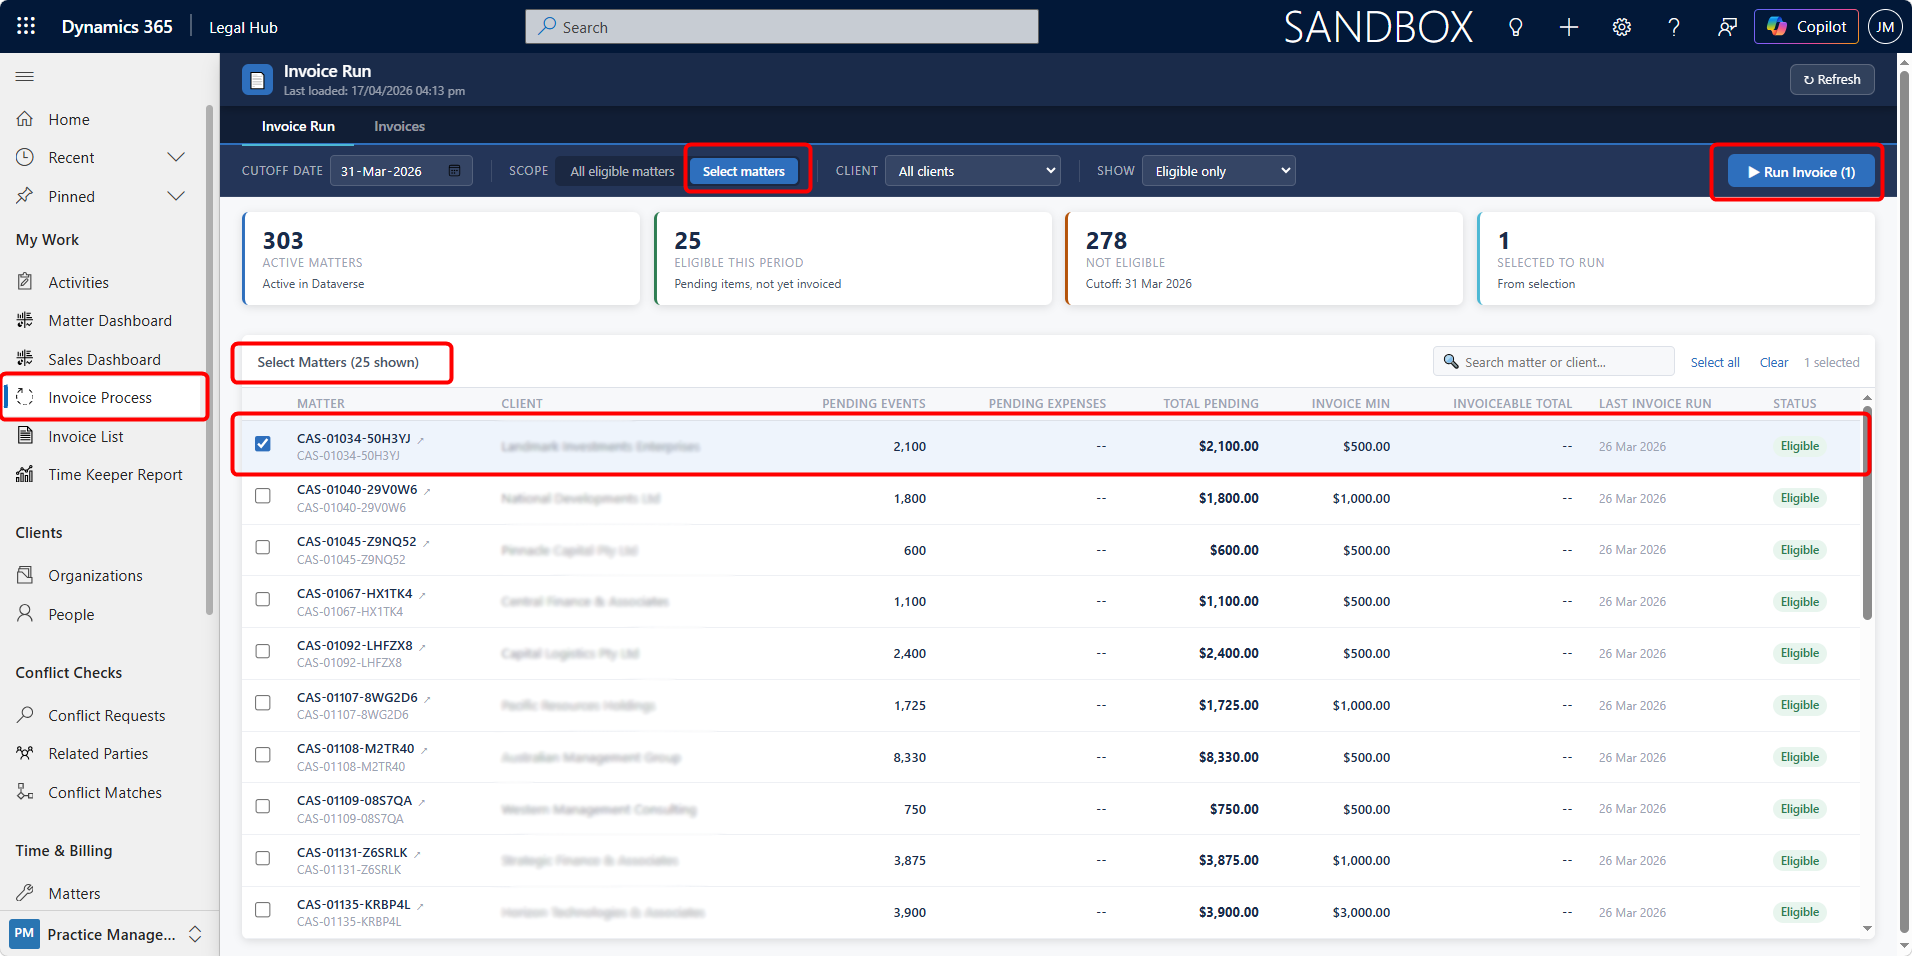
-
Navigate to My Work > Invoice Process.
-
Click Run Invoices.
a. Optional:
i. Set a Cutoff Date to control which Billing Events are included.
ii. Click Select Matters to generate invoices only for specific Matter/s.
-
Proceed to run the invoice process.
Here is what happens during the invoice generation process:
-
The system evaluates all eligible Matters.
-
Only Matters that meet invoicing criteria will be processed.
-
Invoices are generated automatically for those Matters.
-
Results can be reviewed in the Invoice List.
Invoice Generation Criteria
An invoice will only be generated when the following conditions are met:
-
Billing Events and Expenses are Approved.
-
There are no validation errors.
-
The Matter meets the Invoice Minimum Required Amount (if configured).
If these conditions are not met:
-
The Matter will be skipped.
-
No invoice will be created.
After Invoice Generation
Once invoices are generated:
-
They appear in:
-
Matter > Invoices tab, and
-
My Work > Invoice List
-
-
Users can:
-
Review invoice details
-
Generate invoice documents
-
Make adjustments (if required)
-
For Fixed Fee matters, once the invoice is generated, the related fixed fee schedule row is updated to Invoiced and linked to the invoice. For Contingent Fee matters, the generated invoice is based on the contingent fee billing event created from the settlement amount.
Viewing & Managing Invoices
Once invoices are generated, they can be viewed, reviewed, and managed from the system. Users can access invoices either from within a Matter or across all Matters using the Invoice List.
Where to Find Invoices
Invoices can be accessed from:
-
Matter > Invoices tab — Used when working within a specific Matter.
-
My Work > Invoice List — Used to view and manage invoices across multiple Matters.
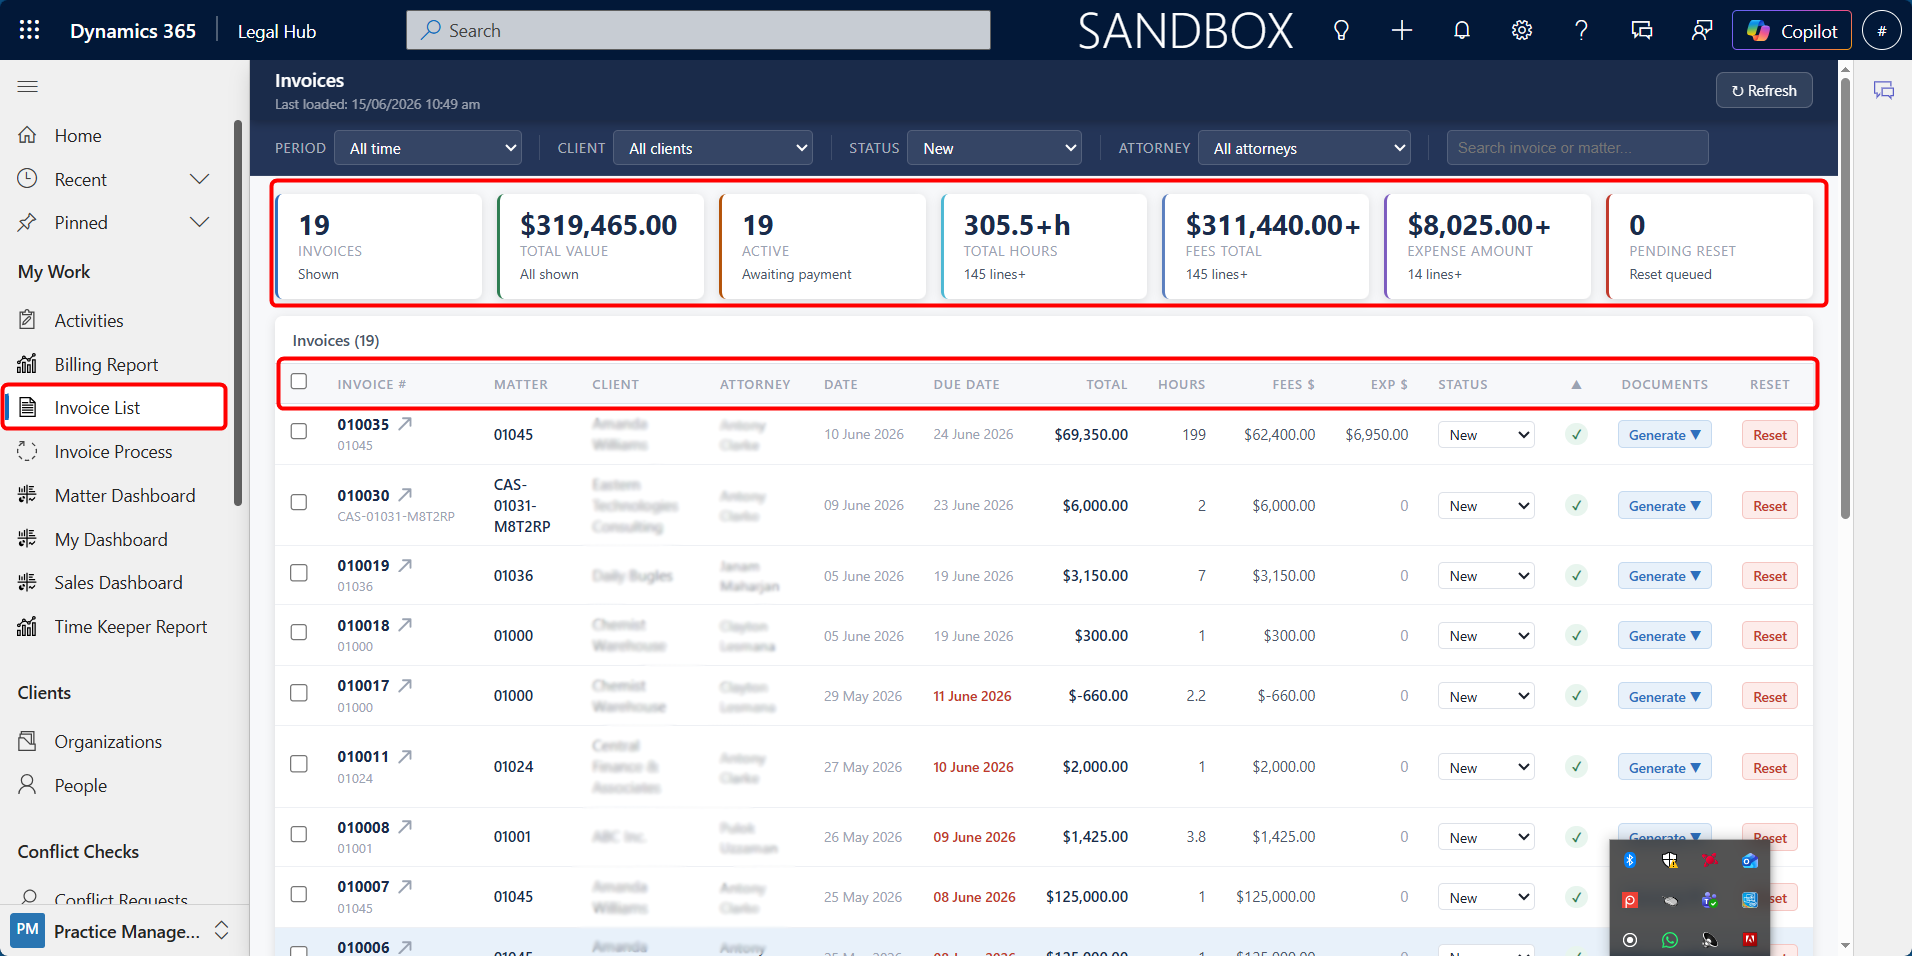
Using the Invoice List
The Invoice List provides a central view of all invoices in the system.
From this screen, users can:
-
View all generated invoices
-
Select one or multiple invoices
-
Generate invoice documents
-
Open full invoice records
-
Reset invoices if required
Opening an Invoice
To view full invoice details:
-
Click on the Invoice, or:
a. Click the arrow icon (↗) next to the invoice name.
b. The full Invoice form will open.
From the invoice form, users can:
-
Review all invoice details
-
View and edit line items (if allowed)
-
Generate documents
-
Update invoice status
Additional Indicators
Within the system, users may see indicators such as:
-
Budget Exceeded warning — when invoice value exceeds the Matter budget
-
Validation errors — if certain records were not included in the invoice
These help identify issues before finalising invoices.


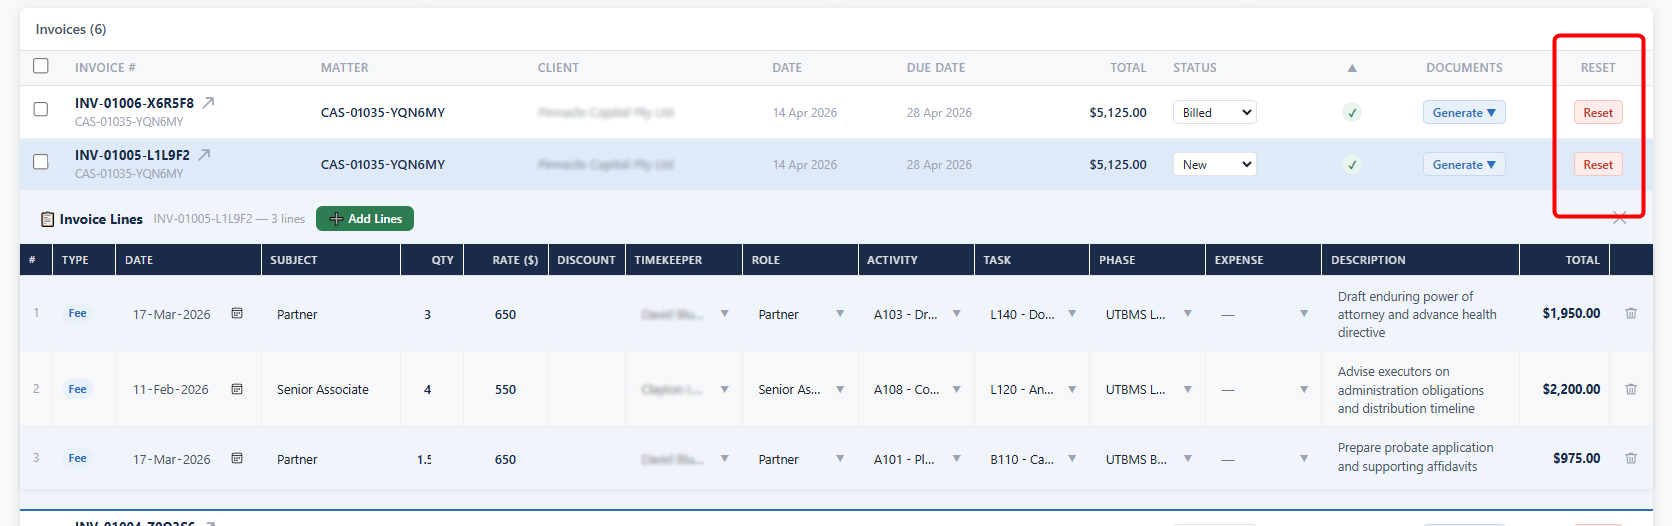
Resetting an Invoice
Invoices can be reset if changes are required after generation.
Follow these steps:
-
Go to Invoice List
-
Select the invoice
-
Click Reset
The reset does the following:
-
Deletes the invoice record
-
Returns Billing Events and Expenses to Pending status
-
Allows corrections to be made before regenerating the invoice
Managing Invoices from the Matter
Invoices can also be accessed directly within a Matter.
-
Open the Matter.
-
Navigate to the Invoices tab.
-
Open the required invoice.
This view is useful when:
-
Reviewing invoices for a specific Matter
-
Checking invoice history for that Matter

Managing Invoice Line Items
Invoice Line Items represent the individual billing entries included in an invoice.
These can be reviewed and adjusted only when the invoice status is set to New.
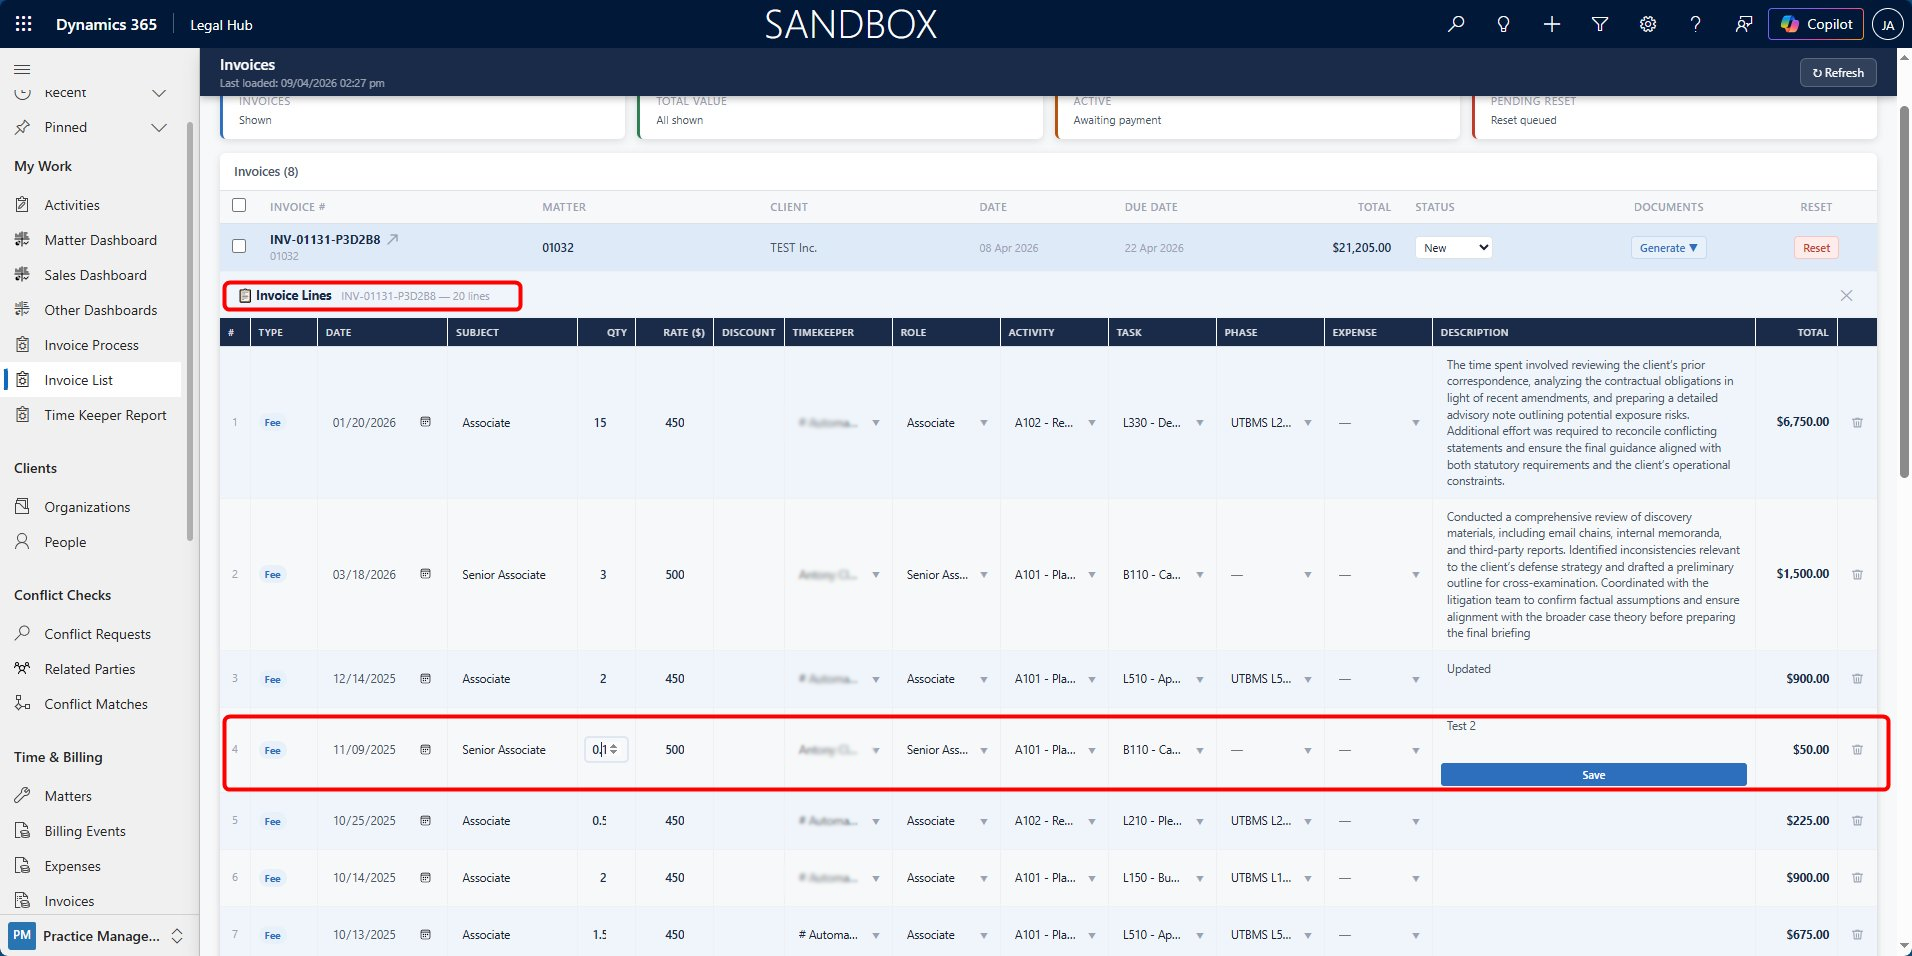
Editing Invoice Line Items
Users can modify or edit the Invoice Line Items directly from the Invoice List.
Follow these steps to edit invoice line items:
-
Navigate to: My Work > Invoice List
-
Click on an invoice row to expand it.
-
In the Invoice Lines section:
a. Click on any field (e.g., Quantity, Rate, Description)
b. Update the value directly
-
Click Save to apply the changes.
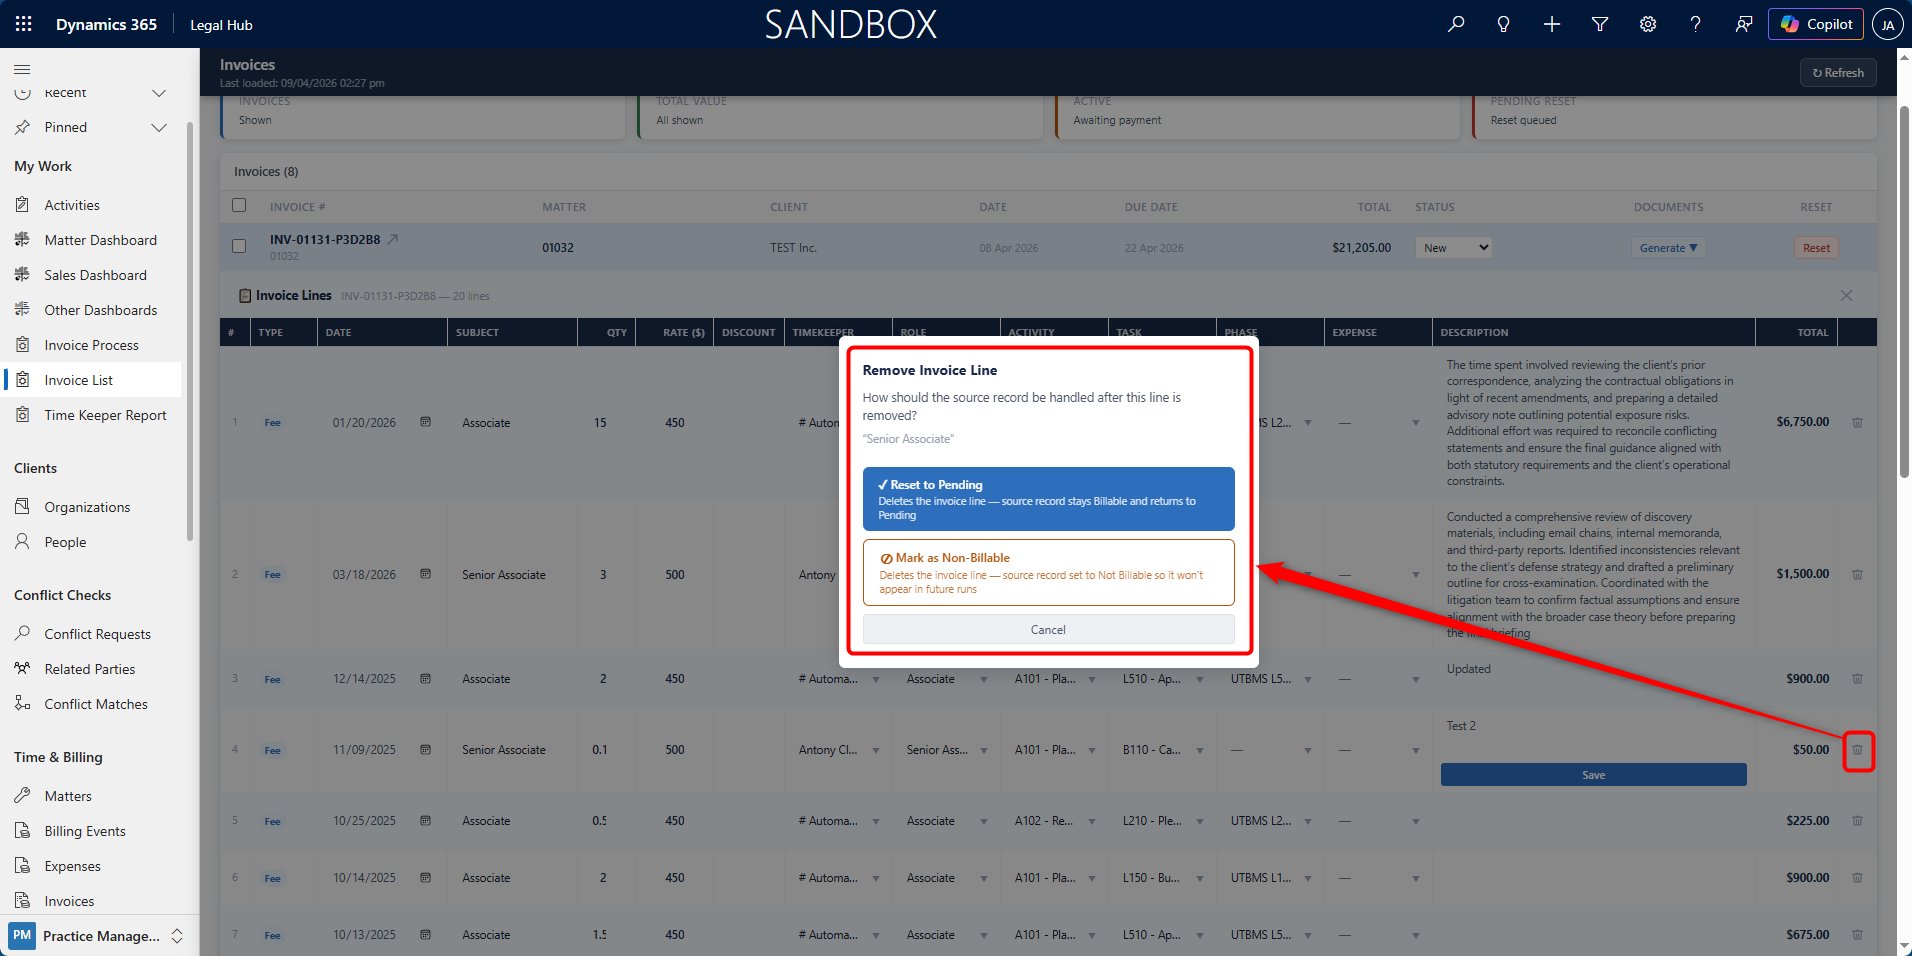
Removing Invoice Line Items
Invoice Line Items can be removed if they are not required.
Here are the steps to follow:
-
In the Invoice Lines section, locate the line item.
-
Click the Delete (trash) icon.
-
Choose one of the following options:
a. Reset to Pending
i. Removes the line from the invoice
ii. Returns the original billing record to Pending
iii. It will be available for future invoice runs
b. Mark as Non-Billable
i. Removes the line from the invoice
ii. Prevents it from being included in future invoices
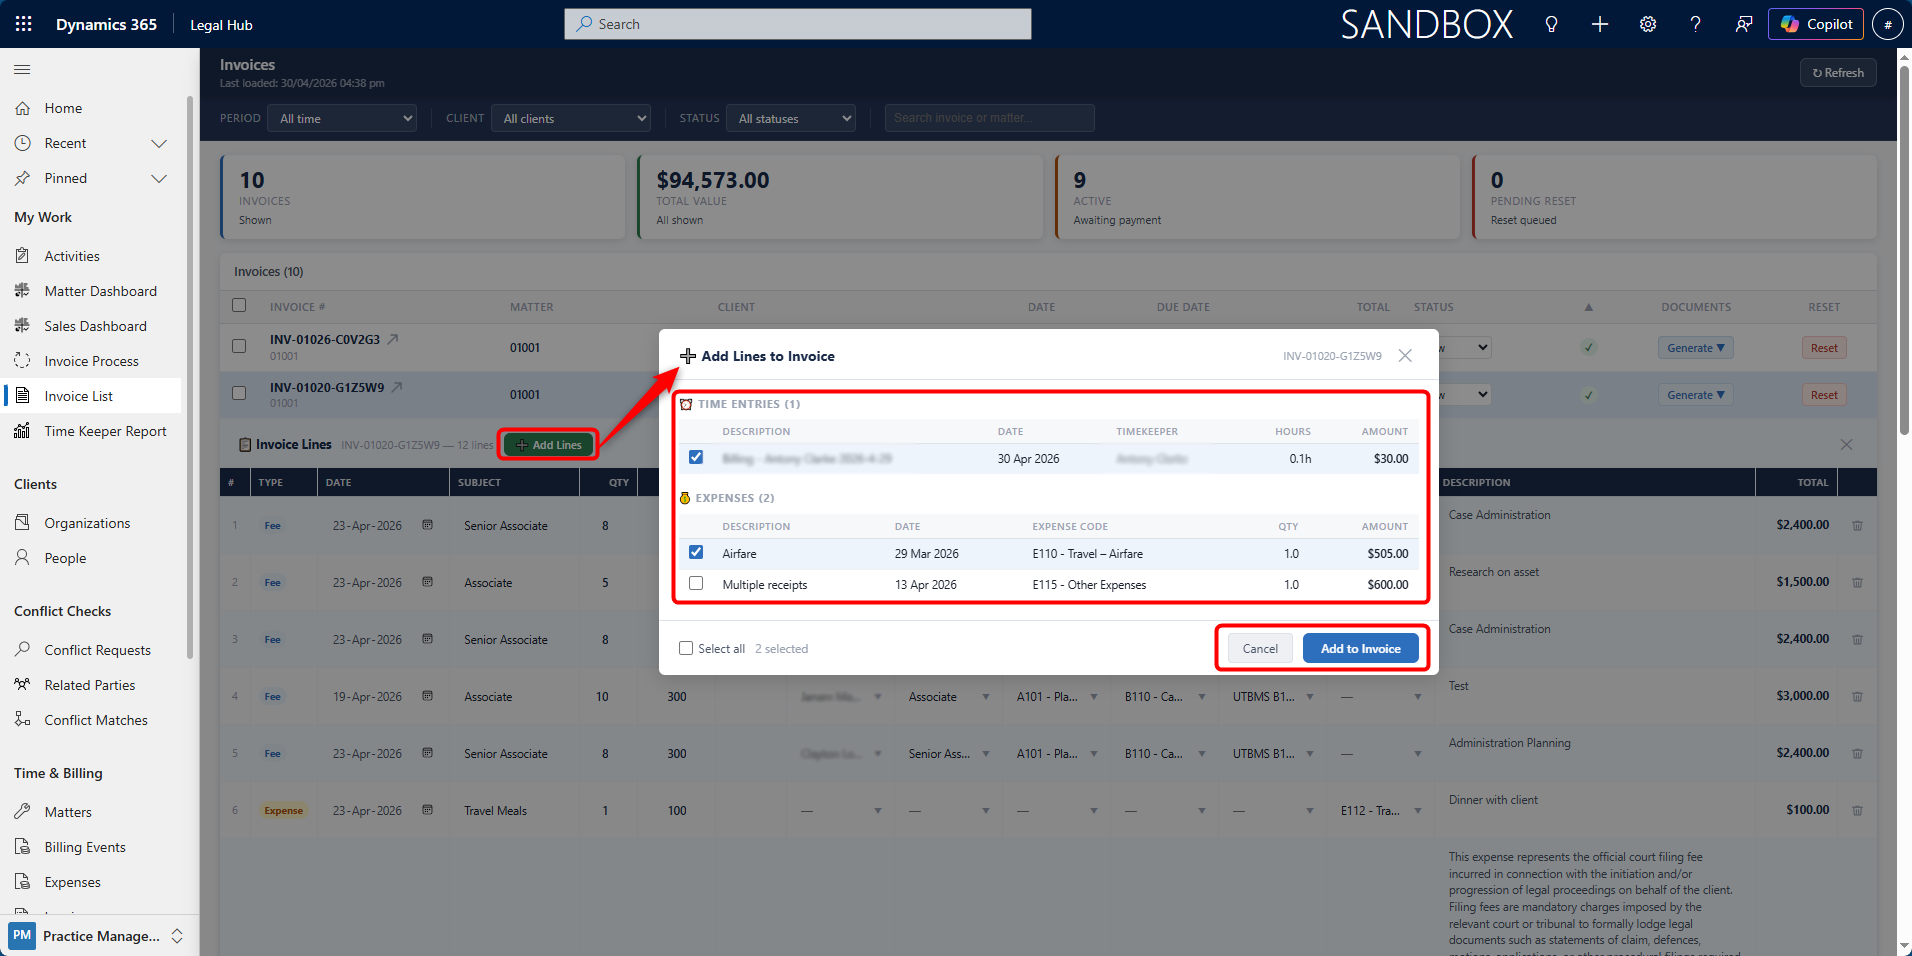
Adding Line Items to an Invoice
Additional eligible billing entries can be added to an invoice.
Follow these steps to add line items:
-
Open the invoice from Invoice List.
-
Click + Add Lines.
-
Select from available:
a. Billing Events (Time Entries)
b. Expenses
-
Click Add to Invoice
Important Notes
-
Line items can only be edited when invoice status is New.
-
Once the invoice is marked as Billed, line items become read-only.
-
Changes to line items directly impact the invoice total.
-
Removing items does not delete original records unless marked non-billable.
Generating Invoice Documents
Invoice documents can be generated from the system for sharing with clients, internal records, or integration with external legal billing systems.
Documents can be generated in two ways:
-
From the Invoice List (multiple invoices)
-
From within an individual Invoice record
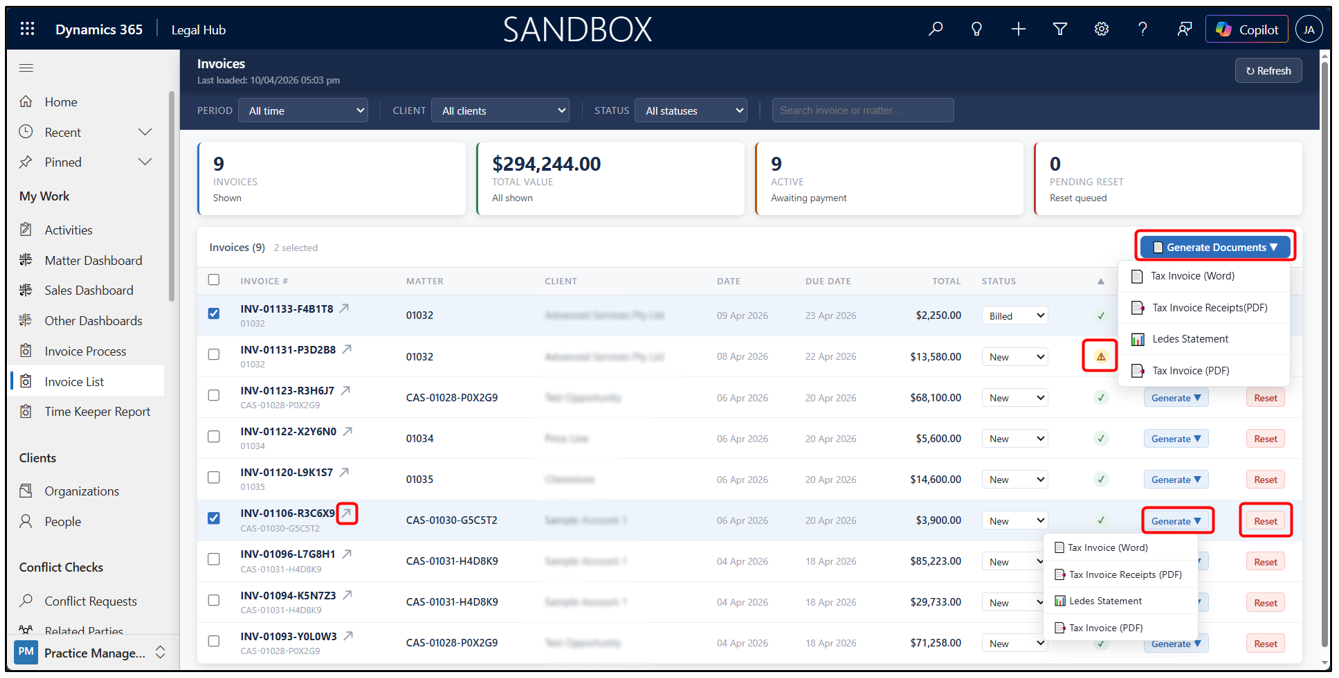
Option 1: Generate Documents from Invoice List (Single/ Bulk / Multiple)
This method is used when generating documents for one or more invoices at once.
Here are the steps to follow:
-
Navigate to: My Work > Invoice List.
-
Select one or more invoices.
-
Click Generate Document.
-
Select the required document type.
-
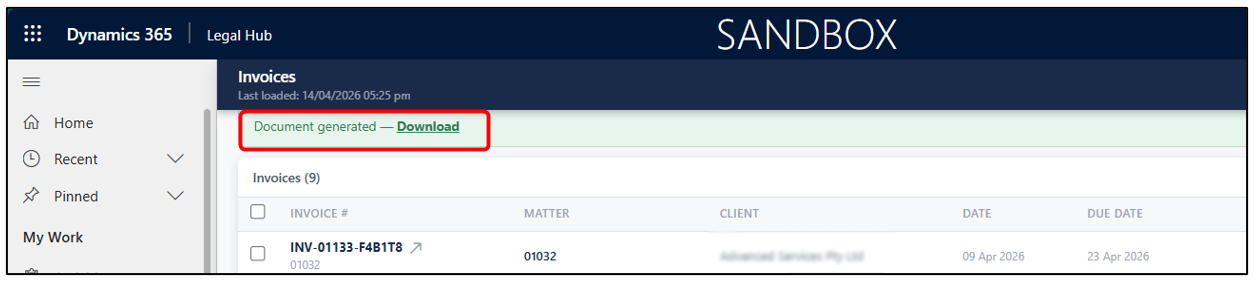
Wait for the system to generate the file.
-
Click Download to access the document.
Option 2: Generate Documents from Invoice Record and Create Email
This method is used when working on a specific invoice.
Follow these steps to generate documents from an invoice record:
-
Open the required Invoice:
a. From Matter > Invoices tab, or
b. From Time & Billing > Invoices
-
Inside the Invoice record, click Generate Document on the top command bar.
-
Select the required document type.
-
Click the desired option.
-
Wait for the system to generate the file.
-
Click Download Document to download the created document or click on Generate Another to create File to view or download the document.
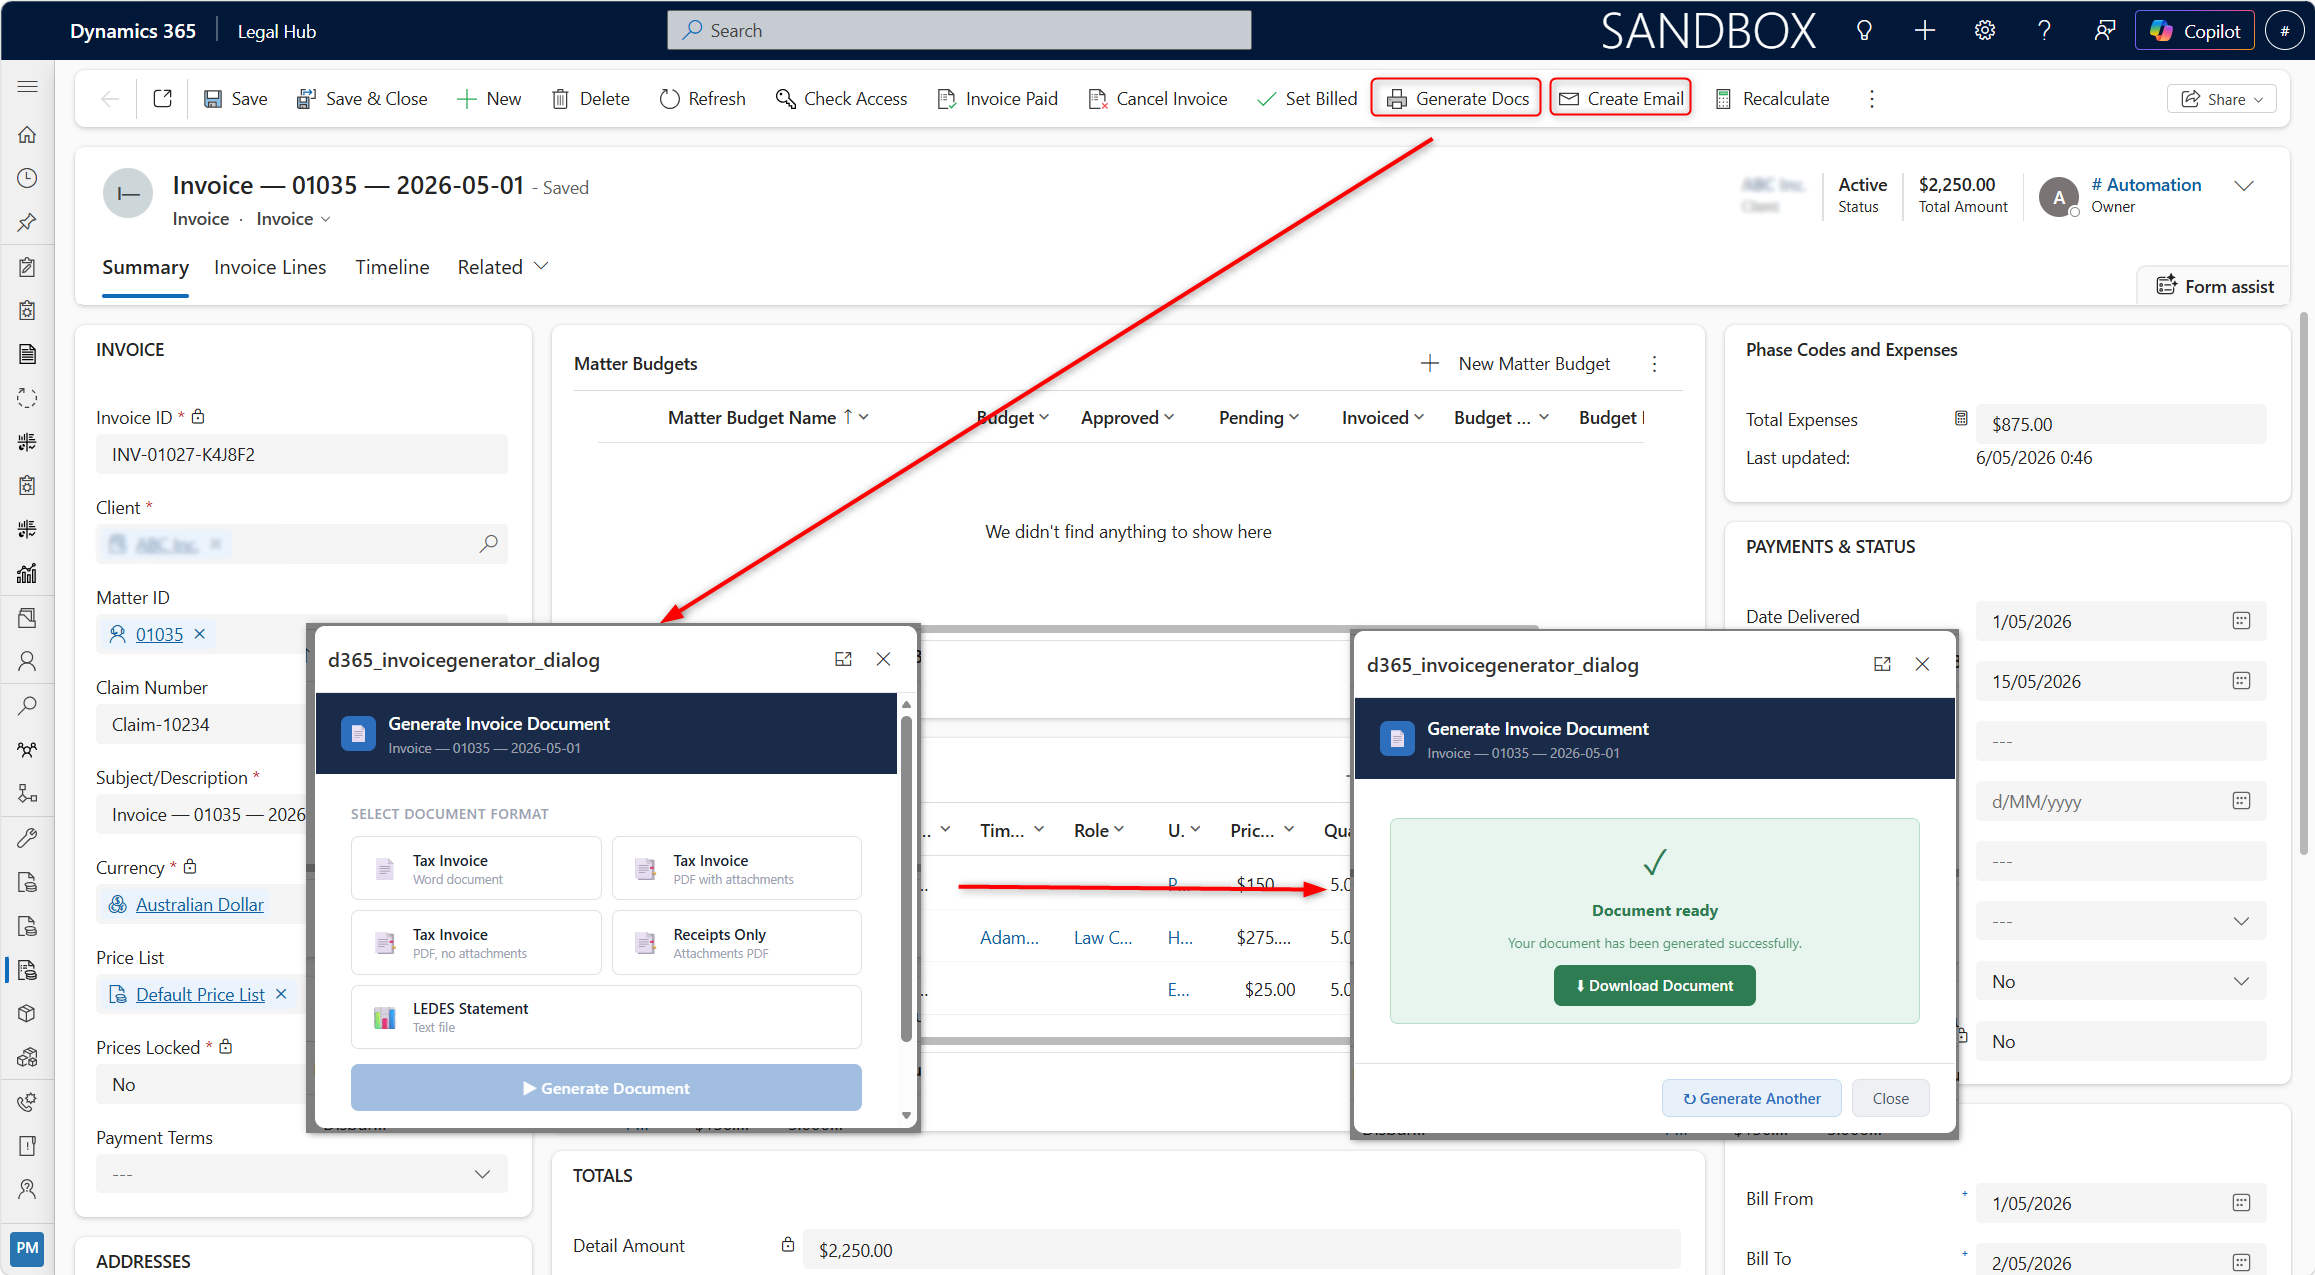
- Click Create Email on the top command bar to create a draft email with the invoice attachment and will also be on Invoice timeline.
Available Document Types
The system supports the following document formats:
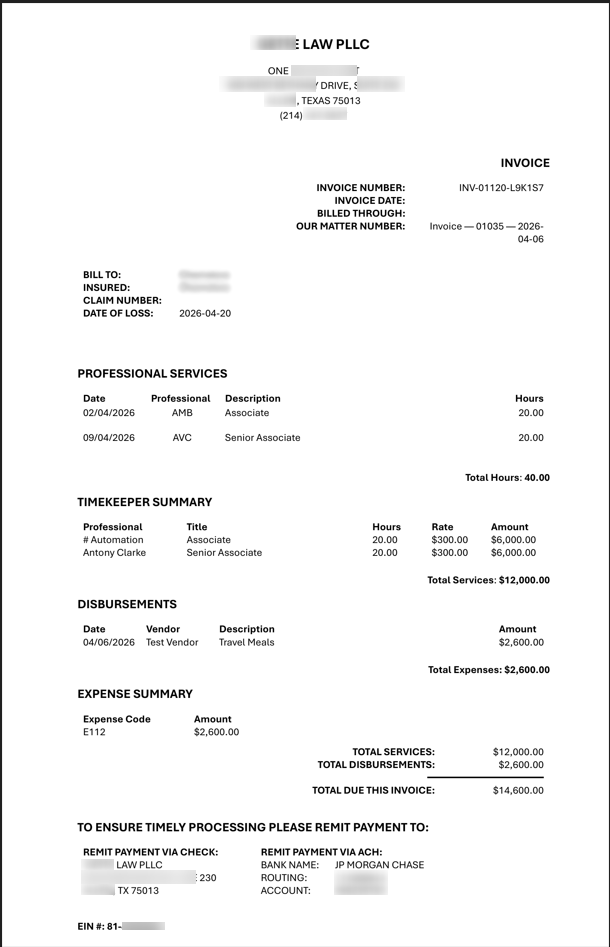
- Invoice (Word / PDF) — Standard invoice document for client sharing.
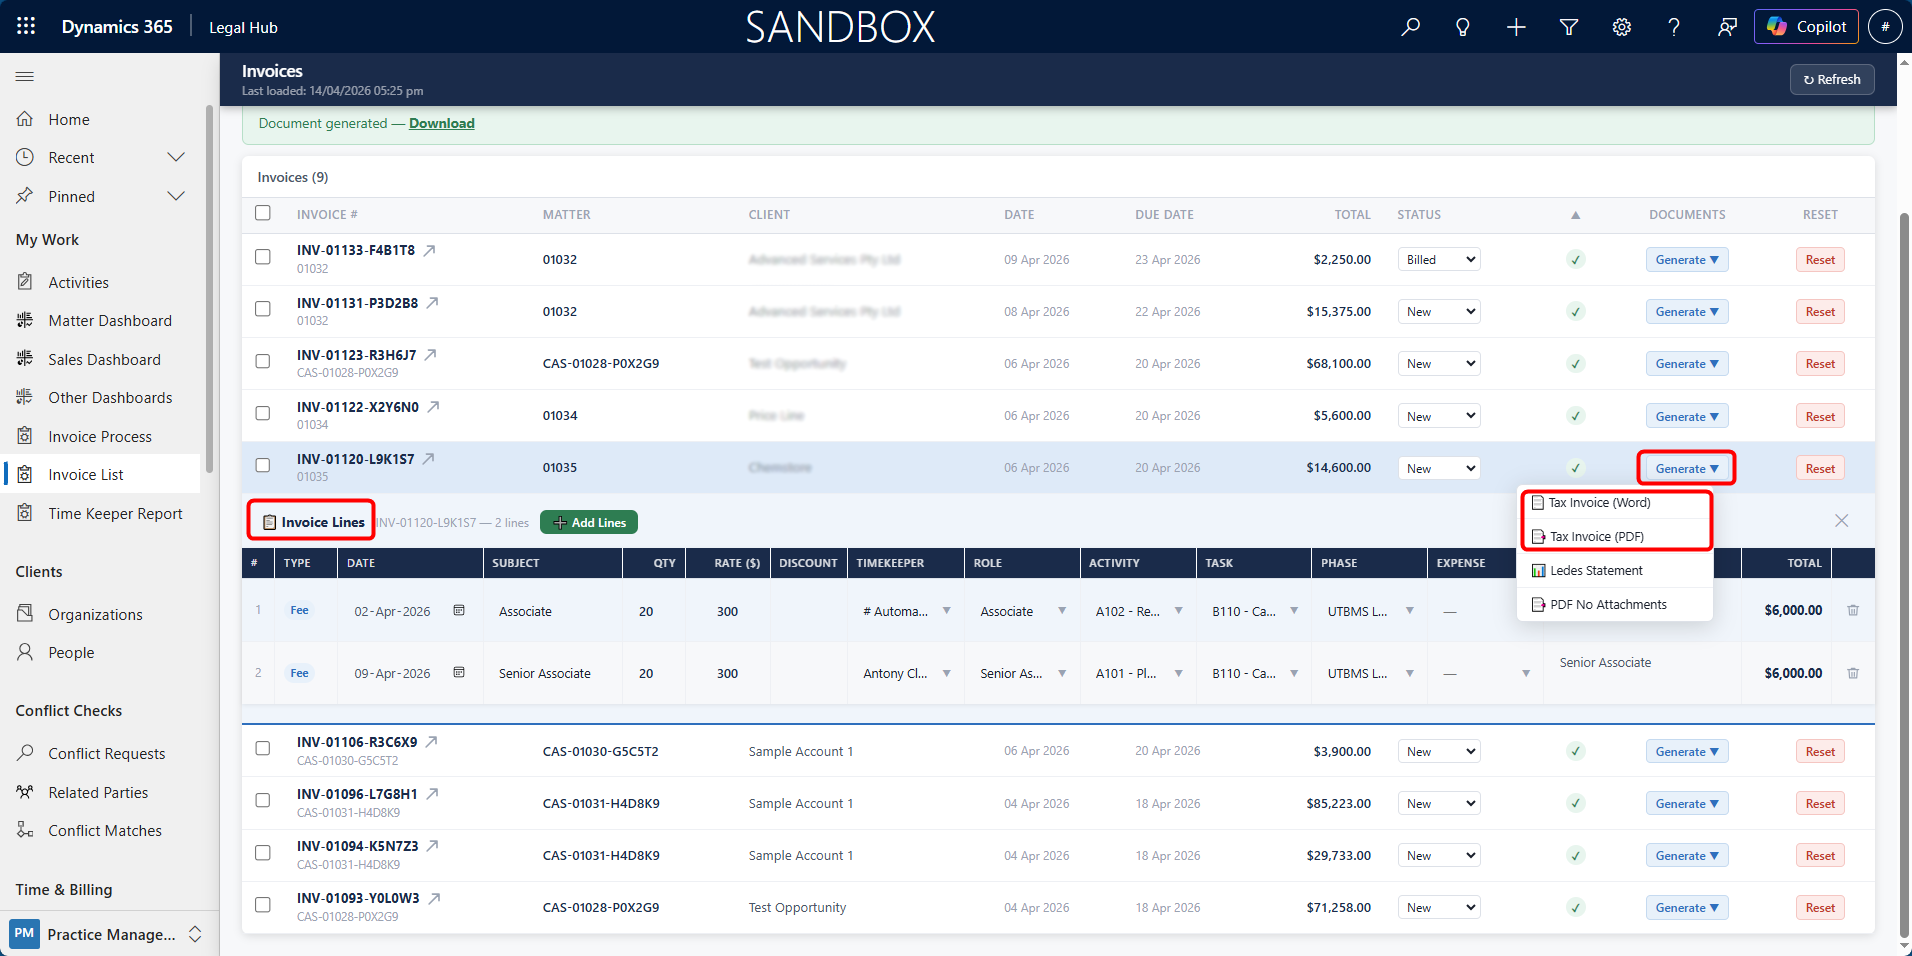
-
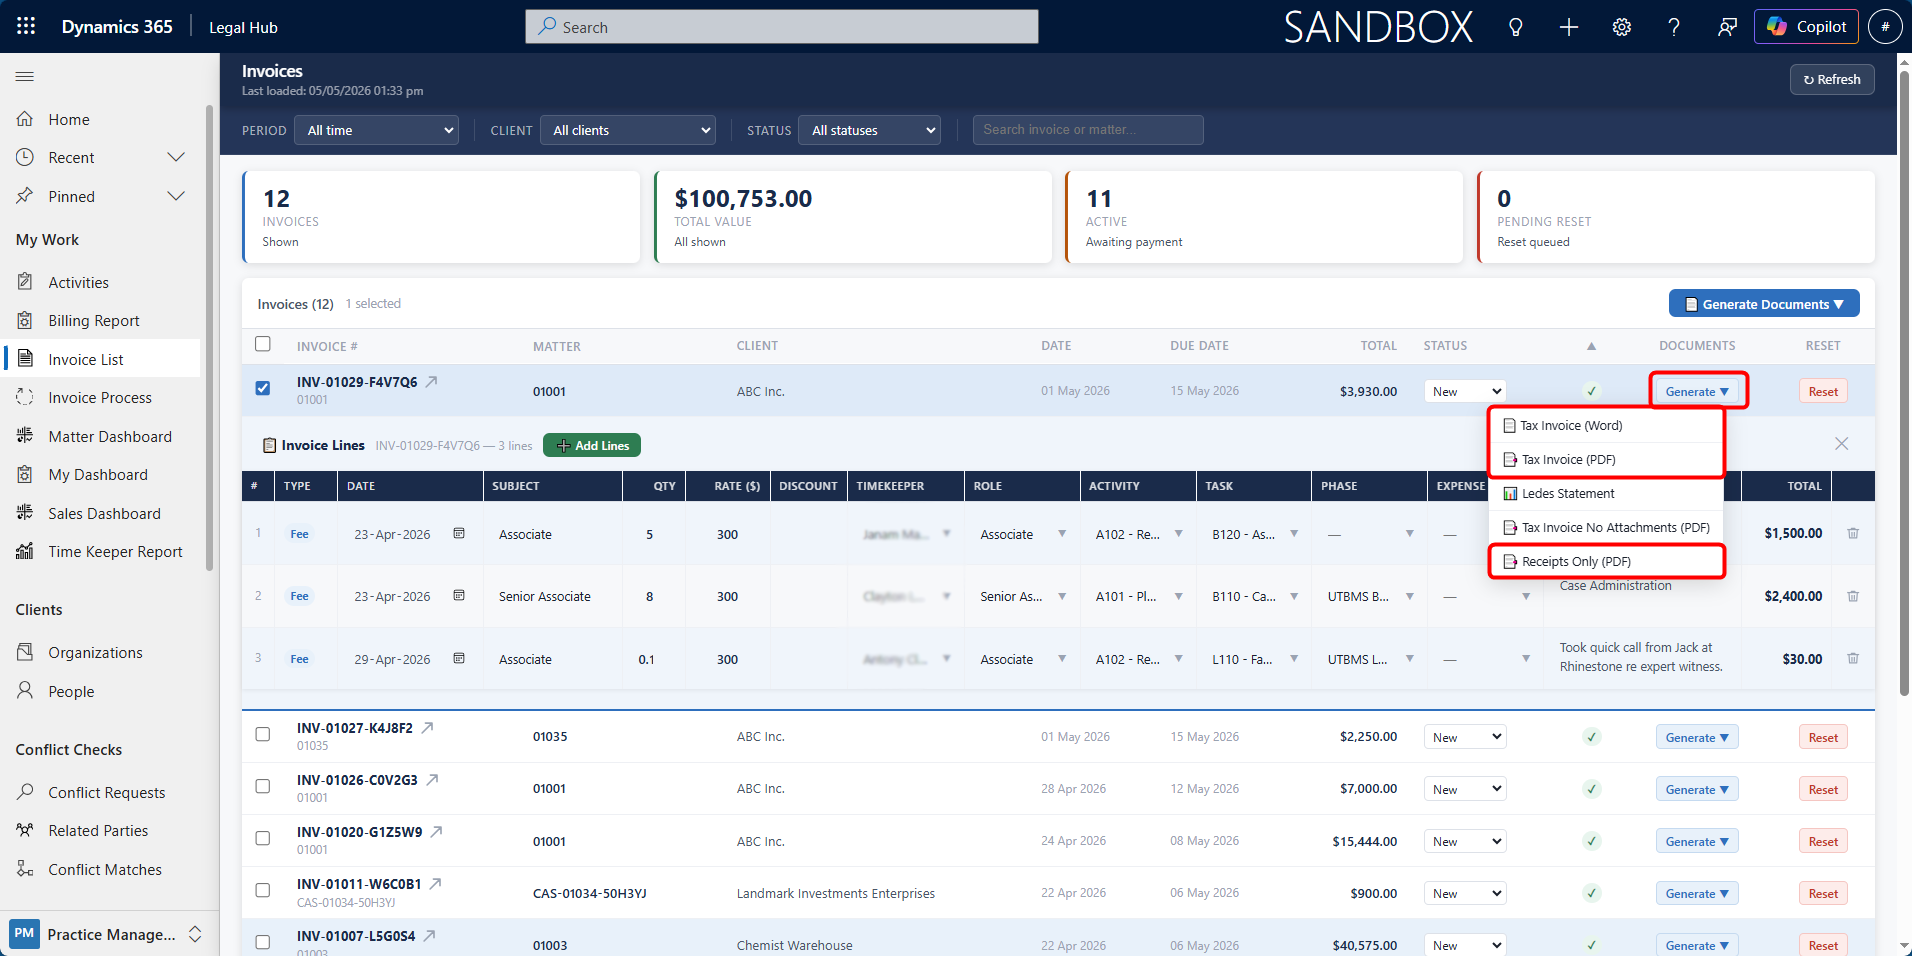
Invoice Receipts (PDF) — Invoice with associated Expense receipts appended.
-
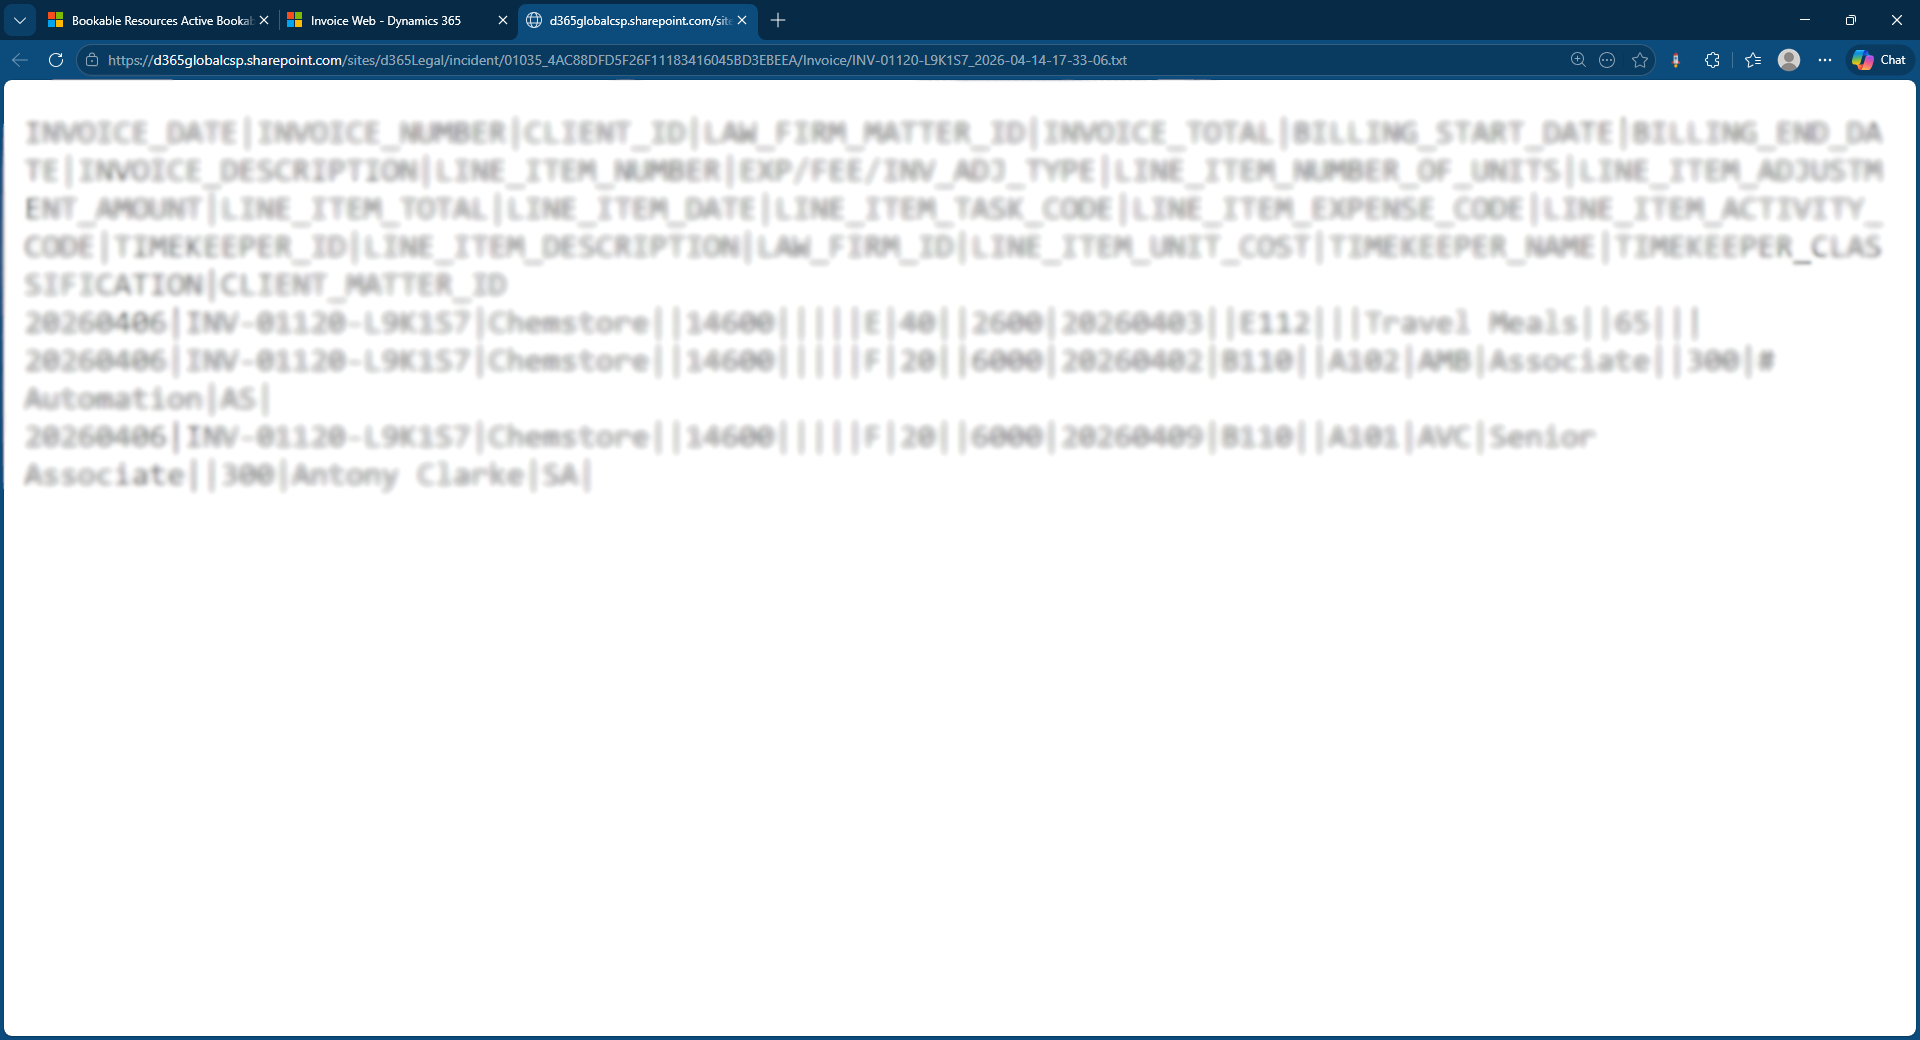
LEDES 1998B — Pipe-delimited text file used for electronic legal billing systems.
After Document Generation
-
The generated document is stored against the Invoice record.
-
Multiple formats can be generated for the same invoice.
-
Documents can be downloaded and shared externally.
Important Notes
-
Only Approved Billing Events and Expenses are included.
-
Once invoiced, their status changes to Invoiced.
-
If billing entries were recently updated, totals may require recalculation.
-
Documents reflect the invoice state at the time of generation.
Invoice Receipts and Merged PDFs
This section explains the Tax Invoice Receipts / Invoice Receipts option more clearly, especially how receipts are pulled from Expenses and merged into the invoice PDF.
The CTO guide confirms that receipts are linked to expenses, collected from SharePoint, merged into the invoice PDF, and saved back to the Matter’s SharePoint Invoice folder.
Invoice Receipts and Merged PDFs
When generating invoice documents, the system can automatically include expense receipts as part of the invoice PDF.
This is useful when sending invoices to clients where supporting receipts or disbursement evidence need to be included along with the invoice.
Receipts are linked to Expense records, not directly to the Invoice. When an invoice receipt document is generated, the system checks the expense line items included in the invoice and merges any attached receipts into a single PDF document.
How Invoice Receipt Merging Works
When an invoice document is generated:
-
The invoice is generated in CRM as normal.
-
The system checks the expense line items included in the invoice.
-
Any related Expense Receipt files are collected from SharePoint.
-
A single merged PDF is created.
-
The merged PDF includes:
a. The invoice document
b. An Expense Receipts separator page
c. The attached receipt files
-
The merged PDF is saved to the Matter’s SharePoint document location under the Invoice folder.
Generating an Invoice with Receipts
To generate an invoice document with receipts:
-
Open the required Invoice from My Work /> Invoice List.
-
Select an invoice record → Click Generate Document.
-
Select the document type for invoice receipts, such as:
a. Receipts Only
b. Tax Invoice (PDF)
-
Wait for the document to generate.
-
Open or download the generated PDF.
The PDF will include the invoice followed by the attached expense receipts, where applicable.
Attaching Receipts to an Existing Expense
Receipts must be uploaded and linked to an Expense record before they can be included in an invoice PDF.
Here are the steps to attach receipts to an expense:
-
On the Matter record click Expense from the top bar.
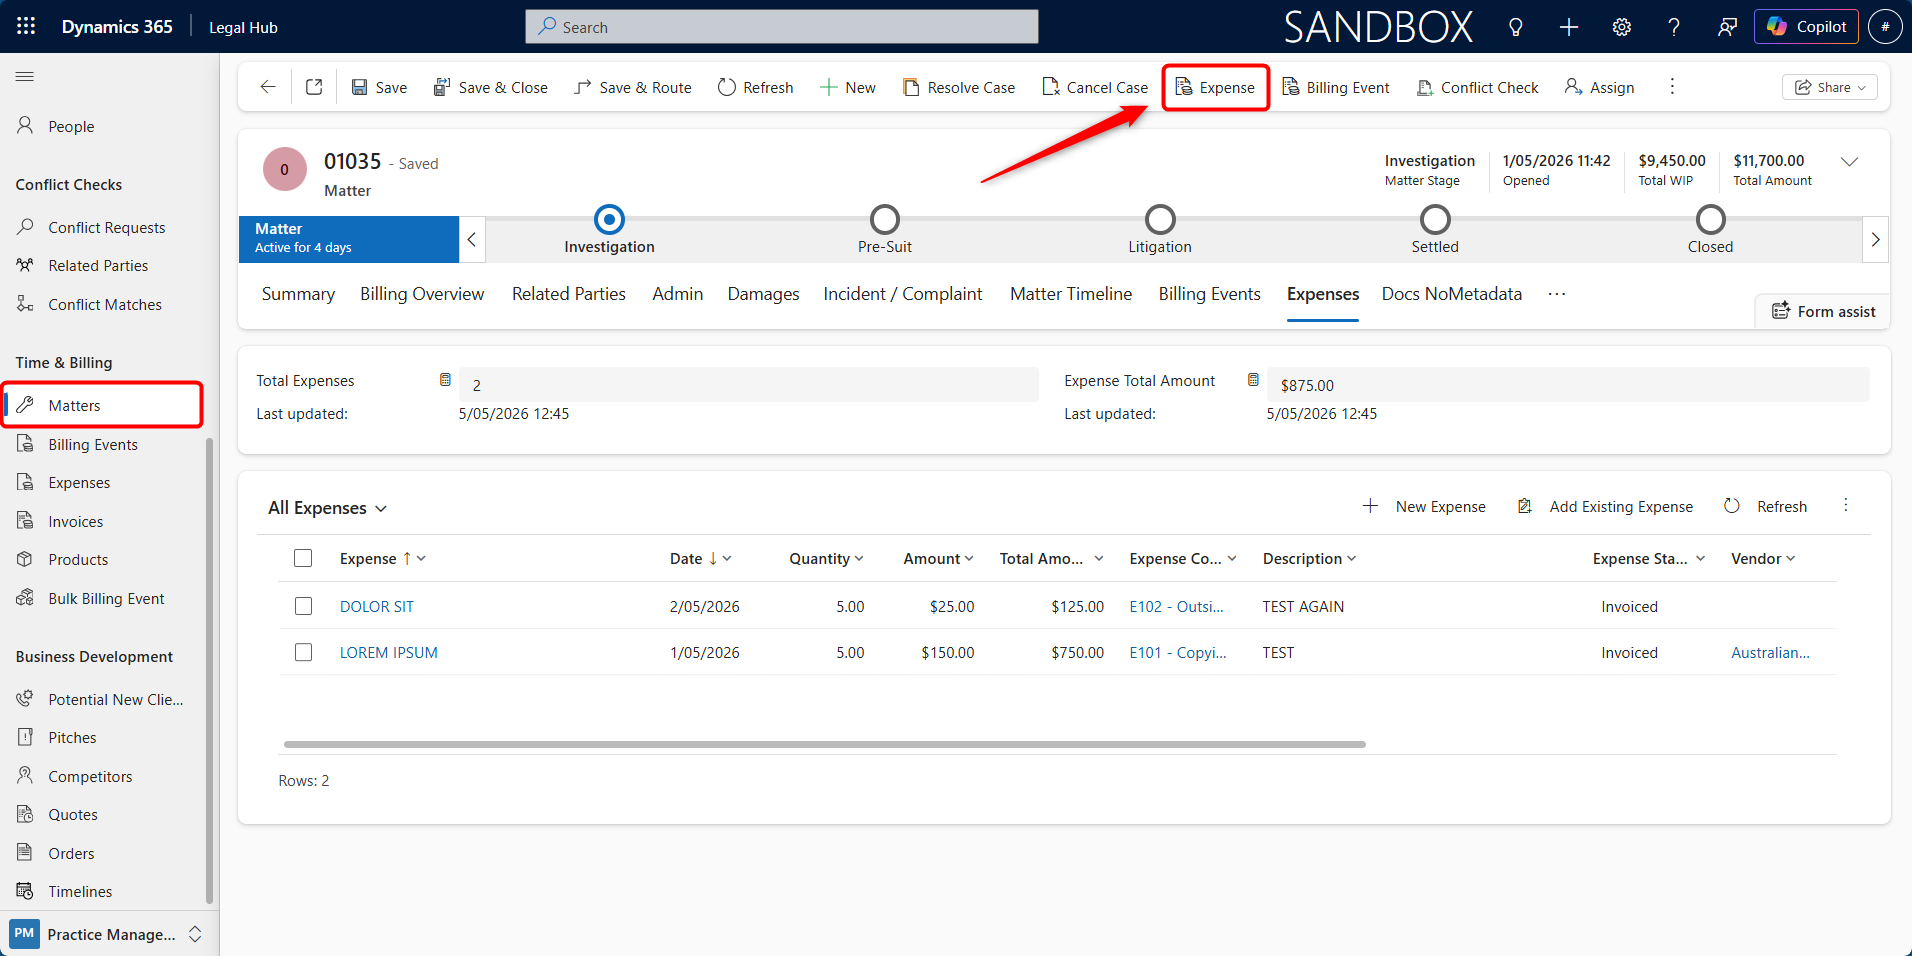
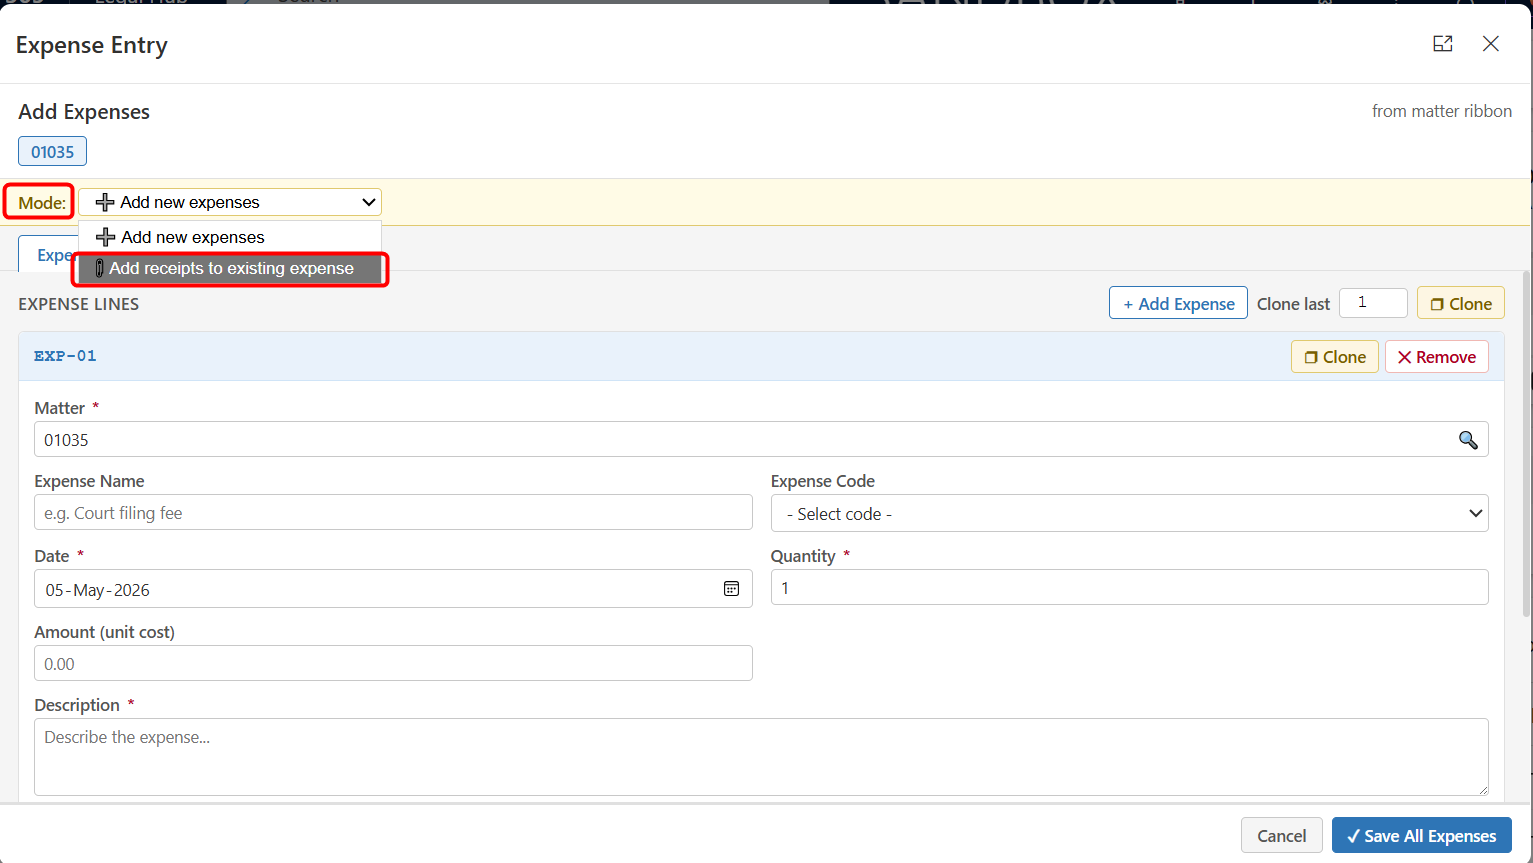
-
Select Add receipts to existing expense from the mode.
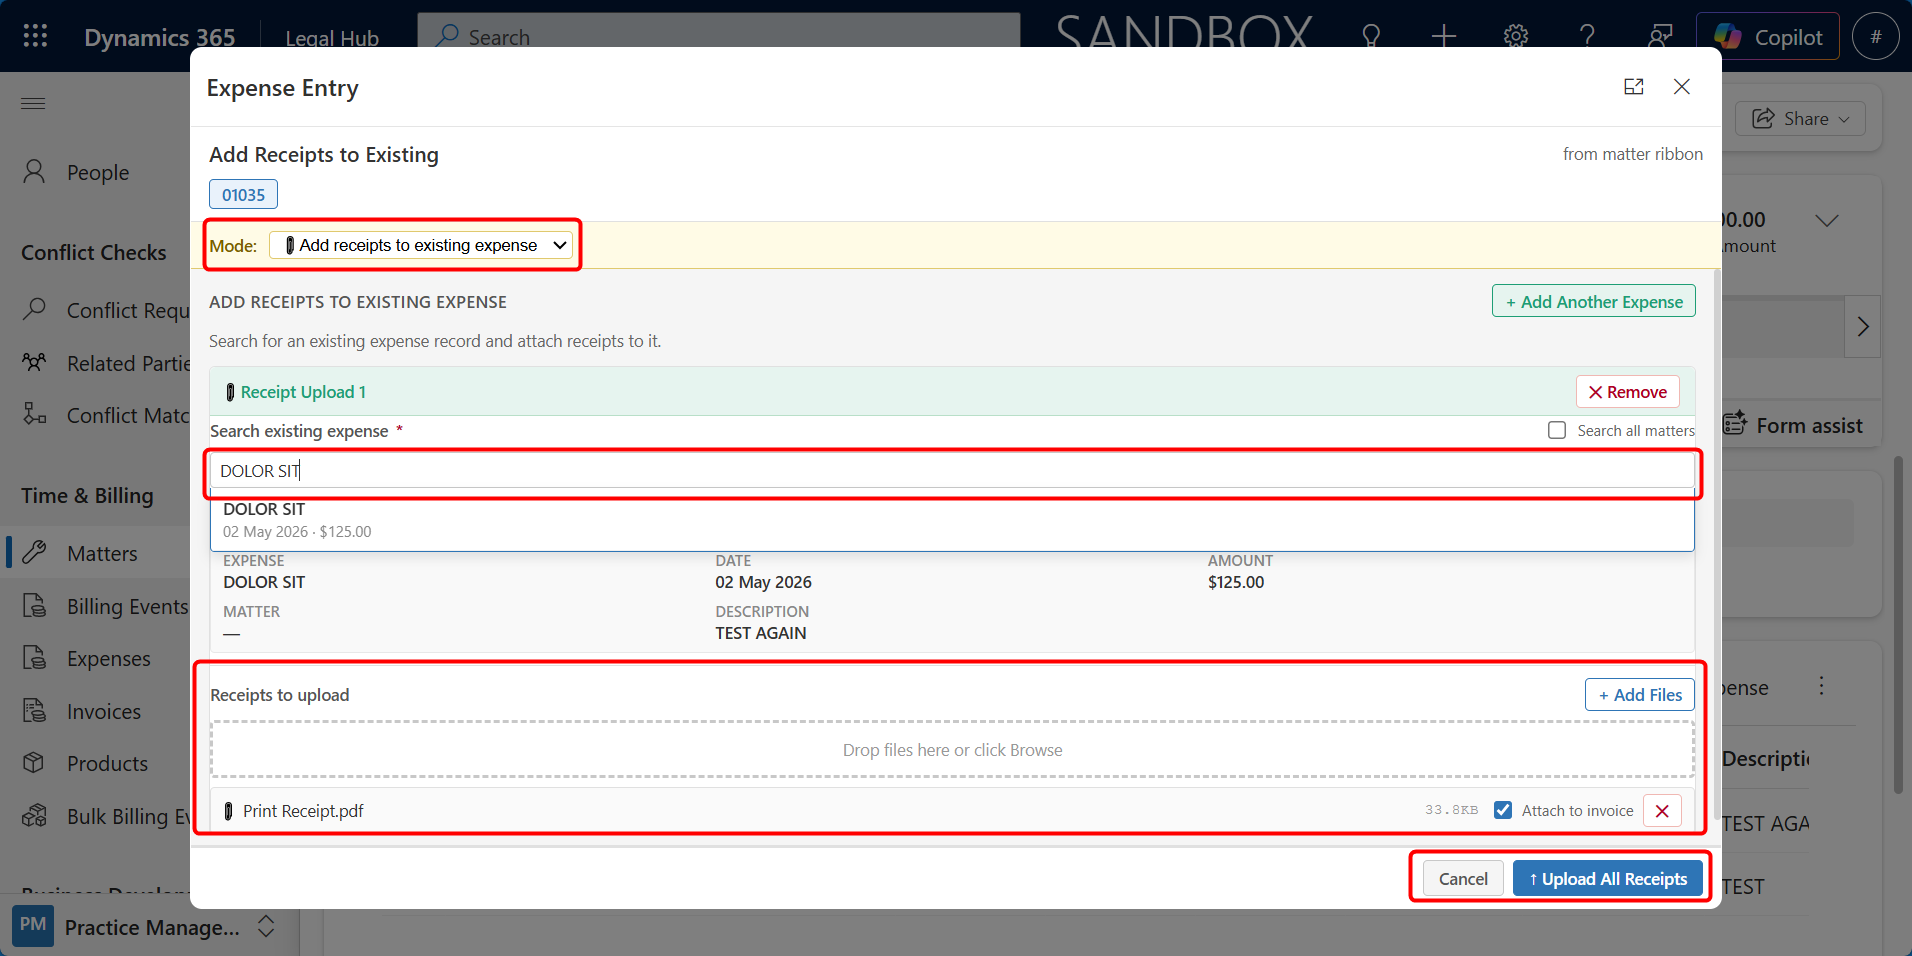
-
Enter the existing Expense record of that Matter.
-
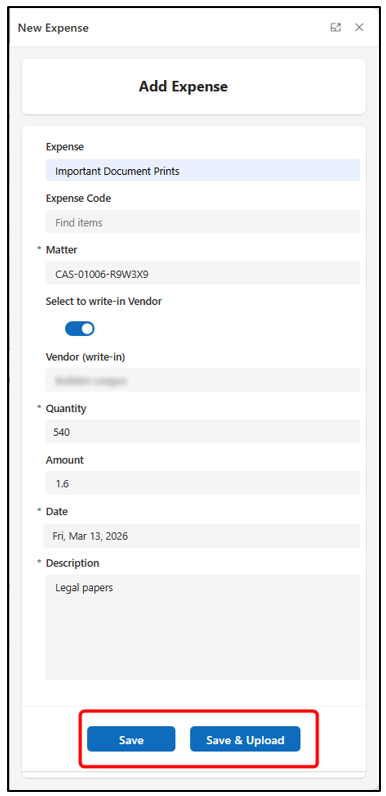
Either press + Add Files or drag and drop receipt files in the Receipts to upload section.
-
Click Upload All Receipts.
Supported Receipt File Types
The following receipt file types are supported:
| File Type | Handling |
|---|---|
| PDF (.pdf) | Merged directly into the invoice PDF |
| JPEG / JPG (.jpg, .jpeg) | Converted to a full A4 page while preserving aspect ratio |
| PNG (.png) | Converted to a full A4 page while preserving aspect ratio |
| TIFF (.tif, .tiff) | Converted to a full A4 page |
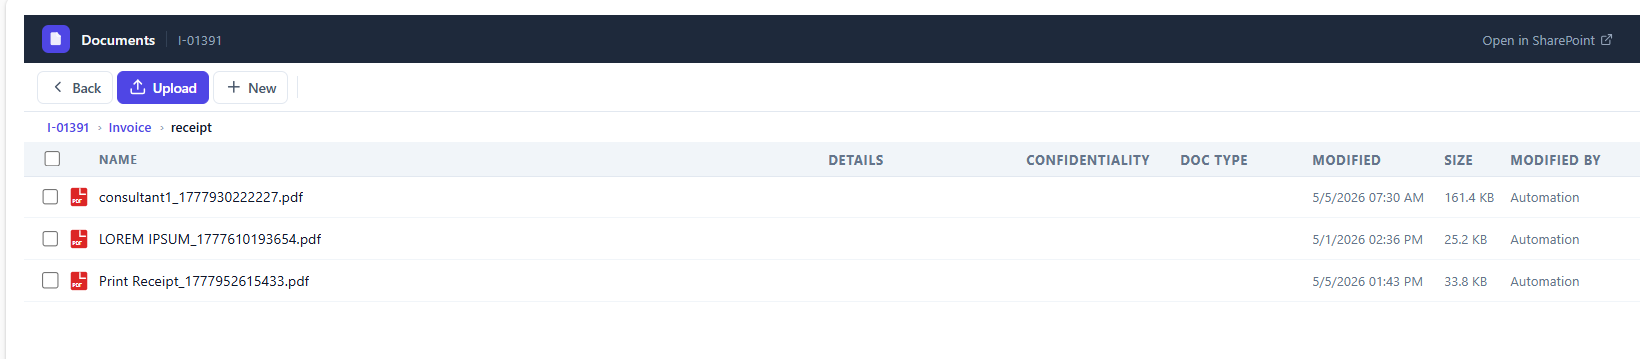
Where to Find the Merged Invoice
After generation, the merged invoice PDF is saved automatically in SharePoint.
Here are the steps to follow to locate the merged invoice PDF:
-
Open the related Matter record.
-
Open the Documents tab.
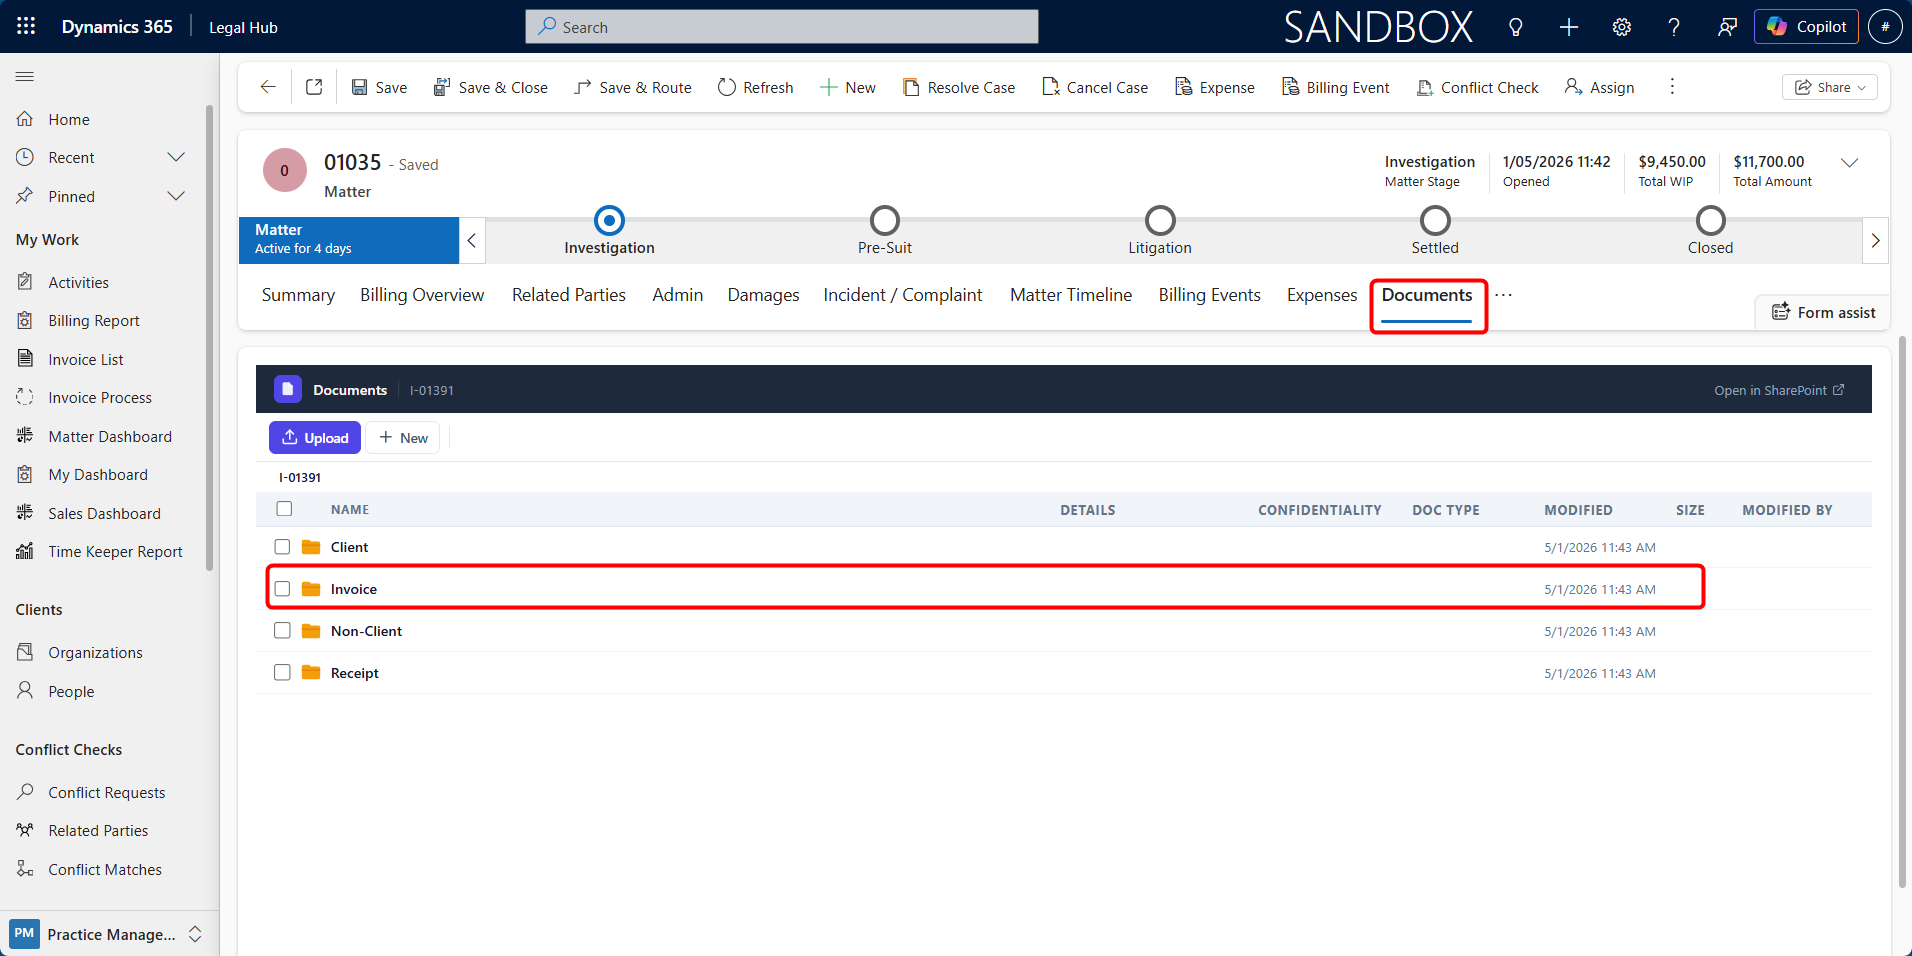
-
Navigate to the Invoice folder → receipt
-
Locate the generated invoice PDF
The file may be named using the invoice number, such as:
- invoice_[InvoiceNumber].pdf
Invoice Status & Lifecycle
Invoices move through a defined lifecycle from creation to finalisation and payment.
The status of an invoice determines whether it can be edited and how it is treated in the system.
Understanding Invoice Status
Each invoice has a status that reflects its current stage in the billing process.
The common invoice statuses are:
-
New — The invoice has been generated but not yet finalised.
-
Invoice is editable.
-
Line items can be reviewed and adjusted.
-
-
Billed — The invoice has been finalised and issued to the client.
-
Invoice becomes read-only.
-
No further edits can be made.
-
-
Paid (Complete) — The invoice has been fully paid.
-
Used for tracking payment completion.
-
No further actions required.
-
-
Cancelled — The invoice has been voided.
-
Invoice is no longer valid.
-
Typically used when an invoice is generated in error.
-
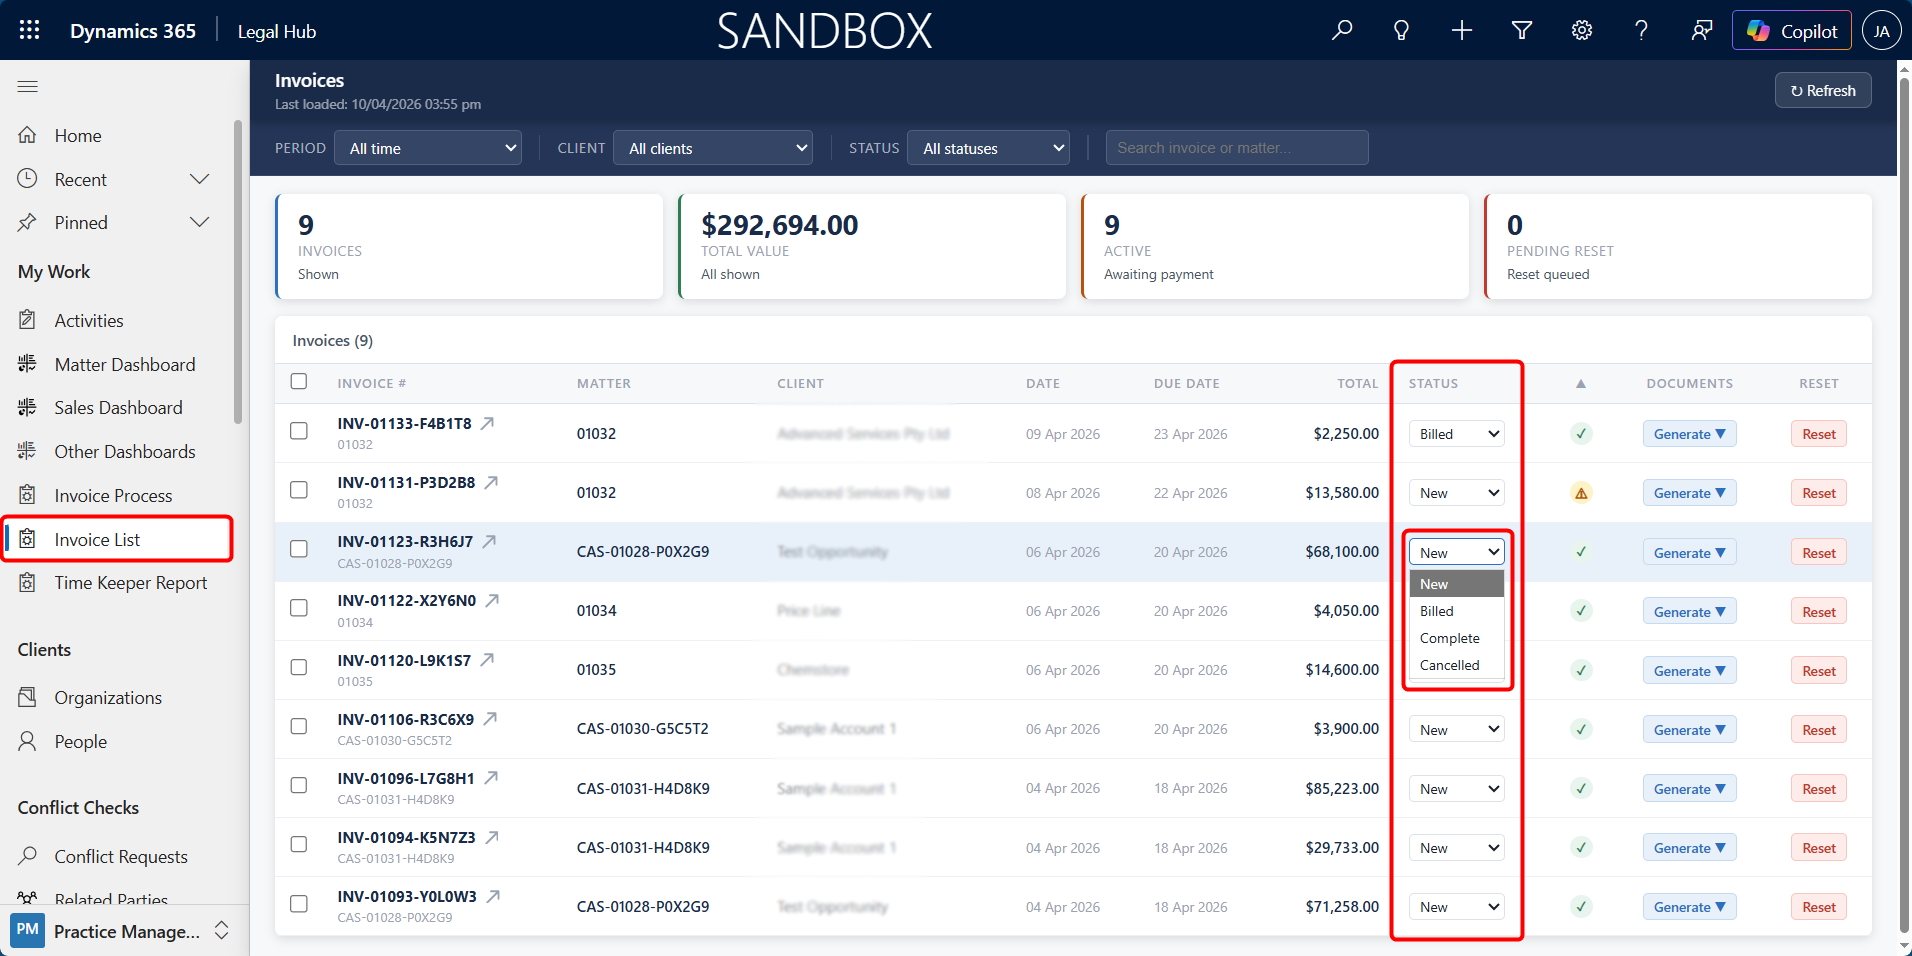
Updating Invoice Status
Invoice status can be updated from the Invoice record or Invoice List.
Follow these steps to update the status of an invoice:
-
Open the required Invoice:
a. From Matter > Invoices tab, or
b. From My Work > Invoice List
-
In Invoice List,
a. Locate the Status field.
b. Update the status as required (e.g., New → Billed).
c. Save the record.
-
In Invoice Form (through Invoice Tab or Time & billing > Invoices),
a. Select Invoice Paid, Cancel Invoice or Set Billed from top command bar.
b. Save the record.

Important Notes
-
Once an invoice is marked as Billed, it becomes read-only.
-
To make changes after billing:
-
The invoice status must be New, or
-
A new invoice must be generated.
-
-
Status updates impact reporting and financial tracking.
Invoice Minimum Amount & Invoice Run History

Invoice Minimum Amount
The Invoice Minimum Amount defines the minimum total value required for an invoice to be generated.
-
By default, this is set to $0
-
An invoice is created only when the total of:
-
Approved Billing Events, and
-
Approved Expenses
meets or exceeds this amount
-
If the total is below the minimum:
-
The Matter is skipped
-
No invoice is created
Invoice Run
The system tracks invoice generation activity for each Matter.
To view:
-
Open the Matter.
-
Go to the Invoices tab.
Here you can see:
- The last invoice run date and time.
Invoice Creation Based on Status
By default, invoices are generated using only Approved Billing Events and Expenses.
However, this behaviour can be configured to allow invoice generation using Pending records, depending on business requirements.
Understanding the Configuration
The system includes a setting called Invoice Create Stage, which determines which records are included during invoice generation.
This setting can be configured to:
-
Approved (Default)
-
Only Approved Billing Events and Expenses are included.
-
Pending records are ignored.
-
-
Pending
-
Only Pending Billing Events and Expenses are included.
-
Approved records are not included.
-
When to Use This Setting
-
Use Approved:
-
When a formal approval process is required.
-
When accuracy must be validated before invoicing.
-
-
Use Pending:
-
When users prefer to review and adjust line items directly in the invoice.
-
When approval at the Billing Event / Expense level is not required.
-
How to Access and Update the Setting
Navigate to:
a. Select Admin from the bottom-left corner.
b. Go to Global/Admin Data > Legal Configuration.
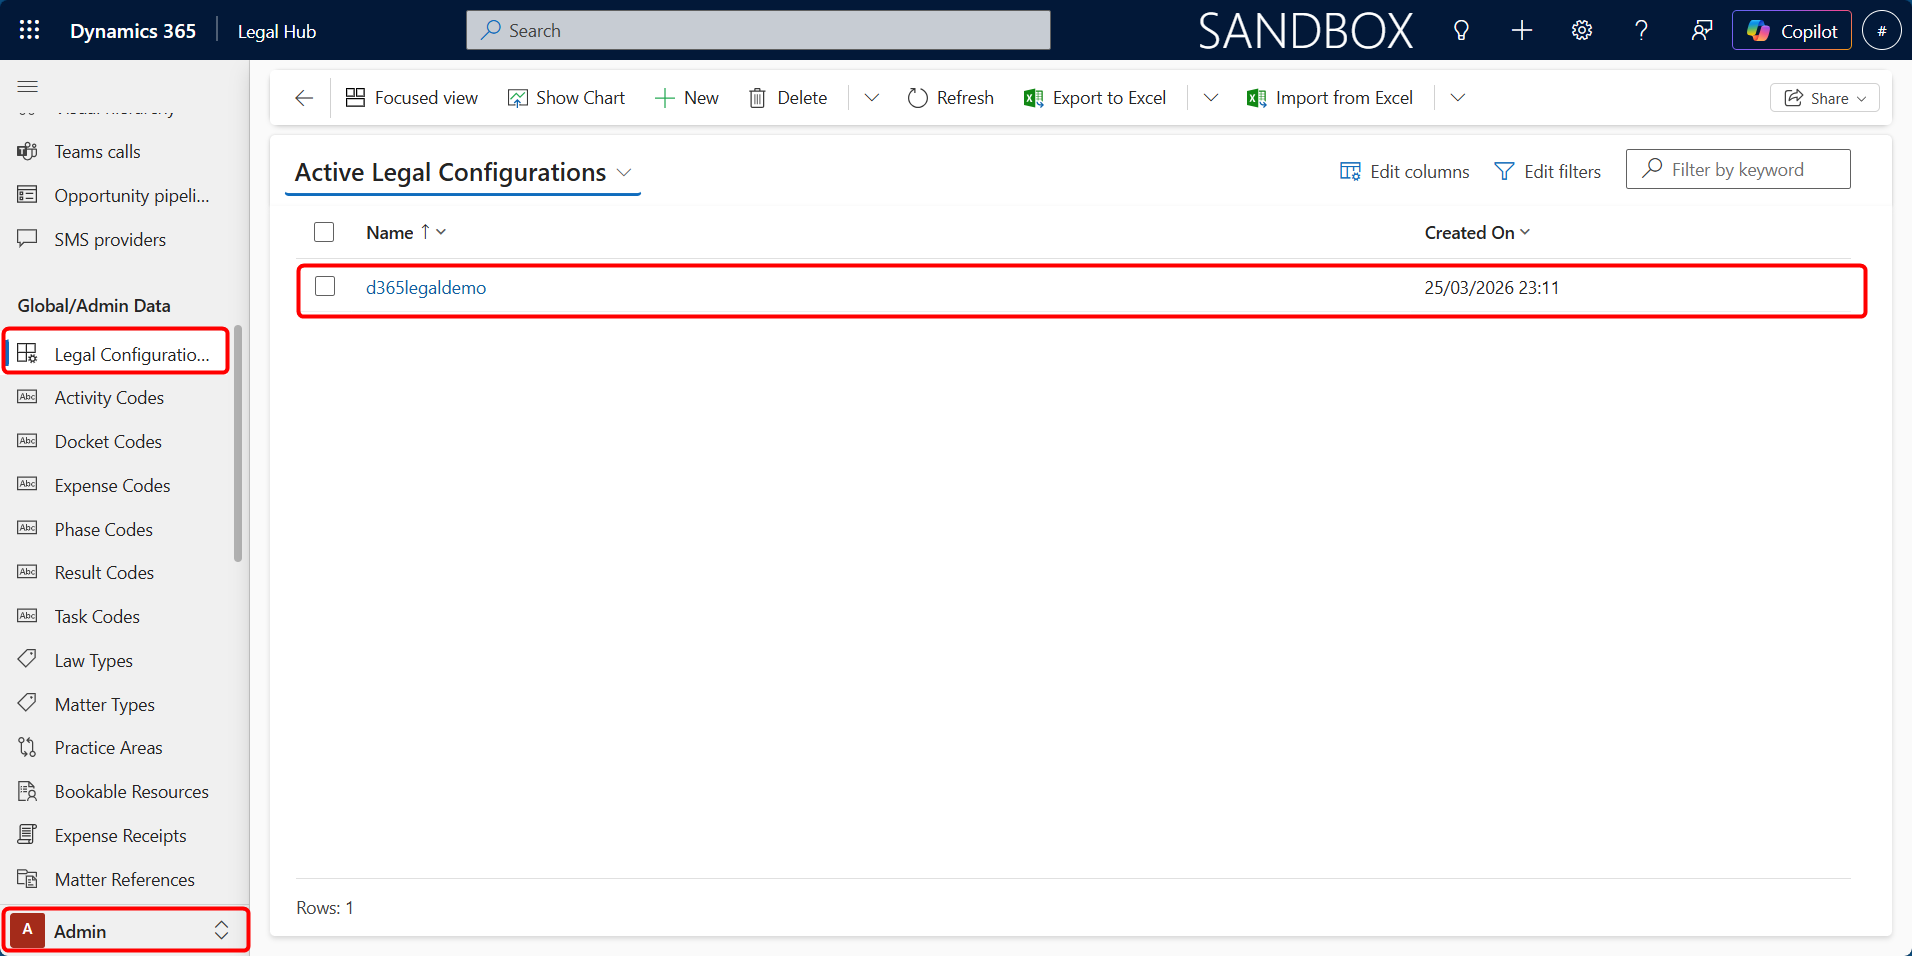
-
Open the active Legal Configuration record.
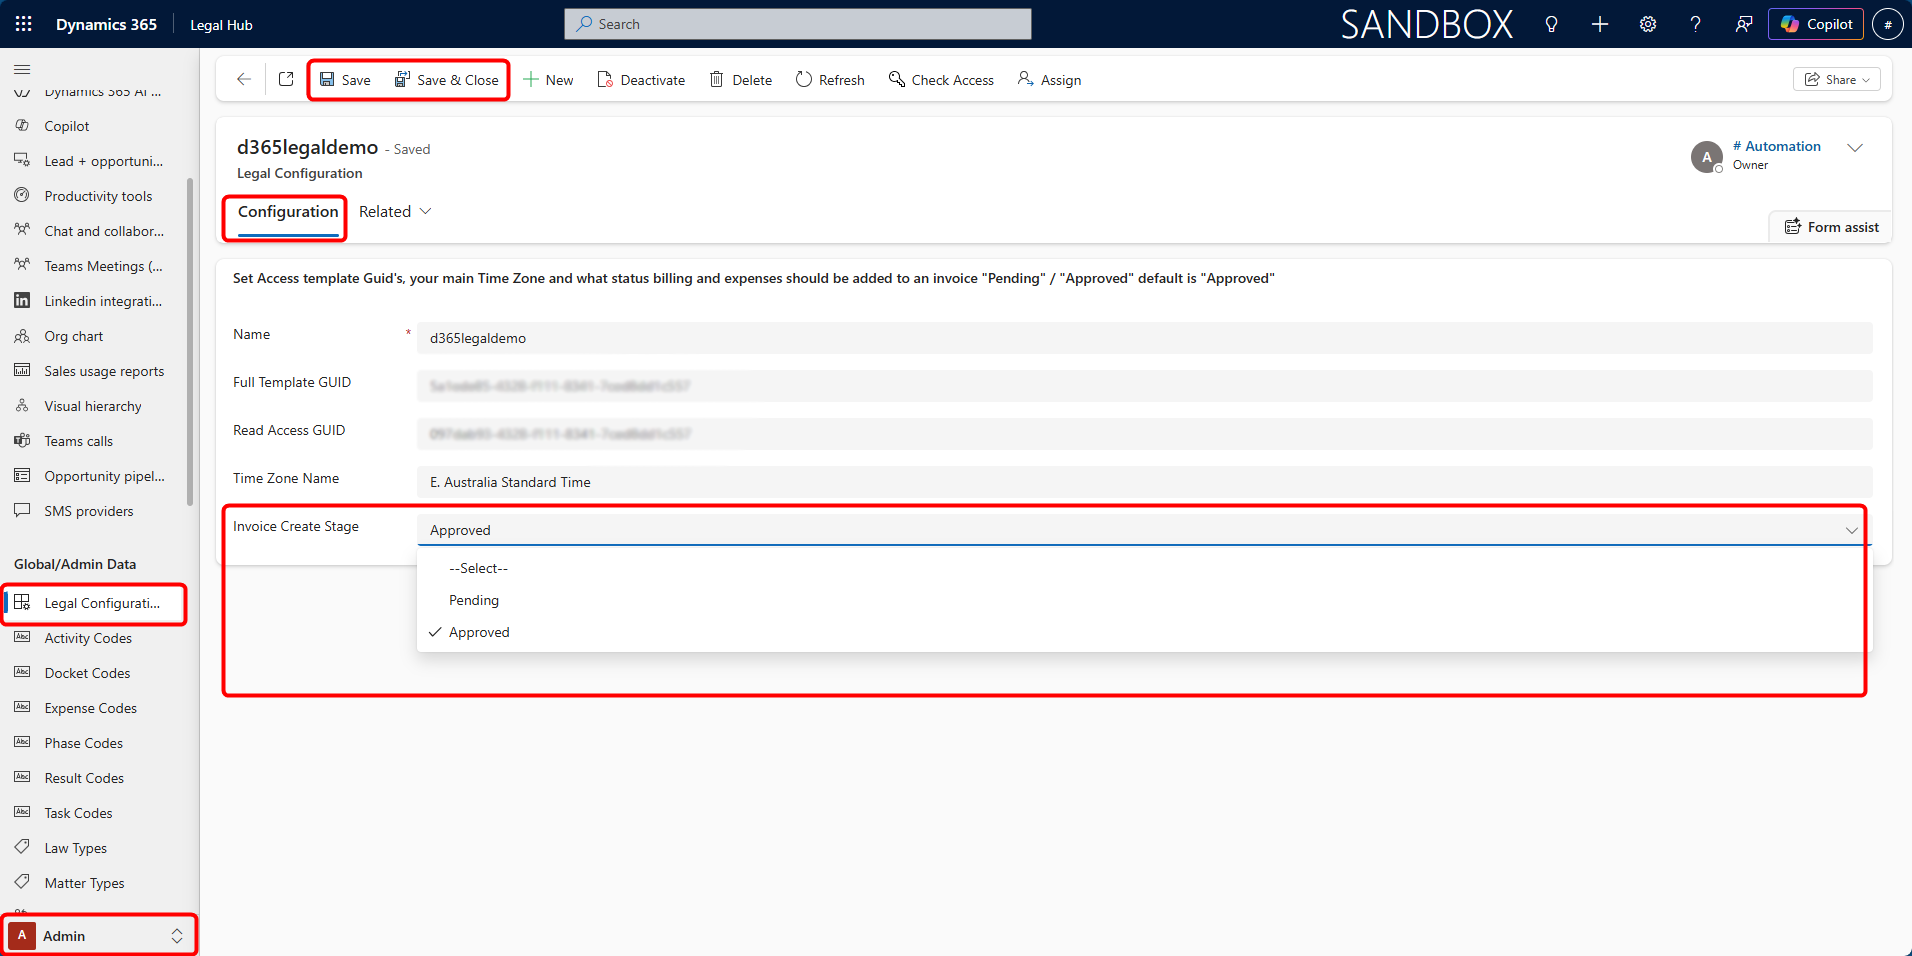
-
In the Configuration tab, locate the field: Invoice Create Stage.
-
Select the required value:
a. Approved, or
b. Pending
-
Click Save.
Important Notes
-
This setting directly affects which records are included during invoice generation.
-
When set to Pending, users must ensure invoice line items are reviewed carefully before billing.
-
Changing this setting impacts all future invoice runs.