Legal Billing with Xero for Immigration in Legal Solution for Microsoft Dynamics 365
Are you ready to try the solution or have questions?

Introduction
This guide provides information regarding Legal Billing with Xero for Immigration in Legal Solution for Microsoft Dynamics 365. This is a part of the immigration solution for users of the Legal Hub in Dynamics 365.
The Legal Hub supports several billing methods. Fixed Fee Billing is the primary billing process used for most matters.
This guide focuses on the day-to-day workflow from setting up Fixed Fee instalments through to generating Billing Events, creating invoices and synchronizing them with Xero financial software.
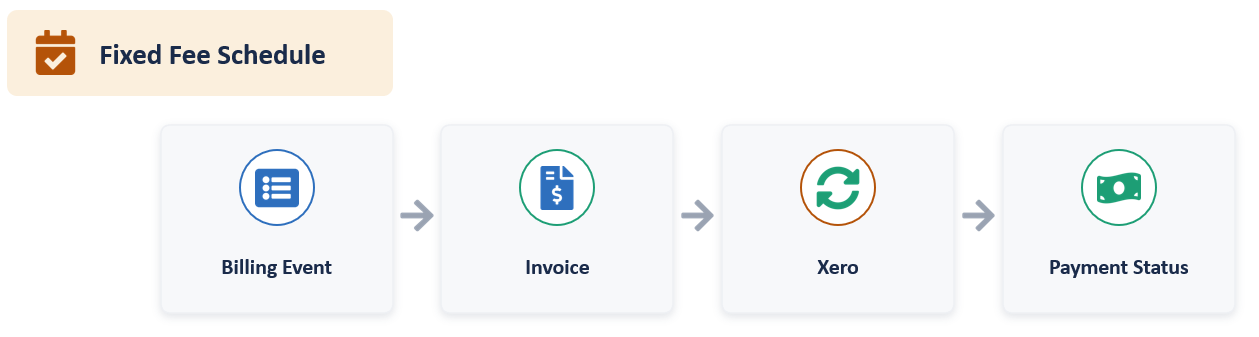
This diagram is a quick look at the workflow. The example financial software is Xero.
Billing Arrangements
Go to the Matters > Summary > Billable Type. This drives how time and fees are captured and billed. There are four types of billing to choose from under Billable Type.
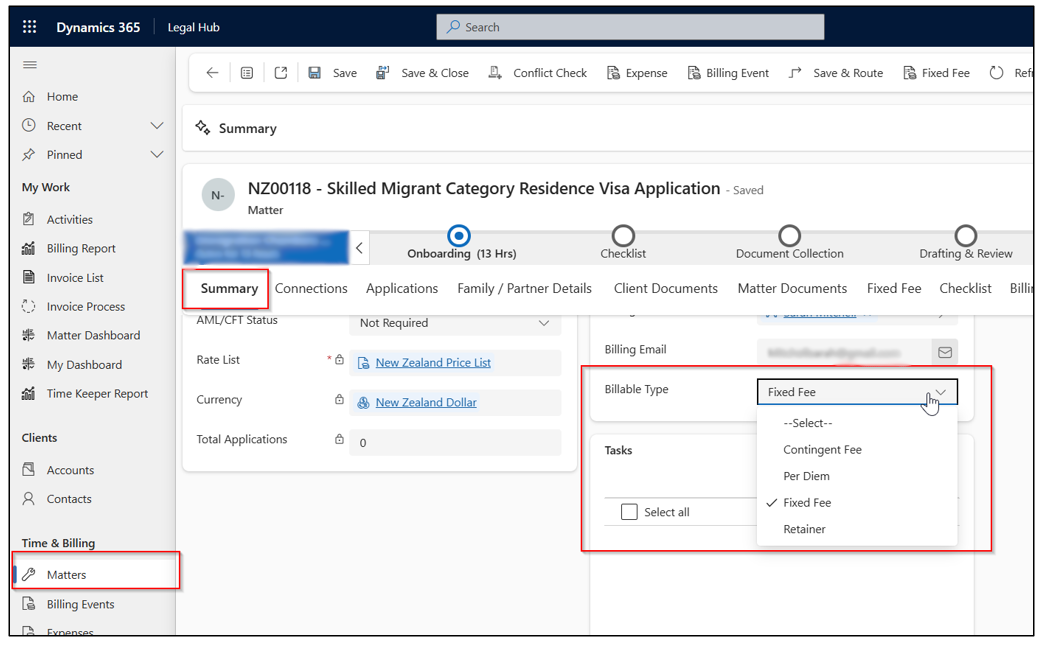
Fixed Fee is the primary billing type.
Fixed Fee
A pre-agreed instalment schedule drives billing. Hours are still logged for internal cost tracking, but don’t directly set the invoiced amount.
Contingent Fee
Fee depends on outcome (% of claim/settlement, capped). A single billing event is generated automatically when the matter settles.
Per Diem
The default. Fee earners log billable time (Billing Events) and disbursements (Expenses) as work happens; both invoice normally.
Retainer
A standing fee arrangement, billed on its own schedule outside the standard time/disbursement flow.
Fixed Fee
How Fixed Fee Matters Bill
In this section, we will look at how matter fees are billed.
Instalment Schedule
The matter’s fee is broken into instalments (amount + due date). The matter’s Expected Matter Value is kept in sync automatically as the sum of all active instalments.
When an instalment falls due, use the Generate Billing Events dialog on the matter to raise the actual billable amount this creates the Billing Event that flows into invoicing or will be automatically processed overnight.
Once that Billing Event is invoiced, the instalment is automatically stamped Invoiced and no manual bookkeeping needed.
Fee Earners Log Hours
Time is still logged as Billing Events for internal cost-tracking and realization reporting. It defaults to Not Billable and doesn’t itself create an invoice line.
Closing The Matter
A Fixed Fee Matter can’t be closed while instalments remain Scheduled invoice or explicitly cancel them first.
Fixed Fee Billing Workflow
Here are the main process for Fixed Fee Matters:
- Schedule the fee
- Raise billing events
- Run the invoice
- Sync to financial software (e.g. Xero)
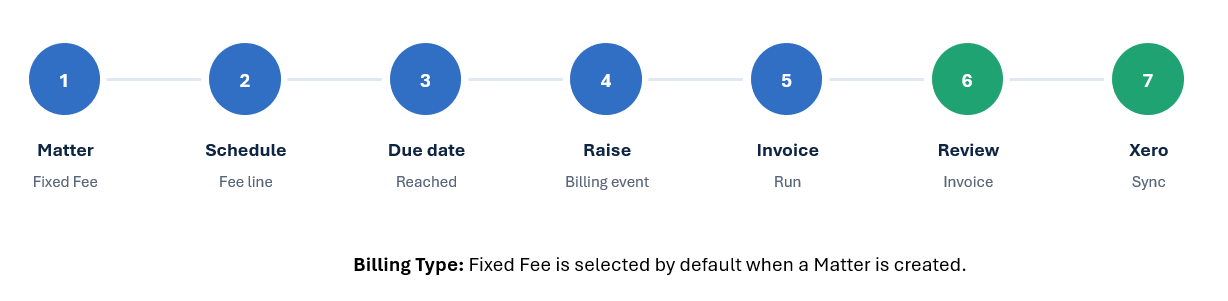
Preferred Setup
Use Fixed Fee unless a different billing arrangement is required. Create one schedule line for each fee or instalment.
Before Invoicing
Billing Events and Expenses must be Approved / ready to invoice. Use today’s cutoff date if invoicing immediately.
Sync (with Financial Software)
Invoices sync through the configured integration. Use Sync All Now when you need to push immediately.
Create Fixed Fee Schedule
Fixed Fee drives the schedule-based billing process used for most invoices.
Follow these steps to create a schedule:
- Open Matter > Summary > Billing Details or Financial tab.
- Keep Billable Type as Fixed Fee.
- Open the Fixed Fee tab. The Fixed Fee tab appears once the matter is Fixed Fee.
- Select + New Fixed Fee Schedule to create a schedule line.
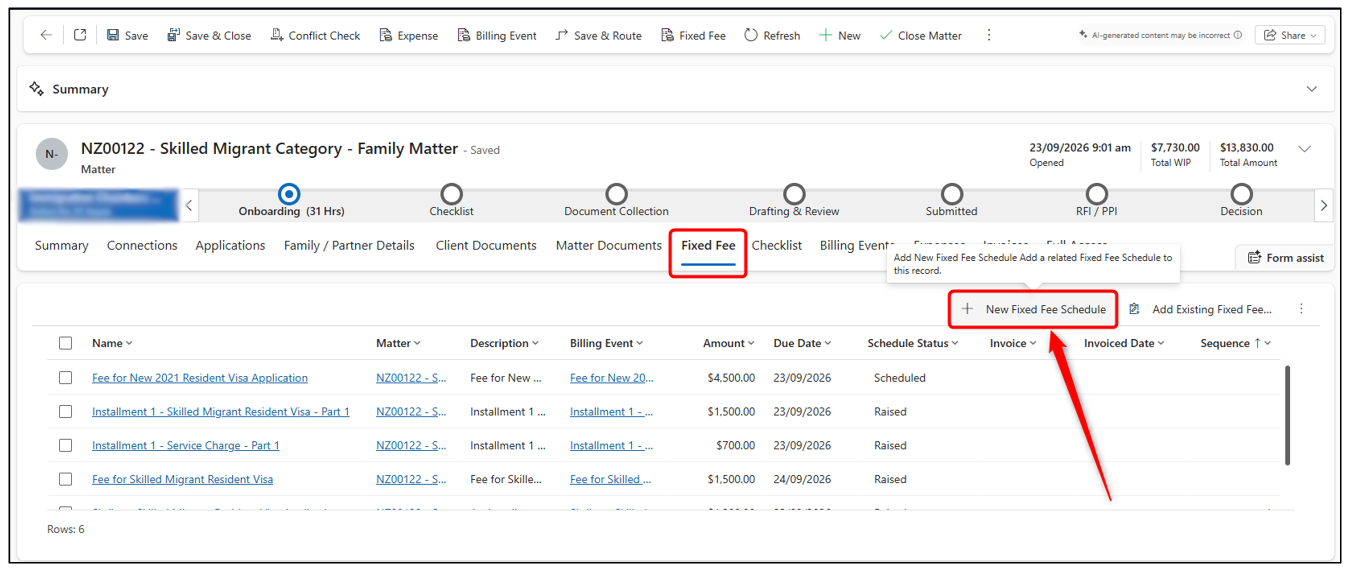
Complete Fixed Fee Schedule
Each schedule line records the service/product, amount and due date for that instalment.
Follow these steps to complete a schedule:
- Complete the fields:
- Name: Meaningful fee description
- Product: Lookup to the service/product
- Description: Appears clearly for review
- Amount: Fee amount to be charged
- Due Date: When it becomes eligible
- Schedule Status: Normally Scheduled
- Sequence: Optional instalment order
- Click Save or Save & Close to save the fixed fee schedule.
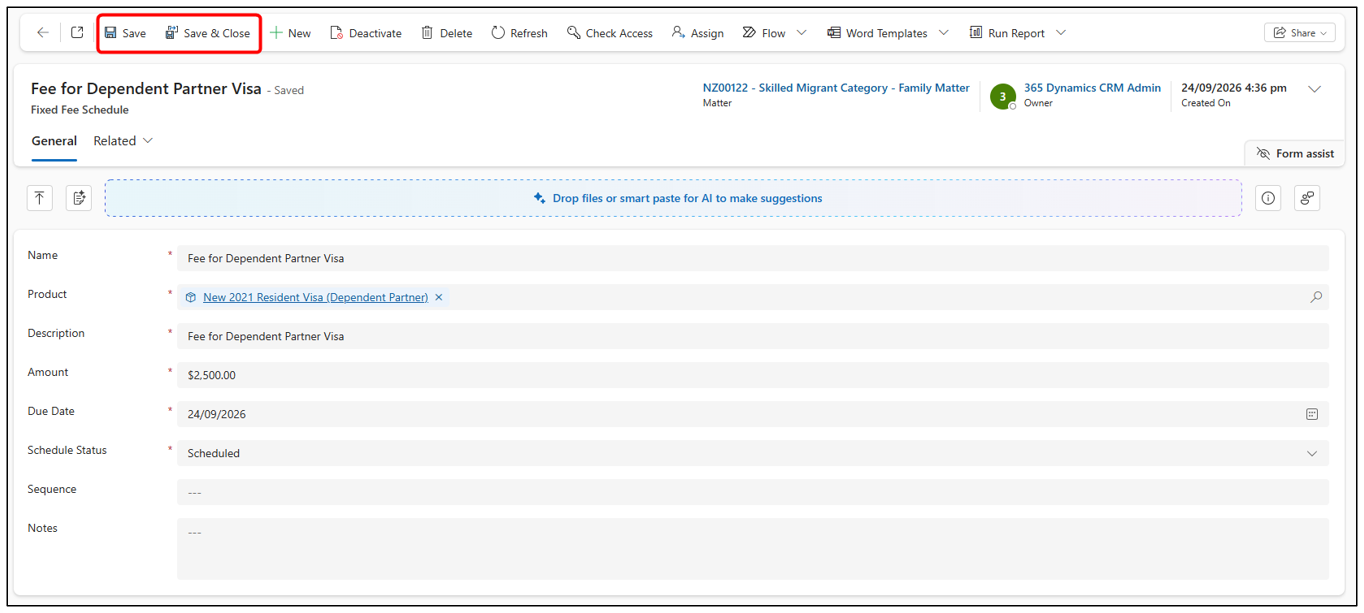
Raise Due Fixed Fee Lines
Use the Fixed Fee command to convert due schedule lines into Billing Events.
Follow these steps to convert dues to raised:
- From the Matter top command bar, select Fixed Fee.
- The Generate Fixed Fee Billing Events window opens.
- Review the Fixed Fee instalments that are due. Select Generate Billing Events.
- Once generated, each eligible Fixed Fee Schedule moves to Raised and a corresponding Billing Event is created.
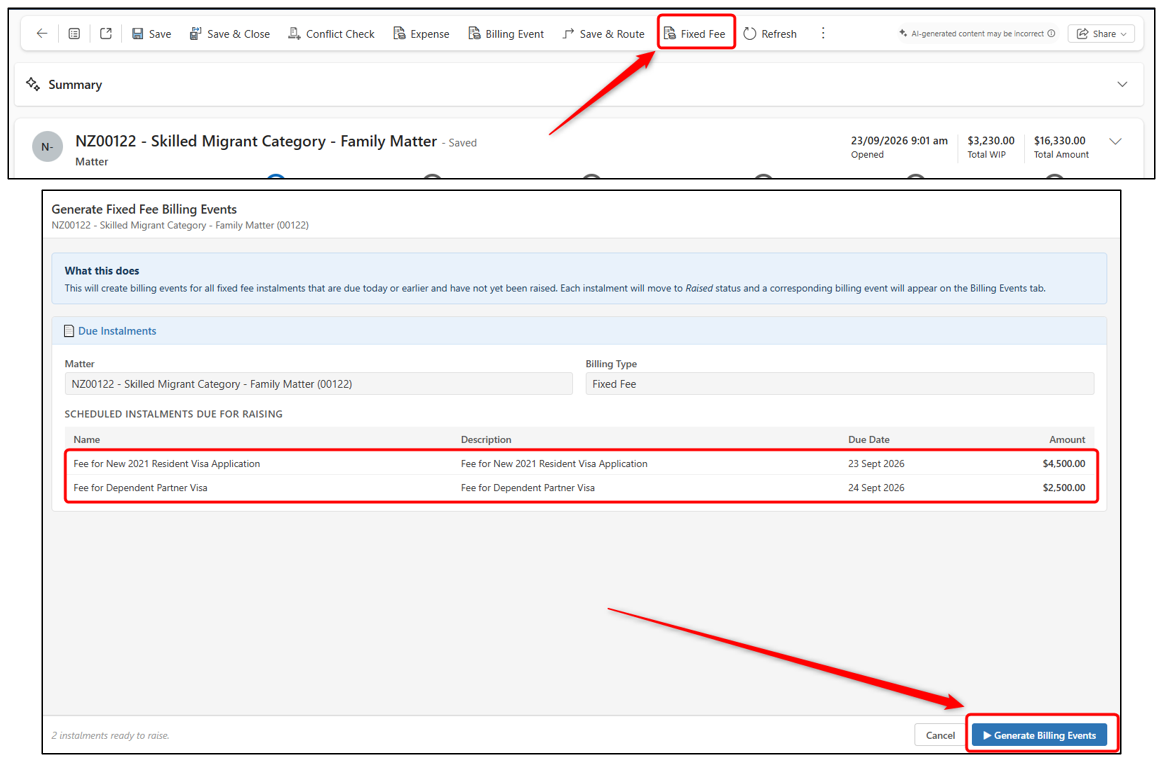
The image shows Scheduled Fixed Fee instalments with a Due Date of today or earlier that have not yet been raised.
Review Billing Events
Fixed Fee-generated Billing Events appear on the Billing Events tab and are ready for invoicing.
Follow these steps to review billing events:
- Confirm Status: Fixed Fee-generated events should appear as Approved. Approved events are ready for the Invoice Process.
- Review Values: Check amount, date, product/role and matter. If something is wrong, correct it before invoicing.
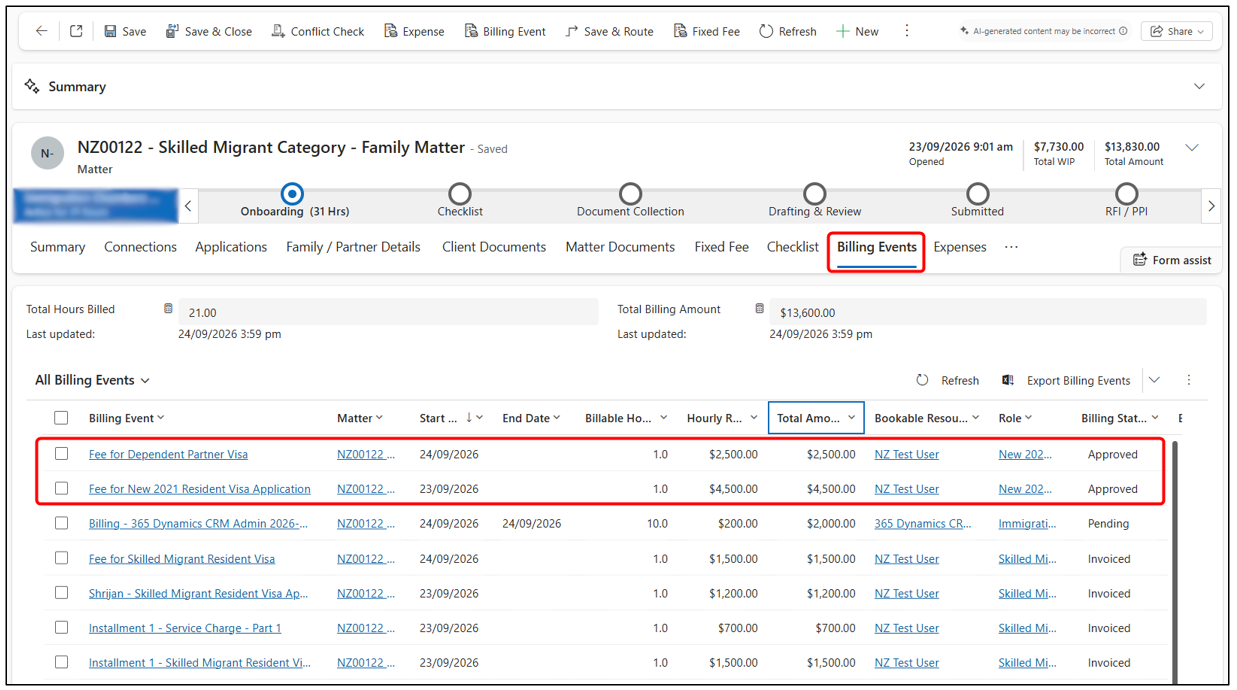
Any Billing Event or Expense that needs to be included in an invoice must be Approved before running the invoice process.
Invoicing
Generating Invoices
Automated Invoice Run
-
Runs per matter, picking up every Billing Event / Expense at the ready-to-invoice stage.
-
Enforces the Matter’s Invoice Minimum if the total (including tax) is below it, no invoice is created at all.
-
Requires a Price List entry for every Product being billed a missing entry routes the line to Error rather than posting a corrupted $0 line.
-
Applies per-line tax (Standard / Zero Rated / Exempt / No Tax) automatically.
Add Lines to Invoice (Manual)
-
From the invoice list, use Add Lines to attach specific Pending (or resolved Error) items to an existing New invoice for that matter.
-
Useful for catching up an already-created invoice, or attaching a just-fixed item from the Error Queue.
-
Same validation runs as the automated path — a line that still fails is skipped and flagged, not silently dropped.
Run Invoice Process
The Invoice Process picks up approved Billing Events and Approved Expenses based on the cutoff date.
Follow these steps to run the process:
- Go to Time & Billing > Invoice Process.
- Review the Cutoff Date and set the Cutoff Date to today if you want to invoice immediately.
- Click Select Matters.
- Review the eligible Matters and select the Matter you want to invoice.
- Click Run Invoice.
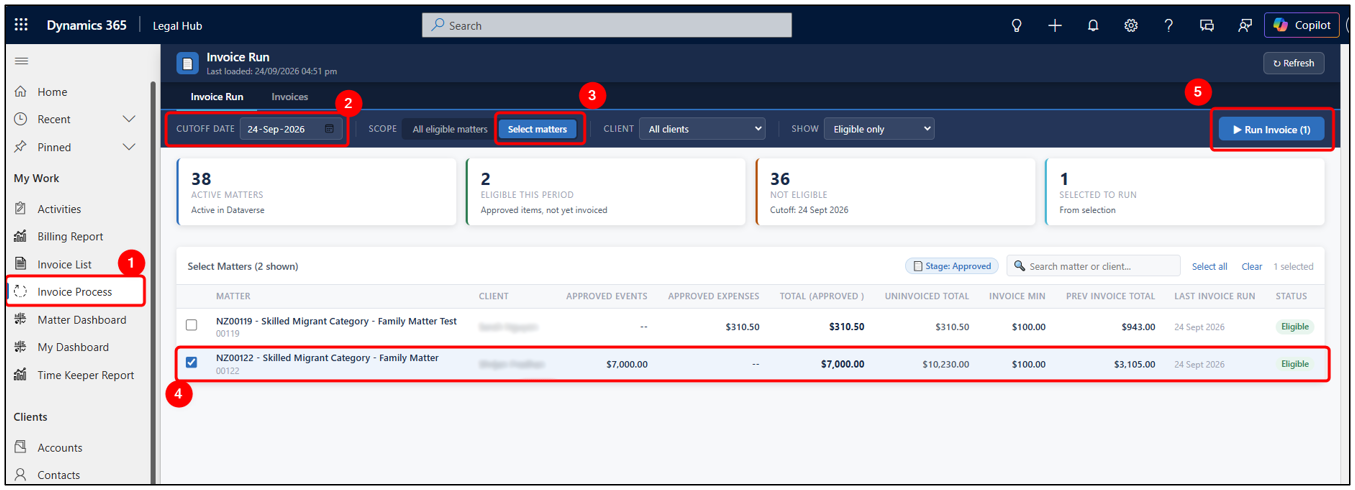
If a Billing Event or Expense is not Approved, it will not be included in the invoice run.
The Invoice Process picks up eligible Approved Billing Events and Expenses for the selected Matter up to the Cutoff Date.
Review & Manage the Invoice
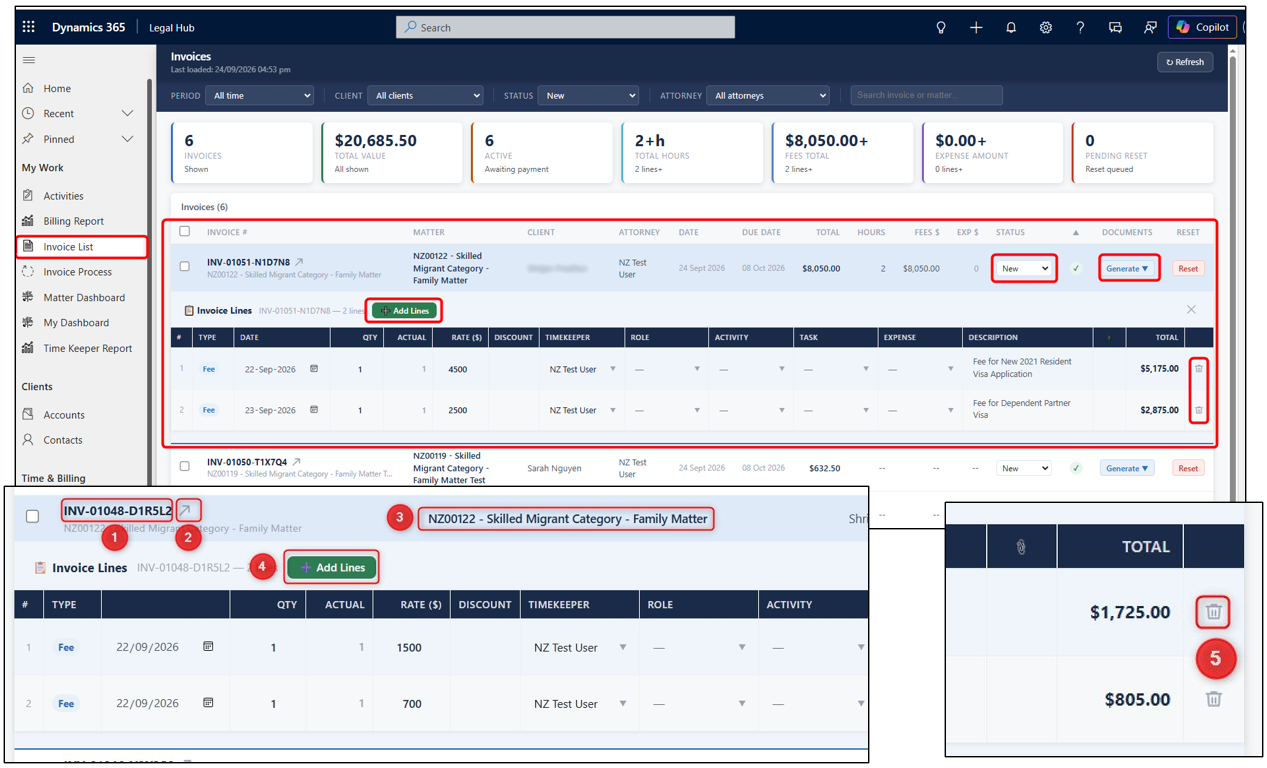
Once the invoice is generated, it can be accessed from My Work > Invoice List or Time & Billing > Invoices.
From here you can:
- Review the invoice lines.
- Edit invoice details while still in a New/Draft state.
- Generate **Documents (Tax Invoice, Ledes Statement, etc.)**.
- Change the status of invoice from New to Billed.
To review and manage an invoice, follow these steps:
Clicking on the invoice name will show the lines.
- Opens Lines from the dashboard.
- Opens Invoice from the dashboard.
- Opens Matter from the dashboard.
- Add Lines Billing or Expense by clicking the Add Lines button.
- Remove lines (Set back Pending, Non Billable or associate different Matter) by clicking the Trash Can icon.
Sync Invoice to Xero
NOTE: This section is specific for users of Xero.
Once the invoice has been generated in Dynamics and its status changed to Billed, it is synchronized with the relevant Xero organisation. The integration is intended to run automatically approximately every 15 minutes.
If you need to sync immediately:
- Go to Time & Billing > Invoices
- Make sure the invoices you want to invoice has status reason as Billed.
- Select Sync All Now from the command bar.
- Allow the sync to complete.
- Open the invoice again to review the updated Xero information.
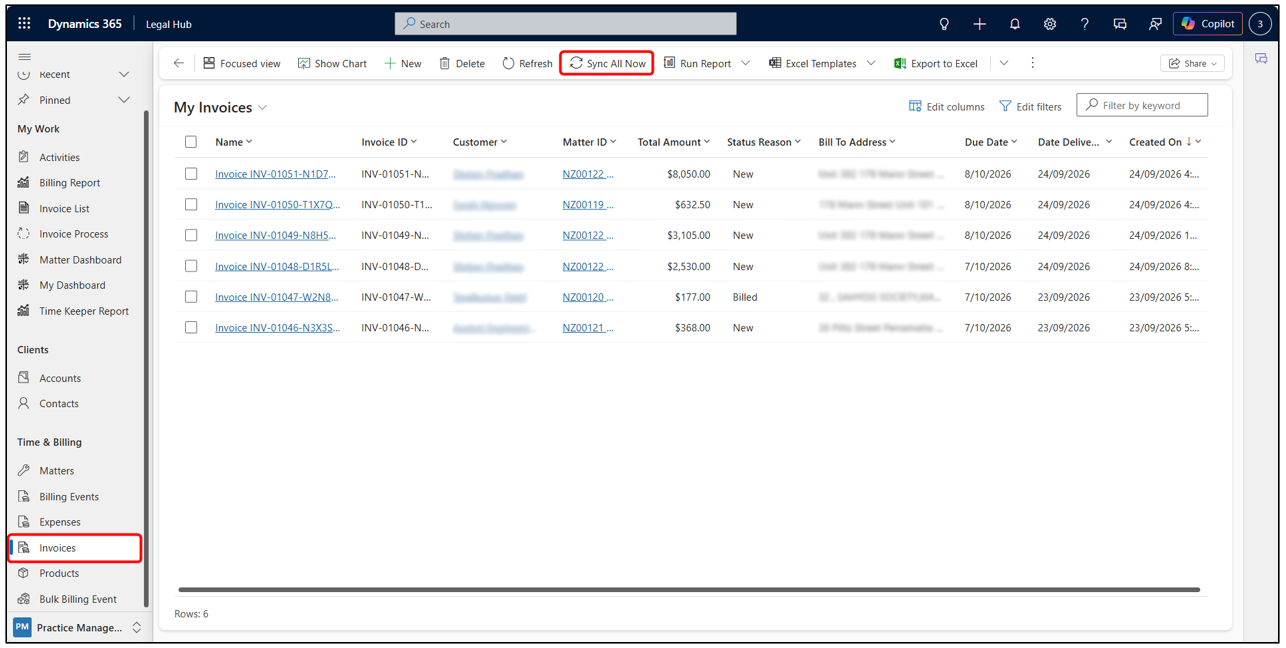
Important: Only those invoices with status changed to Billed will be synchronized from Dynamics 365 to Xero.
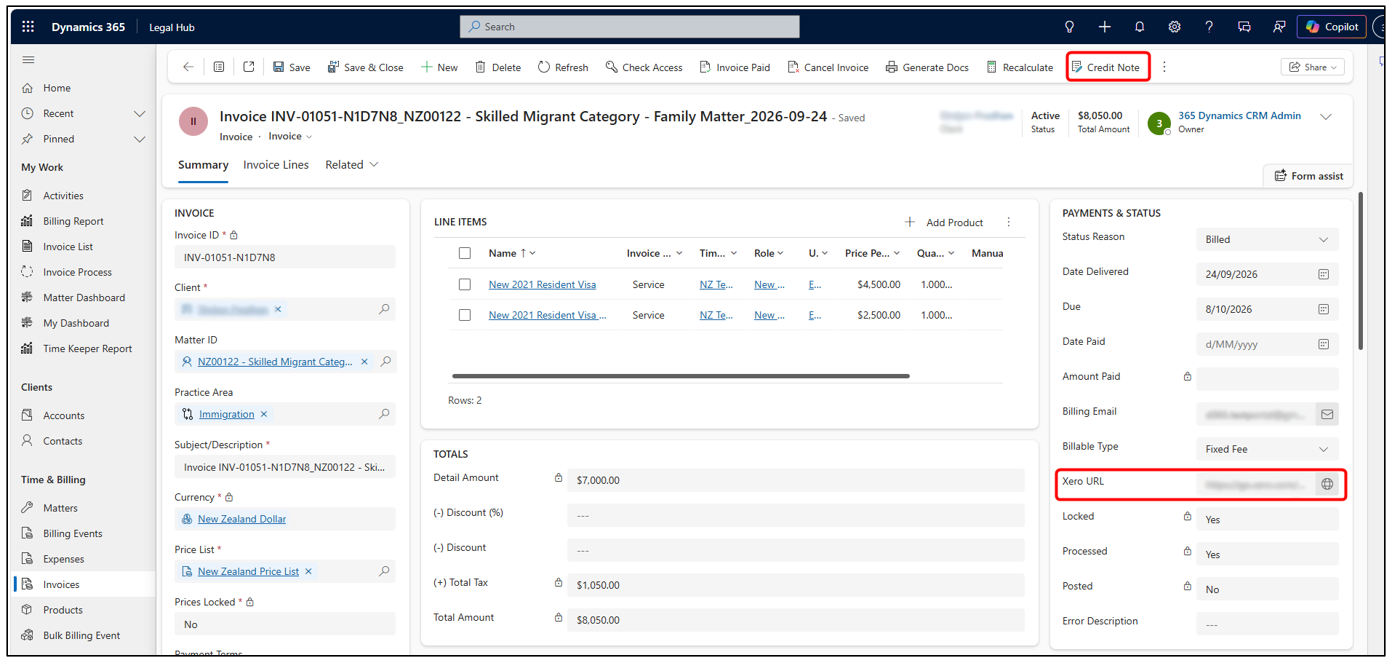
After the invoice has successfully synchronized, a Xero URL is available on the Dynamics invoice.
Important Notes
-
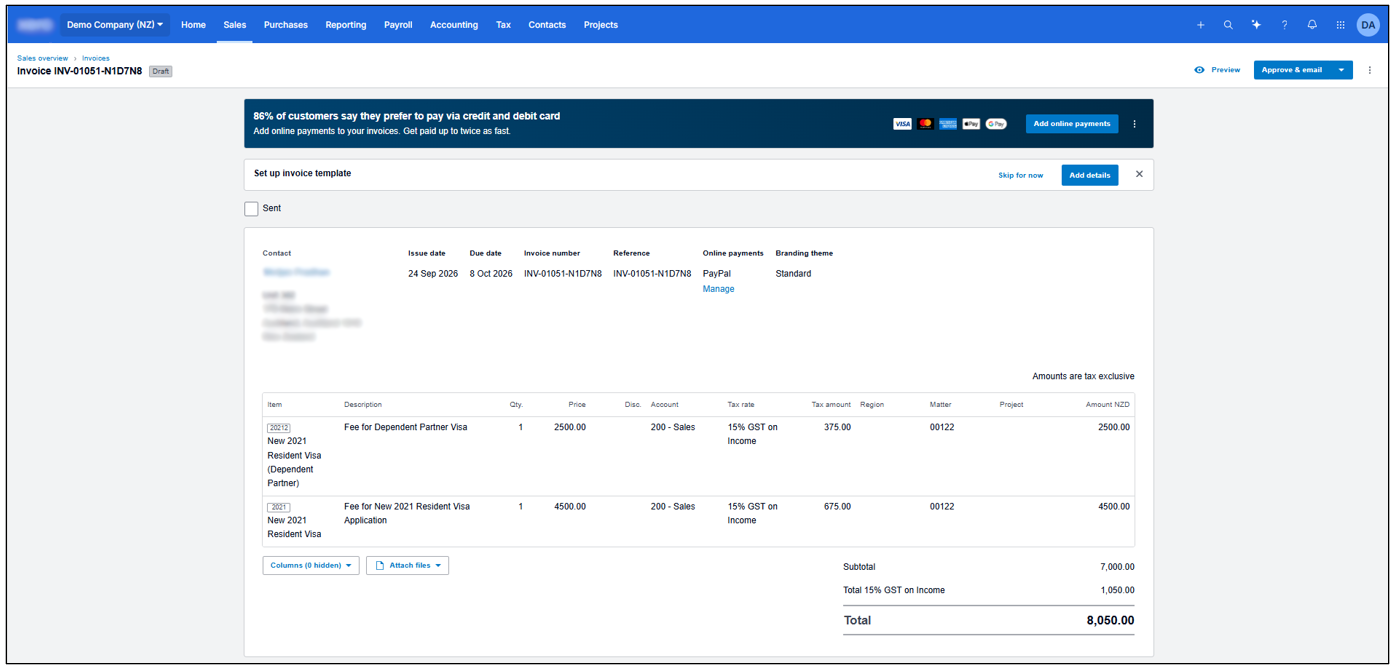
Xero Draft: The invoice has been created in Xero, and the Dynamics invoice is processed and locked from further line changes.
-
Awaiting Payment: Once the invoice is authorized / awaiting payment in Xero, the corresponding Dynamics invoice is treated as posted.
Invoice in Xero
Selecting the Xero URL link on the invoice will open the corresponding invoice directly in Xero.
Changing or Reversing an Invoice
Here are the pointers to take if you need to change or reverse an invoice (new or existing).
New/Draft
Fully editable. Add or remove lines, adjust amounts, etc. Run Add Lines to Invoice since nothing is locked yet.
Processed (posted to Accounting Software)
Locked from line changes after posting. A Draft or Submitted invoice may be deleted; an authorised wholly unpaid invoice may be voided through the controlled sync action.
Billed
Paid, part-paid or credited invoices cannot be voided. Use a credit note; any cash refund remains a separate finance action.
NOTE for Xero Users Credit-note correction Use the CRM Credit Note action as appropriate. The integration creates and allocates the Xero credit note, then writes the applied amount, remaining credit and updated balance/status back to CRM.
Creating a Credit Note
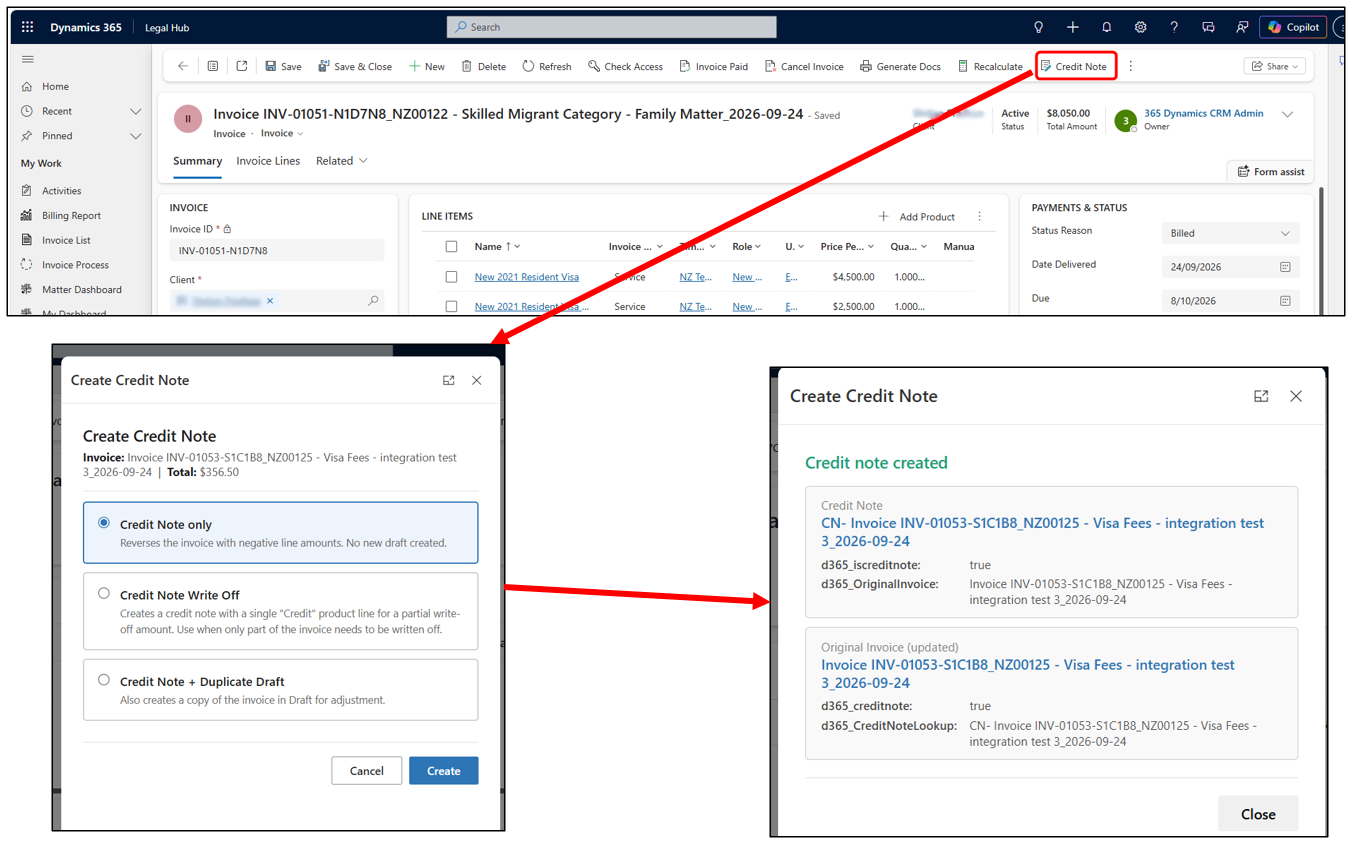
Follow these steps to create a credit note:
- Open the original Invoice.
- Select Credit Note from the command bar.
- Choose the required Credit Note option.
- Select Create.
- Review the newly created Credit Note.
- Credit Note only: Reverses the original invoice using negative line amounts. No new draft invoice is created.
- Credit Note Write Off: Creates a Credit Note using a single Credit product line for a partial write-off.
- Credit Note + Duplicate Draft: Reverses the original invoice and also creates a duplicate Draft invoice that can be adjusted and reissued.
Creating a Billing Event
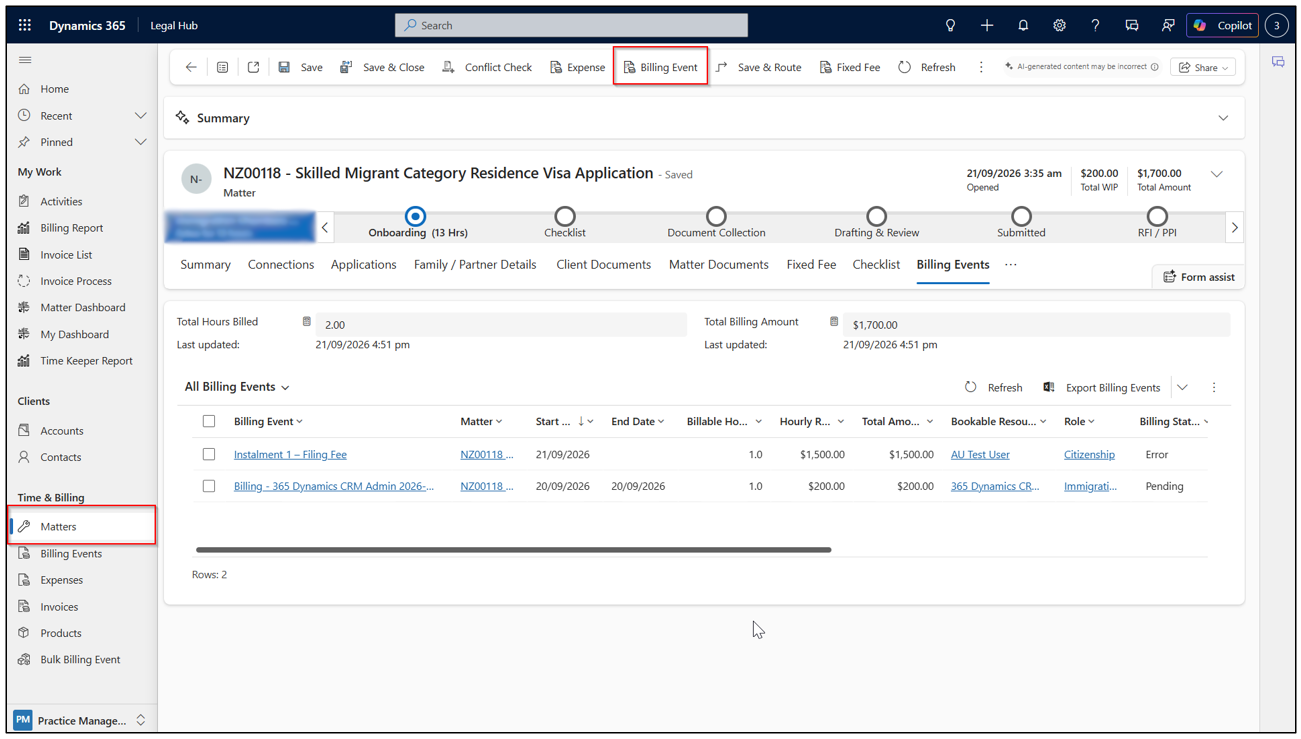
Billing Events can also be created manually when a charge needs to be added outside the Fixed Fee Schedule.
Follow these steps:
- Open the relevant Matter.
- From the top command bar, select Billing Event.
-
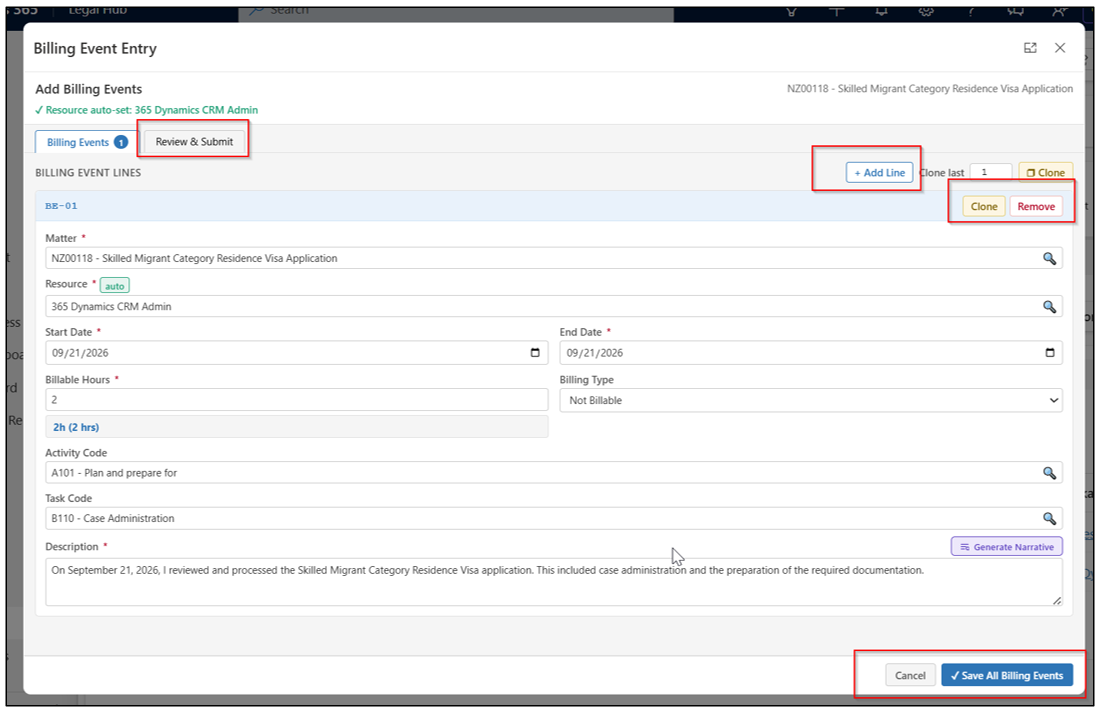
Complete the Billing Event details > hours, activity/task code (if applicable), and description:
- Multiple Billing Events: Use + Add Line to enter multiple Billing Events in one session.
- Clone: Use Clone to copy an existing line where similar work needs to be entered again.
- Generate Narrative: Use Generate Narrative to improve the grammar and wording of the Description before saving.
-
Save the entry.
-
Ensure the item is Approved when it is ready to be invoiced.
Important: Only create a separate billable Billing Event where an additional charge genuinely needs to be invoiced outside the Fixed Fee arrangement.
Creating an Expense
Use an Expense when you pay or incur a cost that needs to be recorded against the Matter and, where applicable, passed on to the Client.
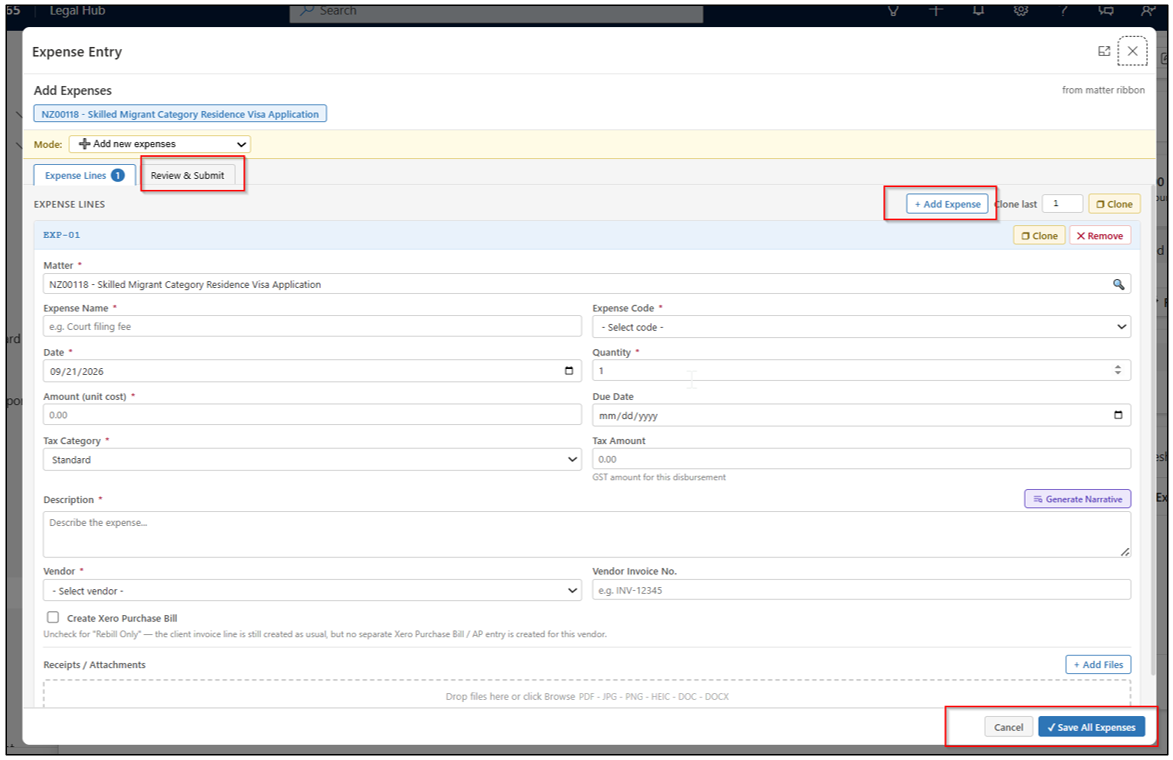
Follow these steps to create an expense:
- Open the relevant Matter.
- From the top command bar, select Expense.
- Complete the expense details.
- Use + Add Expense to enter more than one expense in the same session.
- Attach a receipt or supporting document where required.
- Review the entries under Review & Submit, then select Save All Expenses.
- Ensure the Expense isApproved when it is ready to be included in an invoice.
The Status Life Cycle
Every Billing Event and Expense moves through the same statuses (i.e. life cycles) — shown here with Error as the exception branch.
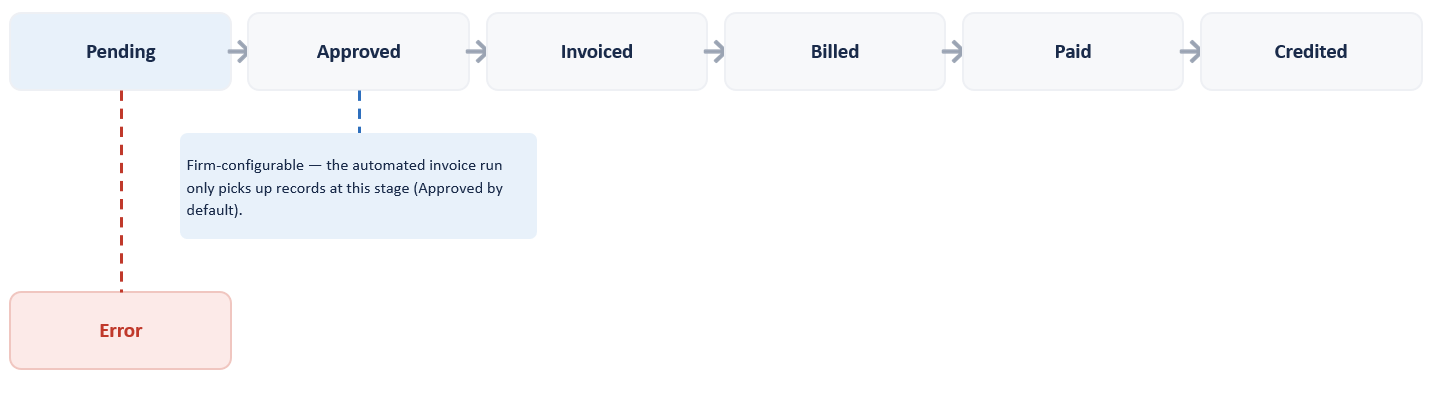
Note: This Error status covers CRM billing validation. Xero integration failures appear in Sync Requests and CRM validation-error fields, with separate correction and authorized-retry rules. If permanent failure [Retry Xero Sync required] will appear and use ‘Retry Xero Sync’ on Invoice or Expense record to clear and retry.
Xero Integration Overview
Dynamics 365 and Xero are connected so that products, contacts, invoices and payment information can be kept aligned between the two systems. This makes sure that the systems are in sync with each other.
Here is an overview:
- Products: Products can be reconciled between Xero and Dynamics 365.
- Contacts: Customer records can be matched, linked or created where required.
- Invoices: Billed invoices from Dynamics are snychronized to Xero.
- Payments: Payment information from Xero is rreturned to Dynamics during synchronisation.
Most Xero administration is only required during initial setup or when new products, customers or exceptions need attention.
Xero Legal Entity Configuration
One configuration row per Xero organisation. The same CRM Product can use different account and tax mappings in each company.
Tax Mappings per Legal Entity
Here are examples:
Standard sales / purchase
e.g. 15% GST codes
Zero Rated sales / purchase
0% still inside the GST system
No Tax sales / purchase
outside the GST system entirely
Tax Resolution Hierarchy
Explicit line or expense → party rule → Product/legal-entity override → Product default → approved legal-entity default. The category maps to this Xero organisation’s TaxType.
Party Tax Rules
Configured per legal entity and Sales/Purchase direction for an Account or Contact, with optional product/category and effective dates.
Xero Legal Entity Setup
The Legal Entity Setup defines which Xero organisation Dynamics 365 connects to and the defaults used for that organisation.
Follow these steps to setup the Legal Entity:
-
Go to Admin > Xero Integration > Legal Entity Setup.
-
From Legal Entity Setup you will see the setup tabs appear.
-
Here is a list of the fields in the tabs:
Routing and Organisation
- Business Unit
- Xero Organisation
- Currency
- Default Price List
- Connection
- Item Sync Enabled
Invoice Defaults
- Draft / Authorized invoice behavior
- Sales Account Code
- Expense Account Code
- Sales Tax Type
- Purchase Tax Type
- GST / tax defaults
Item Sync
- Enable or disable item synchronisation
- Default sales / purchase accounts
- Default tax treatment
- Product creation behavior
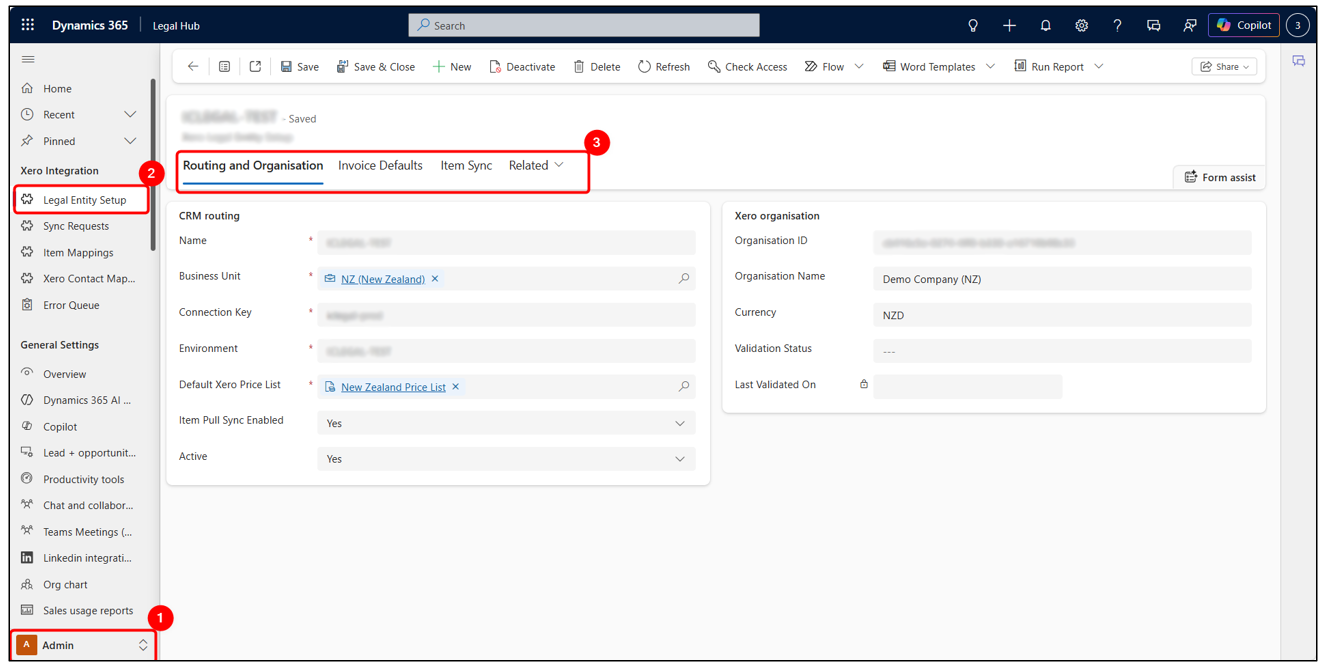
The correct Legal Entity determines which Xero organisation, price list, account codes and tax settings are used during synchronisation.
How Billing Reaches Xero
This section covers how the billing system works with Xero.
| Concept / Feature | Description |
|---|---|
| Routed by the Record’s Owning Business Unit | The invoice or expense owner determines its Owning Business Unit, which selects the active Legal Entity Setup. The Matter’s Business Unit is not used by the current integration. |
| Invoices to Xero Invoices | Each eligible D365 invoice becomes one Xero sales invoice containing the corresponding lines; tax and account resolution happens per line. |
| Expenses to Xero Purchase Bills | Created only when Create Expense Bills is Yes on the routed Legal Entity Setup and the expense date is on or after its cutoff. Otherwise the expense can remain rebill-only. |
| Contact Reuse Within Each Xero Organisation | Within one Xero organisation, a CRM Account or Contact reuses its mapped Xero contact. Separate Xero organisations have separate contact records. |
| Scheduled or Manual | Supports optional scheduled processing and event-driven manual Sync Requests. Availability depends on environment; the current sandbox timer is disabled. |
Xero Product/Item Sync
Products used for billing need to exist in both Dynamics 365 and the relevant Xero organisation.
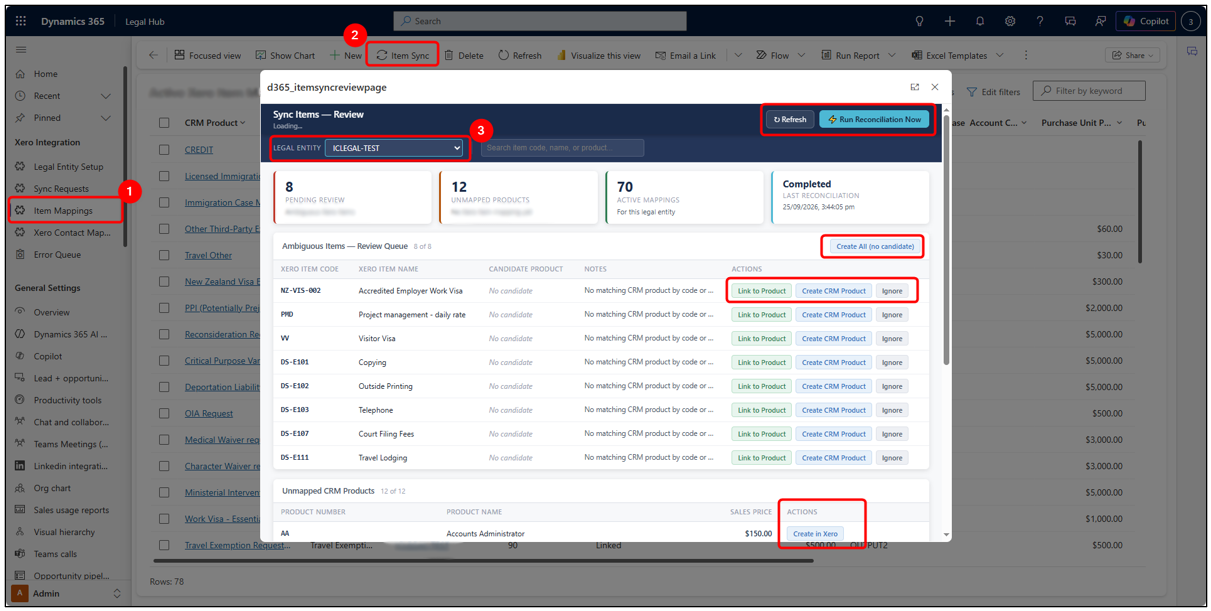
Follow these steps for product sync:
- On Admin Area > under Xero Integration > Select Item Mappings.
- Click Item Sync from the top command bar.
- Select the relevant Legal Entity.
| Feature / Item | Description |
|---|---|
| Ambiguous Items — Review Queue | Xero items that can’t be automatically matched to a CRM product wait here. For each one, choose Link to Product, Create CRM Product, or Ignore. |
| Link to Product — now fully enriched | Linking to an existing product now sets its price and tax category, and creates a Price List Item for the legal entity if one doesn’t exist — the same treatment a new product gets. |
| Create CRM Product | Creates a brand-new CRM product directly from the Xero item’s own name, code and price. |
| Unmapped CRM Products | Products with no Xero item yet get a one-click Create in Xero, building the Xero counterpart automatically. |
| Run Reconciliation Now | Re-checks everything against Xero on demand. It can only resolve items matching a CRM product’s exact code — a genuinely ambiguous item always needs a person to Link or Create. |
Xero is treated as the source of truth for item accounting details such as account codes and tax settings.
Xero Contact Mapping & Sync
Contact Mapping helps keep customer information aligned between Dynamics and Xero.
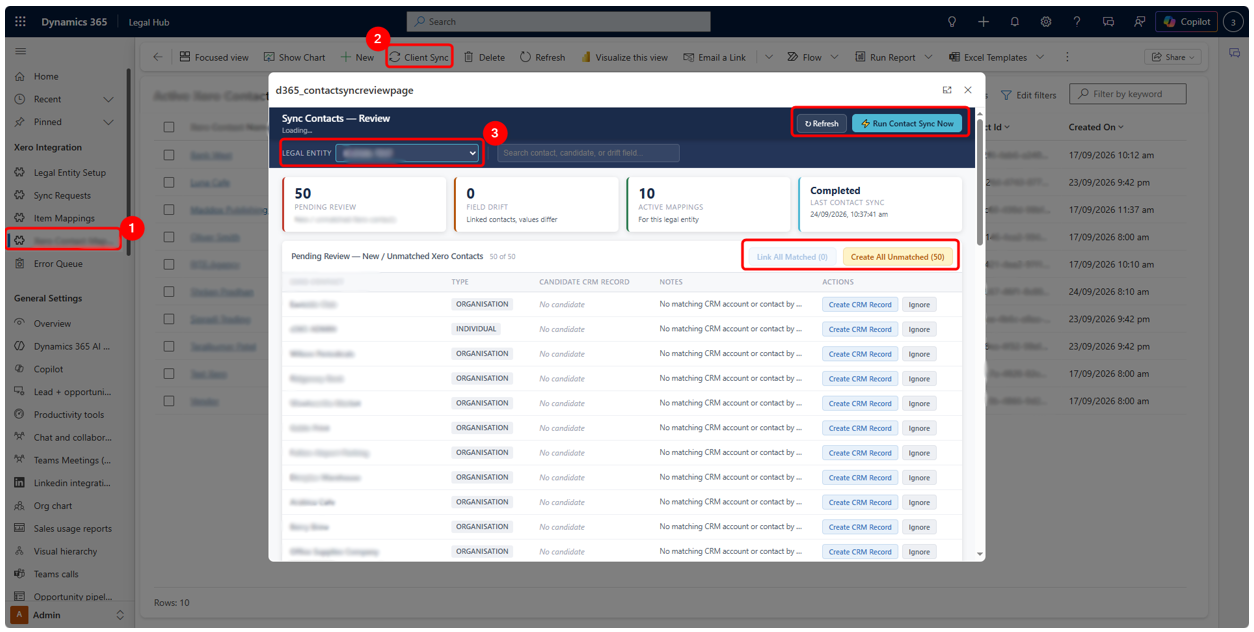
Follow these steps for mapping:
- On Admin Area > under Xero Integration > Select Xero Contact Mappings.
- Click Item Sync from the top command bar.
- Select the relevant Legal Entity.
| Feature / Status | Description |
|---|---|
| Pending Review | A Xero contact with no confident CRM match. Creating a CRM record lets you choose Organisation (Account) or Individual (Contact) before it’s created. |
| Field Drift | An already-linked pair where CRM’s phone, email or address has changed since it was last pushed to Xero — flagged for review rather than pushed automatically. |
| Ignore/Dismiss | Clears a Pending Review or Field Drift row without acting on it. A drift row reappears automatically if the underlying difference is still there next time. |
| Run Contact Syn Now | Re-checks CRM Accounts/Contacts against Xero on demand — on-demand only, same as Item Sync, never a background timer. |
| Still Being Finished | Creating/linking a record and pushing an approved change to Xero. Both need Xero’s own Contact ID written back, so they wait on server-side support — for now, only Ignore and Dismiss are live. |
Contact Sync is generally an administrative maintenance task, rather than something users need to run every day.
Xero Sync Requests
Contact Mapping helps keep customer information aligned (i.e. synched) between Dynamics 365 and Xero.
Follow these steps for sync requests:
-
On Admin Area > under Xero Integration > Select Sync Requests.
-
From here, users can review:
- Run Status
- Created / Started / Completed On
- Items Created
- Items Skipped
- Errors
- Result Message
-
Select Sync All Now to queue the current CRM-to-Xero synchronisation work immediately.
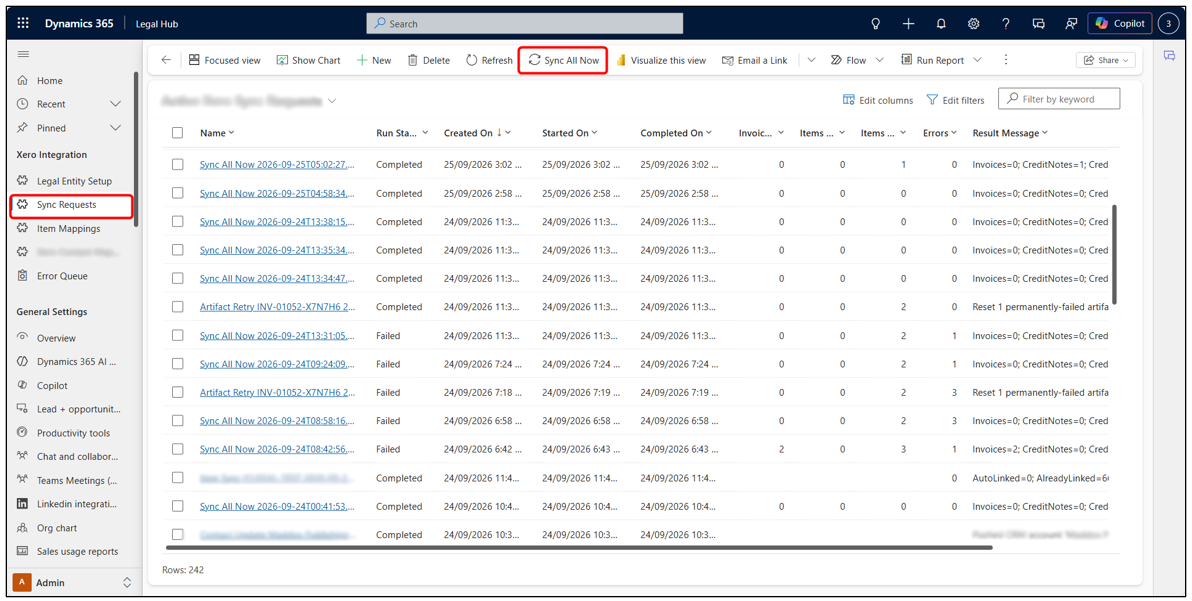
Use this area when you want to confirm whether a product, contact or invoice synchronisation completed successfully or if an error needs attention.
Retrying a Failed Xero Sync
The same Xero sync failures that used to need direct Azure access can now be found and retried from CRM directly.
Where the Error Shows
-
Invoice → the Error Description field, cleared automatically the next time it syncs successfully.
-
Standalone Expense → the same validation-error field the Error Queue already reads.
-
Most failures are retried automatically on the next scheduled sync no action needed.
-
A few are marked permanently failed after repeated attempts, so Xero isn’t hammered with a request that will never succeed on its own. These need a person to act.
Retro Xero Sync
A button on the Invoice and Expense forms. Fix whatever the error describes, click it, and confirm it unblocks the sync and re-attempts it immediately, not on the next timer.
Check Result
Every retry queues a request in Active Xero Sync Requests, with a status and a result message the first place to check if a retry seems to have done nothing.
Using the Error Queue
A single screen listing every Billing Event / Expense stuck at Error status is in the Error Queue. Here are the reasons and two ways to resolve it.
Common Reasons
• No Price List entry for the Role / Expense Code’s Product on the matter’s price list by far the most common cause.
• Missing LEDES coding Role, Timekeeper, Activity, Task or Phase Code on a LEDES-billed matter.
• Missing Expense Code on a LEDES-billed matter.
• An unexpected error while attaching the line to an invoice.
Resolutions
Reset
Clears the error and returns the record to the ready-to-invoice stage it’s picked up automatically on the next invoice run. Use once the underlying issue (e.g. the Price List entry) is fixed.
Add to Invoice
Attach the item directly to an existing open invoice on the same matter the error clears automatically on success. Also has an Open ▾ shortcut per row jump straight to the source record, the Matter, the Product, or the Price List to fix the root cause.
Error Queue List
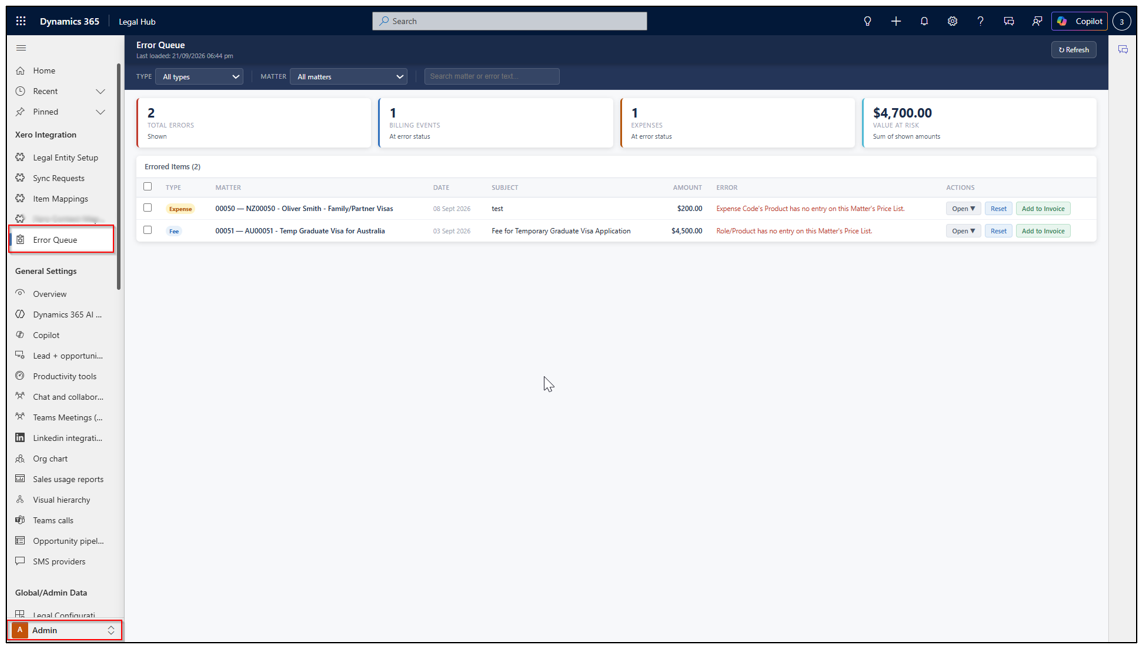
The Error Queue lists every billing item stuck at error status, with the reason and next steps.
To review and/or resolve, follow these steps:
- Change area to Admin from left bottom corner in left navigation pane.
- Select Xero Integration > Error Queue.
- Review errored items, reason, and Open / Reset / Add to Invoice actions.
Where to Find Things
| Action / Task | Location / Method |
|---|---|
| Log time | Billing Event Entry (from the matter, or the bulk sitemap tool) |
| Log a disbursement | Expense Entry |
| Generate fixed-fee instalments | Generate Billing Events, on the matter |
| Review & manage invoices | Invoices screen; Xero Integration > Sync Tools / Sync Requests |
| Add pending/errored items to an invoice | Add Lines to Invoice, from the invoice list |
| Correct a Billed invoice | Credit Note action; controlled VoidInvoice only when Xero status allows |
| Resolve a failed billing item | Billing: Error Queue • Xero: Sync Requests/Retry • Setup: Legal Entity, Tax, Party & Product mappings |
Quick Reference
Use this as a short version for day-to-day Fixed Fee Billing.
- Fixed Fee Schedule
- One line per fee or instalment.
- Due Date controls eligibility.
- Status usually starts as Scheduled.
- Billing Events
- Generated from due Fixed Fee lines.
- Must be Approved before invoicing.
- Manual time is for tracking unless otherwise billed.
- Expenses
- Use for disbursements and additional costs.
- Attach receipts where relevant.
- Approve before invoicing.
- Invoices + Xero
- Invoice Process picks up approved items.
- Generate Tax Invoice document from Invoice List.
- Use Sync All Now if immediate Xero push is needed.
End-to-end: Matter Fixed Fee → Fixed Fee Schedule → Generate Billing Events → Invoice Process → Invoice List → Xero Sync